Register A LoRaWAN Gateway
Register your LoRaWAN gateways to the Yeastar Workplace, so that the devices can be used to transmit data between sensors/Desk Ink Displays and Yeastar Workplace web portal.
Prerequisites
The gateway is installed and powered on.
Step 1. Set up the gateway's network
-
Access the management portal of the gateway.
- Enable Wireless Network Connection on your computer and search for access point
Gateway_******, then connect to the Wi-Fi. - Open a Web browser, enter the IP address
192.168.1.1to access the gateway. -
On the login page, enter the username and password, click Login.
- Username: admin
- Password: password

- Enable Wireless Network Connection on your computer and search for access point
-
Connect the gateway to network.
-
Click Network in the left menu bar, go to Interface > Port page, change the network settings according to your local network.
-
Go to Maintenance > Tools > Ping page, enter a domain in the Host field, and click Ping to check if the gateway can access the Internet.
-
-
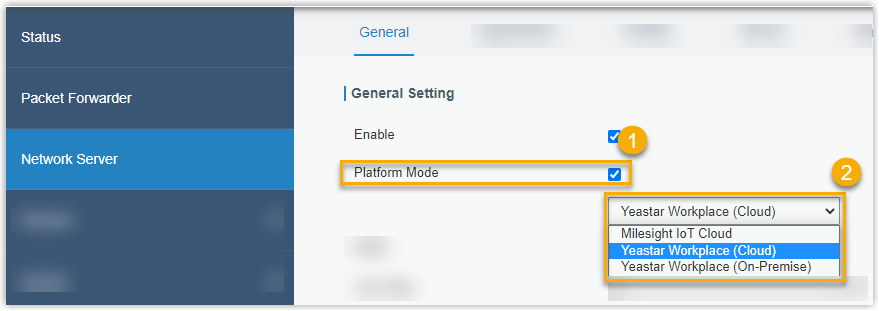
Select the network server.
-
Go to Network Server > General, and enable Platform Mode (for earlier versions, it's Cloud Mode ).
-
Click the Platform Mode dropdown and select the server based on the version of your Yeastar Workplace:
- For SaaS version, select Yeastar Workplace (Cloud).
- For On-premise Deployment version, select Yeastar Workplace (On-Premise), and in the Server Address field, enter your domain name or the IP address of your server.
-
Click Save & Apply.
-
-
Repeat the above steps for all the LoRaWAN gateways that need to be registered.
Step 2. Register gateways to Yeastar Workplace
-
Log in to Yeastar Workplace management portal.
-
Go to Device Management > Device List, and click Add.
-
In the pop-up window, configure the following information according to the device information you recorded.
- Registration Code / SN: Enter the Serial Number of this device.
If the SN is correct, the system automatically detects the device type. - Device Name: Specify a name to help you identify this device.
It's recommended to name the device after the location where it is installed. For example,Gateway--Floor 3.
- Registration Code / SN: Enter the Serial Number of this device.
-
Click OK.
- Repeat the above steps for all the LoRaWAN gateways that need to be registered.
Result
On the device list page, the device status shows ![]() , indicating that the LorRaWAN gateway is registered to Yeastar Workplace.
, indicating that the LorRaWAN gateway is registered to Yeastar Workplace.
You can now set up sensors and Desk Ink Displays, after the setup, the gateways will transmit data between them and Yeastar Workplace web portal.
Created: December 16, 2021
Author: carol