Install Yeastar Workplace
This article describes how to connect to the server host and install Yeastar Workplace on your dedicated server during the process of on-premise deployment.
Prerequisites
You have obtained the download link of the latest Yeastar Workplace installation package.
Step1. Connect to your server
-
Connect to your server.
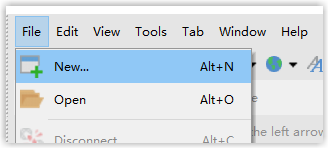
This article uses terminal simulation software Xshell as an example.- Open Xshell, on the top navigation bar, click File and select New.
- In the pop-up window, fill in the fields in the **Genera**l section:
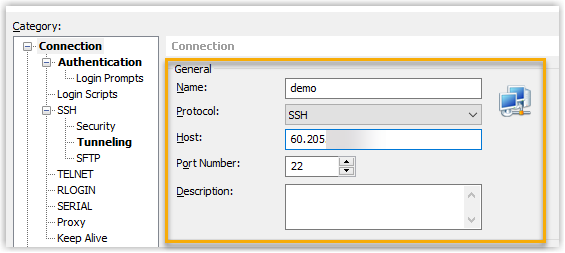
- Name: Specify a name to help you identify this connection.
- Protocol: Retain the default value SSH.
- Host: Enter the IP address of your server.
- Port Number: Retain the default value 22.
- In the Category menu, click Authentication and enter the user name and password.

- Click Connect.
- Open Xshell, on the top navigation bar, click File and select New.
-
After connecting successfully, run the following command and enter the password to enable root privileges.
sudo -i -
Optional: Install lrzsz.
lrzsz (RZ command) will ne used to upload files during the installation, if it's not installed in your system, run the following command to install lrzsz.apt install lrzsztroubleshooting: Unable to locate package
Run the command
apt-get updateto update the package source and try again.
Step2. Download Yeastar Workplace installation package
Linux supports a variety of methods for downloading files, and this article takes wget as an example.
Run the following command to download the Yeastar Workplace installation package to your server.
wget -P /root https://xxx.bin
Important
- Replace the
https: //xxx.binin the command with the download link of Yeastar Workplace installtion package before running it, otherwise the download will fail. - Stay connected to the server before the download is complete.
Step3. Decrypt the installation package
-
run the following command to decrypt the installation package.
openssl enc -aes256 -d -md sha256 -salt -in workplace-xx.x.x.x.bin -out workplace-xx.x.x.x.tar.gz
Important
-
xx.x.x.xrefers to the version number of the downloaded Yeastar Workplace installation package, replace bothxx.x.x.xin the command with the version number of the downloaded installation package before running it, otherwise the decryption will fail. - For example, the version number of the installation package is workplace-71.5.0.19, then enter “openssl enc -aes256 -d -md sha256 -salt -in workplace-71.5.0.19.bin -out workplace-71.5.0.19.tar.gz”.
-
-
Enter the password: Yeastar12345@ and press Enter, the decryption will begin.
Important
No characters will be displayed when you enter the password, but the system will record what you entered. If the decryption failed, it may be because the password is entered incorrectly, so you can re-execute the operation of 1-2.
-
Run the following command to view the decryption result.
lsIf there is workplace-xx.x.x.x.tar.gz (x refers to the version number of the installation package) in the listed files, it means the decryption was successful.

Step4. Unzip Yeastar Workplace installation package
Run the following command to unzip the installation package.
tar -xzvf workplace-xx.x.x.x.tar.gz
Important
Replace the xx.x.x.x in the command with the version number of the downloaded installation package before running it.
Step5. Optional: Upload SSL certificate
For online versions that require integration with a third party, uploading SSL certificate is required.
-
Run the following command to create the directory for SSL certificate files.
mkdir ./workplace-xx.x.x.x/certImportant
Replace the
xx.x.x.xin the command with the version number of your Yeastar Workplace installation package before running it. -
Run the following command to enter the directory for SSL certificate files.
cd workplace-xx.x.x.x/certImportant
Replace the
xx.x.x.xin the command with the version number of your Yeastar Workplace installation package before running it. -
Run the following command to upload smart.key and smart.cer files.
rz
Step6. Upload and edit the .env files
-
Run the following commands to enter the directory for Workplace.
cd ~cd workplace-xx.x.x.xImportant
Replace the
xx.x.x.xin the command with the version number of your Yeastar Workplace installation package before running it. -
Run the following command to upload secret.env file.
rz -
Run the following command to open .env files.
vi .env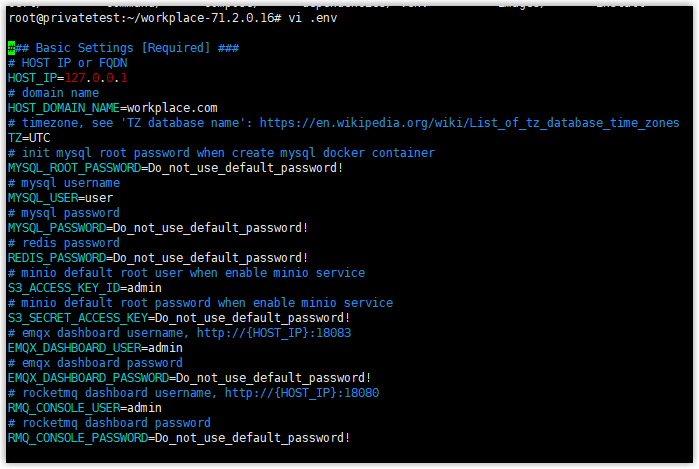
-
Press i key to enter the insert mode, and finish the following configurations in Basic Settings section.
Item Default value Description HOST_IP 127.0.0.1 Replace the default value with the IP address of your host. HOST_DOMAIN_NAME workplace.com Replace the default value with the domain name or IP address of your server. TZ UTC Replace the default value with the time zone where your server is located.
The entered value must be the same value inTZ database namefiled of this list of time zones.MYSQL_ROOT_PASSWORD Do_not_use_default_password! Create a new root password of MySQLand replace the default value.MYSQL_USER user The username to access MYSQL_DATABASE, replace the default value with a new user name, or note down the default value.MYSQL_PASSWORD Do_not_use_default_password! Create a new password for MYSQL_USERand replace the default value.REDIS_PASSWORD Do_not_use_default_password! Create a new password for Redisand replace the default value.S3_ACCESS_KEY_ID admin The username of the initial Admin account of the MinIO container. When using an external S3 service (such as AWS S3), the username will be used as the Access Key Id of the user with access to the S3 Bucket.
Replace the default value with a new username, or note down the default value.S3_SECRET_ACCESS_KEY Do_not_use_default_password! Create a new password for the Admin account of the MinIO container, and replace the default value.
When using an external S3 service (such as AWS S3), the password will be used as the Access Key Id of the user with access to the S3 Bucket.EMQX_DASHBOARD_USER admin The username of the initial Admin account of EMQX Dashboard.
Replace the default value with a new username, or note down the default value.EMQX_DASHBOARD_PASSWORD Do_not_use_default_password! Create a new password for the Admin account of EMQX Dashboard, and replace the default value.RMQ_CONSOLE_USER admin The username of the initial Admin account of RocketMQ Dashboard.
Replace the default value with a new username, or note down the default value.RMQ_CONSOLE_PASSWORD Do_not_use_default_password! Create a new password for the Admin account of RocketMQ Dashboard, and replace the default value. -
If you didn't upload the SSL certificate in step 5, you need to configure the following items in the Advanced Settings section:
- SSL_ENABLED: Replace the default value with false
- HTTP_PROTOCOL: Replace the default value with http
-
Press Esc to quit insert mode, and run the following command to save the changes and close the .env files.
:wq
Step7. Install Yeastar Workplace
-
Run the following command to install Yeastar Workplace.
./workplace-xx.x.x.x/installImportant
Replace the
xx.x.x.xin the command with the version number of the installation package, otherwise the installation will fail. -
Wait till the installation process is not running, then run the following command to view the version number of Yeastar Workplace, if it matches the version number of the downloaded installation package, the system has been installed successfully.
cat /usr/local/smartoffice/docker/.version
What to do next
Now you need to activate the system based on the version of your Yeastar Workplace:
- Online version: Activate Yeastar Workplace online
- Offline version: Activate Yeastar Workplace offline
Created: May 7, 2022