Remove or Add Room Resources Synced from Exchange
This topic describes how to remove and add the room resources that need to be synced from Microsoft Exchange.
Remove the room resources to be synchronized
- Log in to Yeastar Workplace management portal, go to Meeting Room > Room Management.
- Select the room resources that no longer need to be synchronized, and click Delete.
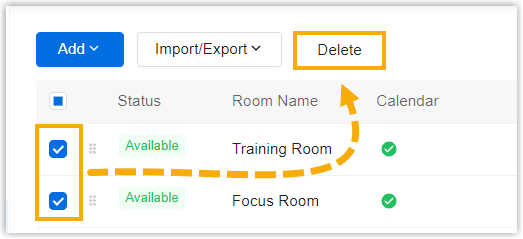
- In the pop-up window, click Delete.
This room resource is deleted from Yeastar Workplace, the system no longer syncs meeting schedules from this room resource.
Note
The result of deletion will not be updated to the room mailbox in Exchange.
Add room resources to be synchronized
-
On the Exchange server, open Exchange Management Shell, and run the following command to add the desired room mailbox to the room list.
Add-DistributionGroupMember -Identity "RoomList-Name" -Member "RoomMailbox-Address"Important
Replace the parameters in the command before running it.
- RoomList-Name: Replace the parameter with the name of the room list that you created for the integration with Yeastar Workplace.
- RoomMailbox-Address: Replace the parameter with the mailbox address of the room mailbox that needs to be synchronized.
-
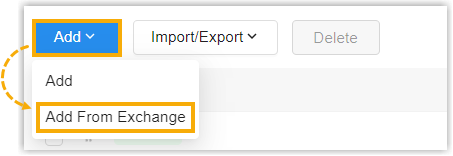
Import the room resource in Yeastar Workplace.
- Log in to Yeastar Workplace management portal, go to Meeting Room > Room Management.
- Click Add and select Add From Exchange.
- In the pop-up window, select the desired room resource to be synced to Yeastar Workplace, and click Save.
Last update:
February 3, 2023
Created: February 3, 2023
Created: February 3, 2023