Set up Email Notifications for Voicemail
Email is one of the most popular communication tools for business. Forwarding voicemail messages to email is an efficient business feature that allows employees to receive voicemail audio files as email attachments. This topic describes what you can do with voicemail to email and how to set up new voicemail email notification for an extension.
Background information
- Scenario
- For employees who travel frequently and require an efficient way to keep up with voicemail and provide a quick response for the customers, it is an efficient way to get alert timely, listen to voicemails anywhere, and handle business over email.
- Benefit
- Each time the employees receive a voicemail message, they can receive an
email with the new voicemail message attached as a .wav file, including
caller ID, time of the call, and callback number.
- Easy to identify: In emails, the employees can quickly identify the person who left the message, and listen to voicemail message as they need.
- Easy to listen: The employees can check and listen to their voicemail messages via computer, smart phone or mobile device at convenience, instead of calling to voicemail box and navigating through the maze of voice prompts. They can also fast-forward or rewind to reach and repeat the important portion.
- Easy to share: The employees can forward emails to share voice messages with teammates to improve collaboration efficiency.
- Easy to manage: Managing the communications is easier since all the voicemail messages are in the email box. It is faster to sort, prioritize, scan, delete, and save voicemail message.
Prerequisites
- Make sure there is a valid email address assigned to the desired extension.
- Make sure the Voicemail feature feature is enabled for the desired extension.
- Make sure the PBX system email works, or the PBX cannot forward the received voicemail to an extension user's email.
Procedure
- Log in to PBX web portal, go to Extension and trunk > Extension >
 > Voicemail > New Voicemail Notification.
- Select the checkbox of New Voicemail Email
Notification, and complete the following settings.
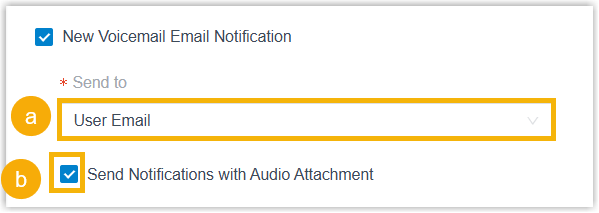
- In the Send to drop-down list, select the
target email address.
- To send voicemail message to the email address of the extension, select User Email.
- To send voicemail message to a custom email address, select
Custom Email.
After selected, you need to enter a custom email address in the Custom Email Address field.
- Optional: Select the checkbox of Send
Notifications with Audio Attachment.
After selected, the system will send a notification email with the new voicemail message attached as a
.wavfile.
- In the Send to drop-down list, select the
target email address.
- In the After Notification drop-down list, set how to handle the voicemail message after the system has successfully notified the recipient by email.
- Click Save and Apply.