Configure Network for Remote Linkus Access by a Yeastar FQDN
With a Yeastar FQDN, users can log in to the Linkus UC Clients anywhere anytime. This topic describes how to configure network for remote Linkus access via FQDN.
Procedure
- Log in to PBX web portal, go to .
- Turn on Yeastar FQDN.
- In the Fully Qualified Domain Name
(FQDN) field, set up an FQDN domain name.
In this example, set FQDN to
yeastardocs.ras.yeastar.com.
- Select a domain name from the drop-down list.
- Enter a host name in the first field.Note: Think twice before you enter the hostname. The FQDN cannot be changed after you save the configurations.
- Optional: Configure remote Linkus access usage permission.
- In the Features section, go to the Remote Access tab.
- Click
 beside the Linkus
Access.
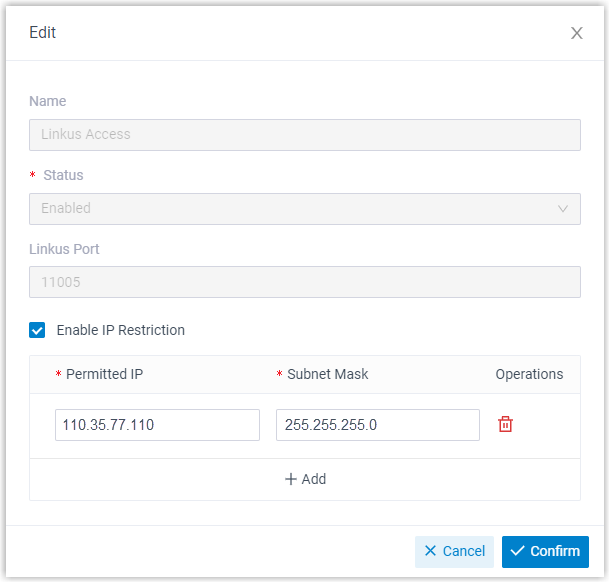
 - In the pop-up window, complete the following settings according to
your need.

- Name: Display the remote access feature name, and cannot be edited.
- Status: Enabled by default, and cannot be disabled.
- Linkus Port: Display the remote Linkus access port 11005. The port is assigned by Remote Access Service automatically.
- Enable IP
Restriction: Select the checkbox of the
option, and add at least one permitted IP address and subnet
mask.
If you configure this option, only the permitted IP address(es) can use the remote access feature.
- Click Confirm.
- Click Save.
Result
Linkus Server is automatically set up for remote access, users can remotely log in to Linkus UC Clients via the FQDN.Troubleshooting: If a user can not access
Linkus Web Client via the FQDN, check if you have
allowed the user to use the remote web access service via FQDN.