Auto Provision IP Phones in Local Network (DHCP Method)
For the IP phones that are located in different LAN subnet with the PBX or don't support PnP provisioning, you can provision the IP phones by DHCP method.
Supported IP phones
This topic can be applied to all the IP phones listed in Auto Provisioning - Supported Devices.
Prerequisites
- Make sure that there is only one DHCP server in the network where the IP phone is located, otherwise the IP phone may fail to obtain an IP address.
- Make sure that there is network connectivity between the subnet segments of the IP phone and the PBX server.
- DHCP provisioning is supported on the phone.
- Make sure that you have downloaded the template for the desired phone model on the PBX (Path: ).
- Gather information of IP phone, including Vendor, Model, and MAC address.
Scenario
An IP phone and a DHCP server are deployed in subnet 6, while the PBX (IP: 192.168.5.150) is deployed in subnet 5.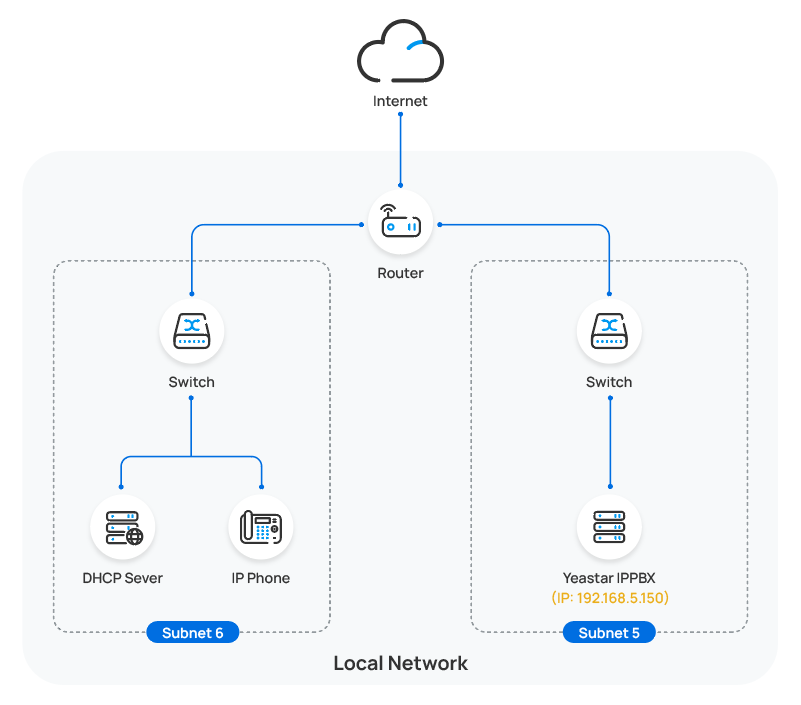
Procedure
Step2. Generate configuration file for an IP phone on the PBX
Step1. Set a remote extension
- Log in to PBX web portal, go to , edit the extension to be assigned.
- Click Advanced tab, select the checkbox of
NAT in the VoIP Settings
section.
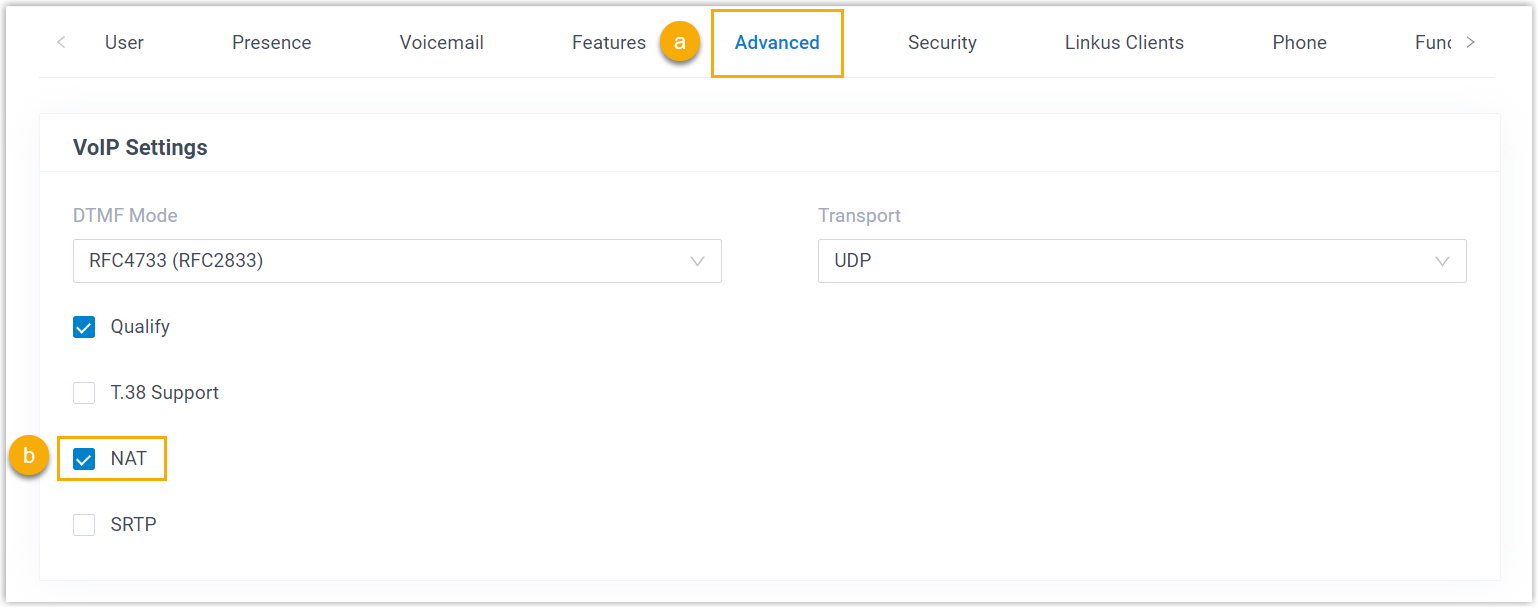
- Click Security tab, select the checkbox of
Allow Remote Registration in the SIP
Security section.

- Click Save and Apply.
The extension can be registered in different LAN subnet or in a remote network.
Step2. Generate configuration file for an IP phone on the PBX
- RESET the phone if it is previously used.
- Log in to PBX web portal, go to .
- Click Add to add a phone to the PBX.
- In the IP Phone section, configure phone information
as follows:
- Vendor: Select a phone vendor.
- Model: Select a phone model.
- MAC Address: Enter MAC address of the phone.
- In the Options section, configure the following
settings.
- Template: Select a desired template from the
drop-down list.Note: The template provides configurations except extension assignment. You can select the default template corresponding to the phone model, or customize your own template.
For more information, see Create a Custom Auto Provisioning Template.
- Provisioning Method: Select DHCP
(In the Office).
A provisioning server URL is generated automatically and displayed on the web page.
Note: Take note of the generated provisioning link, you will use it later on the DHCP server.
- Template: Select a desired template from the
drop-down list.
- In the Assign Extension section, assign an extension
to the phone.Tip: If your desired extension is not listed in the drop-down list, you can check if the extension has been associated with other IP phone or gateway.
- To release the previous phone or gateway, see Release an Extension from a Provisioned IP Phone/Gateway.
- To associate an extension with multiple IP phones, see Allow Multiple Registrations for One Extension Number.
- Click Save.
A configuration file for the phone is generated in the PBX.
Step3. Set up a DHCP option 66
For most firewalls or routers, the built-in DHCP server does not have the capability to add or change the scope option. Tftpd32 software supports this function, which can be an alternative choice to accomplish this task. The following instructions are based on the Tftpd32 DHCP server.
- On Yeastar PBX, obtain the provisioning link.
- Log in to PBX web portal, go to , click the desired IP phone.
- In the Options section, copy the provisioning
link.

- On DHCP server, set up Option 66 using the provisioning link.
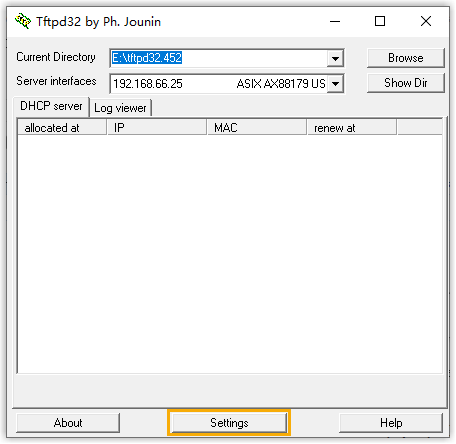
- Run the Tftpd32 software, click
Settings at the bottom of the
window.
- In the pop-up window, click GLOBAL tab, select
the checkbox of DHCP Server.
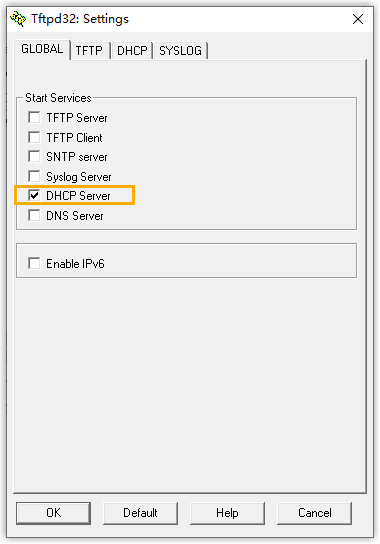
- Click DHCP tab, configure the DHCP server
parameters.
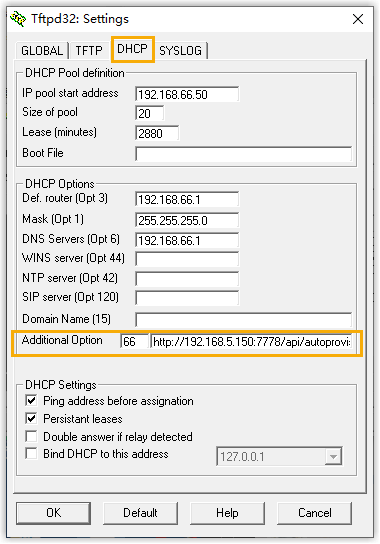
- IP pool start address: The starting IP addresses to be allocated.
- Size of pool: Total number of available IP addresses.
- Lease time: IP address lease time.
- Def. Router (Opt 3): The gateway IP address. In this example, enter 192.168.66.1.
- Mask (Opt 1): Subnet mask that corresponds to the available IP address segment.
- DNS Server (Opt 6): DNS server address for the DHCP server. In this example, enter 192.168.66.1.
- Additional Option: Enter option to 66 and paste the PBX provisioning link besides the option.
- Click OK.
The PC starts to work as a DHCP server.
- Run the Tftpd32 software, click
Settings at the bottom of the
window.
Result
- Connect an IP phone to the same LAN subnet as the DHCP server (PC), the IP phone gets an IP address and download the configuration file from the PBX to achieve Auto Provisioning
-
The extension registration status of provisioned phones is displayed on .
 : The assigned extension is
registered on the phone.
: The assigned extension is
registered on the phone. : The assigned extension is
unregistered on the phone.
: The assigned extension is
unregistered on the phone.
