Configure a Static IPv4 Address
This topic describes how to configure a static IPv4 address for Yeastar P-Series Software Edition.
Background information
The default IP address of Yeastar P-Series Software Edition is 192.168.5.150. According to your network environment, you may need to change the IP address to the same network segment of your local network.
The following instructions assume that you need to use LAN port and WAN port of Yeastar P-Series Software Edition to connect different networks, so that LAN/WAN uplinks can carry different services through separate ports, optimizing the utilization of network bandwidth. The IP information is shown as below:
| LAN | WAN |
|---|---|
|
|
Prerequisites
- PBX and PC are connected to the same local network.
- Your PC has ability to access the default network segment 192.168.5.X of the PBX.Tip: To access the PBX, you need to change your PC to the same network segment of the PBX.
Procedure
- Log in to PBX web portal, go to .
- In the Basic section, configure the following
settings:

- Ethernet Mode: Select the
Ethernet mode. In this scenario, select Dual.
- Single: Only the LAN port is used for up-link connection.
- Dual: Both LAN and WAN are used
for up-link connection. Note: The traffic will be routed to the default interface; you may need to add a static route to override the default route entries, routing the traffic from a specific IP address to the specified destination.
- Number of WAN
Ports: Optional. To connect more than one service
providers, specify the number of WAN ports as needed.Note:
- This is only supported on P-Series Software Edition deployed on Ubuntu, and the PBX version must be 83.17.0.60 or later.
- Up to 5 WAN ports are supported.
- Default Interface: For Dual Ethernet mode, you need to select a default interface. In this scenario, select LAN.
- Ethernet Mode: Select the
Ethernet mode. In this scenario, select Dual.
- In the LAN section, complete the following
settings:
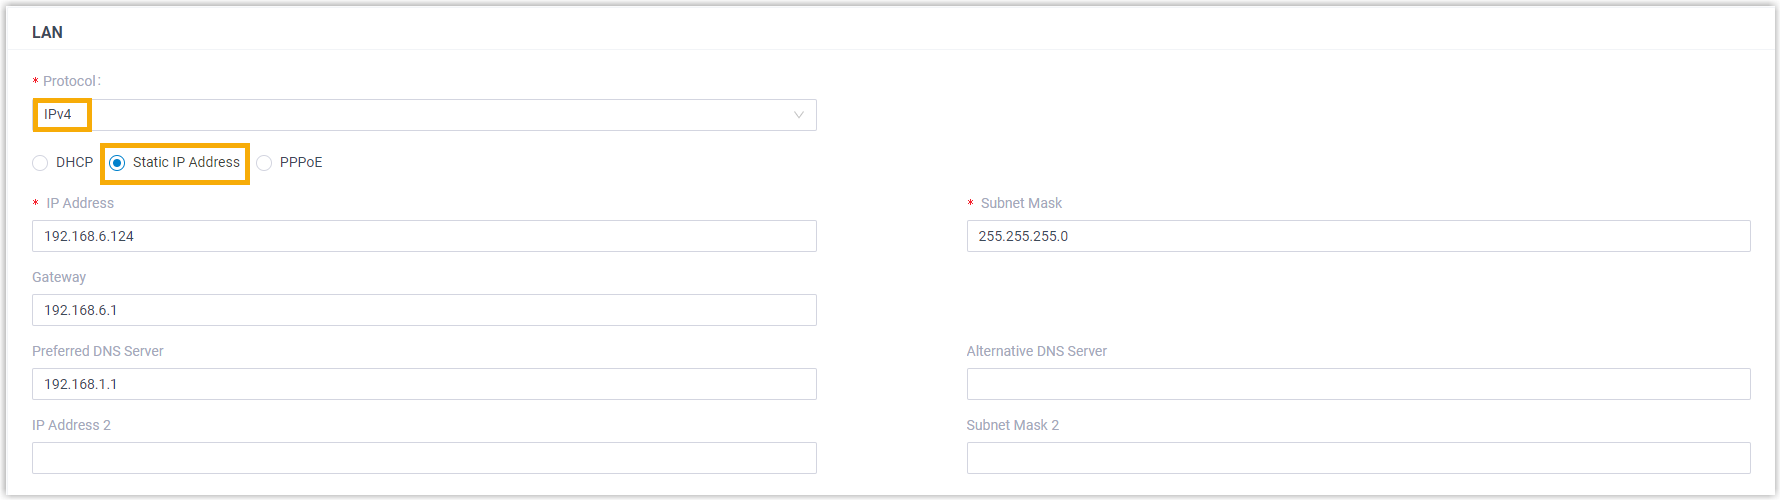
- Optional: To enable Ethernet redundancy for the LAN port, select the checkbox of Enable Redundancy, then select a redundant interface from the drop-down list of Redundant Ethernet.
- In the Protocol drop-down list, select IPv4.
- Set the network mode to Static IP Address, then
fill in the following network information.
Item Description IP Address Enter the IP address that is assigned to the PBX. Subnet Mask Enter the subnet mask. Gateway Enter the gateway address. Preferred DNS Server Enter the IP address of preferred DNS server. Alternative DNS Server Optional. Enter the IP address of alternative DNS server. IP Address 2 Optional. Enter a second IP address for the PBX. Note: According to your network environment, you may need to set another IP address to allow users in different IP segment to access the PBX.Subnet Mask 2 Optional. Enter another subnet mask for the second IP address.
- In the WAN section, complete the following
settings.
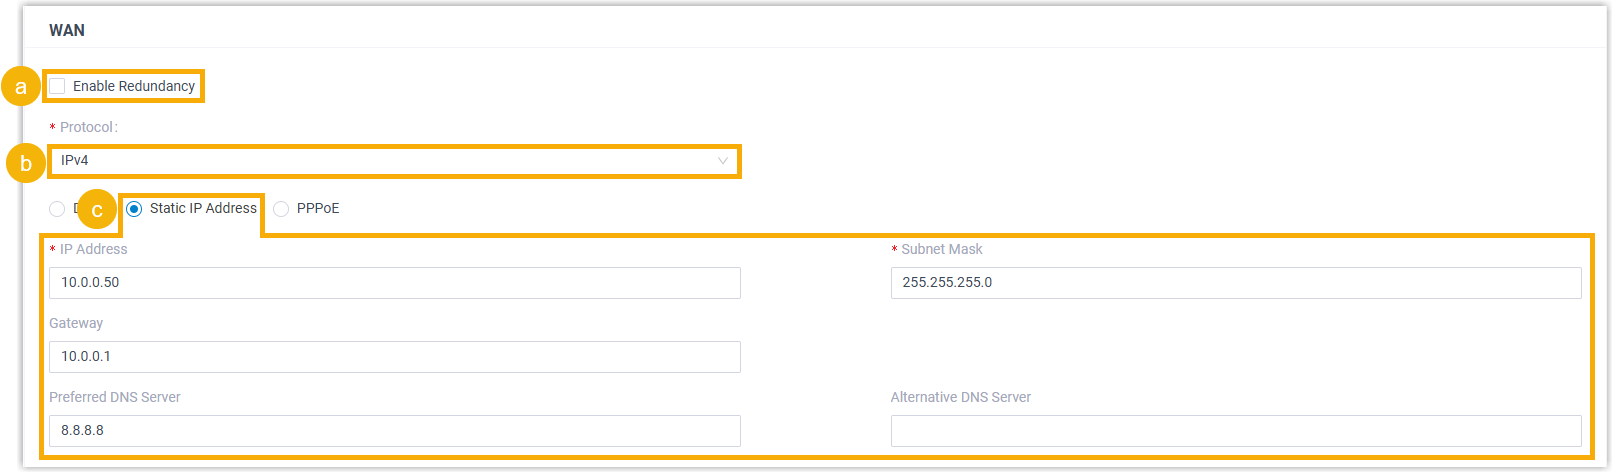
- Optional: To enable Ethernet redundancy for the WAN port, select the checkbox of Enable Redundancy, then select a redundant interface from the drop-down list of Redundant Ethernet.
- In the Protocol drop-down list, select IPv4.
- Set the network mode to Static IP Address, then
fill in the following network information.
Item Description IP Address Enter the IP address that is assigned to the WAN interface. Subnet Mask Enter the subnet mask. Gateway Enter the gateway address. Preferred DNS Server Enter the IP address of preferred DNS server. Alternative DNS Server Optional. Enter the IP address of alternative DNS server.
- If you enable multiple WAN ports, enable the WAN port and
configure related settings.

- Click Save and reboot the PBX to take effect.
Result
After the PBX reboots, the LAN interface is changed to 192.168.6.124, and the WAN interface is changed to 10.0.0.50.
Different services will be sent through different ports. For example, LAN interface can be used to send and receive internal network traffic, while the WAN interface can be used to connect SIP providers.
What to do next
To access the PBX, change your PC's IP to the same network segment of the PBX, for example, 192.168.6.110.