Set up a Two-way Intercom Group
Two-way Intercom feature allows you to establish two-way communication with an individual user or a group of users. The called parties can respond without picking up the handset. This topic describes how to set up a two-way intercom group.
Background information
In office complexes, hospitals, or schools, there are either static guards or patrol guards to ensure safety within the workplace. The Two-way Intercom feature helps improve communication efficiency. For example, a security guard can ask for help when security incidents happen, a supervisor can flexibly dispatch employees in daily activities.
Yeastar P-Series Software Edition supports to place an intercom call to one or more users:
- Place an intercom call to a specific user
- Dial Intercom feature code (default: *6) followed by a desired extension number.
- Place an intercom call to multiple users
- Set up a two-way intercom group on the PBX and place a call to group numbers.
Procedure
- Log in to PBX web portal, go to , click Add.
- Configure a two-way intercom group.
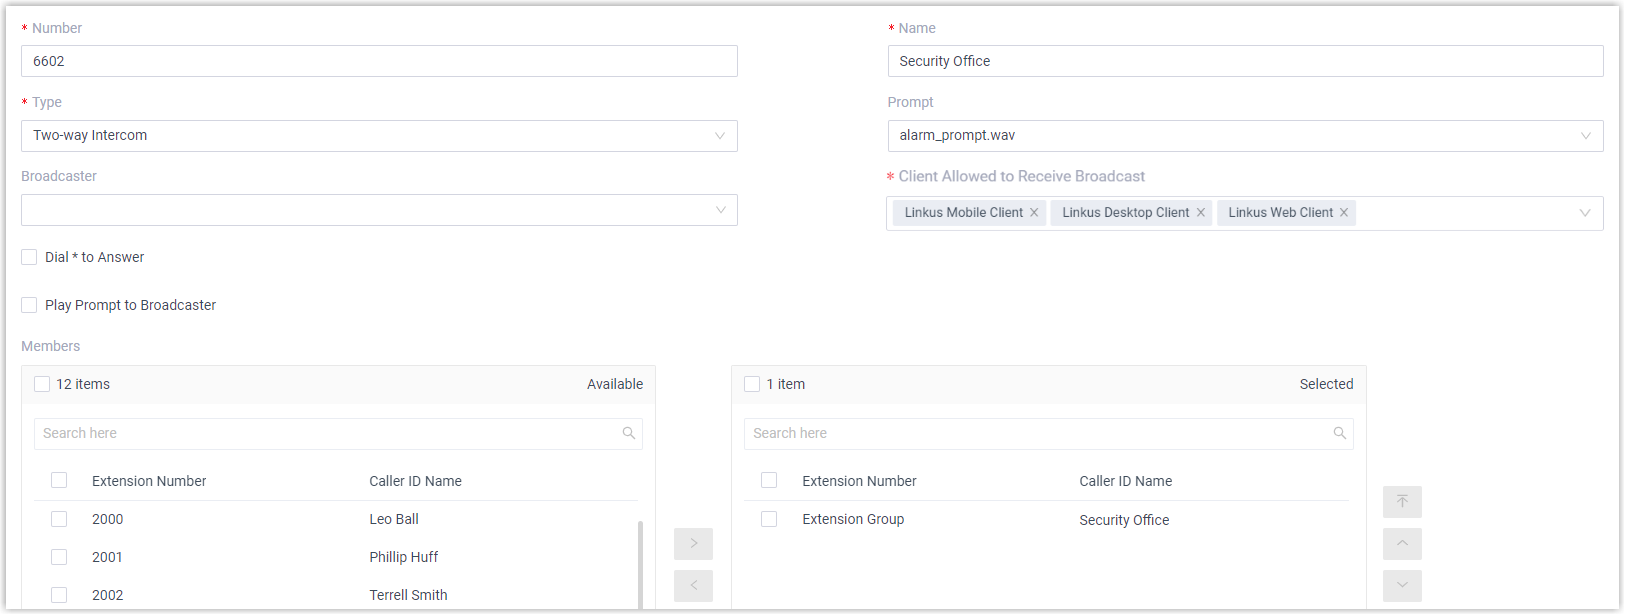
Item Description Number Enter a number for the intercom group. In this example, enter 6602. Name Enter a name for the intercom group. In this example, enter Security Office. Type Select Two-way Intercom. Prompt Optional. To play a prompt before making an announcement, you can select a custom prompt. In this example, select alarm_prompt.wav. Prompt Playback Times Specify how many times the prompt will be played and repeated. Note: Enter a value between 1 and 100, or select Unlimited to play the prompt in a loop.Broadcaster Optional. To restrict users from placing an intercom call to the intercom group, select allowed extensions or extension groups from the drop-down list. In this example, leave it blank. Client Allowed to Receive Broadcast Select the desired clients for receiving intercom calls. Note: Intercom calls initiated by the feature code will NOT be restricted by this configuration and will call all the clients and extension endpoints of members simultaneously.Dial * to Answer Optional. To allow users to dial *to talk to the broadcaster privately, enable this option.When a user dials
*, the call is ended from other users' side, and the user can have a private talk with the broadcaster.Dial # to Stop Playing Prompt Optional. If a prompt is selected, enabling this option allows the broadcaster to dial # during playback to stop the prompt. Play Prompt to Broadcaster Optional. To restrict the broadcaster from hearing the prompt, disable this option. In this example, disable this option. Note: This option is available only when a custom prompt is selected and is enabled by default.Members Select desired members from Available box to Selected box. In this example, select the group Security Office. - Click Save and Apply.
What to do next
- For Linkus clients (Mobile/Desktop/Web/Pad Client), they will ring first, and users need to manually
answer the call to listen to the broadcasts.Note: If necessary, you can set up user's Linkus clients to automatically answer paging calls. For more information, see Set up Auto Answer for Linkus UC Clients.
- For IP phones, they will automatically answer into speakerphone mode.