Set up a Remote SIP Phone via Public IP Address and Port
This topic provides a configuration example to help you understand how to register a remote SIP extension on a SIP phone using public IP address and port of the PBX.
Background information
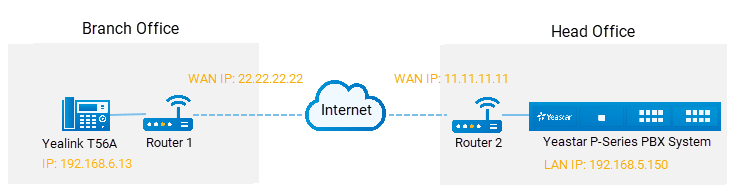
Yealink T56A and Yeastar P-Series Software Edition are in different locations and networks. The administrator wants to register Yealink T56A on Yeastar P-Series Software Edition, so that users in branch office can use Yealink T56A to make and receive calls.
Procedure
Step1. Forward the required ports on your router
Forward the following ports on Router 2 that is connected to Yeastar P-Series Software Edition, so that all the packets received on the router WAN port (11.11.11.11) can be forwarded to the PBX (192.168.5.150).
| Service port | Local port | External port |
|---|---|---|
| SIP Registration Port | UDP 5060 | UDP 5078 |
| RTP Ports Range | UDP 10000-20000 | UDP 10000-20000 |
Step2. Configure SIP NAT settings on your PBX
- Procedure
-
- Log in to PBX web portal, go to , click Public IP and Ports tab.
- Turn on the option Public IP (NAT), and
configure NAT settings.
- In the NAT Type drop-down list, select Public IP Address.
- In the Public IP address field, enter the PBX's WAN IP. In this example, enter 11.11.11.11.
- In the Local Network
Identification section, enter the
local network segment and subnet mask.
- Click +Add IP.
- In the Network Number field, enter the LAN IP. In this example, enter 192.168.5.0.
- In the Subnet Mask field, enter the subnet mask. In this example, enter 255.255.255.0.
- In the NAT Mode drop-down
list, select Yes.
The PBX uses NAT, ignores the address information in the SIP headers or SDP headers, and replies to the sender's IP address and port.
- Enter external ports that you have forwarded on the router 2.
- External SIP UDP Port: In this example, enter 5078.
- Click Save and Apply.
Step3. Set up an extension for remote access
- On the PBX web portal, go to , edit the desired extension.
- Click Security tab, select the checkbox of Allow Remote Registration.
- Click Save and Apply.
Step4. Register the extension on the phone
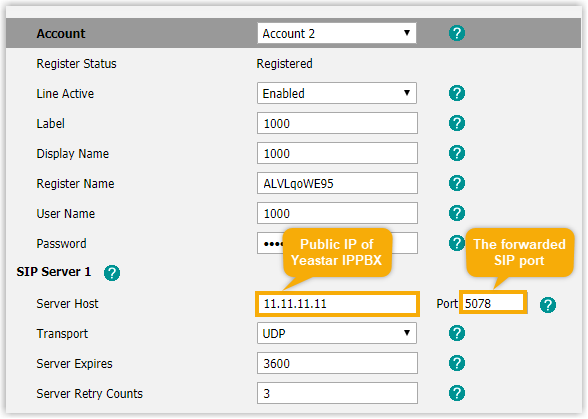
Result
Users in branch office can use Yealink T56A to make and receive calls.