Schedule Automatic Call Report Delivery via Email
Yeastar P-Series Software Edition allows you to schedule call report delivery to specific recipients' mailboxes at the specified time. The recipients can access call report via the download link included in the email and save it in CSV, XLS, or PDF format. This topic describes how to schedule automatic call report delivery via email.
Requirements
The system email server is ready for use.
Limitations
Up to 2000 scheduled call report delivery tasks are supported.
Procedure
- Log in to PBX web portal, go to .
- In the Scheduled Reports tab, click Add
Report.
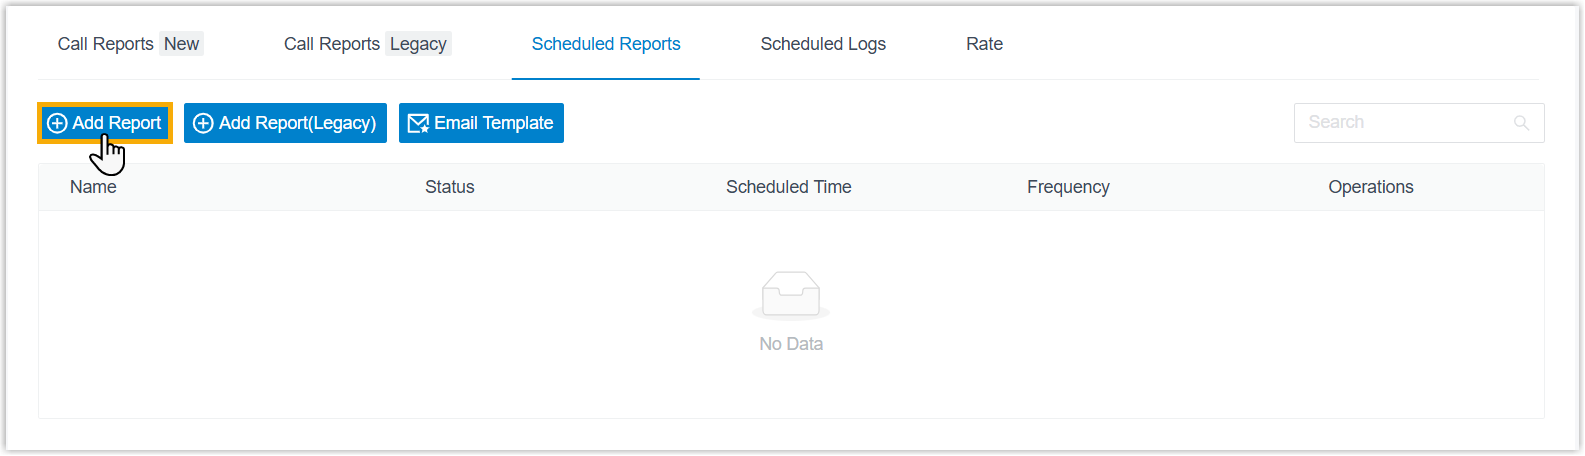 Note: To enhance system performance, Yeastar has upgraded the CDR module in version 83.21.0.117 with a new data structure for clearer display and more comprehensive call details. The system gradually deletes old CDRs and related call report data according to the CDR Auto Cleanup setting. Before old call report data are cleaned up, new and historical data are managed separately - the Add Report button for new data and the Add Report(Legacy) button for historical data.
This topic describes how to schedule new call report data generated after upgrading to version 83.21.0.117 or later. To schedule historical data, click Add Report(Legacy) button to proceed.
- In the Report Data section, configure the call report
data settings.
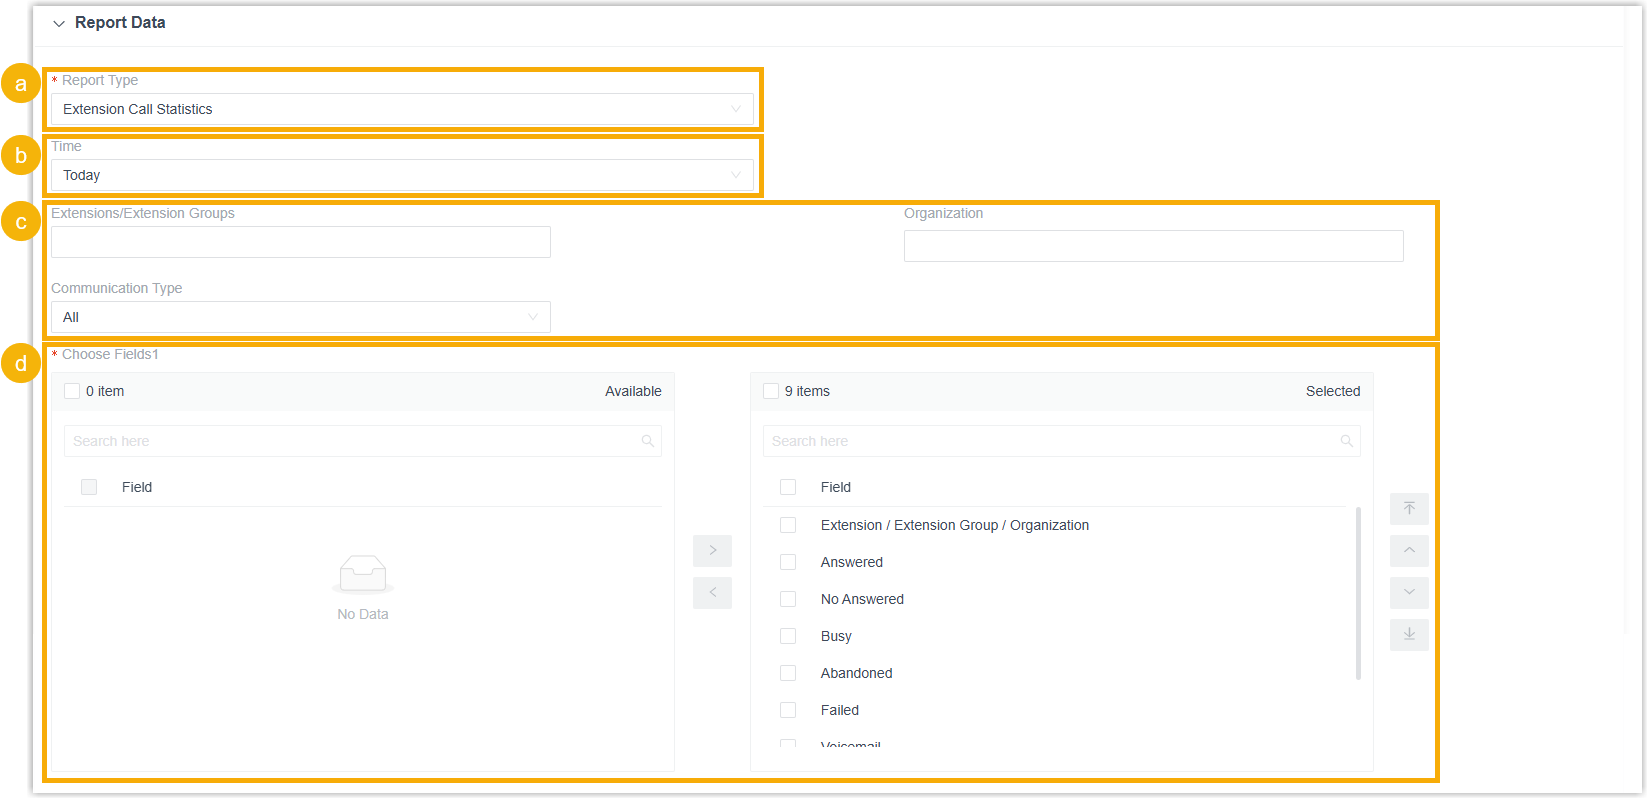
- In the Report Type drop-down list, select a report.
- Specify the time range that the report will cover.Note: If multiple time-based filters are applied, the report data includes data only for the overlapping time period.
- Configure report-specific fields to define the data scope of the report.
Report Filter Extension Extension Call Activity - Extensions/Extension Groups
- Organization
- Communication Type
Extension Call Statistics Accounting Extension Call Accounting - Extensions/Extension Groups
- Trunk
- Organization
Extension Call Accounting Details - Extensions/Extension Groups
- PIN Code
- Organization
- Trunk
Call Activity IVR Report - Type
- IVR
DID/Outbound Caller ID Activity - Trunk
- DID
- DOD
- Communication Type
PBX Call Activity - Trunk
- Include internal calls: Set whether to include internal call activities.
- Communication Type
Call Center Agent Call Summary - Queue
- Agent
Agent Login Activity Agent Missed Call Activity Satisfaction Survey Detail Agent Pause Activity - Queue
- Agent
- Pause Reason
Agent Performance - Queue
- Agent
- Exclude Calls
Abandoned within Xs: Specify the ring
duration to exclude short abandoned calls.
Calls abandoned within this time frame will NOT be included in the report.
Queue AVG Wait & Talk Time - Queue
Satisfaction Survey Queue Callback Summary Queue Callback Activity - Queue
- Callback Result
Queue Performance Activity - Queue
- Exclude Calls
Abandoned within Xs: Specify the ring
duration to exclude short abandoned calls.
Calls abandoned within this time frame will NOT be included in the report.
Queue Performance - Queue
- Exclude Calls
Abandoned within Xs: Specify the ring
duration to exclude short abandoned calls.
Calls abandoned within this time frame will NOT be included in the report.
- Exclude Calls
within Xs: Specify the talk duration
to exclude short answered calls.
Calls ended within this time frame will NOT be included in the report.
Inbound Queue Activity Analysis - Queue
- Wait Time Range: Specify the time interval used to group the amount of time that callers waited in the queue before connecting to an agent.
- Time Range
& Select Date: Specify the time
range that the report will cover.Note: If multiple time-based filters are applied, the report data includes data only for the overlapping time period.
- Exclude Calls
Abandoned within Xs: Specify the ring
duration to exclude short abandoned calls.
Calls abandoned within this time frame will NOT be included in the report.
- Exclude Calls
within Xs: Specify the talk duration
to exclude short answered calls.
Calls ended within this time frame will NOT be included in the report.
Unreturned Missed Call Report - Call From: Enter the caller's number or name.
- Call To: Enter the callee's number or name.
- Call Destination: Select the type of the destination to which the inbound call was routed.
- Missed Call Type: Select the type of missed call.
- Callback Status: Select whether the missed call was returned or not.
- Exclude Calls
Abandoned within Xs: Specify the ring
duration to exclude short abandoned calls.
Calls abandoned within this time frame will NOT be included in the report.
Ring Group Statistics - Ring Group
Inbound Queue Logs - Queue
- Communication Type
- Call From: Enter the caller's number or name.
- Queue Status
- Answered Agent
- Wait Time: Specify the
amount of time callers waited in the queue before
connecting to an agent or leaving the queue.
You can enter numbers,
-,=,<,<=,>,>=, and number ranges to specify the time. - Agent Answer Time:
Specify the amount of time agents took to answer
queue calls.
You can enter numbers,
-,=,<,<=,>,>=, and number ranges to specify the time. - Talk Time: Specify the
amount of time that agents spent talking to
callers, including hold time.
You can enter numbers,
-,=,<,<=,>,>=, and number ranges to specify the time. - Pure Talk Time: Specify
the amount of time that agents spent talking to
callers, excluding hold time.
You can enter numbers,
-,=,<,<=,>,>=, and number ranges to specify the time. - Hold Time: Specify the
amount of time that agents held queue calls.
You can enter numbers,
-,=,<,<=,>,>=, and number ranges to specify the time. - Source Trunk
- DID/DDI
- Exclude Calls
Abandoned within Xs: Specify the ring
duration to exclude short abandoned calls.
Calls abandoned within this time frame will NOT be included in the report.
- Exclude Calls
within Xs: Specify the talk duration
to exclude short answered calls.
Calls ended within this time frame will NOT be included in the report.
Agent Activity Analysis - Queue
- Agent
- Time Range
& Select Date: Specify the time
range that the report will cover.Note: If multiple time-based filters are applied, the report data includes data only for the overlapping time period.
- Exclude Calls
Abandoned within Xs: Specify the ring
duration to exclude short abandoned calls.
Calls abandoned within this time frame will NOT be included in the report.
- Exclude Calls
within Xs: Specify the talk duration
to exclude short answered calls.
Calls ended within this time frame will NOT be included in the report.
Inbound Queue Logs for Agent - Queue
- Agent
- Communication Type
- Call From: Enter the caller's number or name.
- Agent Last Call Status
- Queue Status
- Process Result: Select the process result for an abandoned or missed queue call.
- Wait Time in Queue:
Specify the amount of time callers waited in the
queue before connecting to an agent or leaving the
queue.
You can enter numbers,
-,=,<,<=,>,>=, and number ranges to specify the time. - Agent Wait Time:
Specify the amount of time it took for agents to
answer queue calls.
You can enter numbers,
-,=,<,<=,>,>=, and number ranges to specify the time. - Talk Time: Specify the
amount of time that agents spent talking to
callers, including hold time.
You can enter numbers,
-,=,<,<=,>,>=, and number ranges to specify the time. - Pure Talk Time: Specify
the amount of time that agents spent talking to
callers, excluding hold time.
You can enter numbers,
-,=,<,<=,>,>=, and number ranges to specify the time. - Hold Time: Specify the amount of time that agents held queue calls.
- Source Trunk
- DID/DDI
- Exclude Calls
Abandoned within Xs: Specify the ring
duration to exclude short abandoned calls.
Calls abandoned within this time frame will NOT be included in the report.
- Exclude Calls
within Xs: Specify the talk duration
to exclude short answered calls.
Calls ended within this time frame will NOT be included in the report.
AI AI Receptionist Call Activity Receptionist Transcription Usage Details - -
In the Choose Fields pane, move fields that should not be displayed in the report from the Selected box to the Available box.
- In the Scheduled Info section, configure the call
report delivery settings.

Setting Description Name Enter a name to help you identify the task. Email Address Enter recipients' email addresses. Note: You can set up to 10 email addresses; Separate multiple email addresses by semicolon;.Frequency Set how often to send the report. - Once: If you choose the option, the system sends the report immediately after you save the setting.
- Daily: If you choose
the option, select a time from the drop-down
list.
The system sends the report at this time of the day.
- Weekly: If you choose
the option, choose a day of week and select a time
from the drop-down list.
The system sends the report at this time of the week.
- Monthly: If you choose
the option, choose a day and select a time from
the drop-down list.
The system sends the report on this day and time of the month.
Validity Period of the Download Link Set the validity period of the download link for the scheduled report. After the link expires, the recipients can NOT download the report via the link.
File Format Specify the download format for call report. - CSV
- XLS
- PDFNote: For call reports with a Details view (e.g. IVR report or Queue Performance report), the downloaded PDF does not include call details shown in the Details view.
- HTML
Duration Format Specify the display format for all duration-related fields. - Display in Second (s)
- Display as HH:MM:SS
Include Details Whether to download the list data only, or include call details. If you choose to include call details, specify how the details will be downloaded.- Download data as multiple files/sheets
- Details are displayed as indented, offset rows within the same list
Note: This option is available only for call reports that include call details (e.g. IVR report or Queue Performance report).Send Attachment Optional. If enabled, the report file will be attached to the email sent to the specified recipients. Note: Email attachments in CSV, XLS, or PDF format do not include chart data. - Click Save.
Result
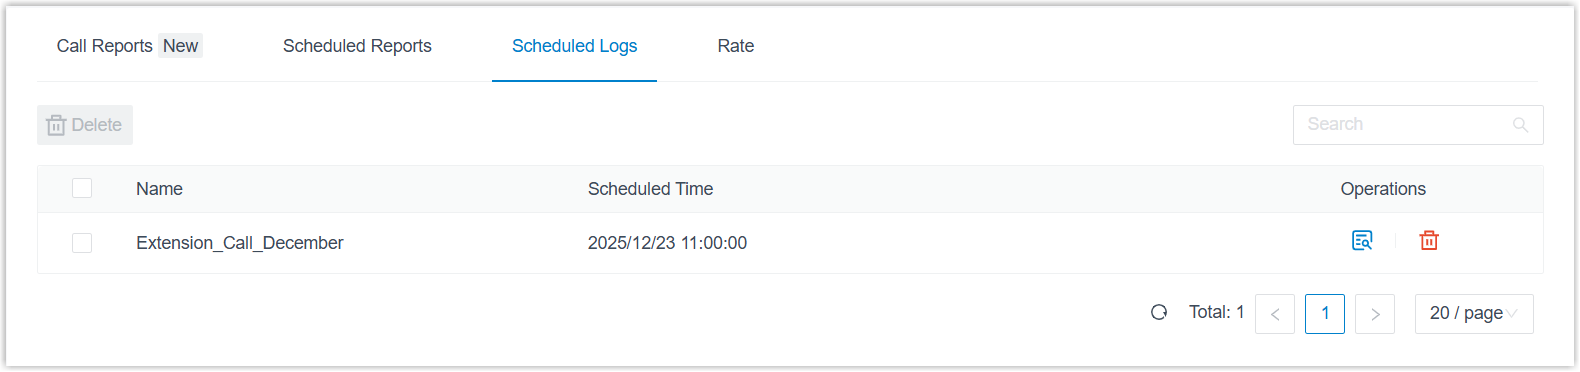
- The task is scheduled and displayed in the list.

- When it comes to the scheduled time, the specified call report will be
automatically sent to the recipients' mailboxes. You can also check the call
report in the Scheduled Logs tab.