Manage TLS certificates on the PBX
Yeastar P-Series Software Edition supports TLS protocol to secure SIP messaging. Before using TLS protocol, you may need to upload or apply for a TLS certificate on the PBX.
Background information
- When the PBX acts as a server, a server certificate is required.
If the PBX requires to verify TLS client (), you need to upload a client certificate to both PBX and TLS client, or the TLS connection would fail. For more information, see Upload a TLS client certificate.
- When the PBX acts as a client, whether a client certificate is required
depends on the server.
If the PBX requires to verify TLS server (), you need to upload or apply for a server certificate. For more information, see Upload a TLS server certificate or Apply for a TLS server certificate.
Upload a TLS server certificate
- Prerequisites
- You have prepared a server certificate in
.pemformat.
- Procedure
-
- Log in to PBX web portal, go to , click Add.
A window pops up, which requires you to select certificate type and upload a certificate.
Note: You can ONLY upload or apply for 3 PBX certificates in total. - In the Certificate Type drop-down list, choose PBX Certificate.
- Select Upload certificate file, and
complete the following settings.
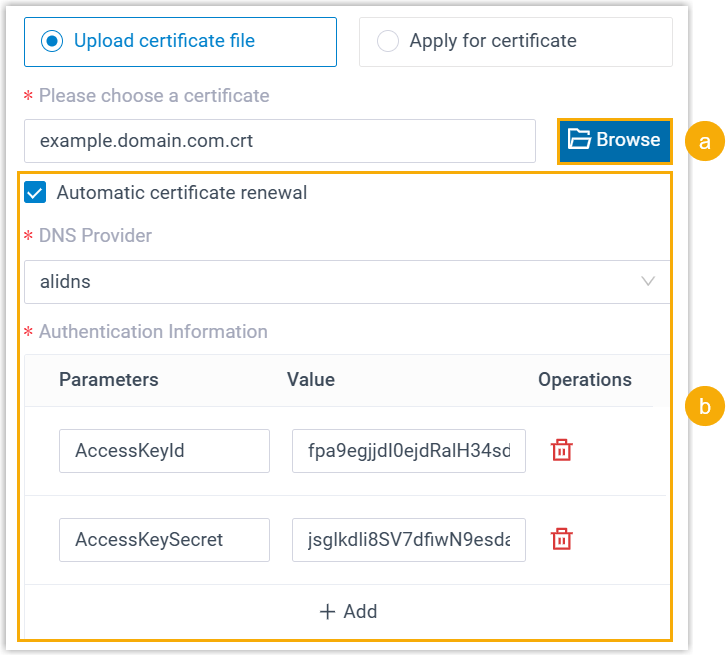
- In the Please choose a certificate section, click Browse to select the desired certificate.
- If you want the PBX to automatically renew the
certificate, select the checkbox of Automatic
certificate renewal, and provide the DNS
provider information.Note: Only Let's Encrypt certificates can be automatically renewed. If the certificate is a non-Let's Encrypt certificate, the PBX will directly apply for a new Let's Encrypt certificate.
- DNS Provider: Search and select your desired DNS provider from the drop-down list.
- Authentication Information:
Enter values for the required authentication
parameters.Note: For the specific authentication information of the DNS providers, see Supported DNS Providers.
- Click Save.
- Log in to PBX web portal, go to , click Add.
- Result
-
- The certificate is uploaded successfully, and is displayed on Certificates list.
- If you enable automatic certificate renewal, the system will automatically renew the certificate through the configured DNS provider 7 days before it expires.
Apply for a TLS server certificate
You can directly apply for a TLS server certificate on the PBX.- Procedure
-
- Log in to PBX web portal, go to , click Add.
A window pops up, which requires you to select certificate type and upload a certificate.
Note: You can ONLY upload or apply for 3 PBX certificates in total. - In the Certificate Type drop-down list, choose PBX Certificate.
- Select Apply for certificate, and complete
the following settings.
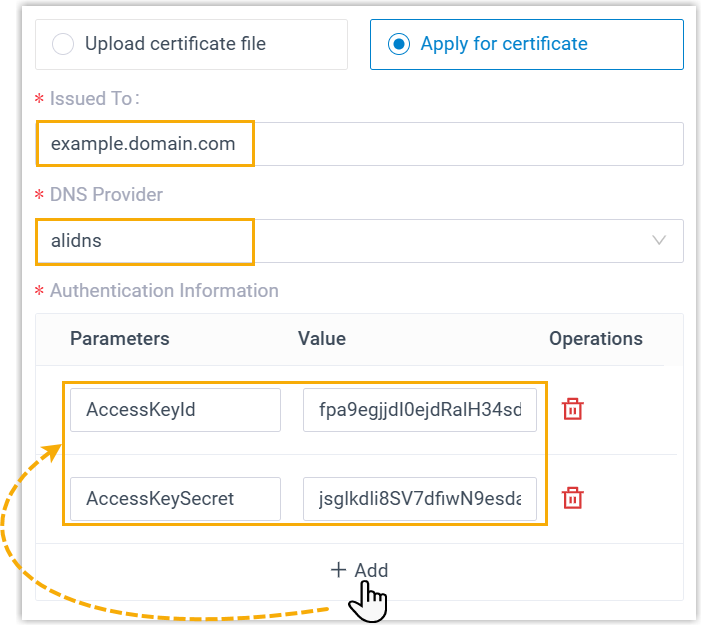
- Issued To:: Enter the domain name for which you want to apply for the certificate.
- DNS Provider: Search and select your desired DNS provider from the drop-down list.
- Authentication Information:
Enter values for the required authentication
parameters.Note: For the specific authentication information of the DNS providers, see Supported DNS Providers.
- Click Save.
- Log in to PBX web portal, go to , click Add.
- Result
-
- PBX will request a domain certificate from Let's Encrypt through the configured DNS provider. The obtained certificate files are named after the domain name.
- If the certificate is applied successfully, the
Application status displays "-".

Upload a TLS client certificate
- Prerequisites
- You have prepared a client certificate in
.ceror.crtformat.
- Procedure
-
- Log in to PBX web portal, go to , click Add.
A window pops up, which requires you to select certificate type and upload a certificate.
Note: You can ONLY upload 20 trusted certificates. - In the Certificate Type drop-down list, choose Trusted Certificate.
- Click Browse to select the desired certificate.
- Click Upload.
- Log in to PBX web portal, go to , click Add.
- Result
- The certificate is uploaded successfully, and is displayed on Certificates list.