Schedule Automatic CDR Delivery via Email
Yeastar P-Series Software Edition allows you to schedule CDR delivery to specific recipients' mailboxes at the specified time. The recipients can access CDR via the download link included in the email and save it in CSV, XLS, PDF, or HTML format. This topic describes how to schedule automatic CDR delivery via email.
Requirements
The system email server is ready for use.
Limitations
- A maximum of 2,000 scheduled CDR delivery tasks are supported.
- The maximum number of CDRs that can be downloaded at one time varies by file format.
File Format Maximum CDRs per Scheduled Download CSV 10,000 (Extension﹤1000) or 100,000 (Extension ≥ 1000) XLS HTML PDF 5,000
Procedure
- Log in to PBX web portal, go to .
- In the Scheduled CDR tab, click
Add.
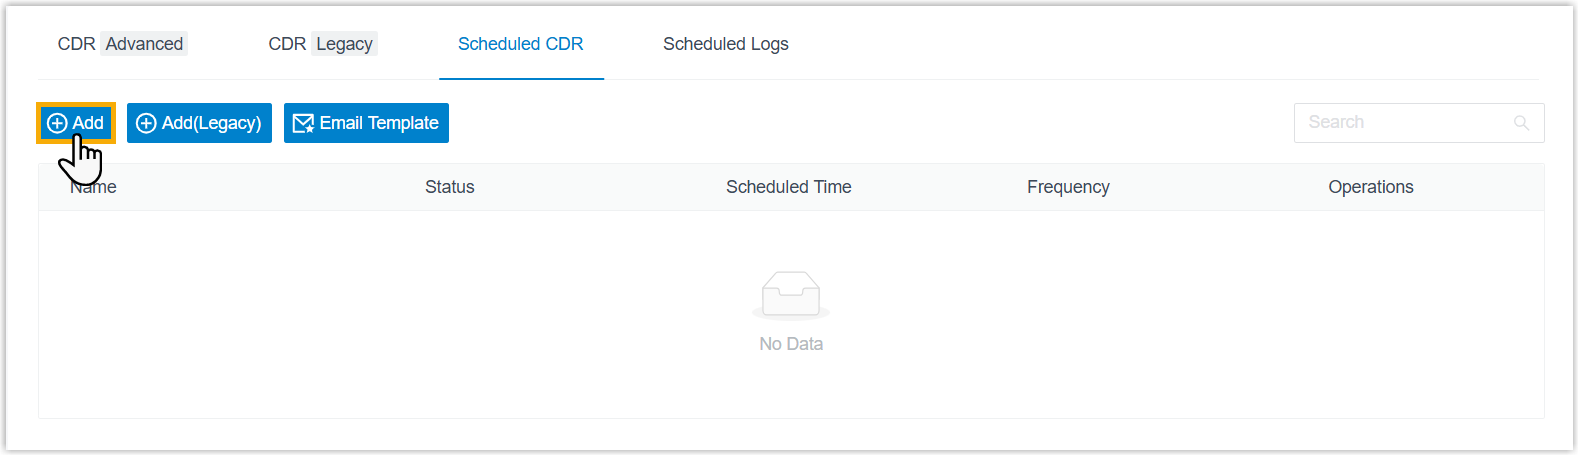 Note: To enhance system performance, Yeastar has upgraded the CDR module in version 83.21.0.117 with a new data structure for clearer display and more comprehensive call details. The system gradually deletes old CDRs according to the CDR Auto Cleanup setting. Before old CDRs are cleaned up, new and historical data are managed separately - the Add button for new data and the Add (Legacy) button for historical data.
This topic describes how to schedule new CDR data generated after upgrading to version 83.21.0.117 or later. To schedule historical data, click Add (Legacy) button to proceed.
- Schedule a task to send CDR via email.
- In the Column header filters section, filter
CDR list data using column-based filters.
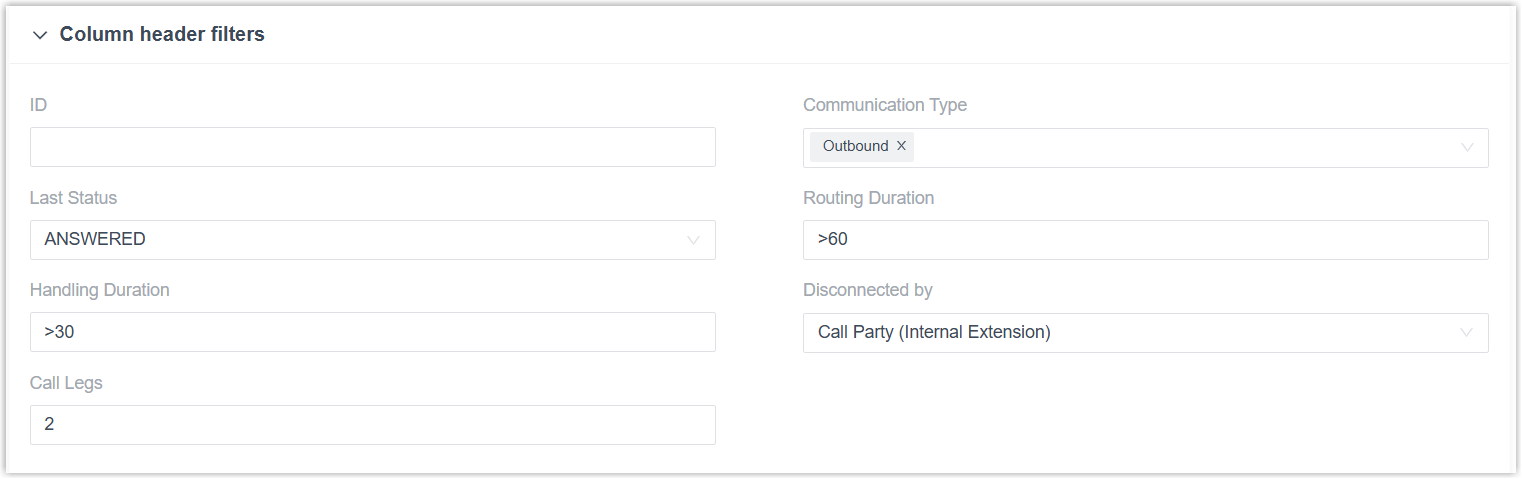
Setting Description ID Enter the unique CDR ID. Note:- You can obtain CDR ID from the CDR
list.
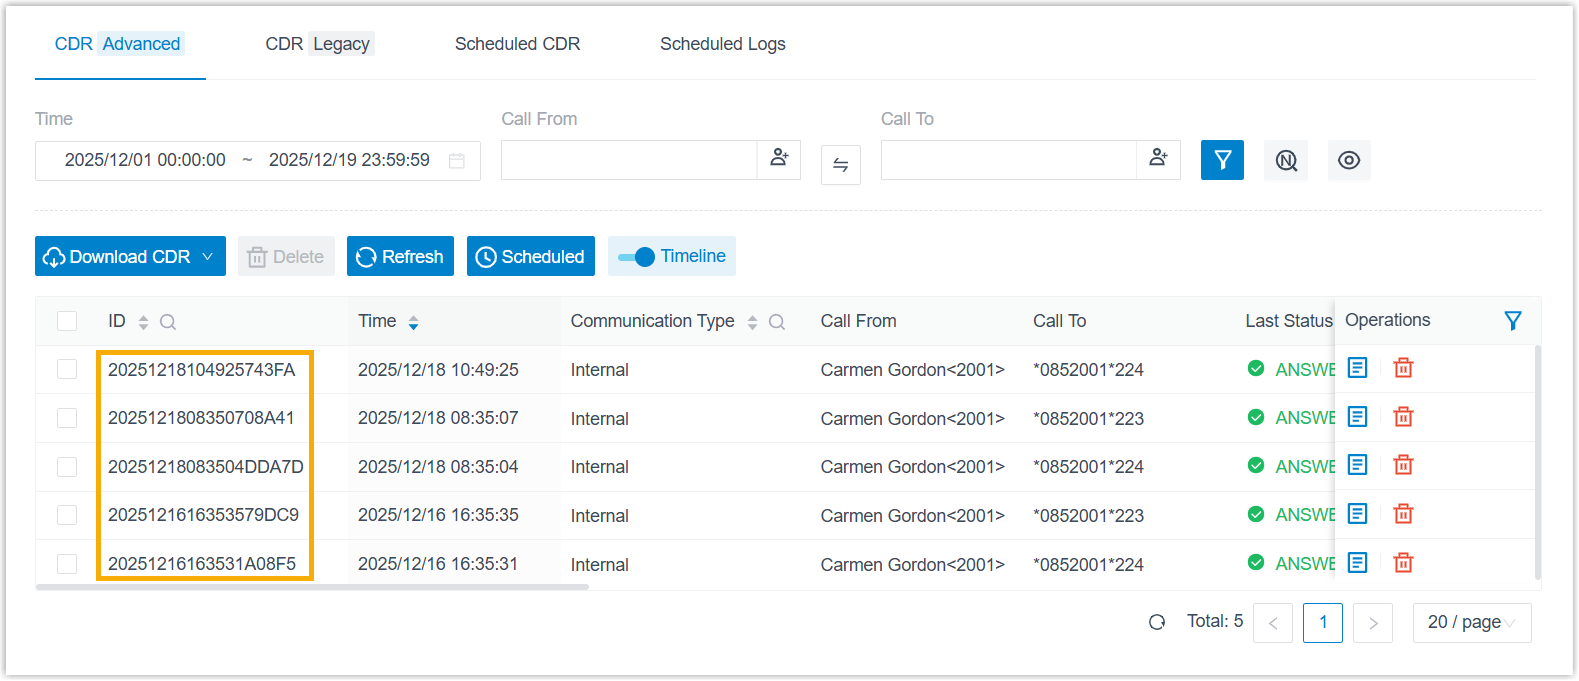
- If a CDR ID is specified, we recommend leaving all other column header filters blank, as mismatched column filter criteria may cause the CDR delivery to fail.
Communication Type Select one or more communication types. - Inbound
- Outbound
- Internal
Note: For calls with multiple call legs, the communication type of the first call leg is used for filtering.Last Status Select the final status of calls. - All
- ANSWERED
- NO ANSWER
- BUSY
- FAILED
- VOICEMAIL
- ABANDONED
Note: For calls with multiple call legs, the final status of the last call leg is used for filtering.Campaign Select campaign(s) that initiated the calls. Routing Duration Specify the time between the call started and the call answered. You can enter numbers,
-,=,<,<=,>,>=, and number ranges to specify the duration.Note: If a call was routed through an IVR or a call flow, the time between entering and leaving the IVR/call flow is included.Handling Duration Specify the time between the call answered and the call ended, including the hold time. You can enter numbers,
-,=,<,<=,>,>=, and number ranges to specify the duration.Note: For outbound queue calls, the agent wrap-up time is also included.Disconnected by Select the party that terminated the call. - All
- Call Party (Internal Extension)
- Call Party (External Number)
- PBX Others
Note: PBX Others indicates the call was terminated by a party not involved in the call. For example, this could happen when an incoming call is not answered within the maximum waiting time, or when it is interrupted by an emergency call.Call Legs Specify the number of call legs. You can enter numbers,
-,=,<,<=,>,>=, and number ranges to specify a range.Outbound Caller ID Enter the Outbound Caller ID. PIN Code Enter the PIN code. - You can obtain CDR ID from the CDR
list.
- In the Top filters section, filter call leg
data using top filters.
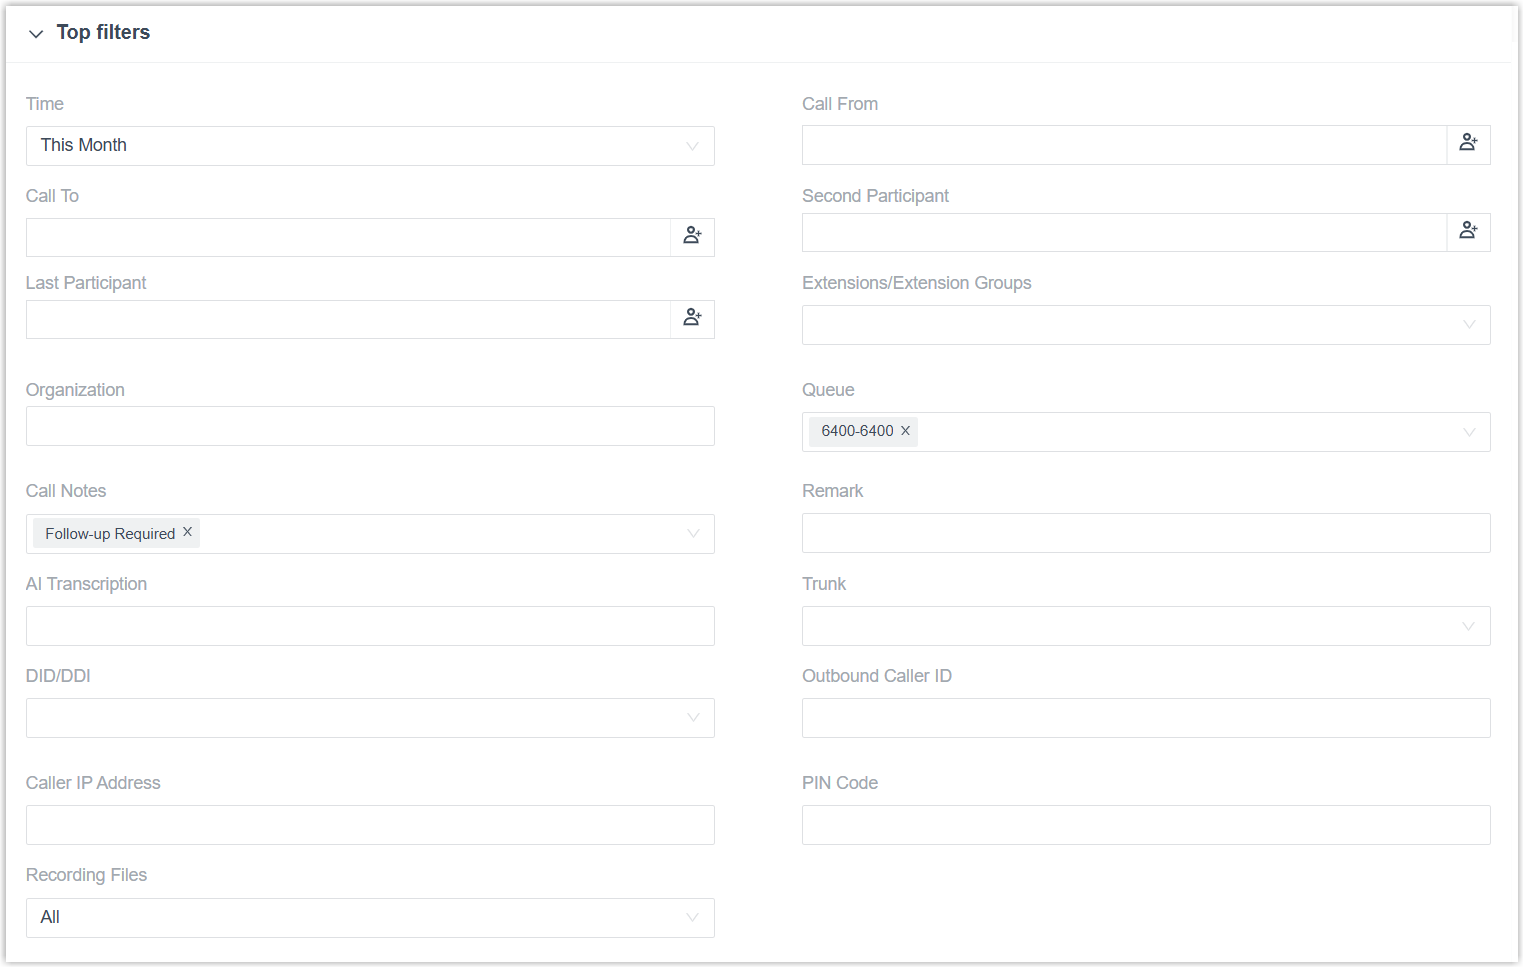
Setting Description Time Select a time period, or click Custom to set a custom time range. Note: If you choose to customize a time range, you can specify an exact time period by clicking Select Time.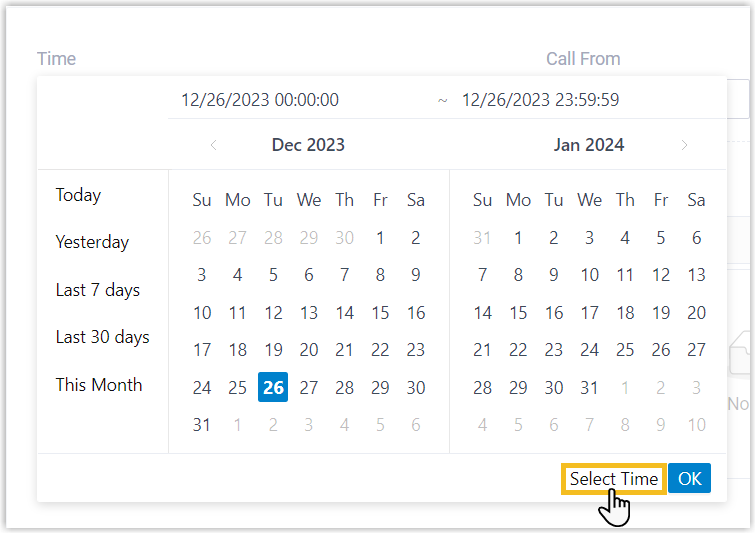
Call From Enter the caller's number or name, or click  to select
extension(s), extension group(s),
organization(s).
to select
extension(s), extension group(s),
organization(s).Call To Enter the callee's number or name, or click to select
extension(s), extension group(s),
organization(s).Second Participant Enter the callee's number or name for the second call leg, or click to select extension(s),
extension group(s), organization(s).Last Participant Enter the callee's number or name for the last call leg, or click to select extension(s),
extension group(s), organization(s).Extensions/Extension Groups Select extension(s) or extension group(s). Organization Select department(s). Queue Select queue(s). Call Notes Select disposition codes. Remark Enter the remark added in the last call leg. AI Summary Enter keywords from the AI summary content. AI Receptionist Processing Result Select the processing result of the AI receptionist calls. - Resolved: The AI receptionist successfully resolved the caller's issue without transferring the call.
- Transferred: The AI receptionist transferred the call to another destination.
- Unresolved: The AI receptionist neither resolved the caller's issue nor transferred the call.
- No Processing Result: The call ended abnormally due to an error or timeout, and no processing result could be determined.
Trunk Select a trunk. DID/DDI Select DID number(s). Caller IP Address Enter the caller's IP address. Recording Files Select an option to include all CDRs, CDRs with recordings, or CDRs without recordings. - In the Schedule Information section,
configure the CDR delivery settings.
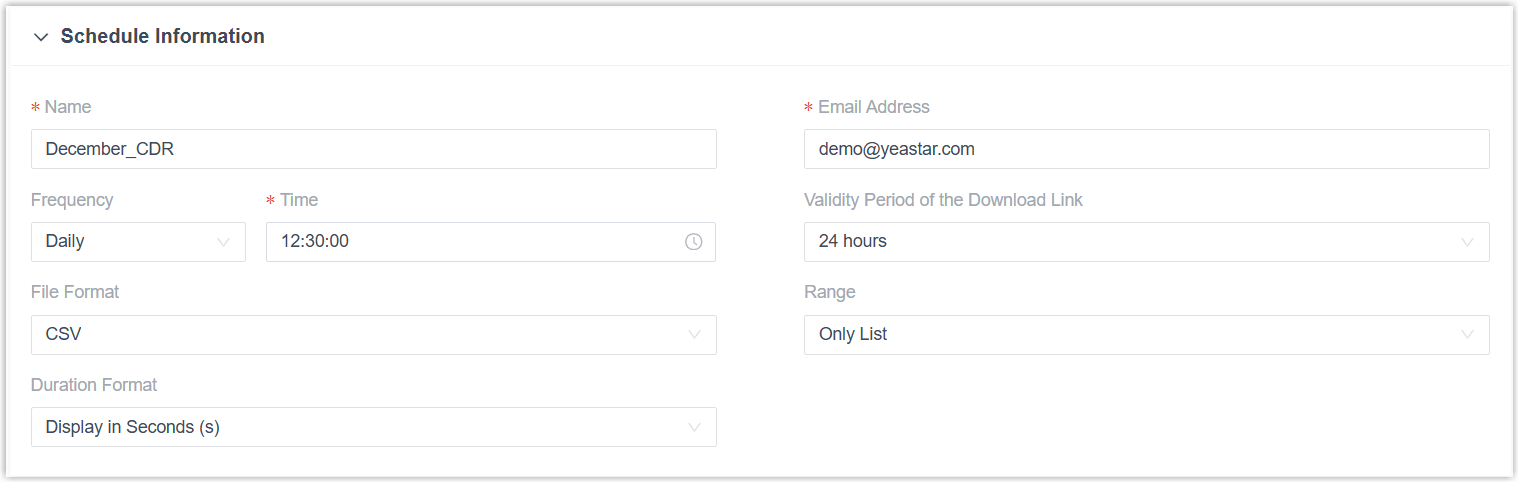
Setting Description Name Enter a name to help you identify the task. Email Address Enter recipients' email addresses. Note: You can set up to 10 email addresses; Separate multiple email addresses by semicolon;.Frequency Set how often to send CDR. - Once: If selected, the system will send the CDR immediately after you save the task.
- Daily: If selected,
choose a specific time from the drop-down list.
The system will send the CDR at the selected time each day.
- Weekly: If selected,
choose a specific day of the week and select a
specific time from the drop-down list.
The system will send the CDR at the selected day and time each week.
- Monthly: If selected,
choose a specific day of the month and select a
specific time from the drop-down list.
The system will send the CDR on the selected day and time each month.
Validity Period of the Download Link Set the validity period of the download link for the scheduled CDR. After the link expires, the recipients can NOT access and download the CDR via the link.
File Format Specify the download format for CDR. - CSV
- XLS
- HTML
Range Specify the download range for CDR. - Only List
- List & Call Legs Data
- List, Call Legs, and Timeline
Data
Duration Format Specify the display format for all duration-related fields. - Display in Second (s)
- Display as HH:MM:SS
- Click Save.
- In the Column header filters section, filter
CDR list data using column-based filters.
Result
- The task is scheduled and displayed in the list.

- When it comes to the scheduled time, the specified CDR will be automatically
sent to the recipients' mailboxes. You can also check the CDR in the
Scheduled Logs tab - click
 to preview
it online, or click
to preview
it online, or click  to download it for offline
viewing.
to download it for offline
viewing.