Configure Network for Remote LDAP Access by a Yeastar FQDN
With a Yeastar FQDN, you can remotely access the LDAP server on PBX via secure LDAP connection without the need of configuring public IP and port forwarding for the PBX. This topic describes how to configure network for remote LDAP access via FQDN.
Prerequisites
You have subscribed any of the following plans:
- Standard Plan
- Enterprise Plan
- Ultimate Plan
Procedure
- Log in to PBX web portal, go to .
- Turn on Yeastar FQDN.
- In the Fully Qualified Domain Name
(FQDN) field, set up an FQDN domain name.
In this example, set FQDN to
yeastardocs.ras.yeastar.com.
- Select a domain name from the drop-down list.
- Enter a host name in the first field.Note: Think twice before you enter the hostname. The FQDN cannot be changed after you save the configurations.
- Enable remote LDAP access feature and configure usage permission.
- In the Features section, go to the Remote Access tab.
- Click
 beside the LDAP
Access.
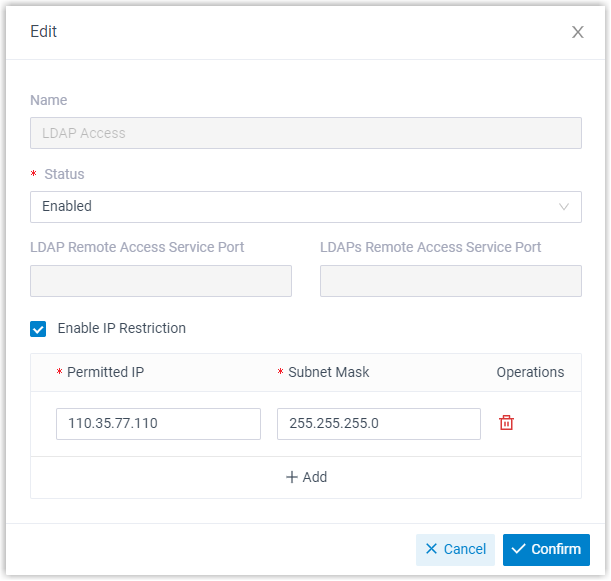
 - In the pop-up window, complete the following settings according to
your need.

- Name: Display the remote access feature name, and cannot be edited.
- Status: Select Enabled.
- Remote Access Service Port: The remote access ports will be assigned by Remote Access Service automatically.
- Enable IP
Restriction: Optional. Select the
checkbox of the option, and add at least one permitted
IP address and subnet mask.
If you configure this option, only the permitted IP address(es) can use the remote access feature.
- Click Confirm.
- Click Save.
Result
- The Remote Access Service automatically assigns ports for remote LDAP
access.

- You can set up the PBX as an LDAP server via the FQDN, allowing an IP phone to remotely and securely query contacts' information within the PBX's directory. For more information of the remote LDAP settings, see Set up Yeastar P-Series PBX System as an LDAP Server.