Install Yeastar P-Series Software Edition on Amazon AWS from AWS Console
Amazon VPC is one of the services provided by Amazon Web Services (AWS), where you can create and manage virtual machines. This topic describes how to install and run Yeastar P-Series Software Edition on an AWS instance via Amazon VPC console.
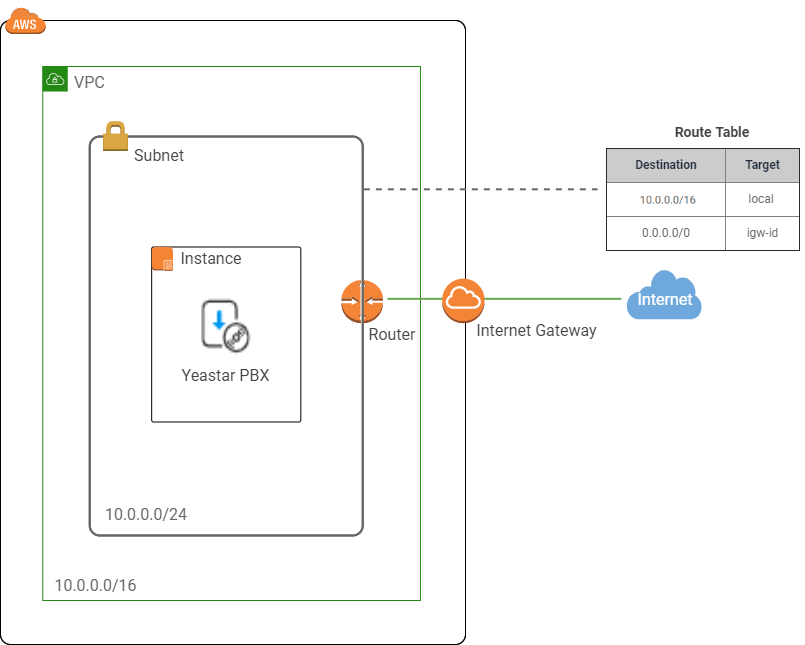
AWS Diagram
The following diagram helps you understand the architecture and the process of building and running Yeastar P-Series Software Edition within AWS.
Procedure
Video Tutorial
Step 1. Create a VPC
Create a Virtual Private Cloud (VPC) to provision a logically isolated section of the AWS.
- Open Amazon VPC console.Note: Take note of the region where you will create a VPC. Make sure you stay working in the region before you finish the installation task.
- On the left navigation bar, click Your VPCs, then
click Create VPC.

- Set up the VPC.
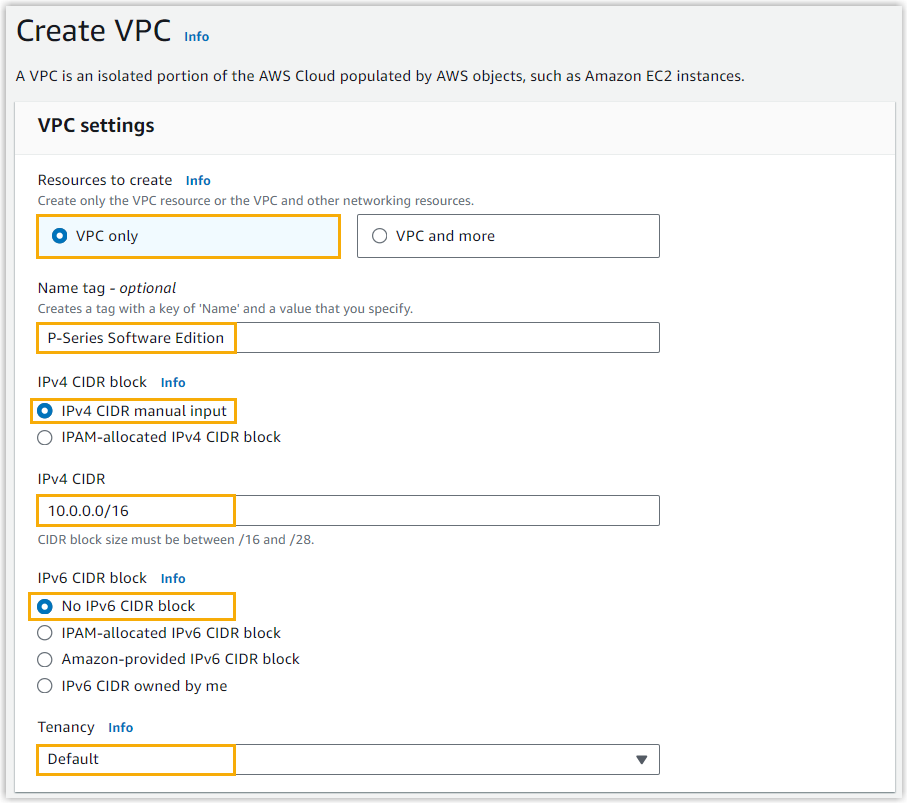
- Resources to create: Select VPC only.
- Name tag: Enter a name to help you identify the VPC. In this example, enter P-Series Software Edition.
- IPv4 CIDR block: Select IPv4 CIDR manual input.
- IPv4 CIDR: Specify an IPv4 CIDR block for the VPC. In this example, enter 10.0.0.0/16.
- IPv6 CIDR block: Select No IPv6 CIDR block.
- Tenancy: Select Default.
- At the bottom of the page, click Create VPC.
The VPC is created and displayed on Your VPCs list.
Step 2. Configure the VPC
- Create a subnet so that you can launch tasks and services in a subnet.
- On the left navigation bar, click
Subnets, then click Create
Subnet.

- Set up a subnet as follows, then click Create
subnet at the bottom of the page.
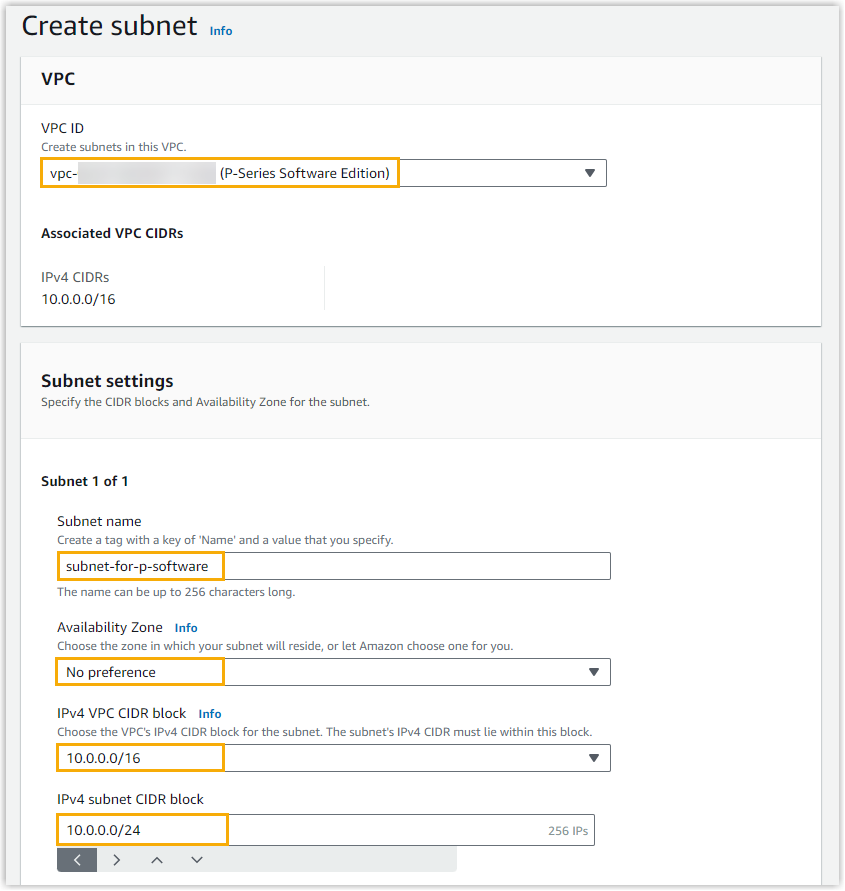
Setting Description VPC ID Select the VPC that is created for Yeastar P-Series Software Edition. In this example, select P-Series Software Edition.
Subnet name Enter a name to help you identify the subnet. In this example, enter subnet-for-p-software.
Availability Zone Select a zone in which your subnet will reside or leave the default No Preference to let AWS choose a zone for you. In this example, select No Preference.
IPv4 VPC CIDR block Select the VPC's IPv4 CIDR block. In this example, select the IPv4 CIDR block you specified when creating the VPC for Yeastar P-Series Software Edition.
IPv4 subnet CIDR block Specify an IPv4 CIDR block for your subnet. Note: The IPv4 block sizes must be between a /16 netmask and /28 netmask, and must be no larger than your VPC's IPv4 CIDR block.In this example, enter 10.0.0.0/24.
The subnet is created and displayed on Subnets list.
- On the left navigation bar, click
Subnets, then click Create
Subnet.
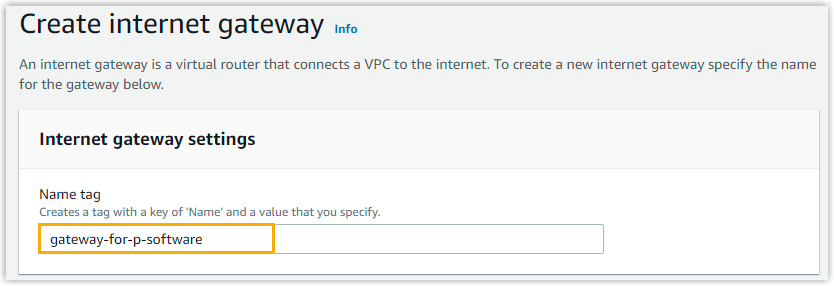
- Create an Internet gateway to allow the communication between your VPC and
the Internet.
- On the left navigation bar, select Internet
gateways, then click Create internet
gateway.

- In the Name tag field, enter a name to
help you identify the gateway, then click Create
internet gateway at the bottom of the page.
In this example, enter gateway-for-p-software.
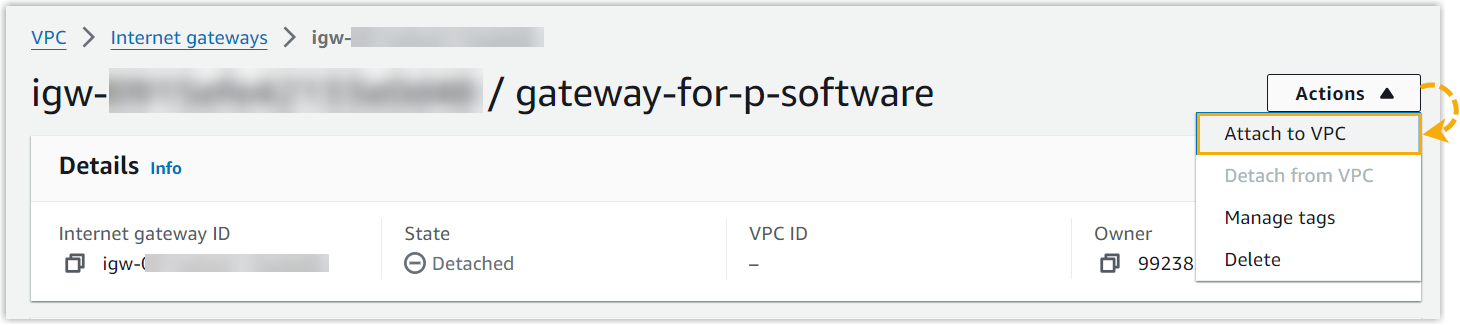
You are redirected to the details page of the created internet gateway.
- At the top-right corner, select Attach to
VPC from the drop-down list of
Actions.
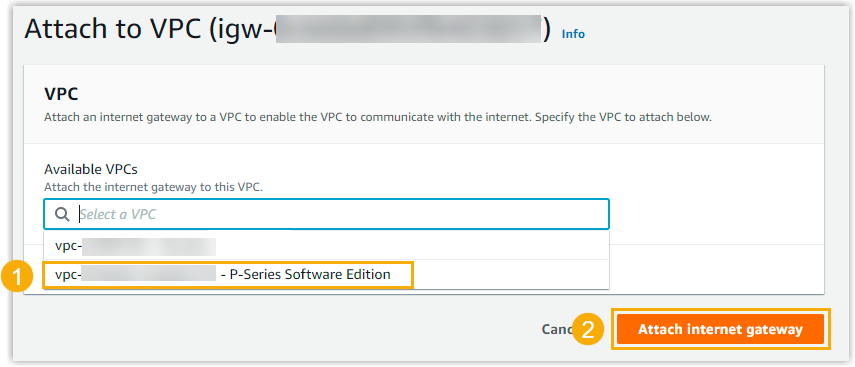
- Select the VPC that is created for Yeastar P-Series Software Edition, then click
Attach internet gateway.
The Internet gateway is created and associated with your VPC.
- On the left navigation bar, select Internet
gateways, then click Create internet
gateway.
- Create a route table, so that network traffic from the subnet can be directed.
- On the left navigation bar, select Route
tables, then click Create route
table.

- Configure the new route table, then click Create
route table.
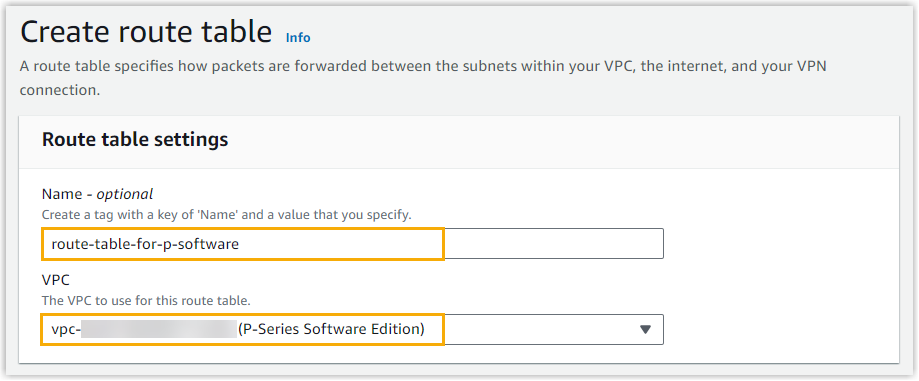
- Name: Enter a name to help you identify the route table. In this example, enter route-table-for-p-software.
- VPC: Select the VPC that is created for Yeastar P-Series Software Edition. In this example, select P-Series Software Edition.
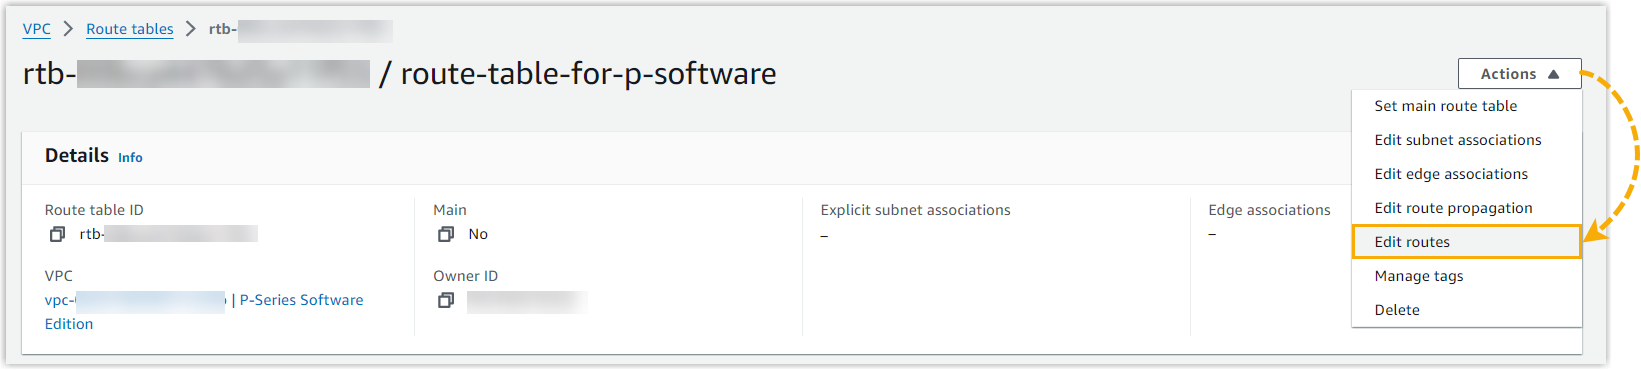
You are redirected to the details page of the created route table.
- Add a rule to access the Internet through an Internet gateway.
- At the top-right corner, select Edit
routes from the drop-down list of
Actions.
- Click Add route, set
Destination as
0.0.0.0/0, and set
Target to the Internet
gateway that you have created.
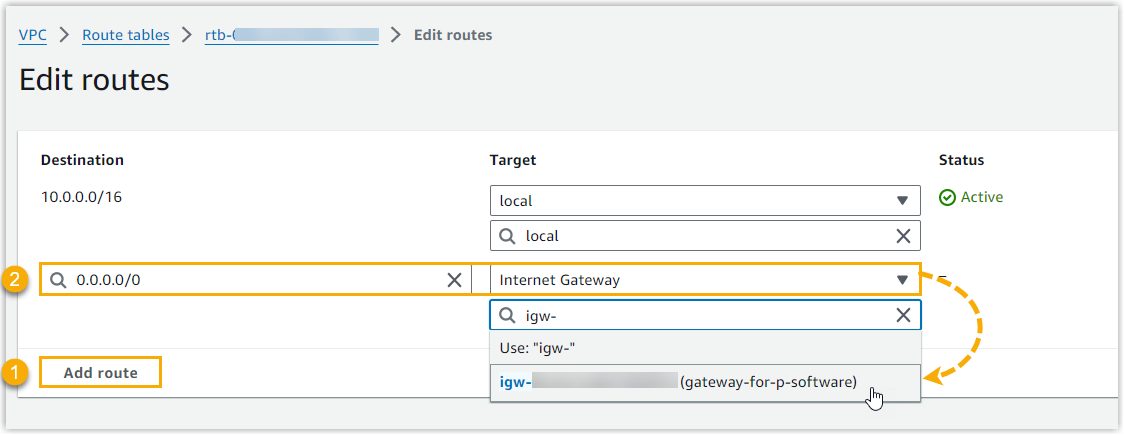
- Click Save Changes.
- At the top-right corner, select Edit
routes from the drop-down list of
Actions.
- Associate route table with the subnet for P-Series Software Edition.
- At the top-right corner, select Edit
subnet associations from the drop-down
list of Actions.

- Select the subnet for P-Series Software
Edition.
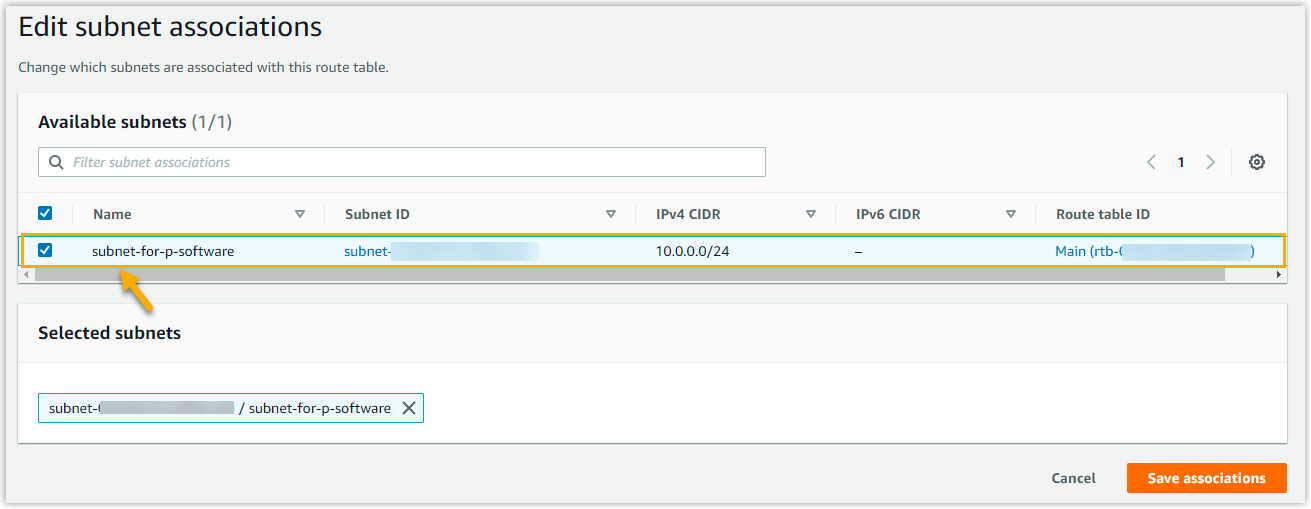
- Click Save associations.
- At the top-right corner, select Edit
subnet associations from the drop-down
list of Actions.
- On the left navigation bar, select Route
tables, then click Create route
table.
Step 3. Install Yeastar P-Series Software Edition on an instance
- Log in to your Amazon EC2 console.
- On the left navigation bar, go to , choose Launch instances.

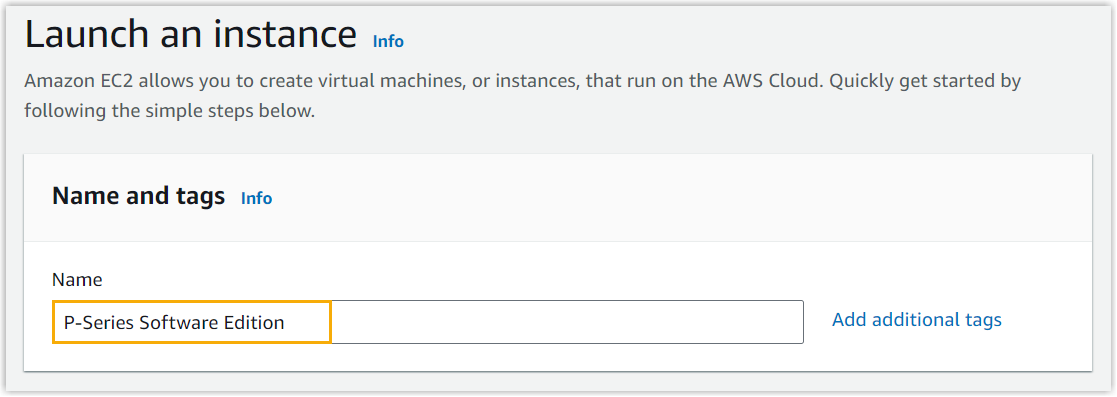
- In Name and tags section, enter a name to help you
identify the instance.
-
In the Application and OS Images (Amazon Machine Image) section, select the AMI.
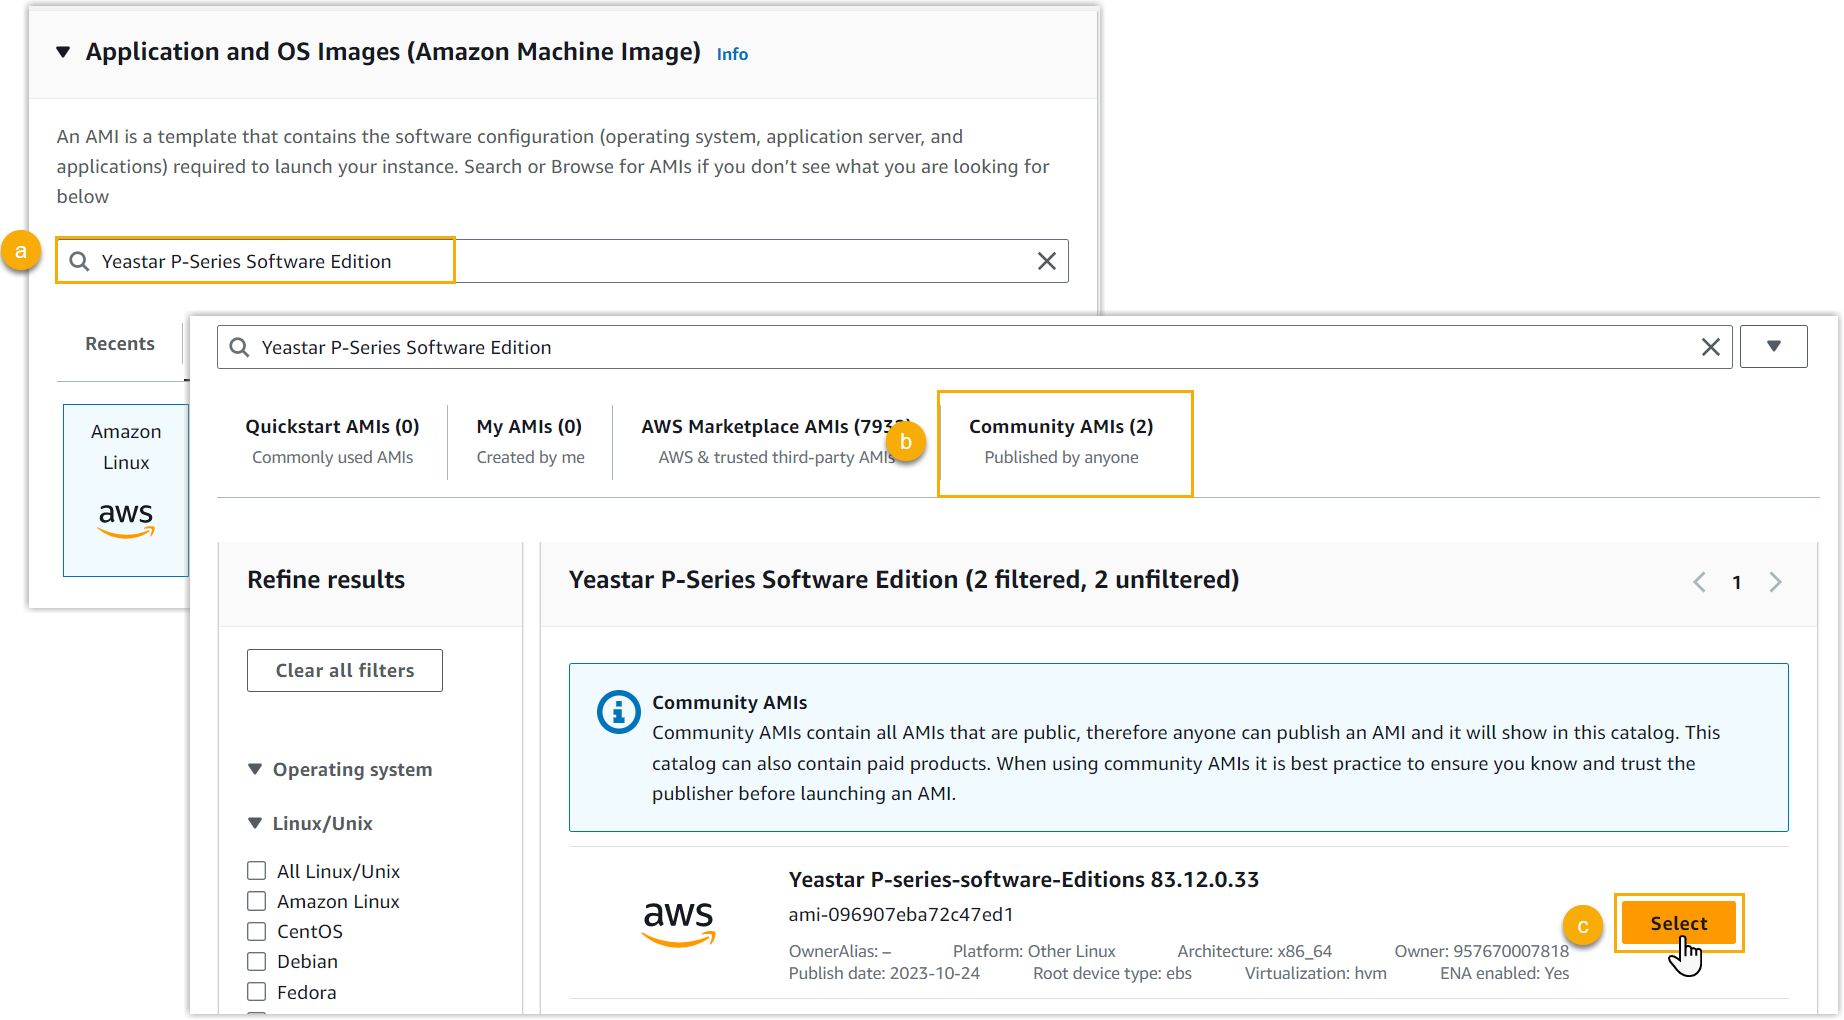
- In the search bar, enter Yeastar P-Series Phone
System, and press
Enterkey. - Click the AWS Marketplace AMIs tab.
- Click Select beside the desired AMI.
- In the search bar, enter Yeastar P-Series Phone
System, and press
- In the Instance
type section, choose the instance based
on the Extensions (EXT) and Concurrent Calls
(CC) of your PBX system.
1-20 EXT (1-5 CC)
21-50 EXT (6-13 CC)
51-250 EXT (14-63 CC)
251-500 EXT (64-125 CC)
501-1000 EXT (126-250 CC)
EXT > 1000 (CC > 250)
Recommended Instance Type t3.small t3.medium c5a.xlarge c5a.2xlarge c5.2xlarge Contact Yeastar 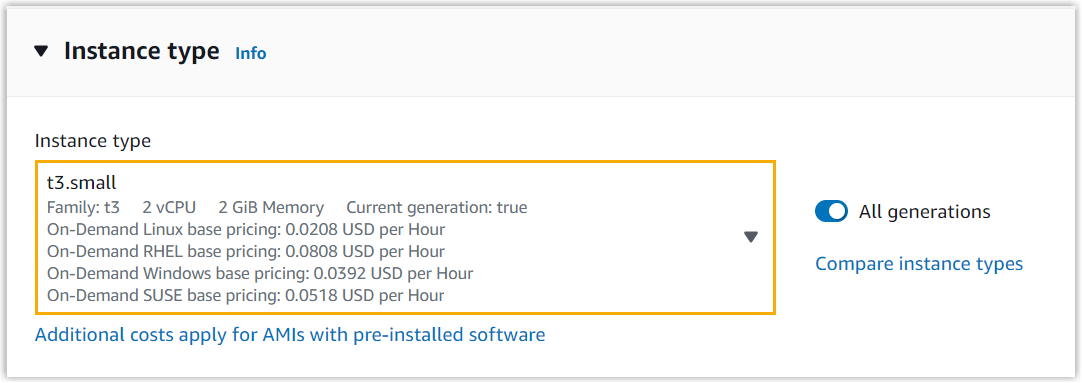
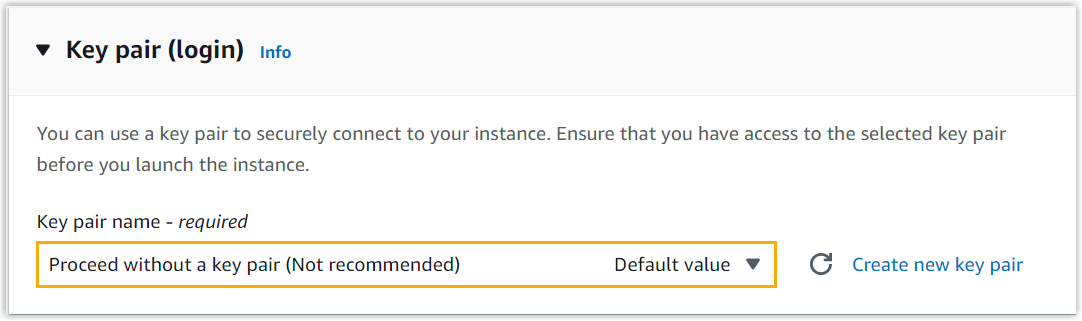
- In the Key pair (login) section, set the
Key pair name to Proceed without a key
pair.
- In the Network settings section, click
Edit and configure the network settings.

- Set up the basic network configurations.
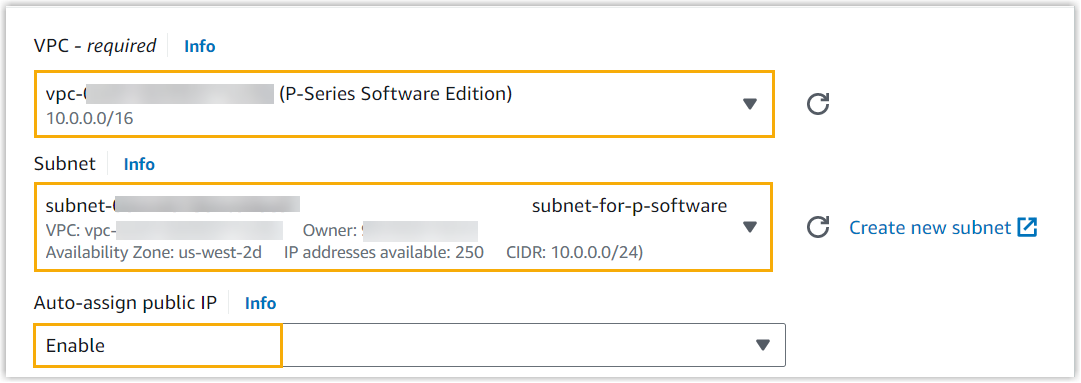
- VPC: Select the VPC that is created for Yeastar P-Series Software Edition. In this example, select P-Series Software Edition.
- Subnet: Select the subnet that is created for Yeastar P-Series Software Edition. In this example, select subnet-for-p-software.
- Auto-assign public IP: Select Enable.
- In the Firewall (security groups) section,
select Create security group, and configure
the following security settings.
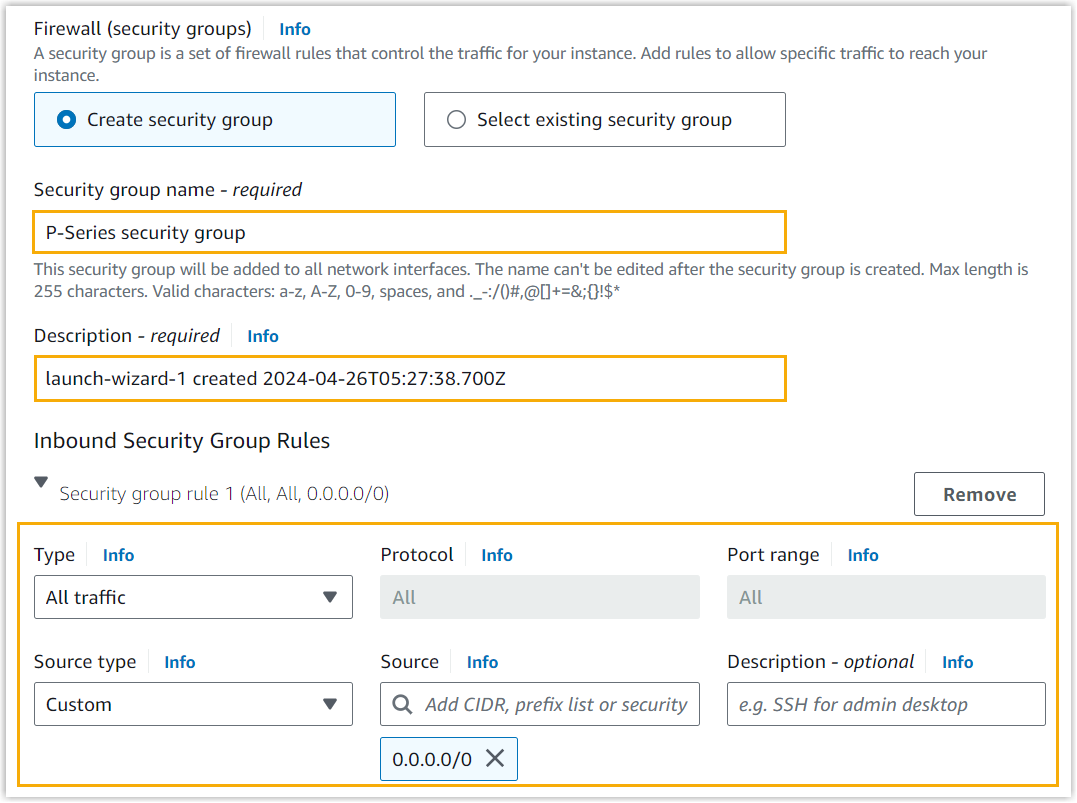
- Security group name: Enter a name to help you identify the security group.
- Description: Enter a description for the security group.
- Inbound Security Group Rules: Add the
following rule to allow all the IP addresses to access the
P-Series Software Edition.
Type Source Type Source All traffic Custom 0.0.0.0/0
- Set up the basic network configurations.
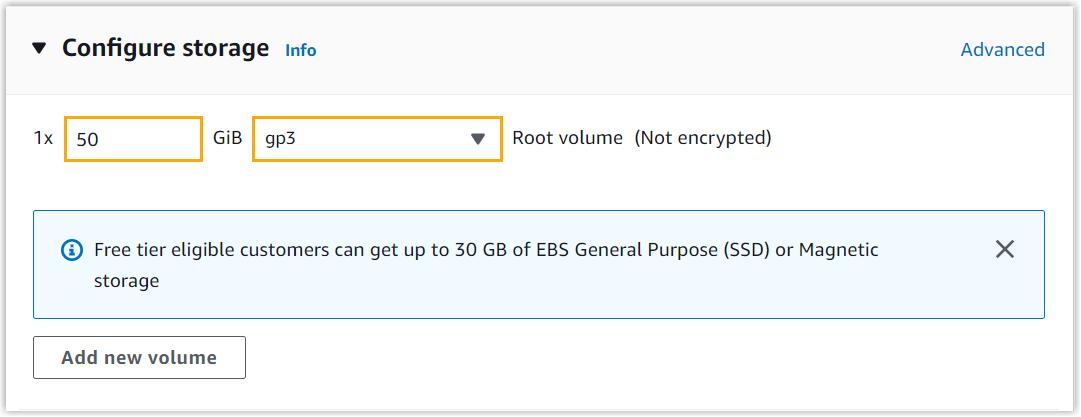
- In Configure storage section, allocate at least 40GB
to the instance. In this example, allocate
50GB.Important: We recommend that you use an external storage device to store call recordings, as storing locally may cause recording issues.
- At the bottom-right corner, click Launch
instance.
The instance is created successfully.
Result
On , if Status check is displayed as 2/2 checks passed, it indicates that the PBX system is installed successfully.
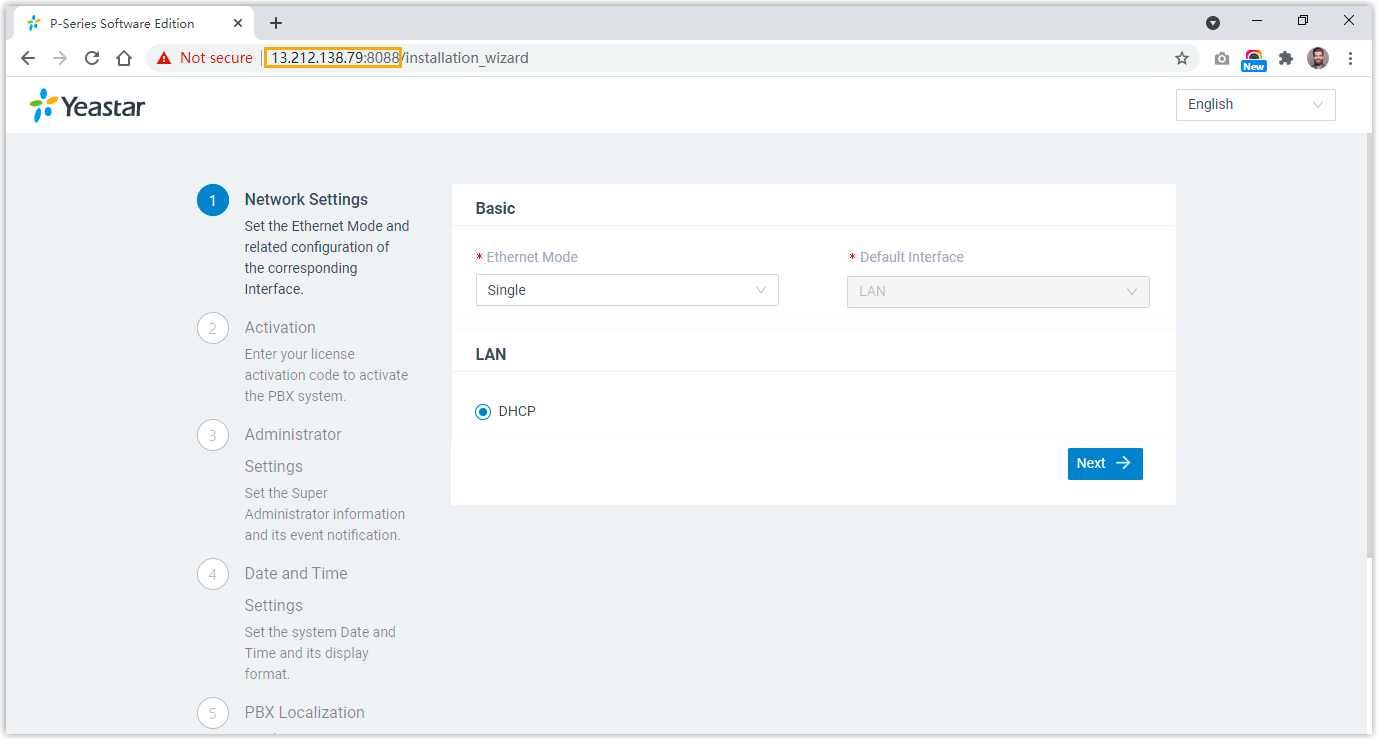
Open a web browser, enter the public
IP address of the PBX https://{public IP address}:8088 in the
address bar, then press Enter
key.
What to do next
-
Activate and set up Yeastar P-Series Software Edition to make it ready for use. You can do this using one of the following methods:
- Complete setup via Web GUI using the installation wizard
- Continue with the installation wizard in the Web GUI. This method only supports to complete the settings included in the wizard.
- Complete setup via SSH using a prepared XML file
-
Upload a prepared XML file to the PBX via SSH. This method allows you to complete the initial setup and apply additional supported PBX settings, such as creating extensions, trunks, inbound routes, and more.
- Download the XML configuration file and edit it as needed.
- Upload the XML configuration file to the designated directory and reboot the PBX to take effect.
For more information, see Activate and Set up Yeastar P-Series Software Edition Using XML Configuration File.
- To ensure remote extensions can register and function properly, and users
can access the PBX via the public URL provided in the system email, you need
to perform one of the following actions:
- Enable Fully Qualified Domain Name (FQDN) for the PBX and allow extensions to use FQDN for remote registration.
- Configure Public IP and Ports on the PBX and enable remote registration for extensions (Path: ).
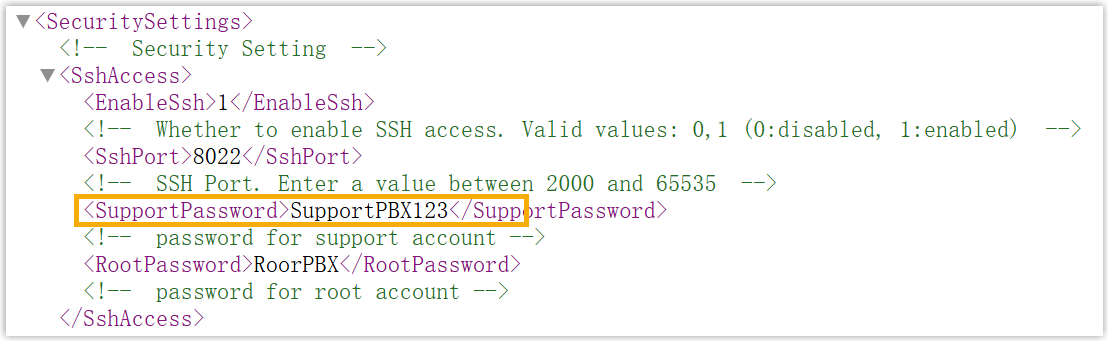
- Root Account: Username is
root, and password is the credential configured in XML configuration file.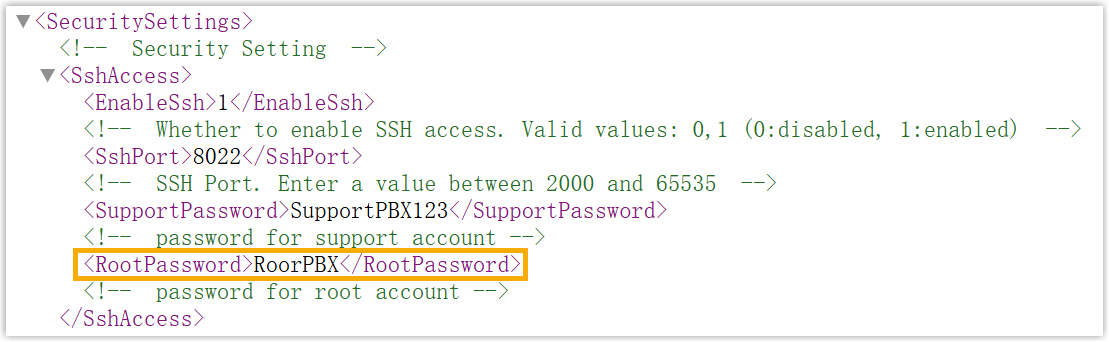
- Support Account: Username is
support, and password is the credential configured in PBX web portal (Path: ) or in XML configuration file.Figure 1. Support password in PBX web portal 
Figure 2. Support password in XML configuration file