Install Yeastar P-Series Software Edition on Alibaba Cloud
Elastic Compute Service (ECS) is one of the services provided by Alibaba Cloud, where you can create and run instances (virtual machines). This topic describes how to install and run Yeastar P-Series Software Edition on an Alibaba Cloud instance.
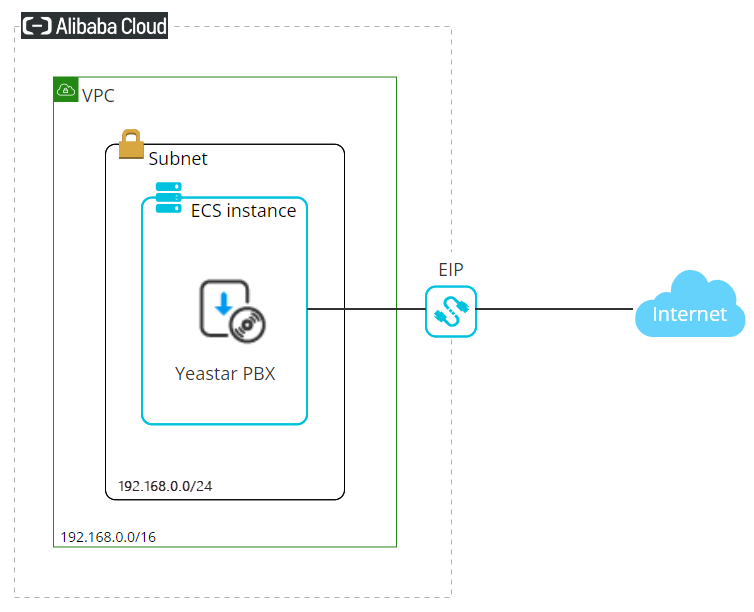
Alibaba Cloud Diagram
Procedure
Step 1. Create a VPC
Create a Virtual Private Cloud (VPC) to provision a logically isolated section of the Alibaba Cloud for Yeastar P-Series Software Edition.
- Log in to the VPC console.
- In the top navigation bar, select the region where you want to deploy the
VPC.Important: Make sure you stay working in the region before you finish the installation task.

- On the VPCs page, click Create VPC.
- Set up the VPC and the vSwitch.
- Set up the VPC.
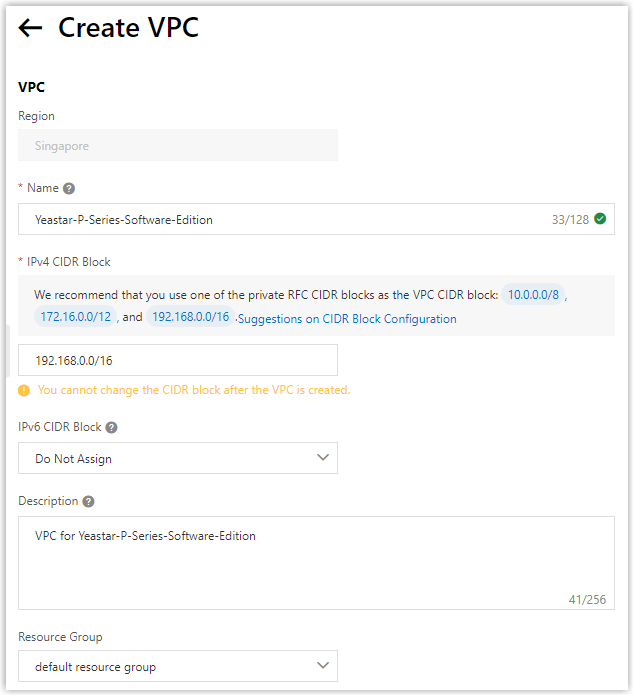
- Name: Enter a name to help you identify the VPC. In this example, enter Yeastar-P-Series-Software-Edition.
- IPv4 CIDR Block: Specify an IPv4 CIDR block for the VPC. In this example, enter 192.168.0.0/16.
- IPv6 CIDR Block: Select Do Not Assign.
- Description: Optional. Enter a description for the VPC.
- Resource Group: Select a resource group to group the VPC. In this example, select default resource group.
- Set up the vSwitch. vSwitch will be used to create a subnet of the
VPC.

- Name: Enter a name to help you identify the subnet. In this example, enter Yeastar-P-Series-Software-Edition-subnet.
- Zone: Select a zone for the subnet.
- IPv4 CIDR Block: Specify an IPv4 CIDR block for the vSwitch. In this example, enter 192.168.0.0/24.
- Set up the VPC.
- Click OK.
The VPC and vSwitch are created and displayed on the VPCs list and vSwitch list.


Step 2. Create a security group
Create a security group to control the traffic that is allowed to reach and leave the ECS instance.
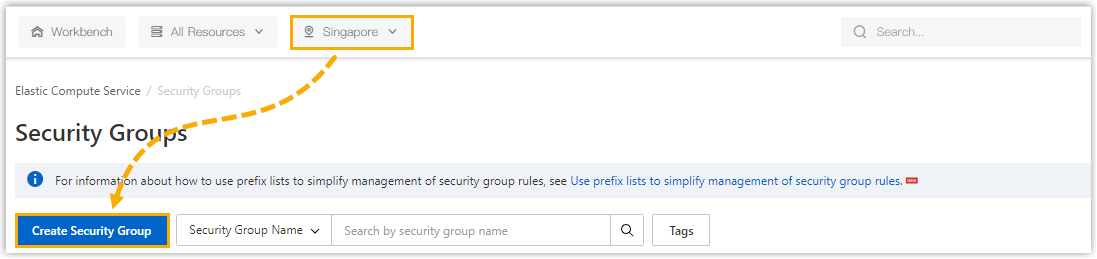
- Log in to the ECS console.
- In the left-side navigation pane, click .
- In the top navigation bar, select the same region as the created VPC, then
click Create Security Group.
- Configure the security group.
-
In the Basic Information section, set the following parameters:

- Security Group Name: Enter a name to help you identify the security group. In this example, enter Yeastar-P-Series-Software-Edition-security-group.
- Network: Select the VPC created for Yeastar P-Series Software Edition. In this example, select Yeastar-P-Series-Software-Edition.
- Security Group Type: Select Basic Security Group.
- In the Access Rule section, set up access
rules for the ECS instance.
By default, basic security groups allow all outbound traffic and deny all inbound traffic. You need to set up an inbound access rule to allow the traffic to reach your instance.
- Click Inbound tab, and then click
Quick Add.
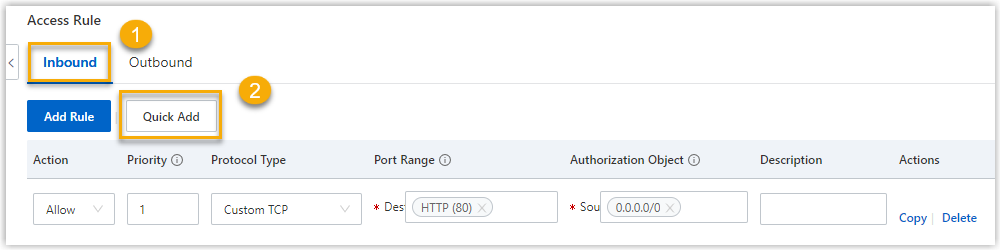
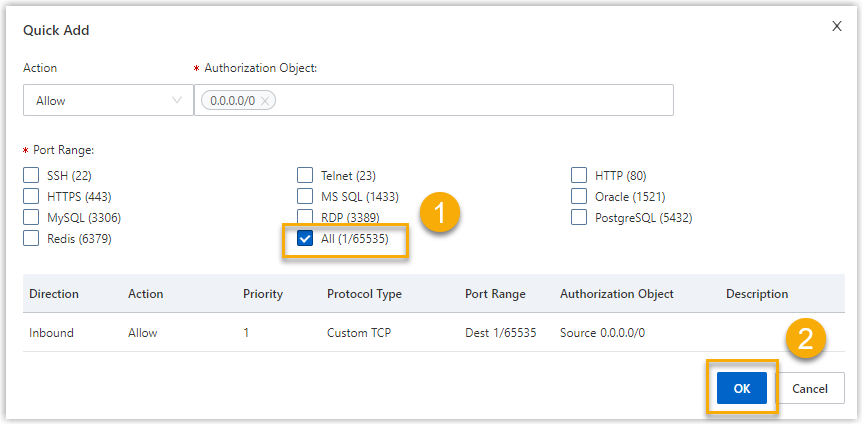
- On the Quick Add page, select
All (1/65535) as the port range,
and click OK.Tip: The default values of Action (Allow) and Authorization Object (0.0.0.0/0) indicate that all IP addresses are allowed to access your instance.
- Click Inbound tab, and then click
Quick Add.
-
- Click Create Security Group.
Step 3. Install Yeastar P-Series Software Edition on an instance
- Log in to the ECS console.
- In the left-side navigation pane, click , then click Create Instance.
- On the Basic Configurations page, set the following
parameters, then click Next.
- Billing Method: Select a billing method for
the instance.
For more information, see Billing Methods Overview.
- Region: Select the same region as the created VPC.
- Instance Type: Select an instance based on
the Extensions (EXT) and Concurrent Calls (CC) of your
PBX system.
1-20 EXT (1-5 CC)
21-50 EXT (6-13 CC)
51-250 EXT (14-63 CC)
251-500 EXT (64-125 CC)
501-1000 EXT (126-250 CC)
EXT > 1000 (CC > 250)
Recommended Instance Type ecs.u1-c1m1.large ecs.n4.large ecs.u1-c1m1.xlarge ecs.u1-c1m1.2xlarge ecs.n4.2xlarge Contact Yeastar - Selected Instance Type Quantity: Retain the default value 1.
- Image: Click Shared
Image and select
Yeastar-P-Series-Software-Edition.

- Storage: Select a system disk type and
storage capacity based on the Extensions (EXT) and
Concurrent Calls (CC) of your PBX system.
1-20 EXT (1-5 CC)
21-50 EXT (6-13 CC)
51-250 EXT (14-63 CC)
251-500 EXT (64-125 CC)
501-1000 EXT (126-250 CC)
EXT > 1000 (CC > 250)
Storage Call Recording Disabled 40 GB or higher
40 GB or higher
50 GB or higher
100 GB or higher
200 GB or higher
Contact Yeastar Call Recording Enabled 1 GB of storage holds approximately 1000 minutes of recorded calls. You can set up the storage based on your recording usage.
- Billing Method: Select a billing method for
the instance.
- On the Networking page, set up the networking for the
instance, then click Next.
- Network Type: Select the VPC and the vSwitch created for Yeastar P-Series Software Edition.
- Public IP Address: Do NOT select the checkbox
of Assign Public IPv4 Address.
 Tip: We will use Elastic IP Address (EIP) for network access instead of the assigned public IP address, as the assigned IP address will be changed every time the ECS instance is restarted from being stopped.
 - Security Group: Select the security group created for Yeastar P-Series Software Edition.
- Elastic Network Interface and IPv6: Retain the default value.
- On the System Configurations page, set up the system
configurations, then click Next.
- Logon Credentials: Set a password or an SSH
key pair as a credential for this instance.
For more information, see Configure Logon Credentials.
- Instance Name: Specify the instance name that will display in the ECS console.
- Host: Specify the host name that will display within the operating system.
- Logon Credentials: Set a password or an SSH
key pair as a credential for this instance.
- On the Grouping page, add tags or group the instance to simplify future management, then click Next.
- Read and select ECS Terms of Service and click
Create Order.
The instance is created and displayed in the Instances list, and Yeastar P-Series Software Edition was installed on the instance successfully.
Step 4. Create an EIP and associate it with ECS instance
An Elastic IP Address (EIP) is a reserved public IP address that can be associated with the ECS instance, allowing the PBX on the instance to communicate with the Internet.
- Log in to the Elastic IP Address console .
- On the Elastic IP Addresses page, click Create EIP.
- Configure and create the EIP.
- On the purchase page, set the following parameters, and click
Buy Now.
- Billing Method: Select a billing method for the EIP. In this example, Pay-As-You-Go is selected.
- Region and Zone: Select the same region as the created VPC.
- Max Bandwidth: Specify a maximum bandwidth value for the EIP.
- Network Traffic: Select a metering method for the EIP.
- Name: Enter a name to help you identify the EIP.
- Resource Group: Specify a resource group for the EIP.
- Quantity: Retain the default value 1.
- Review the order and select the checkbox of Terms of
Service, then click Activate
Now.
The EIP is created and displayed on your Elastic IP Addresses list.

- On the purchase page, set the following parameters, and click
Buy Now.
- Associate the EIP with the ECS instance where the Yeastar P-Series Software Edition is installed.
- In the Actions column of the desired EIP, click Bind
Resource.

- Bind the EIP to the ECS instance created for Yeastar P-Series Software Edition.

- In the Instance Type drop-down list, select ECS Instance.
- In the Resource Group drop-down list,
select the resource group to which the ECS instance
belongs.Note: If the ECS instance is not grouped, then select All.
- In the Select an instance to associate section, select the ECS created for Yeastar P-Series Software Edition.
- Click OK.
- In the Actions column of the desired EIP, click Bind
Resource.
Result
On the Instances page of Alibaba Cloud ECS console, if the Status is displayed as Running and the EIP is displayed in the IP Address column, this means the PBX system is installed successfully and able to communicate with the Internet.

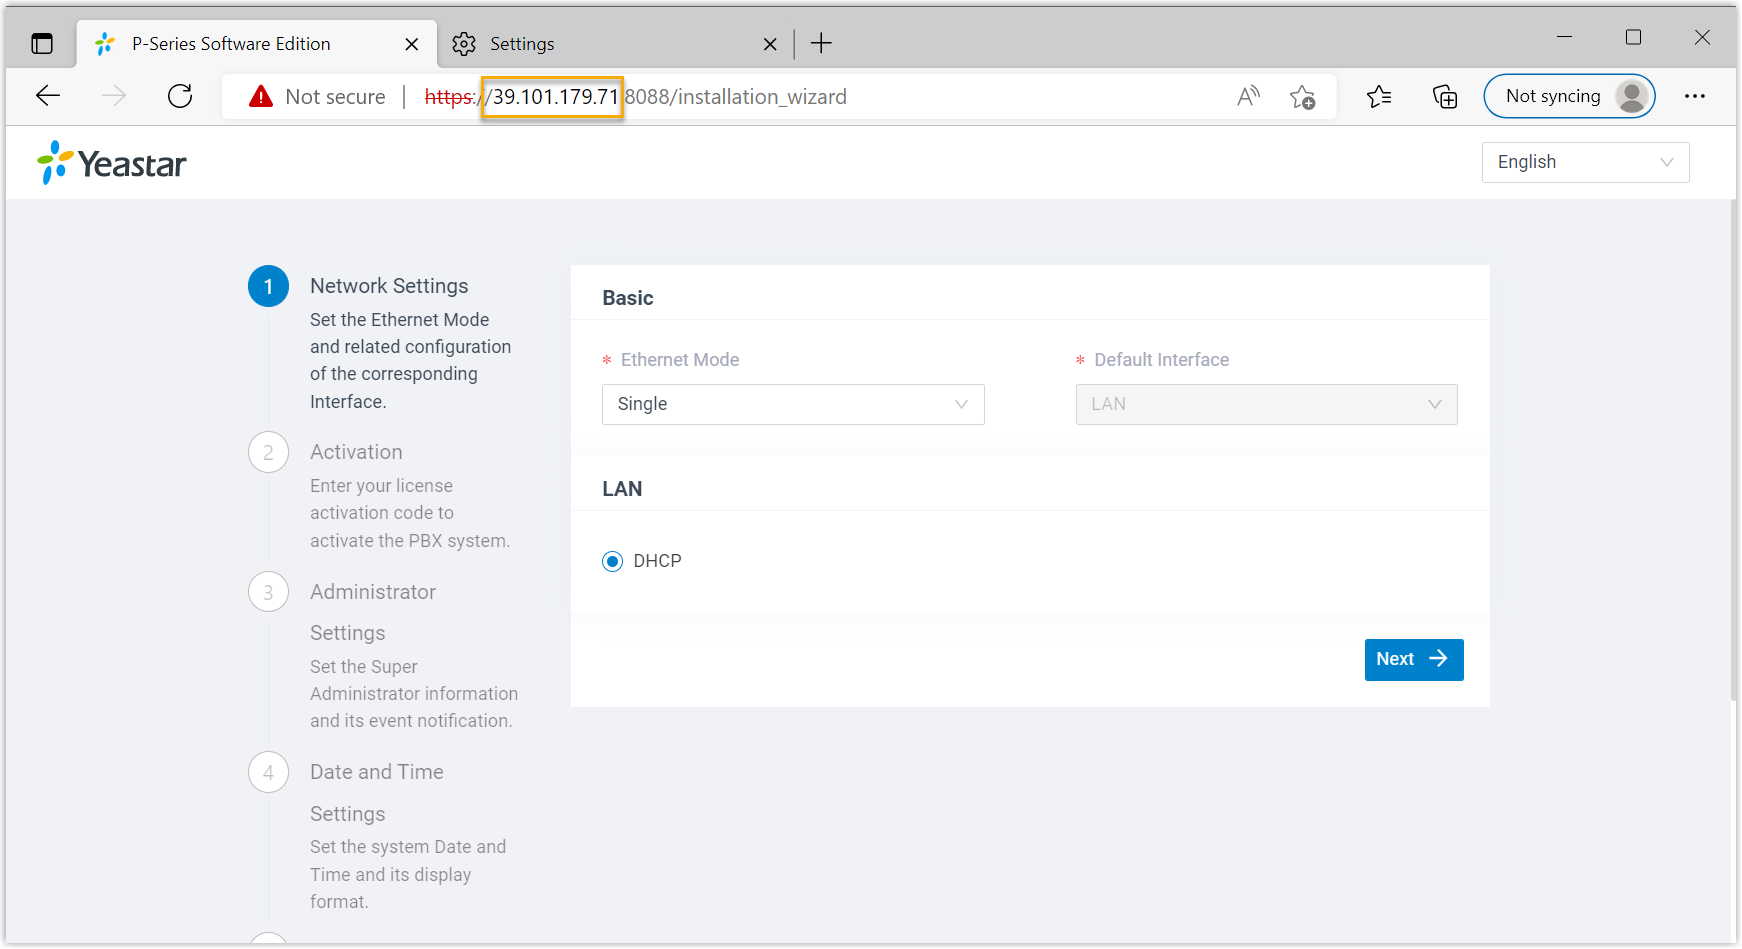
Open a web browser, enter the PBX's IP address and port in the address bar (e.g.
https://39.101.179.71:8088), then press
Enter.
What to do next
-
Activate and set up Yeastar P-Series Software Edition to make it ready for use. You can do this using one of the following methods:
- Complete setup via Web GUI using the installation wizard
- Continue with the installation wizard in the Web GUI. This method only supports to complete the settings included in the wizard.
- Complete setup via SSH using a prepared XML file
-
Upload a prepared XML file to the PBX via SSH. This method allows you to complete the initial setup and apply additional supported PBX settings, such as creating extensions, trunks, inbound routes, and more.
- Download the XML configuration file and edit it as needed.
- Upload the XML configuration file to the designated directory and reboot the PBX to take effect.
For more information, see Activate and Set up Yeastar P-Series Software Edition Using XML Configuration File.
- To ensure remote extensions can register and function properly, and users
can access the PBX via the public URL provided in the system email, you need
to perform one of the following actions:
- Enable Fully Qualified Domain Name (FQDN) for the PBX and allow extensions to use FQDN for remote registration.
- Configure Public IP and Ports on the PBX and enable remote registration for extensions (Path: ).
- Root Account: Username is
root, and password is the credential configured in XML configuration file.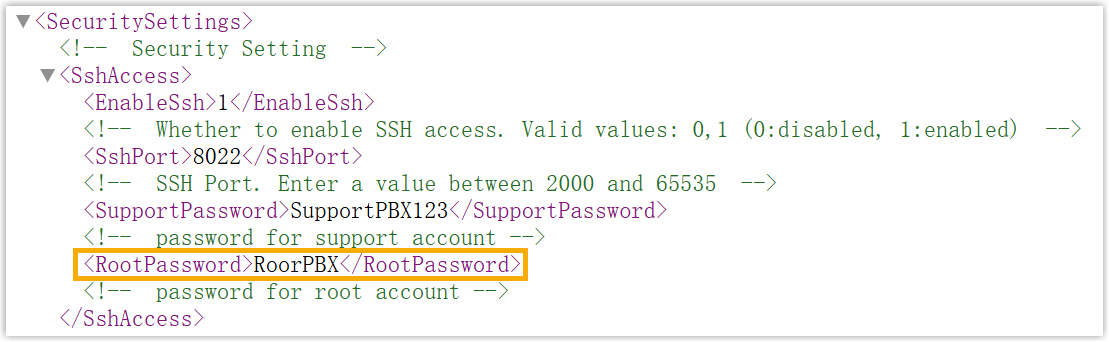
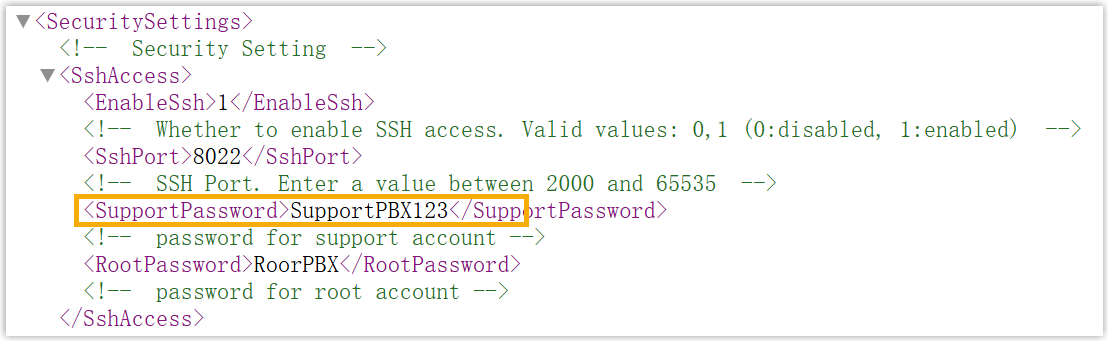
- Support Account: Username is
support, and password is the credential configured in PBX web portal (Path: ) or in XML configuration file.Figure 1. Support password in PBX web portal 
Figure 2. Support password in XML configuration file