Set up Basic Emergency Calling
To ensure that users can make emergency calls for help when an accident occurs, you need to set up emergency calling in Yeastar P-Series Cloud Edition. This topic describes how to set up basic emergency calling in Yeastar P-Series Cloud Edition.
Procedure
- Log in to PBX web portal, go to , click Add.
- In the General section, configure basic settings for
the emergency number.
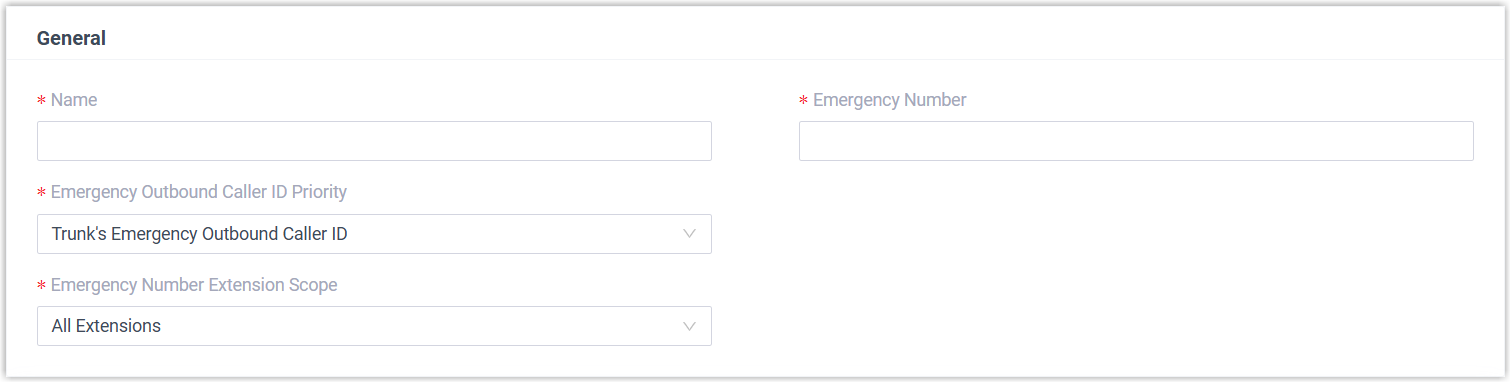
Setting Description Name Enter a name to help you identify the emergency number. Emergency Number Enter the emergency number. Emergency Outbound Caller ID Priority Keep the default setting. Note:- This setting is typically used for enhanced emergency calling and does not affect basic emergency calls.
- For basic emergency calling, you do NOT need to set Emergency Outbound Caller ID for extensions and trunks.
Emergency Number Extension Scope Specify the extensions that are allowed to make emergency calls using the number. - All Extensions: All extensions can make emergency calls using this number through all emergency trunks specified in Outbound Rules.
- Specific Extensions:
Only the specified extensions can make emergency
calls using this number, and only through the
corresponding emergency trunk specified in Outbound
Rules.
If you choose this option, you need to select extensions in the subsequent settings.
Note: For Hot Desking phone: The virtual extension assigned to the phone is not restricted by the setting. However, when a user logs in to the phone as a guest, the user's own extension will be subject to the rule configured here. - In the Outbound Rules section,
configure trunks for emergency calls.
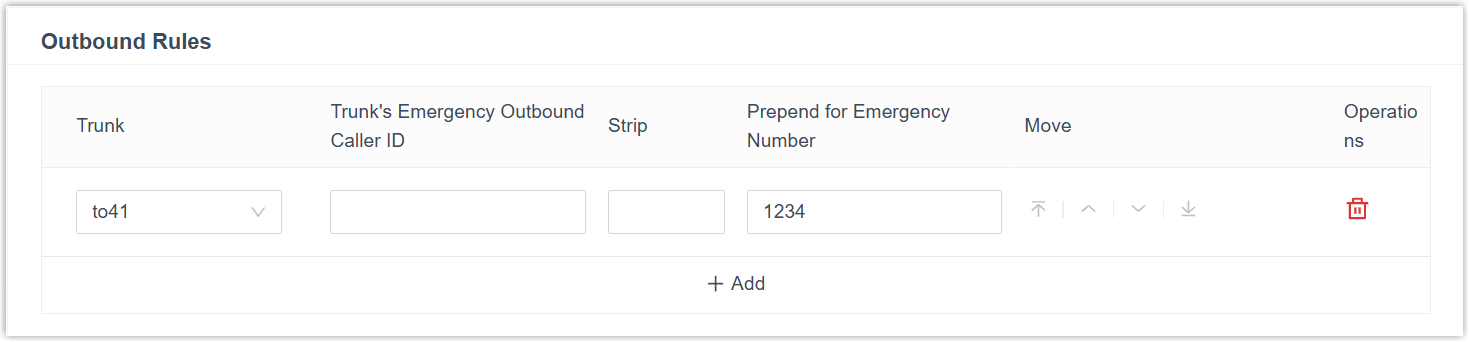 Note: Emergency calls have the highest priority. If the selected trunk is in use, PBX will terminate the ongoing call, and place the emergency call.
- Click Add, then configure the
following settings.
Setting Description Trunk Select a trunk for emergency calls. Trunk's Emergency Outbound Caller ID Keep the default setting. Note: Do NOT set emergency outbound caller ID for basic emergency calling, or the emergency calls may fail.Strip Optional. To strip digits from the beginning of the emergency number, enter a value in this field to define how many digits will be removed. For example, if you set the field to 1, when a user dials 8911, the PBX will remove the first digit (8) from the emergency number and call out 911.
Prepend for Emergency Number Optional. If the ITSP requires a prefix to place outbound calls, enter the provided prefix number in the field. The prefix will be automatically added at the beginning of the dialed emergency number. For example, if you set the field to 1234, when a user dials 911, the PBX system will add 1234 to the emergency number and call out 1234911.
Important: Carefully configure the prefix according to the ITSP's requirements, or the emergency calls may fail.Extensions/Extension Groups Optional. If only specific extensions are allowed to use the number for emergency calls, select extensions authorized to use the emergency trunk. - Repeat step a to add another trunk.
Note: If the first trunk cannot work properly, the PBX will use the second trunk to make calls.
- Click Add, then configure the
following settings.
- Click Save and Apply.
What to do next
After setting up an emergency calling, you may need to consider the following configurations: