Provision Grandstream IP Phone with Yeastar P-Series Cloud Edition
This topic takes Grandstream GPR2602 (firmware: 1.0.3.67) as an example to introduce how to provision a Grandstream IP phone with Yeastar P-Series Cloud Edition.
Requirements
The firmwares of Grandstream IP Phone and Yeastar PBX meet the following requirements.
| Model | Phone Requirement | PBX Requirement |
|---|---|---|
| GAC2500 | 1.0.3.45 or later | 84.11.0.22 or later |
| GAC2570 | 1.0.1.36 or later | 84.11.0.22 or later |
| GHP610 | 1.0.1.71 or later | 84.18.0.18 or later |
| GHP610W | 1.0.1.71 or later | 84.17.0.17 or later |
| GHP611 | 1.0.1.71 or later | 84.18.0.18 or later |
| GHP611W | 1.0.1.71 or later | 84.17.0.17 or later |
| GHP620 | 1.0.1.71 or later | 84.18.0.18 or later |
| GHP620W | 1.0.1.71 or later | 84.17.0.17 or later |
| GHP621 | 1.0.1.71 or later | 84.18.0.18 or later |
| GHP621W | 1.0.1.71 or later | 84.17.0.17 or later |
| GHP630 | 1.0.1.71 or later | 84.18.0.18 or later |
| GHP630W | 1.0.1.40 or later | 84.17.0.17 or later |
| GHP631 | 1.0.1.40 or later | 84.18.0.18 or later |
| GRP2601 | 1.0.3.63 or later | 84.9.0.18 or later |
| GRP2601P | 1.0.3.63 or later | 84.9.0.18 or later |
| GRP2602 | 1.0.3.63 or later | 84.9.0.18 or later |
| GRP2602P | 1.0.3.63 or later | 84.9.0.18 or later |
| GRP2602G | 1.0.3.63 or later | 84.9.0.18 or later |
| GRP2602W | 1.0.3.63 or later | 84.9.0.18 or later |
| GRP2603 | 1.0.3.63 or later | 84.9.0.18 or later |
| GRP2603P | 1.0.3.63 or later | 84.9.0.18 or later |
| GRP2604 | 1.0.3.63 or later | 84.9.0.18 or later |
| GRP2604P | 1.0.3.63 or later | 84.9.0.18 or later |
| GRP2612 | 1.0.7.25 or later | 84.9.0.18 or later |
| GRP2612P | 1.0.7.25 or later | 84.9.0.18 or later |
| GRP2612G | 1.0.7.25 or later | 84.9.0.18 or later |
| GRP2612W | 1.0.7.25 or later | 84.9.0.18 or later |
| GRP2613 | 1.0.7.25 or later | 84.9.0.18 or later |
| GRP2614 | 1.0.7.25 or later | 84.9.0.18 or later |
| GRP2615 | 1.0.7.25 or later | 84.9.0.18 or later |
| GRP2616 | 1.0.7.25 or later | 84.9.0.18 or later |
| GRP2624 | 1.0.7.25 or later | 84.9.0.18 or later |
| GRP2634 | 1.0.7.25 or later | 84.9.0.18 or later |
| GRP2670 | 1.0.7.25 or later | 84.9.0.18 or later |
| GXP1610 | 1.0.7.13 or later | 84.9.0.18 or later |
| GXP1620 | 1.0.7.13 or later | 84.9.0.18 or later |
| GXP1625 | 1.0.7.13 or later | 84.9.0.18 or later |
| GXP1628 | 1.0.7.13 or later | 84.9.0.18 or later |
| GXP1630 | 1.0.7.13 or later | 84.9.0.18 or later |
| GXP2130 | 1.0.11.16 or later | 84.9.0.18 or later |
| GXP2135 | 1.0.11.16 or later | 84.9.0.18 or later |
| GXP2140 | 1.0.11.16 or later | 84.9.0.18 or later |
| GXP2160 | 1.0.11.16 or later | 84.9.0.18 or later |
| GXP2170 | 1.0.11.16 or later | 84.9.0.18 or later |
| GXW4216 | 1.0.23.4 or later | 84.6.0.24 or later |
| GXW4224 | 1.0.23.4 or later | 84.6.0.24 or later |
| GXW4232 | 1.0.23.4 or later | 84.6.0.24 or later |
| GXW4248 | 1.0.23.4 or later | 84.6.0.24 or later |
| HT801 | 1.0.63.3 or later | 84.6.0.24 or later |
| HT802 | 1.0.63.3 or later | 84.6.0.24 or later |
| HT812 | 1.0.5.10 or later | 84.6.0.24 or later |
| HT814 | 1.0.63.3 or later | 84.6.0.24 or later |
| HT818 | 1.0.63.3 or later | 84.6.0.24 or later |
| WP825 | 1.0.11.67 or later |
84.17.0.17 or later |
Scenarios
The provisioning methods and operations vary depending on your provisioning needs, as the following table shows:
| Scenario | Description |
|---|---|
| Provision a SINGLE Grandstream IP phone | In this scenario, you can manually add a provisioning link
provided by Yeastar PBX to the phone. In this way, the phone can
retrieve configurations from the PBX using the given link. For more information, see Manually provision a Grandstream IP phone. |
| Provision MULTIPLE Grandstream IP phones | In this scenario, you can utilize DHCP option 66 to deliver
the provisioning link offered by Yeastar PBX to the IP phones.
In this way, the phones can retrieve configurations from the PBX
using the given link. For more information, see Auto provision multiple Grandstream IP phones. |
Manually provision a Grandstream IP phone
- Prerequisites
-
- Make sure that you have downloaded the template for the desired phone model (Path: ).
- RESET the IP phone if it is previously used.
- Gather information of the IP phone, including Vendor, Model, and MAC address.
- Procedure
- Step 1. Add the Grandstream IP phone on PBX
- Add the IP phone on PBX. The PBX will generate a configuration file based on the phone's MAC address.
- Step 2. Configure provisioning server on the Grandstream IP phone
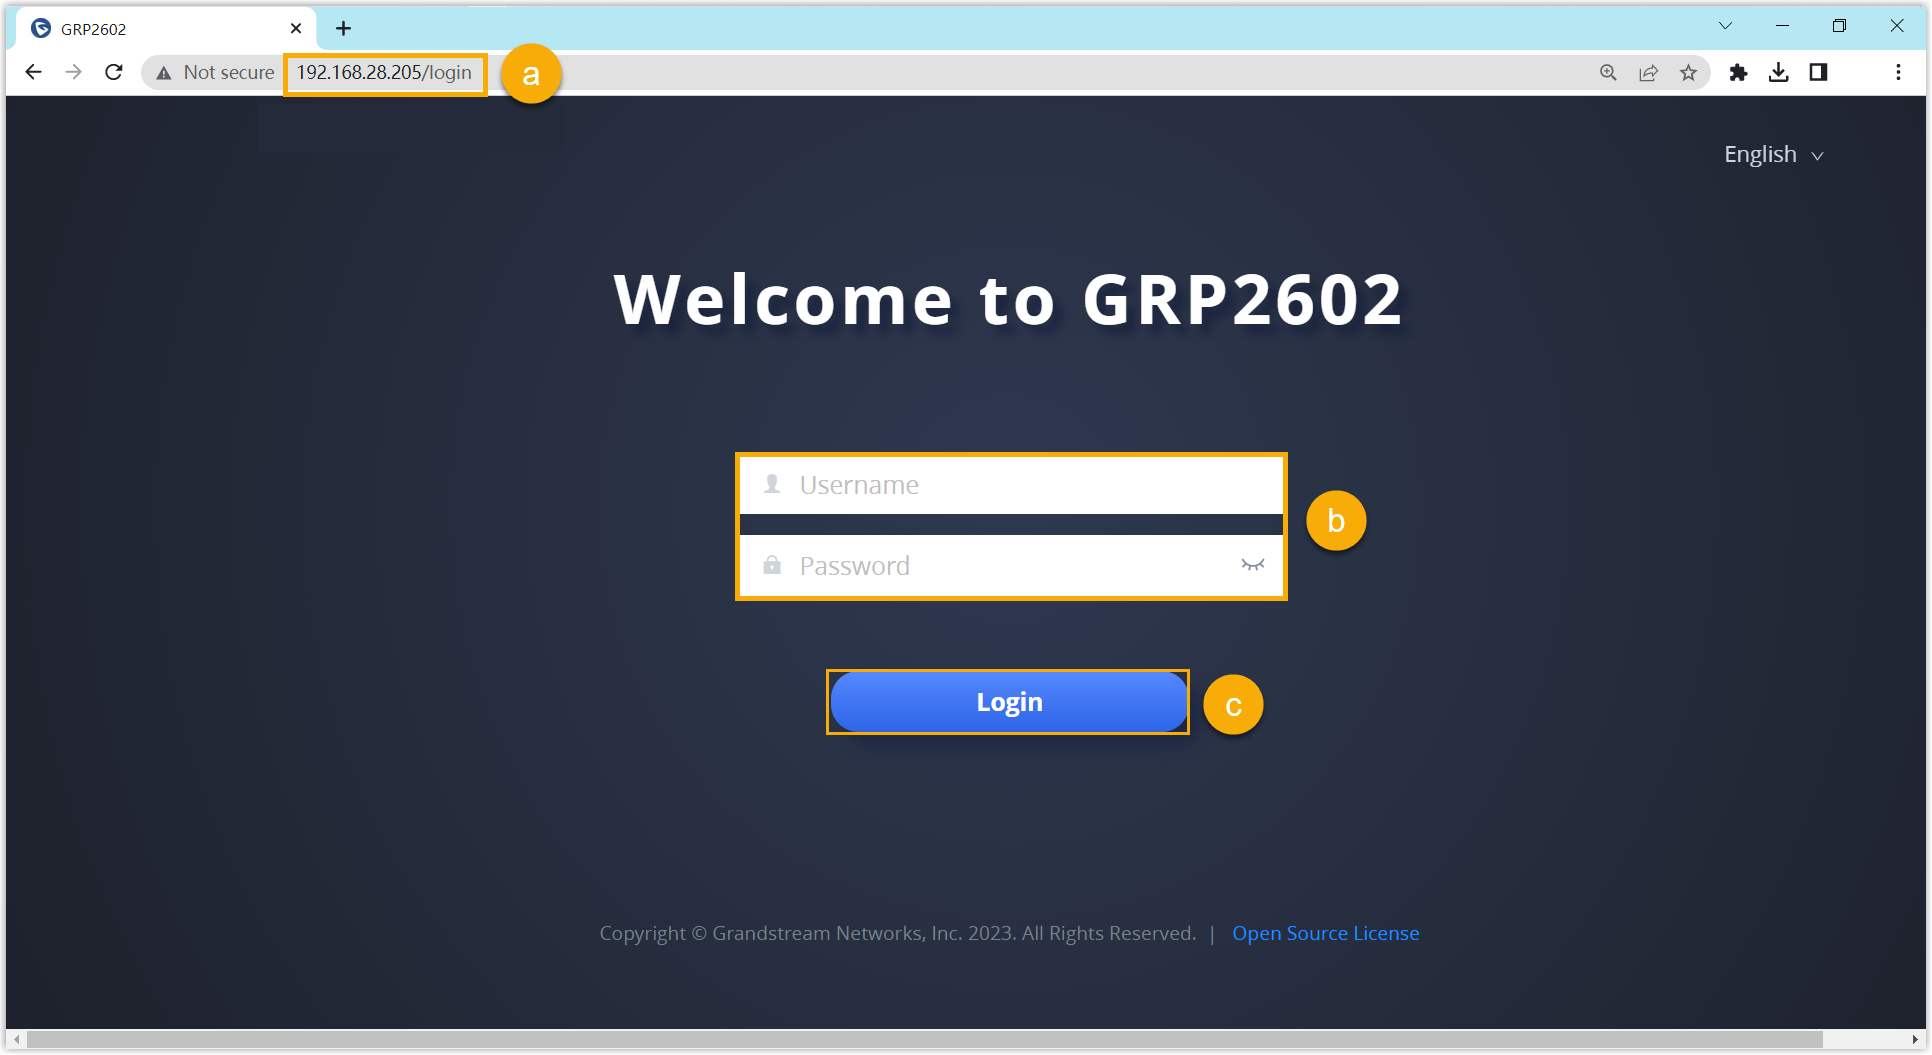
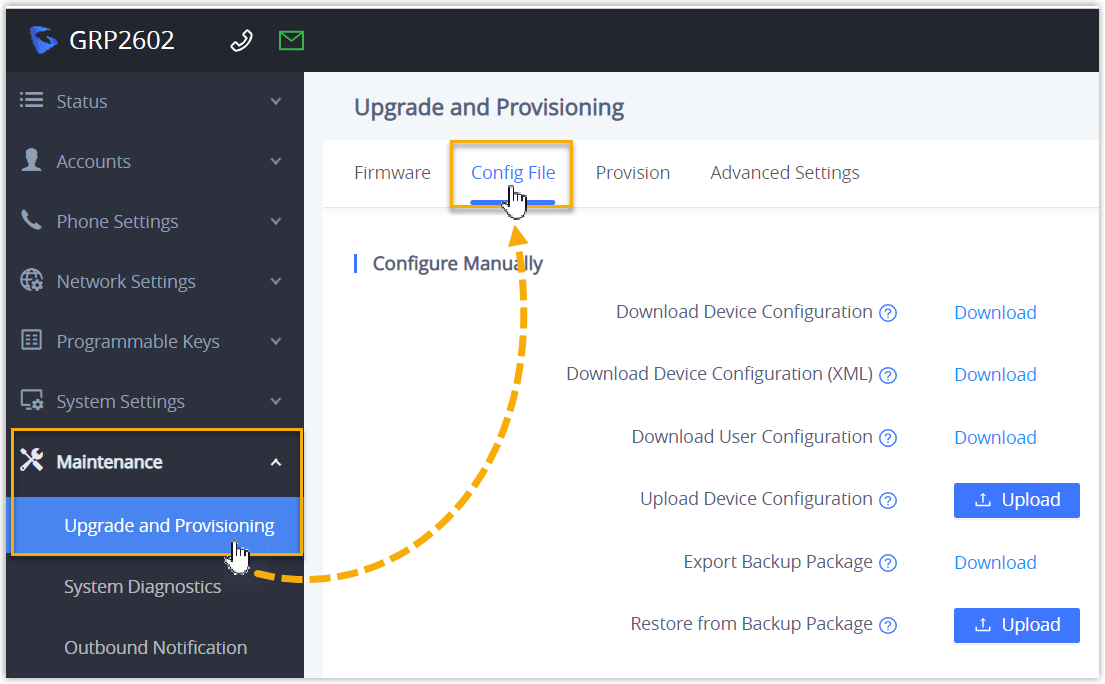
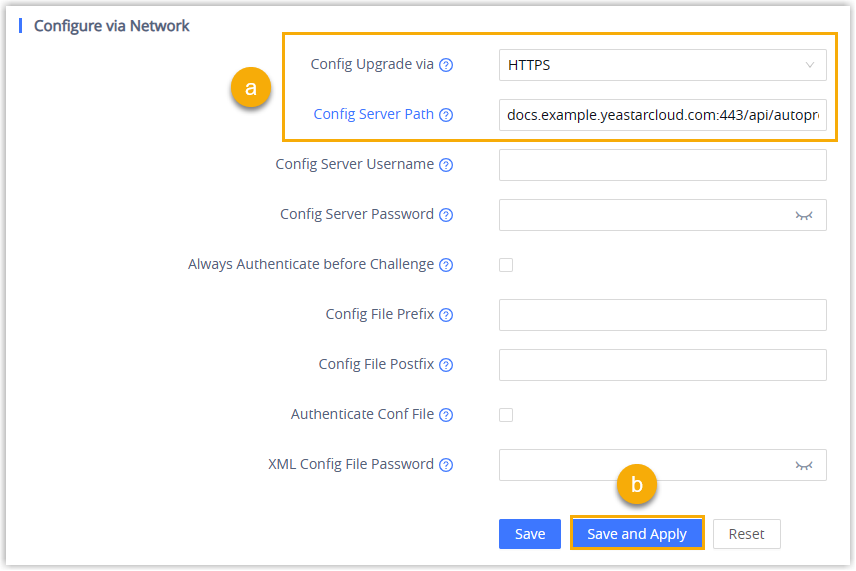
- Manually configure provisioning server for the Grandstream IP phone using the provisioning link provided by the PBX.
- Result
-
Note: Some IP phones will reboot automatically. If not, you need to manually reboot the phone to make the configurations take effect.
- After the IP phone is rebooted, it automatically downloads the configurations from the PBX and applies the settings.
- The extension is successfully registered on the IP
phone. You can check the registration status on on the PBX web portal.

- What to do next
- By default, Grandstream IP phone enables all available codecs for its accounts, which may lead to issues with outgoing calls. Therefore, it is recommended to remove unnecessary codecs for the account that has been registered with the PBX extension.
Auto provision multiple Grandstream IP phones
- Prerequisites
-
- Make sure that there is only one DHCP server in the subnet where the IP phones are deployed, or the IP phones may fail to obtain IP addresses.
- Make sure that you have downloaded the template for the desired phone model (Path: ).
- RESET the IP phone if it is previously used.
- Gather information of the IP phone, including Vendor, Model, and MAC address.
- Procedure
- Step 1. Add the Grandstream IP phone on PBX
- Add the IP phone on PBX. The PBX will generate a configuration file based on the phone's MAC address.
- Step 2. Configure DHCP option 66 on DHCP server
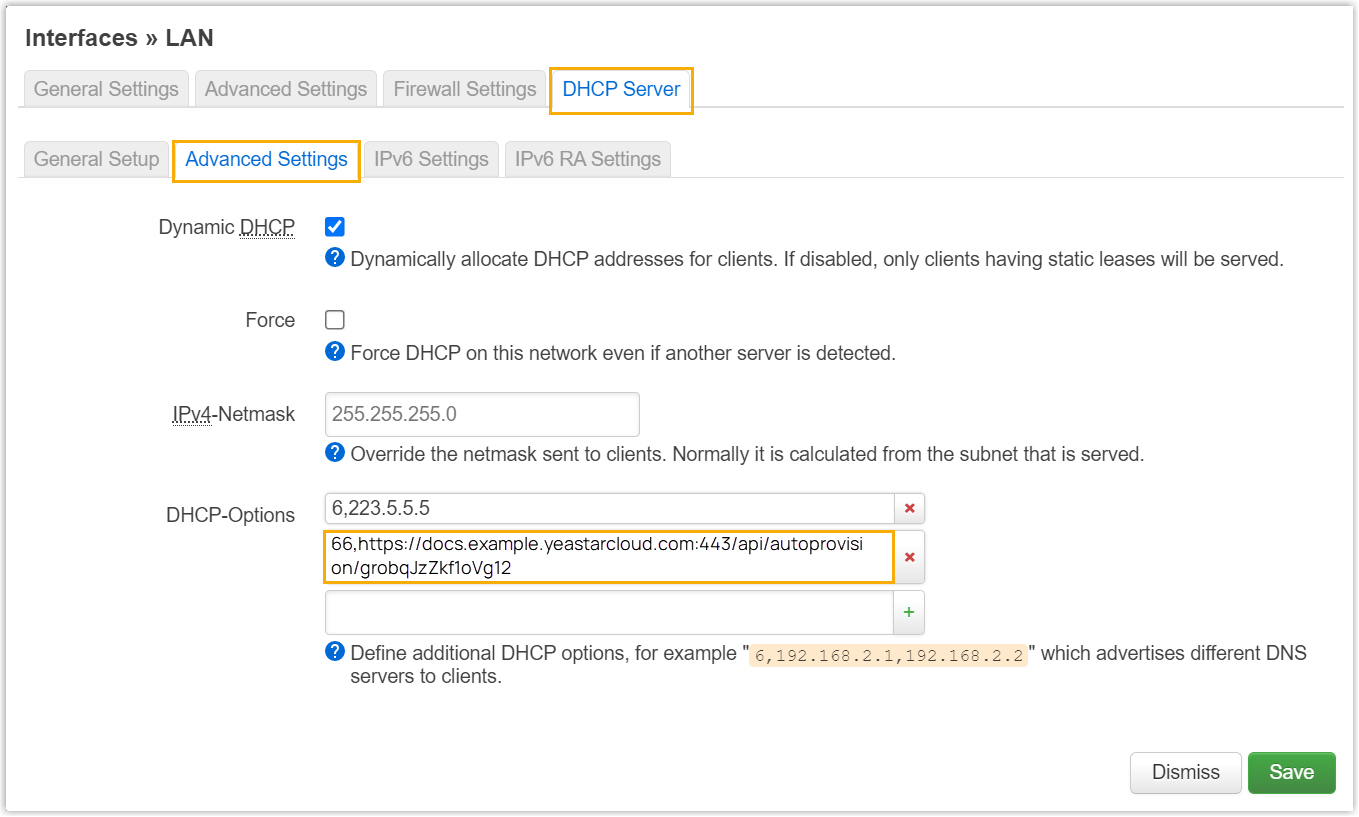
- In the subnet where the IP phone is deployed, use the generated provisioning link to configure option 66 on the DHCP Server.
- Result
-
Note: Some IP phones will reboot automatically. If not, you need to manually reboot the phone to make the configurations take effect.
- After the IP phone is rebooted, it gets an IP address from the DHCP server, downloads the configurations from the PBX via the provisioning link, and applies the settings automatically.
- The extension is successfully registered on the IP
phone. You can check the registration status on on the PBX web portal.

- What to do next
- By default, Grandstream IP phone enables all available codecs for its accounts, which may lead to issues with outgoing calls. Therefore, it is recommended to remove unnecessary codecs for the account that has been registered with the PBX extension.


