Create a P-Series Cloud PBX for a Reseller
After assigning capacity of P-Series Cloud Edition hosting package to resellers according to their subscription, you can create Cloud PBX instances for them using the allocated capacity, helping them get started quickly. This topic describes how to create a Cloud PBX for a reseller based on his/her subscription capacity and available resources.
Prerequisites
- You have the permission to Add Cloud PBXs.Note: If the Add button is not visible, contact your service provider to obtain this permission.
- You have created the desired reseller and assigned capacity to the account.
Procedure
- Log in to Yeastar Central Management, go to .
- Click Add to create a P-Series Cloud PBX.
- In the PBX Owner section, do as follows.
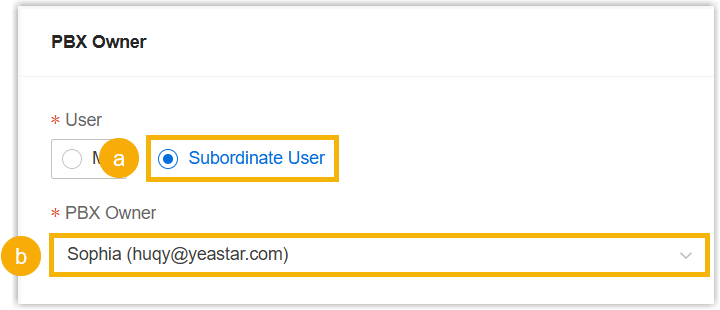
- Select Subordinate User.
- In the PBX Owner drop-down list, select the desired reseller.
- In the PBX Information section, fill in the following information:
Setting Description PBX Name Enter a name to help you identify the PBX. PBX Plan Select Enterprise Plan (EP) or Ultimate Plan (UP). Extension Set the maximum number of extensions.
Valid value: Subject to extension capacity assigned to the reseller and system restriction (Max. 500 extensions for a PBX).
Concurrent Calls Set the maximum number of concurrent calls. Call Recording Set whether to enable Call Recording feature for the PBX or not. - Enabled: PBX users can record both internal calls and external calls.
- Disabled: PBX users can NOT record calls.
Recording Capacity (mins) Set recording capacity. Note:- Only when Call Recording is enabled can you configure the option.
- Each PBX has 500-minute recording time for free. If you enter a value greater than 500, the exceeding minutes will be deducted from the total recording capacity assigned to the reseller.
AI Transcription (One-Time Capacity) (mins) Assign extra AI transcription minutes. Note:- The setting is available only when you have assigned AI transcription minutes (One-Time Capacity) to the reseller, and can be applied to the P-Series Cloud PBX with firmware version 84.19.0.110 or later.
- Each PBX comes with one-time free transcription time (120 minutes for Enterprise Plan and 240 minutes for Ultimate Plan). The number of minutes specified here will be added to these default quotas.
- Set the value to 0 if no extra minutes are needed.
AI Transcription (Monthly Quota Pack) Specify the number of monthly quota packs of AI transcription minutes to assign.
Each pack provides a recurring quota of minutes that resets each month; unused minutes do not roll over. For example, if two monthly quota packs of 500 minutes are assigned, the PBX will have 1000 transcription minutes available per month.
Note:- The setting is available only when you have assigned AI transcription minutes (Monthly Quota Pack) to the reseller, and can be applied to the P-Series Cloud PBX with firmware version 84.22.0.138 or later.
- Set the value to 0 if you do not need to assign any packs.
AI Receptionist (One-Time Capacity) (mins) Assign extra AI receptionist minutes. Note:- The setting is available only you have assigned AI receptionist minutes (One-Time Capacity) to the reseller, and can be applied to the P-Series Cloud PBX with firmware version 84.22.0.138 or later.
- Each PBX comes with 60 free AI Receptionist minutes (one-time). The number of minutes specified here will be added to the default quotas.
- Set the value to 0 if no extra minutes are needed.
AI Receptionist (Monthly Quota Pack) Specify the number of monthly quota packs of AI receptionist minutes to assign.
Each pack provides a recurring quota of minutes that resets each month; unused minutes do not roll over. For example, if two monthly quota packs of 200 minutes are assigned, the PBX will have 400 AI receptionist minutes available per month.
Note:- The setting is available only when you have assigned AI receptionist minutes (Monthly Quota Pack) to the reseller, and can be applied to the P-Series Cloud PBX with firmware version 84.22.0.138 or later.
- Set the value to 0 if you do not need to assign any packs.
Region Select a desired region. The PBX will be created in the region. URL Enter a prefix in the text field, then select a suffix from the drop-down list.Note:- The URL is the domain name of the PBX.
- Only allowed to enter numbers, letters, and
hyphens
-.
PBX Version Select a firmware version to be used on the PBX. Group Select the existing group(s) to which the PBX will be added. PBX Type Select a type to help you identify the PBX. Note: By default, the PBX to be created is for commercial use. To allow specific users to try PBX for a short period of time, you can set the type to Trial.- Trial
- Commercial
PBX Expiration Date Set an expiration date.
The expiration date indicates period of validity for PBX, which will be displayed on PBX management portal.
When the expiration date is reached Set whether users can continue to use the PBX when reaching the expiration date. - Stop the PBX immediately
- Allow PBX to continue working
-
In the Customer Information section, select one or more customers to receive PBX activation email(s).
Scenario Instruction Figure 1. Select an existing customer 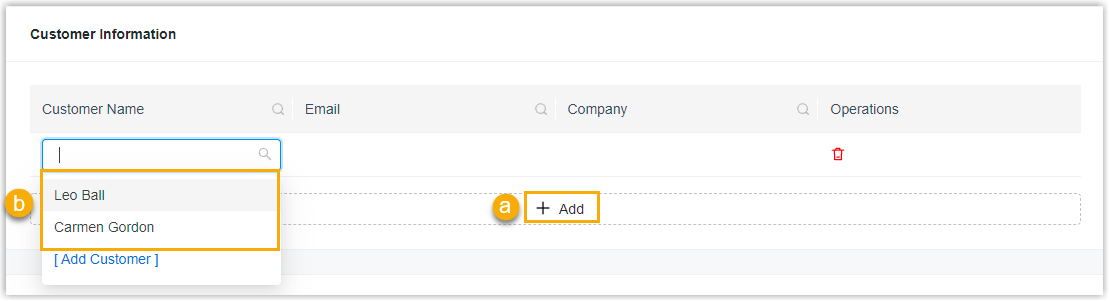 To select an existing customer, do as follows:Note: The customer list displays reseller's customers.
- Click Add.
- In the drop-down list of Customer Name, select a customer.
Figure 2. Add a new customer 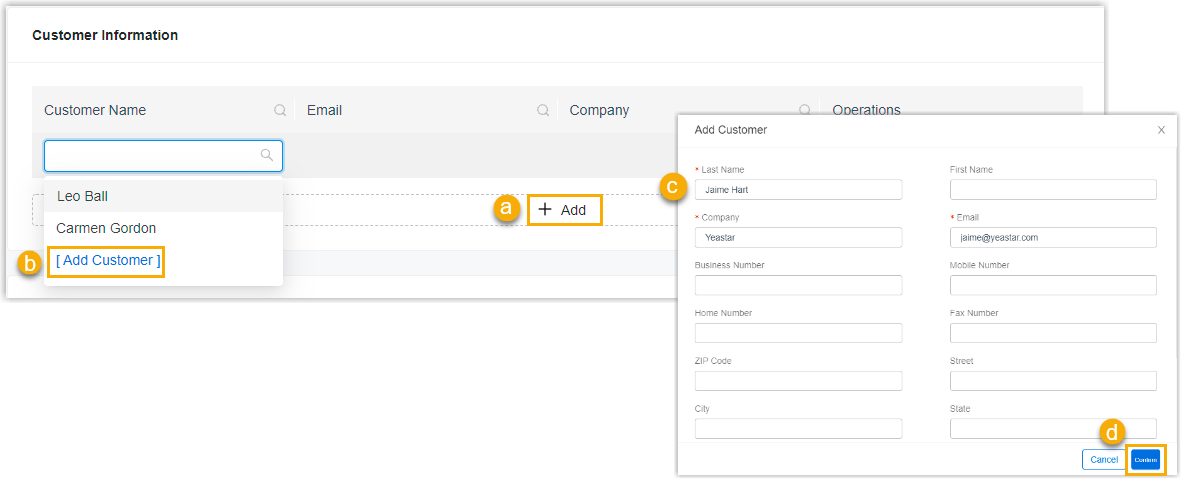 To add a new customer, do as follows:Note: The added customer will be synchronized to your and the reseller's Customer list (Path: ).
- Click Add.
- In the drop-down list of Customer Name, select Add Customer.
- Fill in customer information.
- Click Confirm.
-
Optional: In the Assigned DIDs section, assign DID numbers to the PBX for trunk sharing.
Note: This setting is available only when the following requirements are met:- The reseller has available
shared trunks (with DID numbers) in the same region as the
PBX, under one of the following conditions:
- You have assigned the access permissions of shared trunks with DID numbers to the reseller.
- The reseller has created his own shared trunks and assigned DID numbers to them.
- The firmware version of the Cloud PBX is 84.19.0.22 or later.
- Click Add to add
an assignment rule.
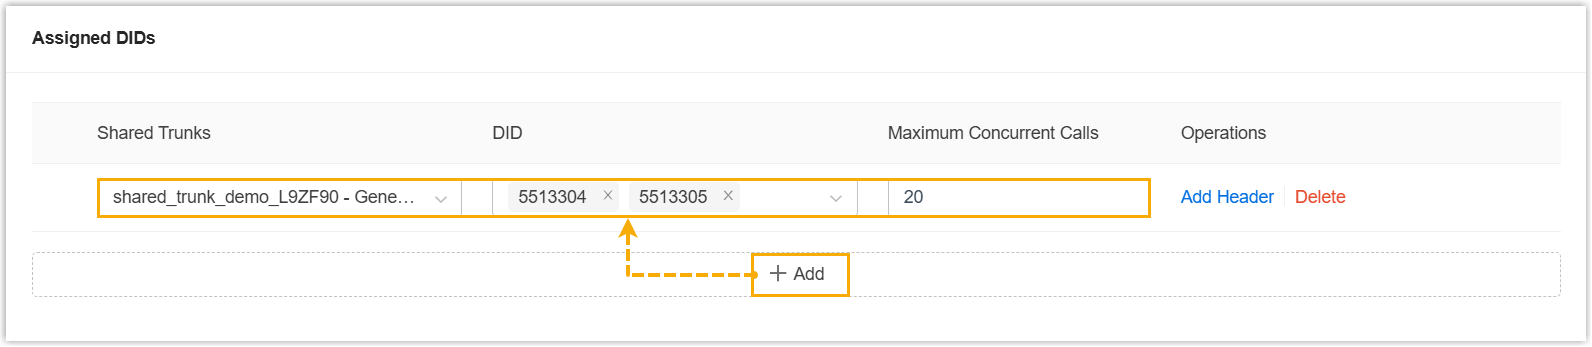
- Shared Trunks: Select the desired trunk that will be shared with the PBX.
- DID: Select the trunk's associated DID numbers to be assigned to the PBX for inbound and outbound call routing.
- Maximum Concurrent
Calls: (Optional) Set the concurrent
call limit for the PBX on the shared trunk. Note:
- This setting only takes effect on P-Series Cloud PBX with firmware version 84.23.0.123 or later.
- If left blank, the PBX can utilize the trunk's maximum concurrent capacity.
Assign custom SIP headers of the shared trunk to the PBX as needed, which will be included in SIP INVITE messages of the outbound calls routed through the shared trunk.
Note: This setting is available only when the following requirements are met:- The firmware version of the Cloud PBX is 84.22.0.138 or later.
- The shared trunk has been configured with the custom SIP headers.
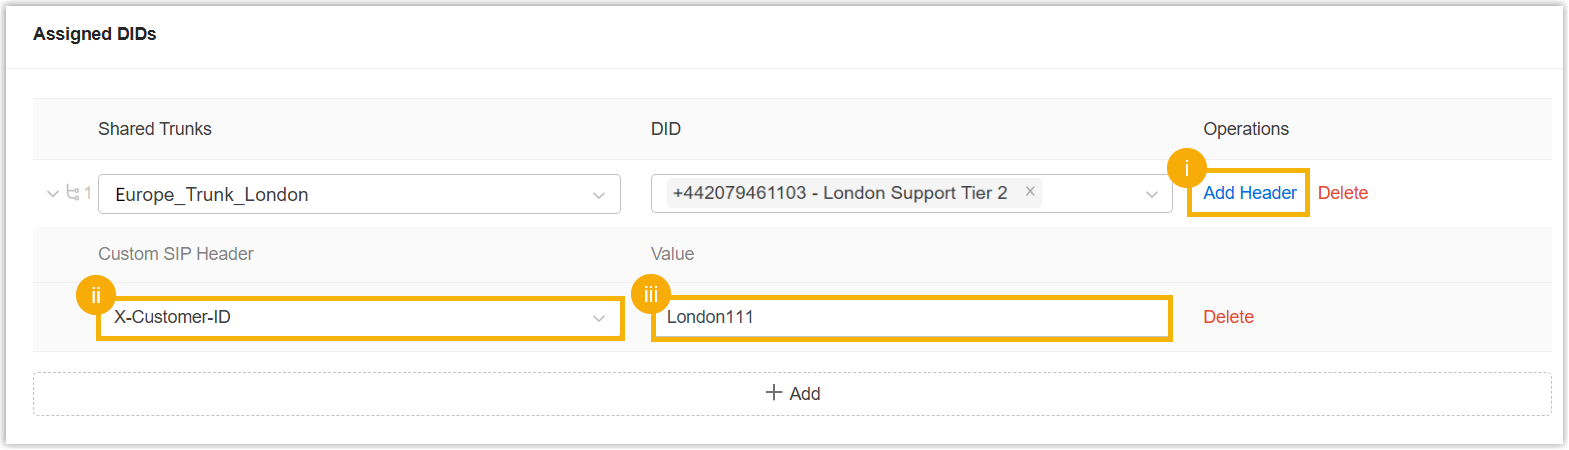
- Click Add Header in the Operations column.
- In the Custom SIP Header drop-down list, select the desired custom SIP header.
- In the Value
filed, enter a value for the SIP header.Note:
- The total length must not exceed 255 characters.
- This value MUST be unique across all Cloud PBXs for the same custom SIP header on the shared trunk.
- To assign more custom SIP headers to the Cloud PBX, repeat step i to iii.
- The reseller has available
shared trunks (with DID numbers) in the same region as the
PBX, under one of the following conditions:
- In the Option section, configure the
following system options for the PBX as needed.
Option Description Allow to Upgrade from the PBX Side The option is enabled by default. To prevent PBX administrators from upgrading firmware on the PBX management portal, disable the option. Note: If you disable the option, the Upgrade feature entrance will NOT be displayed on PBX management portal.Allow Passwordless Login to PBX - To allow the reseller and his colleagues to passwordless login to the PBX from Yeastar Central Management, enable the option.
- To allow yourself to passwordless log in to
the PBX from Yeastar Central Management, enable
the option and then enable the Allow
Passwordless PBX Login for your service
provider option.

Note: To implement passwordless login to the Cloud PBX, the 'Passwordless Login' feature on the Cloud PBX must also be enabled (Path: ).Allow Provisioning via Template To allow the PBX to be provisioned via a template, enable the option, then select a template from the Provisioning Template drop-down list as needed.
The system will automatically provision the PBX using the selected template on initial start-up.
Note: Templates displayed in the drop-down list are synchronized from the reseller's provisioning template (Path: ).Allow to Use Internal Chat This option is enabled by default. If you don't want users to use the internal chat feature on their Linkus UC clients, you can disable this option. Note: The setting can be applied to the P-Series Cloud PBXs with a firmware version of 84.12.0.32 or later.Trunk Configuration Access This option is enabled by default. If you don't want the PBX users to add or import trunks on the PBX, you can disable this option. Note:-
This option is only available when the following requirements are met:
- You have grant the reseller the permission to configure Trunk Configuration Access for Cloud PBXs.
- The firmware version of the P-Series Cloud PBX is 84.21.0.66 or later.
- If the P-Series Cloud PBX is provisioned via a template while this option is disabled, the trunk configuration in the template will not be applied.
- Click Save.
Result
- The P-Series Cloud PBX is created successfully, appears in your and the reseller's Cloud PBX list with status displayed as
 (Stopped) simultaneously.
- The number of extensions and concurrent calls as well as other subscription resources that you have assigned to the PBX is deducted from the reseller's total subscription capacity.
What to do next
- Send PBX activation emails to the customers.
For more information, see Send Cloud PBX Activation Emails.
- Start the PBX so that customers can activate it.
For more information, see Start a P-Series Cloud PBX.