Add a Static Route
This topic gives a configuration example to show you how to add a static route on Yeastar P-Series PBX System.
Background information
Adding custom static route is typically used in the "Dedicated SIP trunking" scenario.
This topic assumes that you have bought a dedicated SIP trunk from the Internet Telephony Service Provider (ITSP) . The ITSP provides a router for the dedicated SIP trunk. The router is used for the SIP trunk only, but cannot access the Internet.
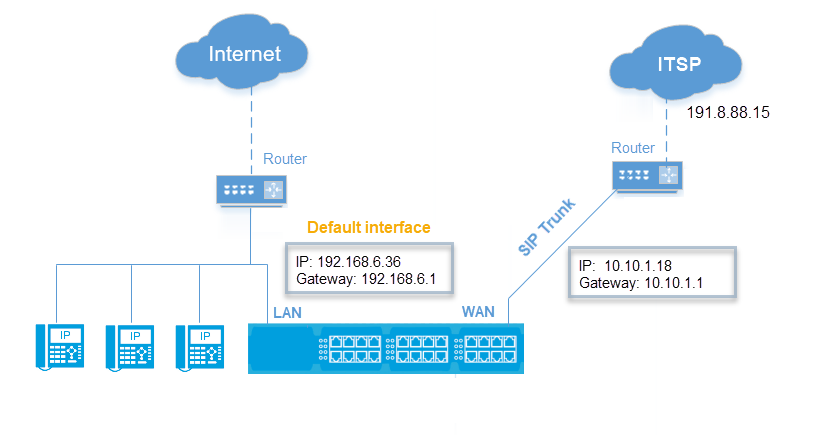
- Network topology
- The following figure shows the network topology for the dedicated SIP trunking on the PBX.
- PBX Network settings
-
Setting Value Ethernet Mode Dual Default Interface LAN LAN IP Address 192.168.6.36 Subnet Mask 255.255.255.0 Gateway 192.168.6.1 Preferred DNS Server 192.168.1.1 WAN IP Address 10.10.1.18 Subnet Mask 255.255.255.0 Gateway 10.10.1.1 Preferred DNS Server 10.10.1.1
Procedure
To route the network traffic of SIP trunking 191.8.88.15 through WAN port, you need to add a static route on the PBX. Follow the instructions below to add a static route for SIP trunking.
- Log in to PBX web portal, go to , click Add.
- On the pop-up window, configure the route entry:
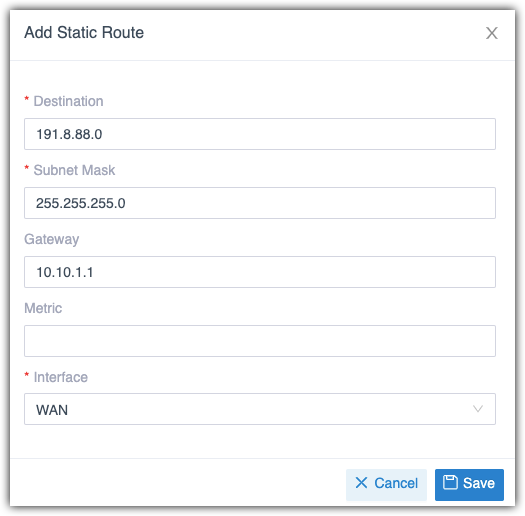
- Destination: Enter the destination IP
address or IP subnet for the PBX to reach using the static
route. Note: To ensure that both SIP registration packets and SIP media packets can be routed to the desired destination, set the IP range of the SIP trunking. In this scenario, enter 191.8.88.0.
- Subnet Mask: Enter the subnet mask for the destination address. In this scenario, enter 255.255.255.0.
- Gateway: Enter the gateway address. The PBX will reach the destination address through this gateway. In this scenario, enter 10.10.1.1.
- Metric: Optional.
Routing metric is used to determine whether one route should be chosen over another.
-
Interface: Select the network interface.
The PBX will reach the destination address using the static route through the selected network interface. In the scenario, select WAN.
- Destination: Enter the destination IP
address or IP subnet for the PBX to reach using the static
route.
- Click Save and Apply.
Result
After you set up a SIP trunk with the IP address 191.8.88.15 on the PBX, the SIP packets are sent and received by the WAN port, which ensure the communication between the PBX and the ITSP.
What to do next
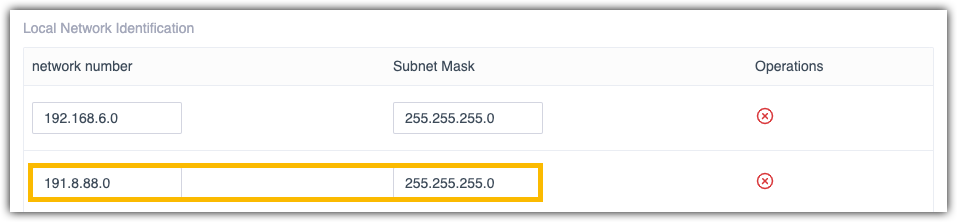
To avoid SIP audio issues through the SIP trunk, you may need to add the network segment of the SIP trunk as a local network identification in PBX NAT settings.
In this scenario, add the IP segment 191.8.88.0/255.255.255.0 in the NAT settings as the following figure shows. For more information of NAT, see Configure Network for Remote Access by a Domain Name.