Remotely Access a Provisioned IP Phone / Gateway
Yeastar P-Series PBX System allows users to visit a provisioned IP phone or gateway when remotely accessing the PBX. This topic describes how to remotely connect to and access IP phone or gateway from the PBX.
Scenario
When tech supporters visit your PBX via either the FQDN domain name or a visit link randomly generated for PBX Remote Management to provide remote troubleshooting, they might also need to examine the configurations of the connected IP phones / gateways to address the problems.
For this sake, Yeastar P-Series PBX System supports to visit the IP phones / gateways when remotely accessing the PBX. Tech supporters can directly visit the web interface of an IP phone or a gateway from the PBX auto provisioning device list and conduct troubleshooting on the IP phone or gateway remotely.
Prerequisites
To implement the IP phone / gateway remote access, make sure the followings are ready:
- The PBX firmware version is 37.7.0.16 or later.
- Remote access to the PBX system via the FQDN domain name, or via the visit link randomly generated for PBX Remote Management.
-
The PBX can visit the web interface of the IP phone / gateway in the local network.
Tip: To make sure of this, check if the private IP address of the IP phone / gateway is recognized and displayed in the Auto Provisioning device list.
Remotely visit an IP phone on PBX
- Log in to PBX web portal, go to .
- Hover the mouse over
 beside the desired phone, and click
Remote Access.
- Connect to the IP phone as the following instructions guide according to the
method users visit the PBX.
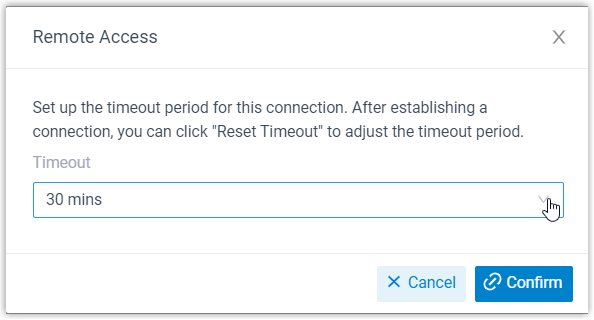
Table 1. Method Instruction FQDN domain name - Set a connection timeout period.
- In the Timeout
drop-down list of the pop-up window, set the
timeout period.

- Click Confirm.
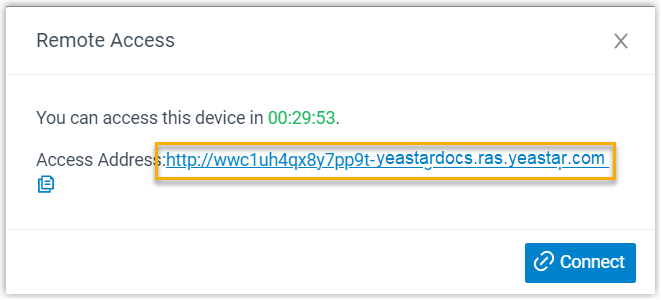
The pop-up window displays a temporary remote access link and the connection time countdown; And the remote access icon turns to
 , indicating that the IP phone is
connected.
- In the Timeout
drop-down list of the pop-up window, set the
timeout period.
- Click Connect to visit the IP phone web interface.
Random PBX remote management link The pop-up window directly displays a temporary link as well as the connection time countdown; And the remote access icon turns to  , indicating that the IP phone is connected.Note: In this case, the time limit of IP phone remote access is synchronized with the remote management timeout of the PBX.
Click Connect to visit the IP phone web interface.
- Set a connection timeout period.
Remotely visit a gateway on PBX
- Log in to PBX web portal, go to .
- Click
 beside the desired gateway.
- Connect to the gateway as the following instructions guide according to the
method users visit the PBX.
Table 2. Method Instruction FQDN domain name - Set a connection timeout period.
- In the Timeout
drop-down list of the pop-up window, set the
timeout period.

- Click Confirm.
The pop-up window displays a temporary remote access link and the connection time countdown; And the remote access icon turns to
 , indicating that the gateway is
connected.
- In the Timeout
drop-down list of the pop-up window, set the
timeout period.
- Click Connect to visit the gateway web interface.
Random PBX remote management link The pop-up window directly displays a temporary link as well as the connection time countdown; And the remote access icon turns to  , indicating that the gateway is connected.Note: In this case, the time limit of gateway remote access is synchronized with the remote management timeout of the PBX.
Click Connect to visit the gateway web interface.
- Set a connection timeout period.
FAQ
- How to extend the IP phone / Gateway remote access time
- After the connection is established, users can re-configure the timeout
period to extend the connection time.Note:
- Only when users access the PBX via the FQDN domain name can they reset the time limit of IP phone / gateway remote access on the PBX.
- If users access the PBX via a random visit link for PBX remote management, please contact the device provider to extend the remote access time.
- On PBX web portal, go to Remote Access
setting of the connected device.
IP Phone

Gateway

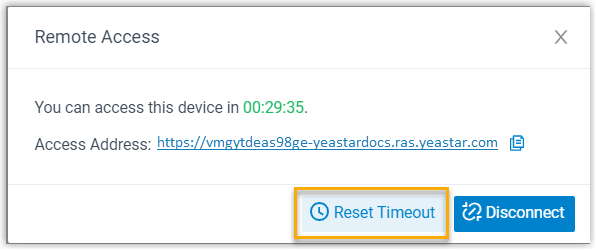
- In the pop-up window, click Reset
Timeout.

- Reset the Timeout and click
Confirm

The pop-up window displays the new countdown of connection time.