Monitor Yeastar P-Series PBX System through SNMP using Zabbix Server
This topic takes Zabbix 6.0.45 as an example to show you how to monitor Yeastar P-Series PBX System through SNMP.
Requirements
The firmware version of Yeastar P-Series PBX System is 37.18.0.18 or later.
Prerequisites
Procedure
Step 1. Add a host to Zabbix Server
A host in Zabbix is a network entity (physical or virtual) that you want to monitor. In this example, we will add a host for Yeastar P-Series PBX System on Zabbix Server.
- On the left navigation bar, go to .
- At the top-right corner, click Create host.
- Under the Host tab, complete the following
settings.
- In the Host name field, enter a name to help
you identify the host.
In this example, enter P-Series PBX.
- In the Groups field, enter the name of an existing group or click Select to select a group.
- In the Interfaces section, add host
interface(s).
- Click Add, select
SNMP, then complete the following
settings:
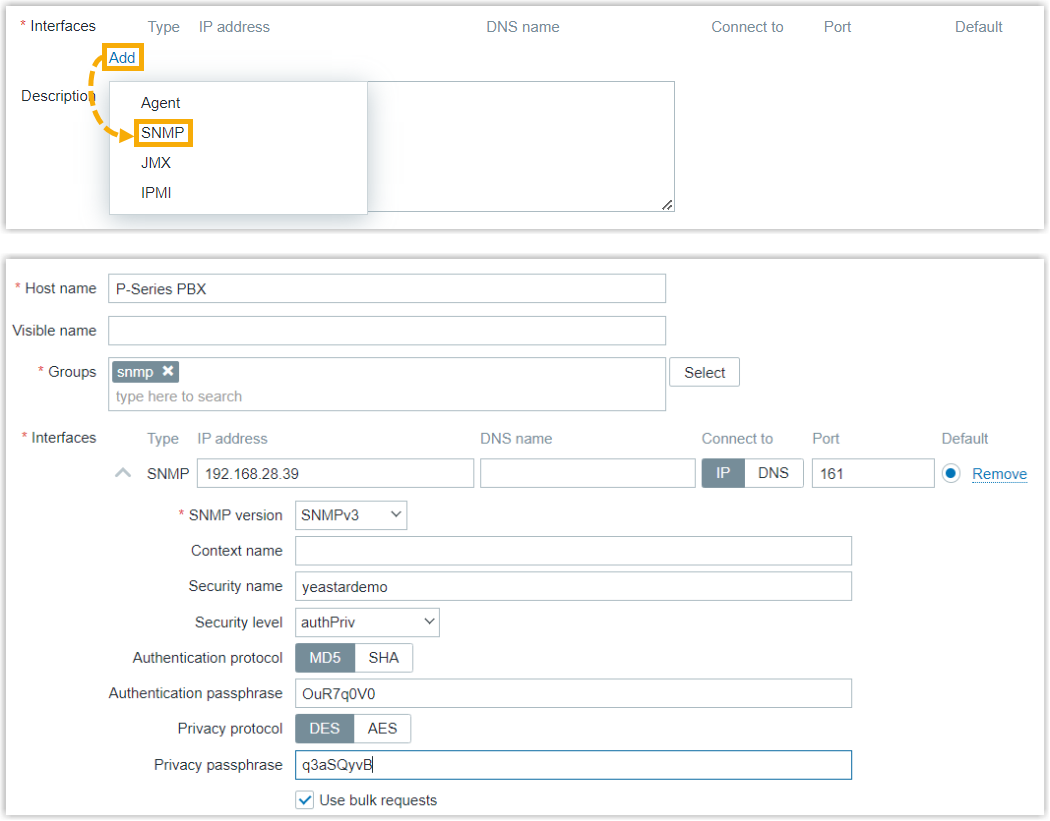
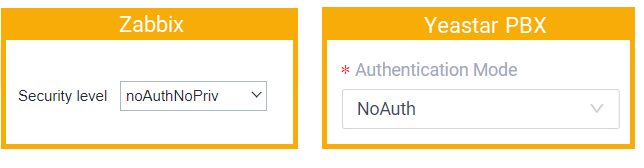
Setting Description IP address Enter the IP address of PBX. In this example, enter 192.168.28.39. Port Enter the SNMP query port configured on PBX. In this example, retain 161. SNMP version Select SNMPv3. Security name Enter the SNMPv3 username configured on PBX. In this example, enter yeastardemo. Security level Select the authentication mode specified on PBX. - noAuthNoPriv: This
option corresponds to
NoAuth on PBX.
- authNoPriv: This option
corresponds to Auth on
PBX.
If you choose this option, you need to set Authentication protocol to MD5, then enter the authentication passphrase.

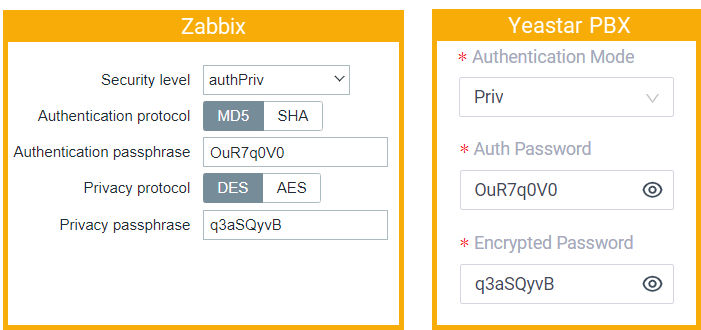
- authPriv: This option
corresponds to Priv on
PBX.
If you choose this option, you need to set Authentication protocol to MD5 and Privacy protocol to DES, and enter the authentication passphrase and privacy passphrase.
In this example, select noAuthNoPriv.
- noAuthNoPriv: This
option corresponds to
NoAuth on PBX.
- Optional: To enable SNMP trap, repeat step i to add another host interface.Note: Use the same configuration as the previous interface, except for the port. Ensure that the port matches the SNMP trap port configured on the PBX (Path: ).

- Click Add, select
SNMP, then complete the following
settings:
- In the Host name field, enter a name to help
you identify the host.
- Click Add.
The host is added successfully. You can check it on the Hosts list.

Step 2. Add monitoring items to the host
A monitoring item defines a single metric or the kind of data to collect from a host. In this example, we will add monitoring items to collect data from the PBX host.
You can add monitoring items in the following ways:
- Import monitoring items
- Manually add monitoring items
- Automatically discover monitoring items (tabular objects)
- Import monitoring items (scalar objects)
-
Scalar objects can be quickly added to the NMS by importing a template. We provide a Yeastar PBX MIB file in both
.miband.xmlformats. Download the file in the appropriate format, and follow the instructions below to import.- On the left navigation bar, go to .
- At the top-right corner, click Import,
select the MIB file, then click
Import.
You can check the imported template in the Templates list.

- On the left navigation bar, go to , search and find the PBX host, then go to the host detail page.
- Click the Templates tab, search and
select the imported template in the Link new
templates field, then click
Update.
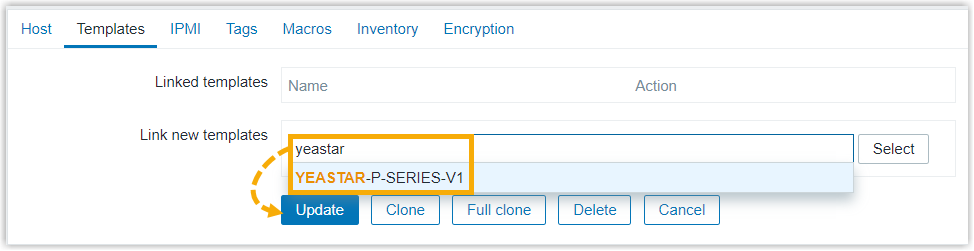
On the Hosts list, you will find the template and the items are linked with PBX host successfully.

- Manually add monitoring items (scalar objects)
-
Scalar objects can also be added manually by creating SNMP agent items in the NMS. We provide a list of scalar objects as a reference for manually adding items on NMS. Check against the Yeastar P-Series PBX System MIB to add desired items.
- Go to the creation page of monitoring items.
- On , search and find the PBX host.
- Click Items beside the
host.

- Add SNMP agent items to monitor and retrieve data from
PBX.
- At the top-right corner, click Create item.
- Under Item tab, configure the
following settings.
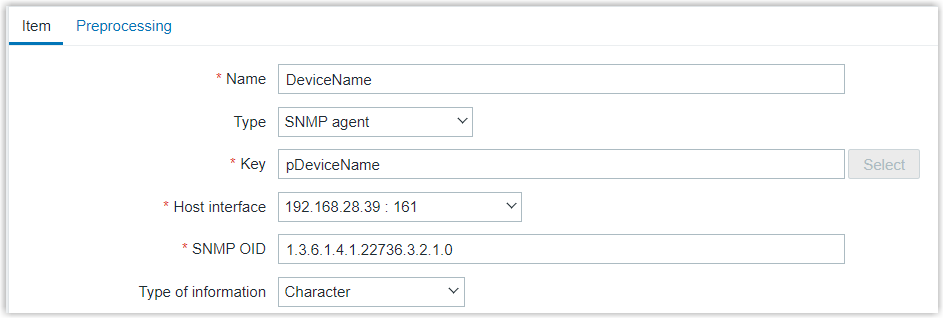
Setting Description Name Enter a name to help you identify the item. In this example, enter DeviceName. Type Select SNMP agent. Key Enter the name of the scalar object. In this example, enter pDeviceName. Type of information Select the information type. In this example, select Character. Host interface Select the host interface used for SNMP queries. SNMP OID Enter the OID of the scalar object. In this example, enter 1.3.6.1.4.1.22736.3.2.1.0. -
Optional: Click to test if the configuration works, then close the window.
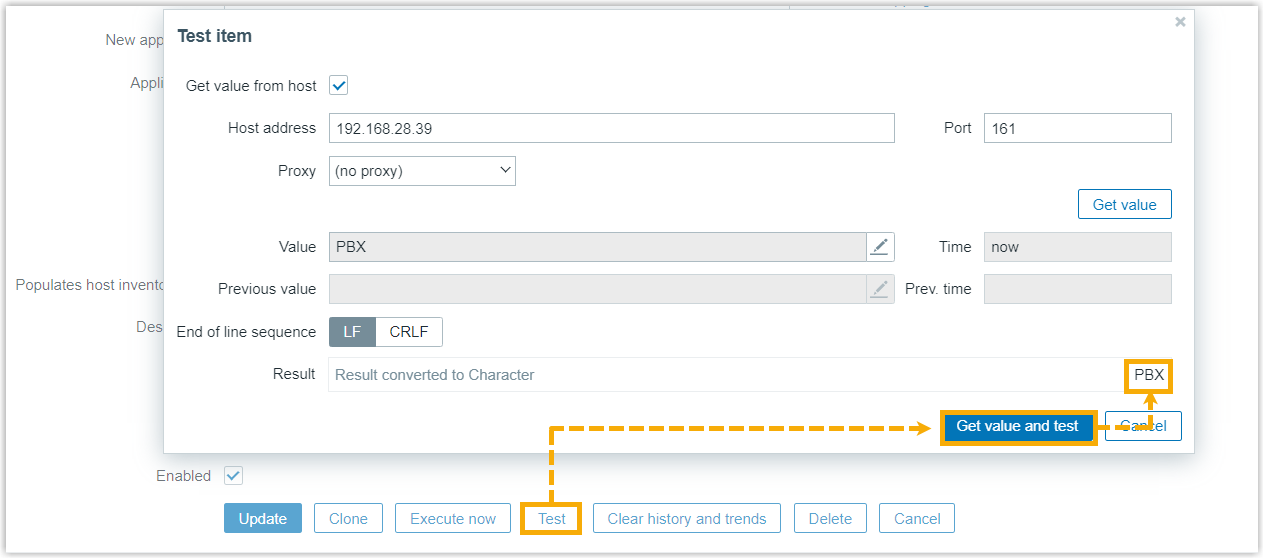
- Click Add.
- Go to the creation page of monitoring items.
- Automatically discover monitoring items (tabular objects)
-
Tabular objects holding multiple related entries can be automatically discovered by traversing a specified MIB subtree using SNMP Walk. During this process, SNMP Walk sends repeated SNMP requests to network entities to retrieve all parameters and their corresponding values under that subtree.
To achieve this, you need to install SNMPwalk, create discovery rules to automatically discover tabular objects, and define item prototypes to generate monitoring items based on the discovered data.
- Install and verify SNMP tool.
- Access Zabbix server via SSH.
- Install
net-snmppackage based on the operating system.- For Ubuntu or Debian: Run the command
apt-get install snmp -y. - For CentOS or RHEL: Run the command
yum install net-snmp-utils
                                                  -y
- For Ubuntu or Debian: Run the command
- Run
snmpwalk --versionto verify the installation.In this example,
NET-SNMP version: 5.7.3is returned, indicating successful installation with version 5.7.3.
- Create SNMP discovery rule(s).
- On the left navigation bar, go to .
- Click Discovery beside the
desired host.

- At the top-right corner, click Create discovery rule.
- Configure the following settings.
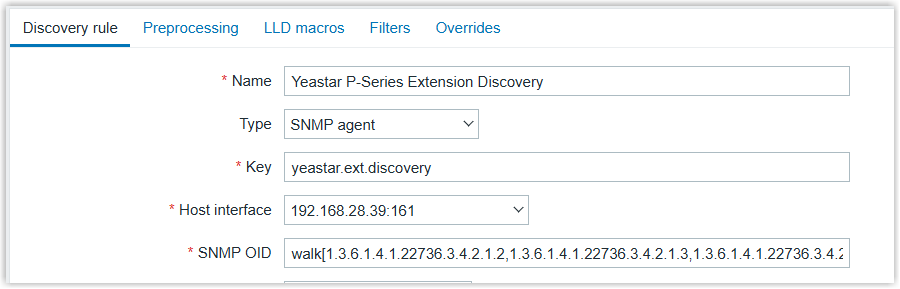
Setting Description Name Enter a name to help you identify the discovery rule. In this example, enter
Yeastar P-Series Extension Discovery.Type Select SNMP agent. Key Enter a unique key for the discovery rule.
In this example, enter .
Host interface Select the host interface used for SNMP queries. SNMP OID Enter the OID used for SNMP discovery. The expression format varies depending on the Zabbix version:
- Zabbix 6.0 or later: Use the
walk[] syntax to specify
one or more OIDs.
For example, enter walk[1.3.6.1.4.1.22736.3.4.2.1.2,1.3.6.1.4.1.22736.3.4.2.1.3,1.3.6.1.4.1.22736.3.4.2.1.4].
- Earlier than Zabbix 6.0: Use the
discovery[{#MACRO}, OID]syntax to specify one or more OIDs.For example, enter
discovery[{#EXT_NUM},
                                                  1.3.6.1.4.1.22736.3.4.2.1.2, {#EXT_NAME},
                                                  1.3.6.1.4.1.22736.3.4.2.1.3, {#EXT_STATUS},
                                                  1.3.6.1.4.1.22736.3.4.2.1.4]
.
- Zabbix 6.0 or later: Use the
walk[] syntax to specify
one or more OIDs.
- Click Add.
- Create item prototypes.
- Under Discovery rules tab,
click Item prototypes beside
the desired host.

- At the top-right corner, click Create item prototype.
- Configure the following settings.
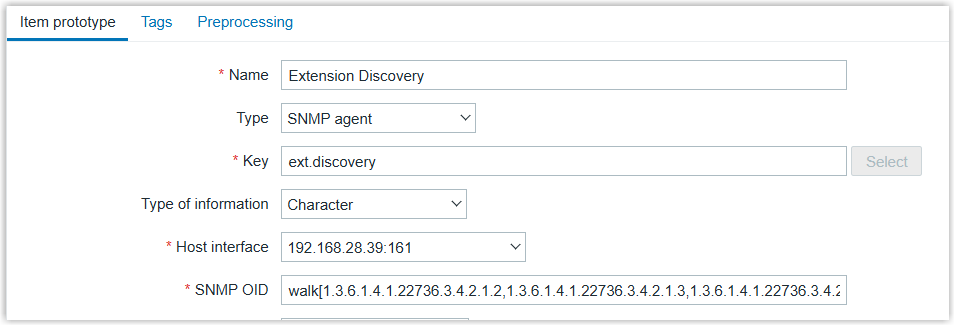
Setting Description Name Enter a name to help you identify the item prototype. In this example, enter Extension Discovery.
Type Select SNMP agent. Key Enter a unique key for the item prototype.
In this example, enter ext.discovery.Type of information Select Character. Host interface Select the host interface used for SNMP queries. SNMP OID Enter the OID used for SNMP data collection. The expression format varies depending on the Zabbix version:
- Zabbix 6.0 or later: Use the
walk[] syntax to specify
one or more OIDs.
For example, enter walk[1.3.6.1.4.1.22736.3.4.2.1.2,1.3.6.1.4.1.22736.3.4.2.1.3,1.3.6.1.4.1.22736.3.4.2.1.4].
- Earlier than Zabbix 6.0: Use the
discovery[{#MACRO}, OID]syntax to specify one or more OIDs.For example, enter
discovery[{#EXT_NUM},
                                                  1.3.6.1.4.1.22736.3.4.2.1.2, {#EXT_NAME},
                                                  1.3.6.1.4.1.22736.3.4.2.1.3, {#EXT_STATUS},
                                                  1.3.6.1.4.1.22736.3.4.2.1.4]
.
- Zabbix 6.0 or later: Use the
walk[] syntax to specify
one or more OIDs.
- Click Add.
- Under Discovery rules tab,
click Item prototypes beside
the desired host.
- Copy the following content and adjust the parameters as
needed, then run it to verify that SNMP data can be
successfully retrieved.
snmpwalk -v3 -l {noAuthNoPriv|authNoPriv|authPriv} -u {username} [-a MD5] [-A {authphrase}] [-x DES] [-X {privpassphrase}] {host[:port]} [OID]In this example, run
snmpwalk -v3 -l
                                                noAuthNoPriv -u yeastardemo 192.168.28.39
                                                1.3.6.1.4.1.22736.3.4.2.1.2
. After execution, the system returns a list of existing extension numbers.
- Install and verify SNMP tool.
Step 3. Set up SNMP trap
SNMP traps are sent from SNMP-enabled device to snmptrapd, and can be collected or trapped by Zabbix server from a log file for monitoring potential issues.
To implement this, you need to configure snmptrapd and any one of the mechanisms - Bash script, Perl script, or SNMPTT for passing PBX traps to Zabbix. This example shows you how to use a Bash script to process SNMP traps.
- Install SNMP tool that is required for SNMP traps.
- Access Zabbix server via SSH.
- Install the required SNMP tool based on the operating system.
- For Ubuntu or Debian: Run the command
apt-get install snmp snmptrapd
                                            -y
. - For CentOS or RHEL: Run the command
yum
                                                install net-snmp net-snmp-utils -y
.
- For Ubuntu or Debian: Run the command
- Retrieve SNMP engine ID from PBX.
- Access PBX server via SSH.
- Run
tcpdump -i any udp port 162 -vv -Xto capture SNMP trap. - Trigger a trap event.
For example, close the webpage where an extension is logged in.
- Locate the line containing
ScopedPDU
                                    E
, copy its value, remove all underscores, and save it for later use.In this example,
ScopedPDU
                                        E=_80_00_1f_88_80_bd_69_d0_29_ad_d7_c4_69_00_00_00_00
is returned. The value we save is80001f8880bd69d029add7c46900000000.
- Configure snmptrapd to receive traps from PBX and pass to the Bash receiver
script.
- Run
vi /etc/snmp/snmptrapd.confto edit the snmptrapd configuration file. - Press
ito enter edit mode. - Copy the following content, replace the placeholders with actual
values, then execute the command.
# Disable authentication checking (accept all traps)
disableAuthorization yes

# Run in foreground, do not fork into background
doNotFork yes

# Listen on standard SNMP trap port
snmpTrapdAddr udp:{trap_port}

# Ignore authentication failure messages
ignoreAuthFailure yes

# Allow SNMPv3 users to process traps
authUser log,execute

# Create SNMPv3 user with specified engine ID
createUser -e 0x{engine_id} {username}

# Forward all traps to Zabbix handler script
traphandle default /bin/bash /usr/sbin/zabbix_trap_handler.sh
In this example, we paste the following content:
# Disable authentication checking (accept all traps) disableAuthorization yes # Run in foreground, do not fork into background doNotFork yes # Listen on standard SNMP trap port UDP 162 snmpTrapdAddr udp:162 # Ignore authentication failure messages ignoreAuthFailure yes # Allow SNMPv3 users to process traps authUser log,execute # Create SNMPv3 user with your engine ID and username createUser -e 0x80001f8880bd69d029add7c46900000000 yeastardemo # Forward all traps to Zabbix handler script traphandle default /bin/bash /usr/sbin/zabbix_trap_handler.sh - Press Esc, enter
:wq, then press Enter to save and exit.
- Run
- Configure the Bash receiver script to write traps to the Zabbix SNMP trap
log file.
- Run
vi /usr/sbin/zabbix_trap_handler.shto edit the script. - Press
ito enter edit mode. - Copy the following content, replace the placeholders with actual
values, then execute the command.
#!/bin/bash

ZABBIX_TRAPS_FILE="{directory_for_snmp_trap_logs}"

ZBX_SNMP_TRAP_DATE_FORMAT=${ZBX_SNMP_TRAP_DATE_FORMAT:-"+%Y%m%d.%H%M%S"}

ZBX_SNMP_TRAP_FORMAT=${ZBX_SNMP_TRAP_FORMAT:-"\n"}

ZBX_SNMP_TRAP_USE_DNS=${ZBX_SNMP_TRAP_USE_DNS:-"false"}

date=$(date "$ZBX_SNMP_TRAP_DATE_FORMAT")

# The name of the host that sent the notification, as determined by gethostbyaddr(3).
# In fact this line is irrelevant and useless since snmptrapd basically attempts to
# perform reverse name lookup for the transport address (see below).
# In case of failure it will print "<UNKNOWN>"
read host
# The transport address, like "[UDP: [172.16.10.12]:23456->[10.150.0.8]]"
read sender
# The first OID should always be SNMPv2-MIB::sysUpTime.0
#read uptime
# the second should be SNMPv2-MIB::snmpTrapOID.0
#read trapoid

# The remaining lines will contain the payload varbind list. For SNMPv1 traps, the final OID will be SNMPv2-MIB::snmpTrapEnterprise.0.
vars=
while read oid val
do
    if [ "$vars" = "" ]
    then
        vars="$oid = $val"
    else
        vars="$vars$ZBX_SNMP_TRAP_FORMAT$oid = $val"
    fi

    if [[ "$oid" =~ snmpTrapAddress\.0 ]] || [[ "$oid" =~ 1\.3\.6\.1\.6\.3\.18\.1\.3\.0 ]]; then
        trap_address=$val
    fi
done

[[ ${sender} =~ \[(.*?)\].*\-\> ]] && sender_addr=${BASH_REMATCH[1]}

! [ -z $trap_address ] && sender_addr=$trap_address

[[ "$ZBX_SNMP_TRAP_USE_DNS" == "true" ]] && ! [[ ${host} =~ \[(.*?)\].*\-\> ]] && sender_addr=$host

# Header in Zabbix format shouldn't exist anywhere in vars, it is injection
# Must exit with 0
date_regex=$(echo "$ZBX_SNMP_TRAP_DATE_FORMAT" | sed -e 's/^+//g' \
        -e 's/%Y/[0-9]\{4\}/g' \
        -e 's/%m/[0-9]\{2\}/g' \
        -e 's/%d/[0-9]\{2\}/g' \
        -e 's/%T/[0-9]\{2\}:[0-9]\{2\}:[0-9]\{2\}/g' \
        -e 's/%z/[\+\-][0-9]\{4\}/g' \
        -e 's/%H/[0-9]\{2\}/g' \
        -e 's/%M/[0-9]\{2\}/g' \
        -e 's/%S/[0-9]\{2\}/g')

zbx_trap_regex="$date_regex ZBXTRAP"
echo "$vars" | grep -qE "$zbx_trap_regex" && exit 0

echo -e "$date ZBXTRAP $sender_addr$ZBX_SNMP_TRAP_FORMAT$sender$ZBX_SNMP_TRAP_FORMAT$vars" >> $ZABBIX_TRAPS_FILE
In this example, we paste the following content:
#!/bin/bash ZABBIX_TRAPS_FILE="/var/log/snmptrap/snmptrap.log" ZBX_SNMP_TRAP_DATE_FORMAT=${ZBX_SNMP_TRAP_DATE_FORMAT:-"+%Y%m%d.%H%M%S"} ZBX_SNMP_TRAP_FORMAT=${ZBX_SNMP_TRAP_FORMAT:-"\n"} ZBX_SNMP_TRAP_USE_DNS=${ZBX_SNMP_TRAP_USE_DNS:-"false"} date=$(date "$ZBX_SNMP_TRAP_DATE_FORMAT") # The name of the host that sent the notification, as determined by gethostbyaddr(3). # In fact this line is irrelevant and useless since snmptrapd basically attempts to # perform reverse name lookup for the transport address (see below). # In case of failure it will print "<UNKNOWN>" read host # The transport address, like "[UDP: [172.16.10.12]:23456->[10.150.0.8]]" read sender # The first OID should always be SNMPv2-MIB::sysUpTime.0 #read uptime # the second should be SNMPv2-MIB::snmpTrapOID.0 #read trapoid # The remaining lines will contain the payload varbind list. For SNMPv1 traps, the final OID will be SNMPv2-MIB::snmpTrapEnterprise.0. vars= while read oid val do if [ "$vars" = "" ] then vars="$oid = $val" else vars="$vars$ZBX_SNMP_TRAP_FORMAT$oid = $val" fi if [[ "$oid" =~ snmpTrapAddress\.0 ]] || [[ "$oid" =~ 1\.3\.6\.1\.6\.3\.18\.1\.3\.0 ]]; then trap_address=$val fi done [[ ${sender} =~ \[(.*?)\].*\-\> ]] && sender_addr=${BASH_REMATCH[1]} ! [ -z $trap_address ] && sender_addr=$trap_address [[ "$ZBX_SNMP_TRAP_USE_DNS" == "true" ]] && ! [[ ${host} =~ \[(.*?)\].*\-\> ]] && sender_addr=$host # Header in Zabbix format shouldn't exist anywhere in vars, it is injection # Must exit with 0 date_regex=$(echo "$ZBX_SNMP_TRAP_DATE_FORMAT" | sed -e 's/^+//g' \ -e 's/%Y/[0-9]\{4\}/g' \ -e 's/%m/[0-9]\{2\}/g' \ -e 's/%d/[0-9]\{2\}/g' \ -e 's/%T/[0-9]\{2\}:[0-9]\{2\}:[0-9]\{2\}/g' \ -e 's/%z/[\+\-][0-9]\{4\}/g' \ -e 's/%H/[0-9]\{2\}/g' \ -e 's/%M/[0-9]\{2\}/g' \ -e 's/%S/[0-9]\{2\}/g') zbx_trap_regex="$date_regex ZBXTRAP" echo "$vars" | grep -qE "$zbx_trap_regex" && exit 0 echo -e "$date ZBXTRAP $sender_addr$ZBX_SNMP_TRAP_FORMAT$sender$ZBX_SNMP_TRAP_FORMAT$vars" >> $ZABBIX_TRAPS_FILE - Press Esc, enter
:wq, then press Enter to save and exit.
- Run
- Grant execute permission for the Bash receiver script.
chmod +x /usr/sbin/zabbix_trap_handler.sh - Verify that the trap handler in
/etc/snmp/snmptrapd.confis configured to use the Bash receiver script.grep "traphandle" /etc/snmp/snmptrapd.confIf either
traphandle default /usr/sbin/zabbix_trap_handler.shortraphandle default /bin/bash /usr/sbin/zabbix_trap_handler.shis returned, it indicates that the configuration is correct. - Restart snmptrapd service to apply the configuration changes.
- Method 1: Restart snmptrapd as a system service
systemctl restart snmptrapd - Method 2: Stop snmptrapd and start it manually
kill -9 $(pidof snmptrapd)
snmptrapd -f -Lo -n -c /etc/snmp/snmptrapd.conf
- Method 1: Restart snmptrapd as a system service
- Copy the following content, replace the placeholder with actual value, then
execute the command to verify if snmptrapd service is listening on the SNMP
Trap port to receive incoming trap messages.
ss -unlp | grep {port}In this example, we paste the following content:
ss -unlp | grep 162If the command returns a line containing
snmptrapdand:162, it indicates that the service is listening correctly. - Create the log directory and an empty log file to store received SNMP trap
messages.
# Create the directory for SNMP trap logs if it does not exist mkdir -p /var/log/snmptrap/ # Create an empty log file for storing trap messages touch /var/log/snmptrap/snmptrap.log # Allow read and write access for all users chmod 666 /var/log/snmptrap/snmptrap.log - Configure Bash trap handler to receive incoming traps and write them into
the log file created.
- Configure Zabbix server to enable trap receiver.
- Run
vi /etc/zabbix/zabbix_server.confto edit the Zabbix configuration file. - Press
ito enter edit mode. - Add or update the following
parameters:
# Enable SNMP trap processing in Zabbix server
StartSNMPTrapper=1

# Define log file path for incoming traps
SNMPTrapperFile={directory_for_snmp_trap_logs}
In this example, we paste the following content:
# Enable SNMP trap processing in Zabbix server StartSNMPTrapper=1 # Define log file path for incoming traps SNMPTrapperFile=/var/log/snmptrap/snmptrap.log - Press Esc, enter
:wq, then press Enter to save and exit.
- Run
- Restart Zabbix server to apply SNMP trap settings.
systemctl restart zabbix-server
- Configure Zabbix server to enable trap receiver.
- Add a monitoring item for trap.
- On the left navigation bar, go to .
- Click Items beside the desired host.

- At the top-right corner, click Create item.
- Configure the following settings.

Setting Description Name Enter a name to help you identify the item. In this example, enter PBXTrapData.
Type Select SNMP trap. Key Enter a unique key for the item. In this example, enter snmptrap.fallback.
Type of information Select Log. Host interface Select the host interface for SNMP trap. Log time format Specify the pattern for parsing the log line timestamp.
In this example, enter yyyyMMdd.hhmmss.
- Click Add.
- Create trigger(s) for SNMP trap event notification.
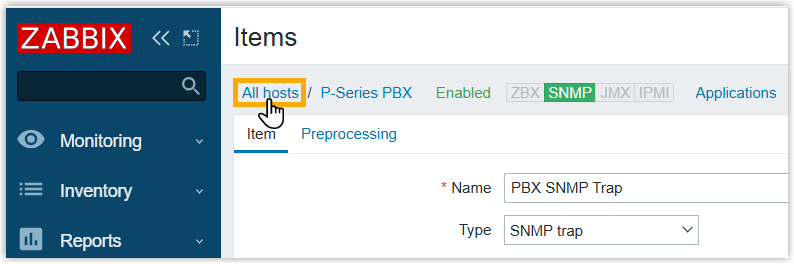
- At the top of the page, click All hosts to
return to the host list.
- Click Triggers beside the desired host.
- At the top-right corner, click Create trigger.
- Configure the following settings.

Setting Description Name Enter a name to help you identify the trigger. In this example, enter ExtensionDown. Expression Define the condition used to detect SNMP trap events.
In this example, enter find(/P-Series PBX/snmptrap.fallback,,"like","pIPphoneDown")=1 or find(/P-Series PBX/snmptrap.fallback,,"like","pExtDown")=1.
- Click Add.
- At the top of the page, click All hosts to
return to the host list.
- Verify whether the SNMP Trap message is successfully received.
- On the left navigation bar, go to .
- Search for the desired host.
- Click History beside the SNMP Trap monitoring
item.
If the trap is successfully received, the SNMP Trap message will be displayed in the bottom panel.

Result
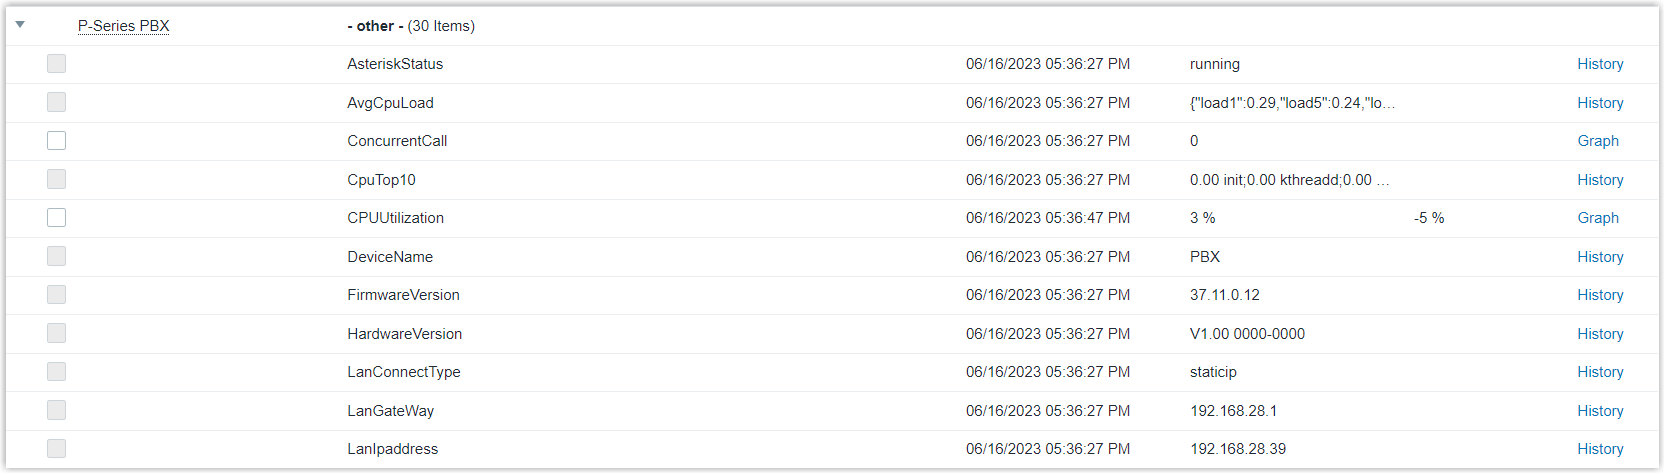
You can view the latest data collected on Zabbix.- On the left navigation bar, go to , search and find the PBX host.
- Click Latest data beside the host.

You can view the latest data of the PBX.