Archive Files to FTP Server
Yeastar P-Series PBX System supports archiving the system's call recordings and backup files to FTP server, either on a regular interval or at any time you want. This topic describes how to add FTP server as an archive server and schedule tasks to archive the desired files.
Requirements
| Item | Requirement |
|---|---|
| PBX Firmware | Version 37.22.0.17 or later |
| PBX Plan | Enterprise Plan or Ultimate Plan |
Limitations
- Archive server: 10
- Archive task: 200
Prerequisites
- Prepare an FTP server, and note down its Domain/IP Address, Port, and File Transfer Protocol.
- Prepare an FTP account with both read and write permissions,
and note down its Username and Password.Note: If you want old files to be automatically deleted from your FTP server, make sure the FTP account also has file deletion permission.
Step 1. Add FTP server as archive server
- Log in to PBX web portal, go to .
- Under the Archive Task tab, click
Archive Server.
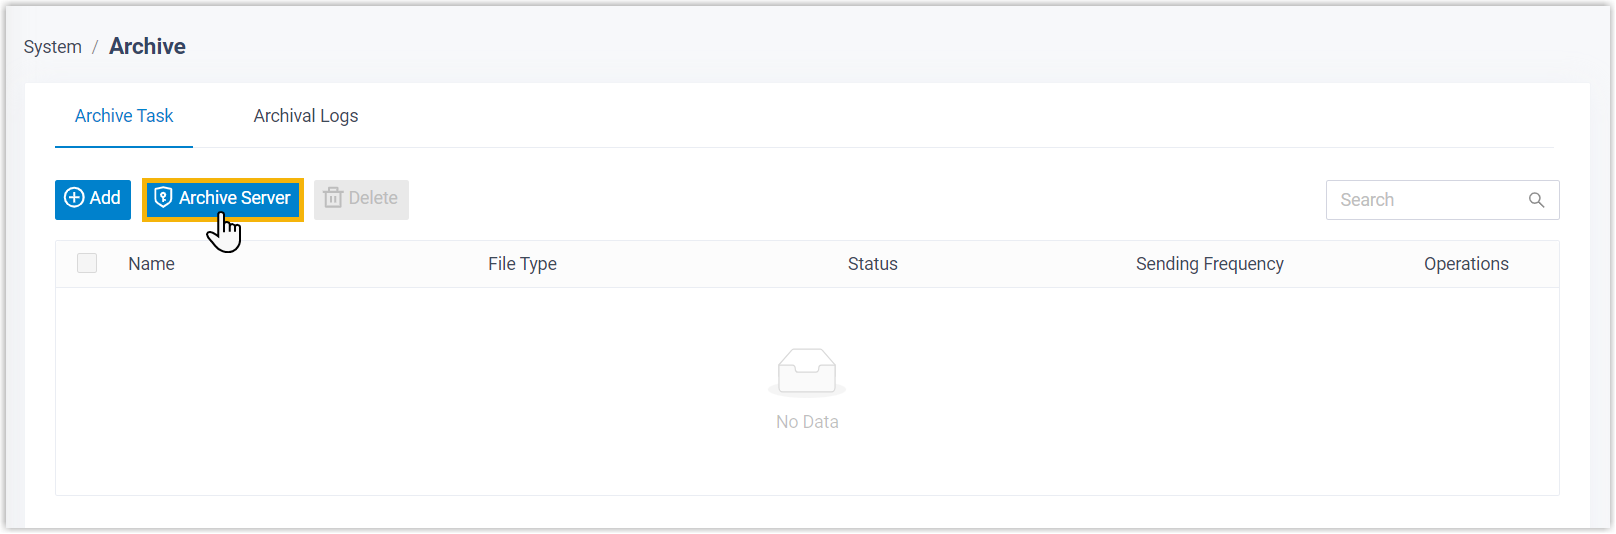
- Set up FTP server as the archive server.
- Click Add.
- In the pop-up window, complete the following settings.
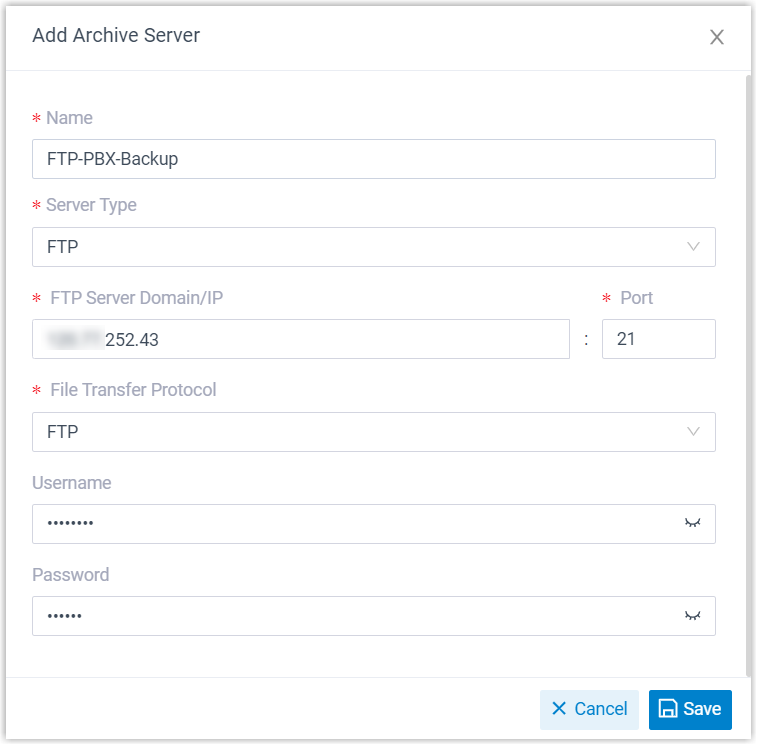
Setting Description Name Enter a name to help you identify the server. Server Type Select FTP. FTP Server Domain/IP Enter the address of your FTP server. Port Enter the port on which your FTP server is running. The default port is 21. File Transfer Protocol Select the transfer protocol supported by the FTP server. - FTP: Standard File Transfer Protocol.
- FTPES: FTP over
Explicit TLS/SSL.Note:
- The TLS feature on the FTP server must be enabled, and the encryption policy must be well-configured for security reason.
- The supported TLS protocol version is TLS V1.2.
Username Enter the username for the FTP account. Password Enter the password associated with the username. - Click Save.
The FTP server is added as an archive server and displayed on the archive server list.
- Click
 to close the window.
Step 2. Create a task to archive files to FTP server
- Under Archive Task tab, click Add.
- In the Task Configuration section, complete the basic
settings for the archive task.
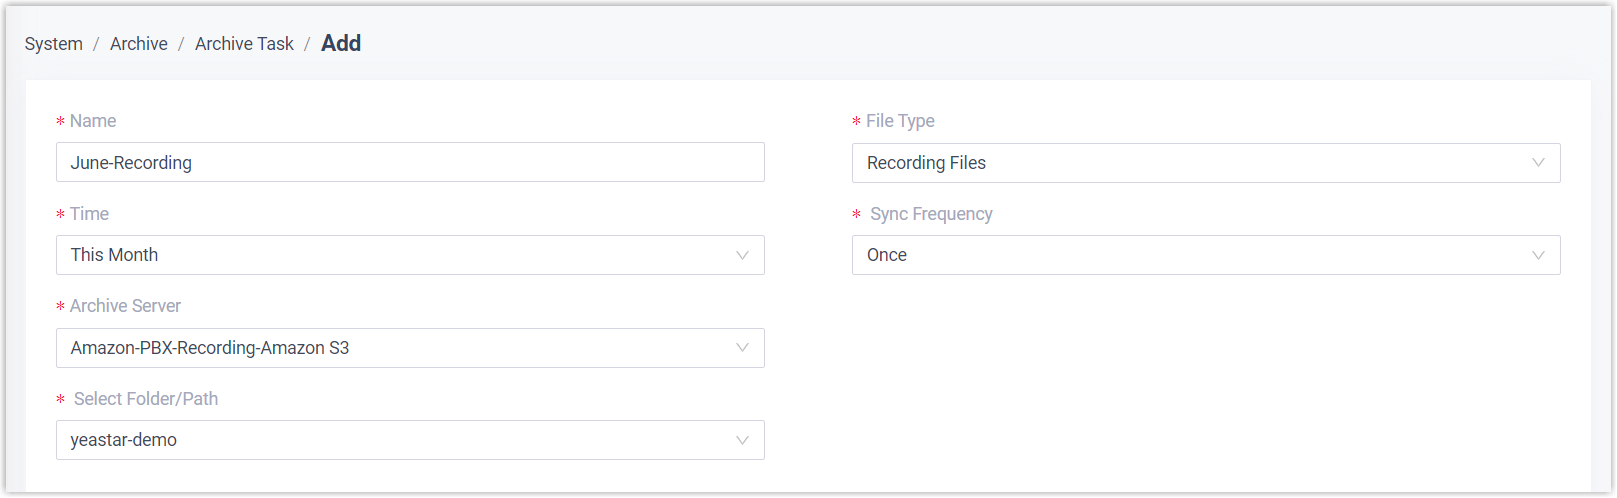
Setting Description Name Enter a name to help you identify the task. File Type Select Recording Files or Backup Files as needed. Data Range Specify a time range of the files to be archived. Note: You can archive files for up to 31 days at a time.Sync Frequency Set how often to archive files to FTP server. Note: As large amounts of data will consume PBX's CPU resources, we recommend that you schedule archive tasks during off-peak hours.- Once: If you choose the option, the system will archive files immediately after you save the task.
- Daily: If you choose the option, select a time from the drop-down list. The system will archive files at this time of the day.
- Weekly: If you choose the option, choose a day of week and select a time from the drop-down list. The system will archive files at this time of the week.
-
Monthly: If you choose the option, choose a day and select a time from the drop-down list. The system will archive files on this day and time of the month.
Recording File Format Select the download format for recording files. Note:- This option is available only when you schedule to archive recording files.
- All recording files in the system will be downloaded and archived in the selected format.
- In the Storage Configuration section, select the
archive server and complete the related settings.
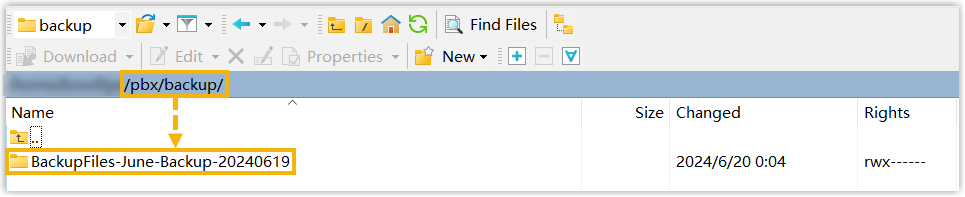
Setting Description Archive Server Select the FTP server that you have added. Select Folder/Path Optional. Set the path to the folder in which you want to store archived files. For example, pbx/backup/.Note: If you leave this field blank, the files will be stored under the root directory.Storage Method Specify the storage method for archived files based on the archive task's execution frequency.
- One-time task
-
- Create Task Folder: Create a folder named "FileType-TaskName" under the selected path and store files within it.
- Save Directly to Selected Path: Save the archived files directly to the selected path without creating a folder.
- Recurring task
-
- Create Folder per Execution: Create a folder named "FileType-TaskName-ExecutionDate" under the selected path each time the task executes, and store files within it.
- Create Task Folder Once and Reuse It: Create a folder named "FileType-TaskName" under the selected path during the first execution, and store files from subsequent executions in the same folder.
- Save Directly to Selected Path: Store files directly to the selected path each time the task executes, without creating a folder.
Skip archived files Optional. Specify whether to skip files that have already been archived. Note: This option is available only when you schedule to archive recording files.- If enabled, the system will NOT archive files that have already been archived.
- If disabled, the system will archive files even if they have been previously archived. The file's storage location will be updated, but the previous copy will NOT be deleted from the third-party server.
Delete local files after archiving Optional. Specify whether to delete local files after archiving. Note: This option is available only when you schedule to archive recording files.- If enabled, the local files will be deleted after archiving. They can still be played and downloaded from PBX admin portal and Linkus UC clients, but are NO longer available for playback and download on third-party server or Dynamics 365.
- If disabled, the local files are retained after archiving.
Organize Files by Date Optional. Specify whether to organize archived files by date. - If enabled, the system will create date-based
subfolders under the storage path, with folder
names formatted as YYYYMMDD (e.g. 20260301).Note: If the selected time range contains only one data record, no date-based subfolder will be created, and files will be stored directly in the specified path.
- If disabled, the system will save files directly in the specified path, without organizing them by date.
- Optional: Set retention policy for archived files.Note:
- This option is available only when you schedule to archive on a recurring basis.
- Ensure that the FTP account has permission to DELETE resources on the archive server.

Setting Description Retention Type Specify how archived files are retained.
- Retention by Quantity:
Retain files/folders in the archive server storage
path based on the maximum number allowed.
If you choose this option, enter the desired number in the Retention Limit (files/folders) field.
When the number of files/folders exceed the configured value, the system automatically deletes the oldest ones.
- Retention by Days: Retain
files/folders in the archive server storage path
based on the maximum retention period.
If you choose this option, enter the desired days in the Retention Limit (in days) field.
Files/folders that exceed the maximum retention period will be automatically deleted.
Note:- The retention period is calculated from the archive time on the archive server, not from the file creation time on PBX.
- Retention period is measured in exact 24-hour intervals, not calendar days.
Retention Limit Specify the maximum number of files/folders or the maximum retention days, depending on the selected retention type. Retention Unit Select the retention unit. - Folder: This indicates
the task folders created on the archive server
upon archive.Note:
- This option is available only when the Storage Method is set to Create Folder per Execution.
- The folder does NOT include date-based subfolders generated by the Organize Files by Date feature.
- File: This indicates the individual files archived on the archive server.
- Click Save.
Result
The specified files will be archived to the designated folder in your FTP server immediately or at the scheduled time.
You can check the archive result in the following ways.
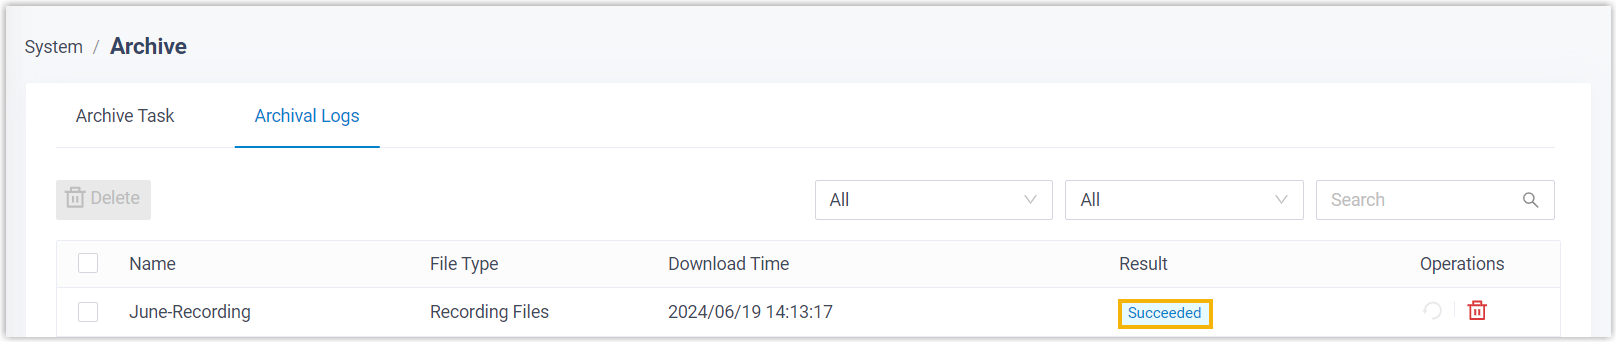
- Check the archive result on PBX
- On PBX web portal, go to . If the Result column of the task shows Succeeded, it indicates that the specified files have been successfully archived to the FTP server.
-
 Note: If the task is failed, the Failed to Archive File(s) event will be triggered; You can click
 to retry the
task.
to retry the
task.
- Check the archive result on FTP server
- Go to the designated folder in FTP server. If the specified files appear in the list, it indicates that the archive is successful.