Integrate Yeastar Workplace with Active Directory
This topic describes how to integrate Yeastar Workplace with Active Directory (AD) using Lightweight Directory Access Protocol (LDAP).
Requirements
-
Operating System: Windows Server 2008 / 2008 R2 / 2012 / 2012 R2 / 2016 / 2019 / 2022
-
Yeastar Workplace Plan: Pro Plan
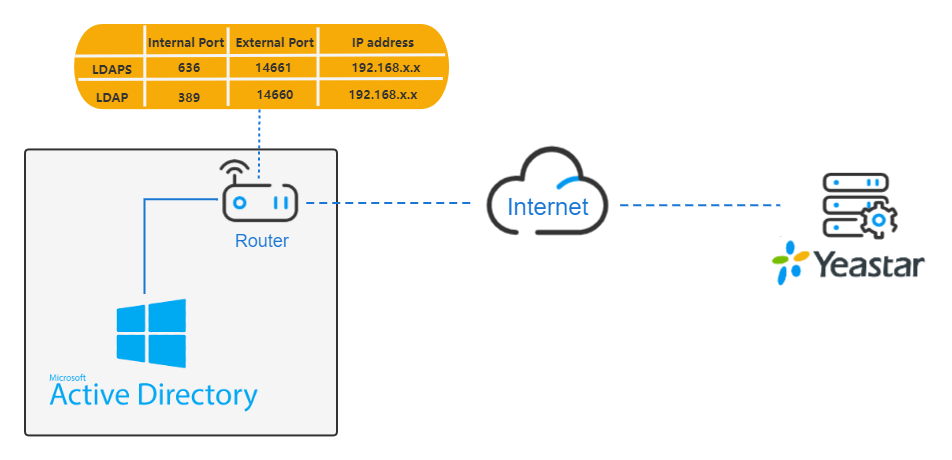
Network Scenario
This topic describes how to integrate Yeastar Workplace and Active Directory from different networks. For example, you are using the SaaS version of Yeastar Workplace and the Active Directory is on-premise deployed. In this case, you need to configure port forwarding on the network where the Active Directory locates to ensure Yeastar Workplace can communicate with your Active Directory (AD) via LDAP protocol.
We provide a diagram to help you understand the integration in a better manner:
Prerequisites
- Configure your network
-
- Make sure that Yeastar Workplace can access the Active Directory.
- Forward the following port(s) as needed on the router to pass
LDAP(S) requests from Yeastar Workplace to Active Directory.
- TCP/UDP 389 for LDAP
-
TCP/UDP 636 for LDAPS (Recommended)
Note: For Windows Server 2016 and above, Active Directory Certificate Services (AD CS) is required when using LDAPS protocol. For more information, see Enable LDAP over SSL with a third-party certification authority.
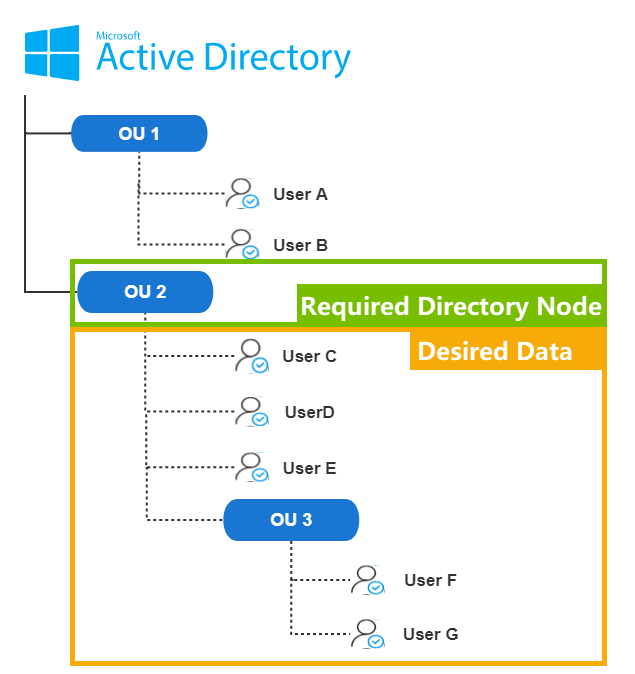
- Gather the following information from Active Directory
-
- The Distinguished Name (DN) of the directory node where
you want the data to be synced to Yeastar Workplace. The
directory node will be used as the root for LDAP query, you can
sync the desired AD users, groups, or organizational units in
this directory to Yeastar Workplace.
For example, if you want to sync data in OU2 to Yeastar Workplace, then collect the DN of OU2.
 Note: How to check the Distinguished Name of the desired directory node?
- In the Active Directory Users and
Computers page, click
View and select
Advanced Features.
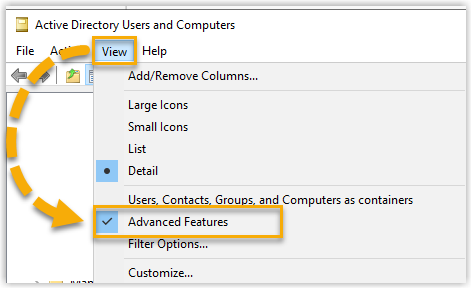
- Right click the desired directory node, and check the DN on .
- In the Active Directory Users and
Computers page, click
View and select
Advanced Features.
- The Distinguished Name (DN) of the directory node where
you want the data to be synced to Yeastar Workplace. The
directory node will be used as the root for LDAP query, you can
sync the desired AD users, groups, or organizational units in
this directory to Yeastar Workplace.
-
- The logon name and password of an Active
Directory domain account that has read access to the desired
directory.Note: Right click the desired account, and check the logon name on .

- The logon name and password of an Active
Directory domain account that has read access to the desired
directory.
Procedure
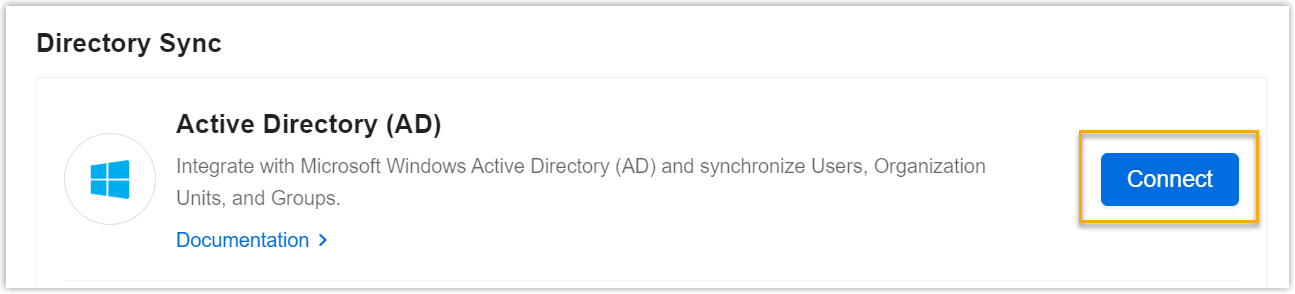
- Log in to Yeastar Workplace admin portal, and go to Integration.
- In the Directory Sync section, click
Connect beside Active Directory
(AD).
- In the Connect to Server section, fill in the following information.
Setting Description Host Enter the public IP address of the Active Directory. Protocol Specify the communication protocol.
- LDAP: Unencrypted LDAP communication.
- LDAPS: Encrypted LDAP communication with SSL.
Port Enter the mapped port, which is used to pass LDAP(S) request from Yeastar Workplace to Active Directory. Base DN Enter the distinguished name of the base entry as the root for LDAP query in Active Directory. -
In the Account Verification section, enter the credential of an AD domain account.
-
User Name: Enter the logon name of an AD domain account.
-
Password: Enter the password associated with the user name.
-
-
Click OK.
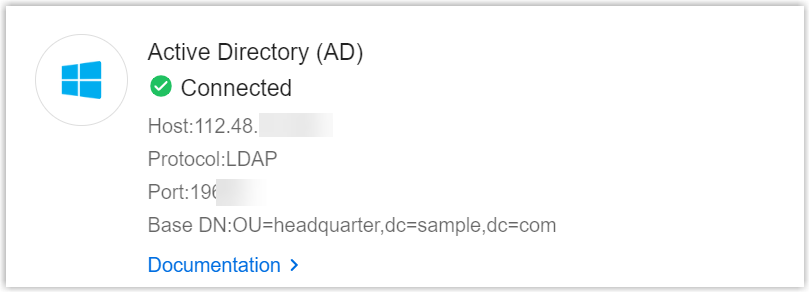
Result
The Integration page displays Connected, indicating that Yeastar Workplace is successfully connected to Active Directory.The details of the connection are also displayed on this page.
What to do next
Set up synchronization rules to synchronize the desired AD users, organizational units, and groups to Yeastar Workplace. For more information, see Synchronize AD Users/OUs/Groups to Yeastar Workplace.