Reset the System on Web Interface
This topic describes how to reset Yeastar P-Series Cloud Edition on web interface.
Note: After you reset the system, the domain name of
Yeastar P-Series Cloud Edition remains unchanged, but you need to re-activate the
PBX.
Prerequisites
- Ensure there are no ongoing calls, or the calls would be disconnected.
- We recommend that you create a backup file for PBX configurations before proceeding.
Procedure
- Log in to PBX web portal, go to .
- Select the configurations and data that you want to clear.
- Reset All: Clear all the configurations and data on the PBX.
- Reset CDR, Call Reports and Recording Files: Clear all call logs, call reports, and recording files stored on PBX local disk.
- Reset Backup Files: Clear backup files.
- Reset Prompts: Clear custom
prompts.Note: Whether the option is enabled or not, system prompts, music on hod, and preference settings for all the prompts would be cleared.
- Reset Company Contacts: Clear company contacts, phonebooks, and Caller ID match settings.
- Reset Other System Configurations: Reset all the logs and configurations except CDR, call reports, recording files, backup files, prompts, and contacts.
- Click Factory Reset.
A Factory Reset dialog box pops up.
-
In the pop-up dialog box, complete the followings.
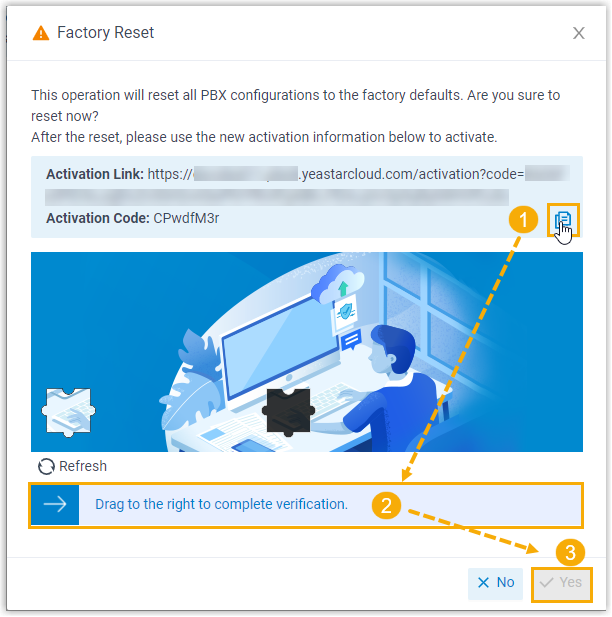
- Click
 to take note of the
Activation Link and Activation
Code.Important: You need to use the new activation link and activation code to activate the PBX after resetting.
to take note of the
Activation Link and Activation
Code.Important: You need to use the new activation link and activation code to activate the PBX after resetting. - Drag to verify your operation.
- Click Yes.
- Click
Result
It takes several minutes to reset the PBX. After resetting, the current web page prompts that the PBX is not activated.
What to do next
- Click the activation link, which redirects you to the PBX activation page. Then
paste the activation code and click Confirm.
You will be redirected to Installation Wizard page,
- Follow the Installation Wizard to set up the PBX.