Set up New Cluster Server Domain Names (DNS Alias Mode)
This topic describes how to set up new domain names for cluster servers (SBC Server and SBC Proxy Server) in a region, and manage certificate issuance and renewal via DNS alias mode without requiring your DNS provider's API credentials.
Introduction
Yeastar Central Management supports two methods for domain certificate management:
-
DNS API Mode: The system automatically interacts with your DNS provider's native API to complete certificate application and renewal. It dynamically adds and removes DNS TXT records required for ACME challenge, handling issuance and renewal without manual intervention. This method requires you to provide API credentials for your DNS provider.
For more information, see Set up New Cluster Server Domain Names (DNS API Mode).
-
DNS Alias Mode: The system uses ACME delegation via CNAME record to complete certificate application and renewal without requiring any API credentials. You manually add a one-time, static DNS CNAME record during initial setup to delegate SSL verification authority. After that, the system handles certificate renewal automatically. For more information, see the instructions in this topic.
Requirements and restrictions
- Requirements
-
-
The firmware version of Yeastar Central Management is 87.19.0.76 or later.
- You have purchased sufficient custom domain quotas for the
Custom Domain service.Note: If you have subscribed to the White Label service, one custom domain quota is provided by default.
- You have added a DNS provider for DNS Alias mode in the system if you want the system to request or refresh domain certificates automatically.
-
- Restrictions
- Once the domain is successfully deployed, it cannot be changed. You can only delete the domain and re-deploy it.
Step 1. Obtain server information and CNAME targets
- Log in to Yeastar Central Management, go to , then click Add.
You are redirected to the Add Cluster Domain page.
- In the Region drop-down list, select the
region where the cluster servers are deployed.

The system automatically recognizes and displays the IP address of SBC Server and SBC Proxy Server that are deployed in the region.
- Obtain the cluster server's IP addresses, and the SBC Proxy Server domain
name.
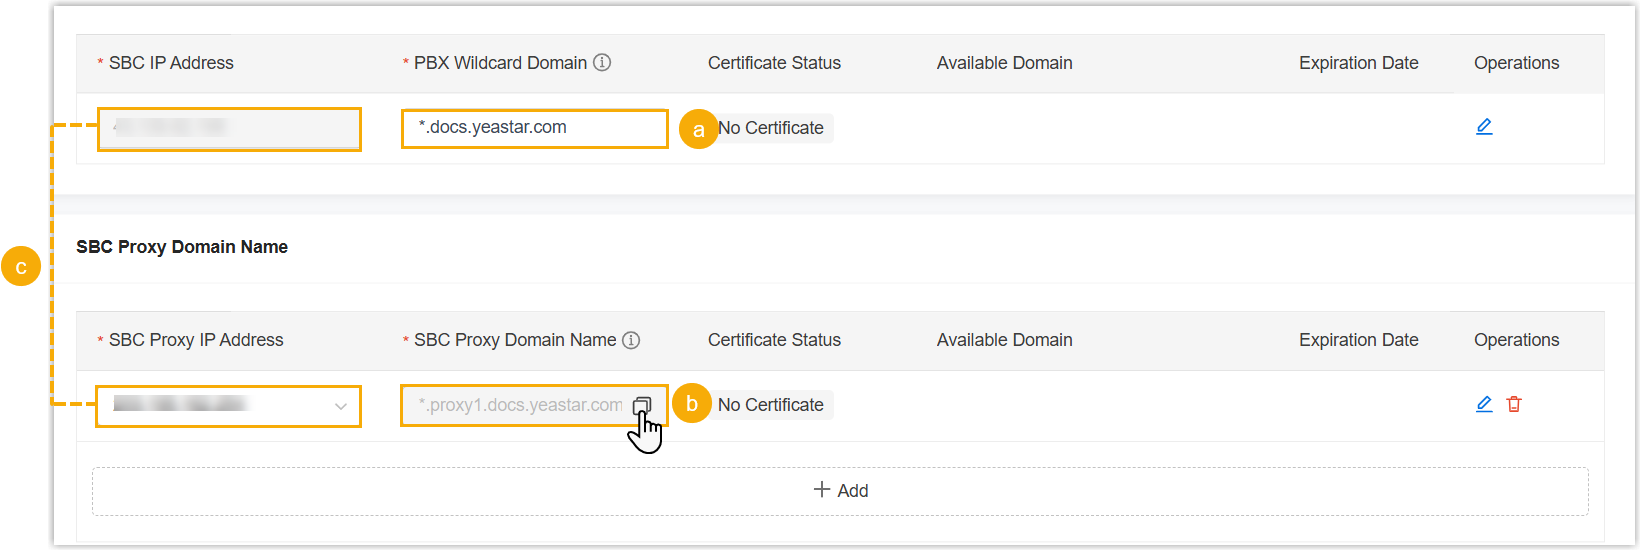
- In the PBX Wildcard Domain field, enter your
SBC Server domain name.
SBC Proxy Domain displays the SBC Proxy Server domain name accordingly.
- Note down the corresponding SBC Proxy Server domain name.Note: If you have deployed more than one SBC Proxy Server in the region, click Add and note down another IP address and domain name for the additional SBC Proxy Server.
- Note down both the IP addresses of the SBC Server and SBC Proxy Server.
- In the PBX Wildcard Domain field, enter your
SBC Server domain name.
- Obtain the CNAME targets.
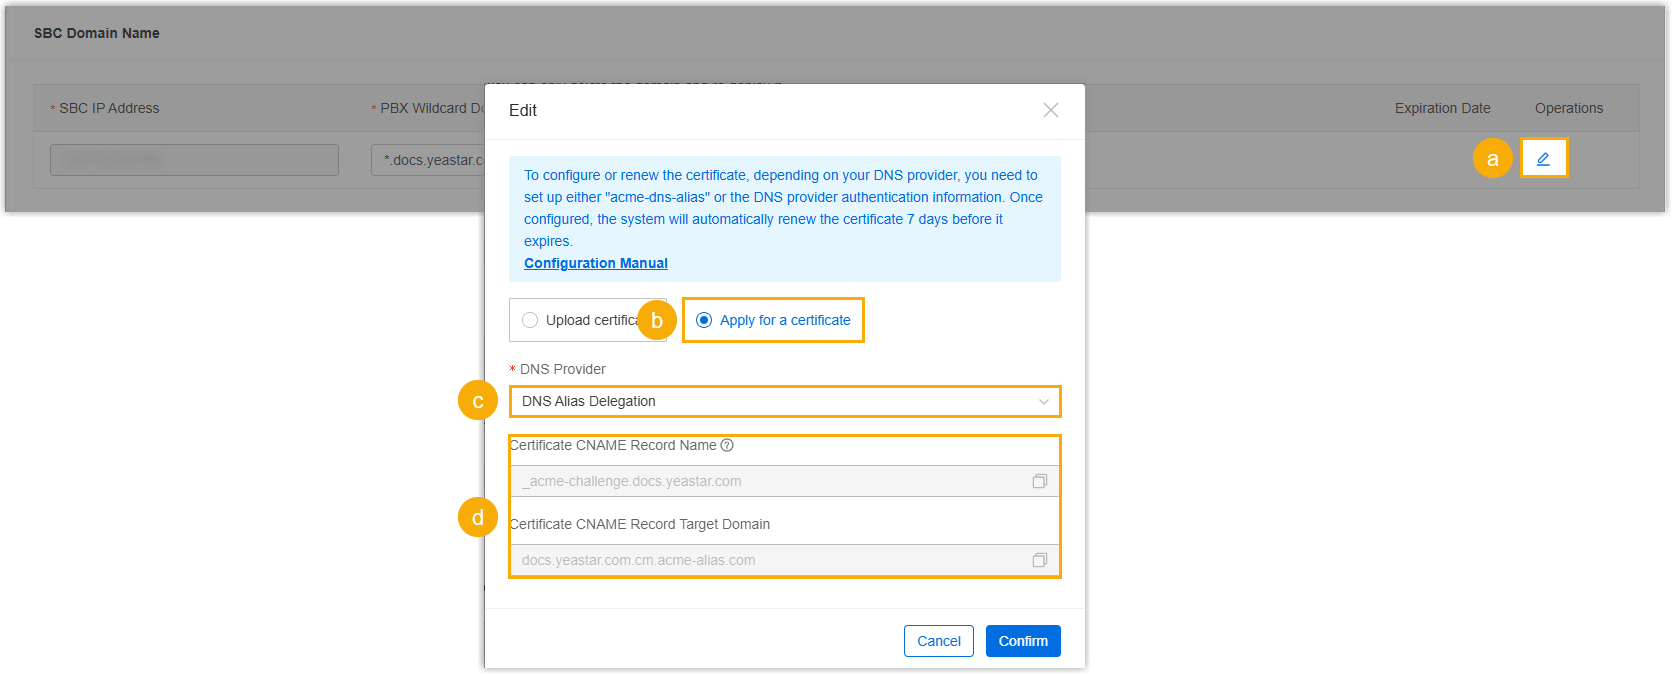
- In the Operations column of SBC
Domain Name section, click
 .
. - In the pop-up window, select Apply for a certificate.
- In the DNS Provider drop-down list, select the DNS provider you added for DNS Alias Mode.
- Note down the Certificate CNAME Record Name and Certificate CNAME Record Target Domain.
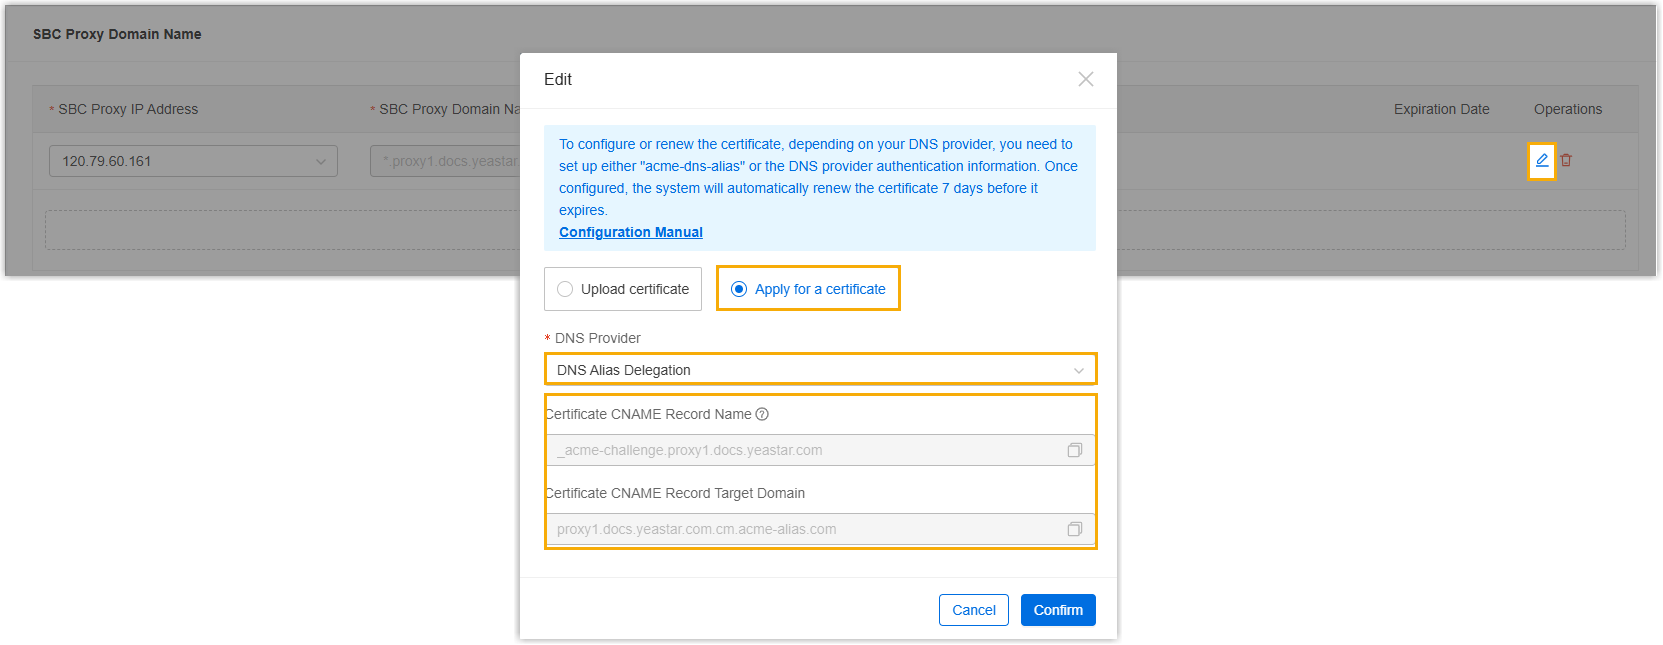
- In the SBC Proxy Domain Name section, click
, then repeat steps b - d
to obtain the CNAME target for SBC Proxy Server.
- In the Operations column of SBC
Domain Name section, click
Step 2. Configure DNS records on your DNS Provider
Add the required DNS records (A records and CNAME records) on your DNS provider's management console.
- Log in to your DNS provider's management console, and locate your domain name.
- Add the following DNS records for the domain name.
- A records
Set up domain forwarding to resolve the domain names to the corresponding server IP addresses.
Domain Name Record Type IP Address PBX wildcard domain name *.docs.yeastar.comA SBC IP address 123.123.123.123.SBC Proxy domain name *.proxy1.docs.yeastar.comA SBC Proxy IP address 124.124.124.124 - CNAME records
Add CNAME records to point the validation domain names to the CNAME target domains generated by Yeastar Central Management.
Domain Name Record Type Target Domain SBC Server's certificate CNAME record name _acme-challenge.docs.yeastar.comCNAME SBC Server's certificate CNAME record target domain docs.yeastar.com.cm.acme-alias.comSBC Proxy Server's Certificate CNAME Record Name _acme-challenge.proxy1.docs.yeastar.comCNAME SBC Proxy Server's certificate CNAME record target domain proxy1.docs.yeastar.com.cm.acme-alias.com
- A records
(Optional) Step 3. Prepare domain certificates
Purchase and download SSL certificates from Certified Authority (CA).
- Purchase wildcard SSL certificates for the domain names.
In this example, purchase wildcard SSL certificates for the domain name
*.docs.yeastar.comand*.proxy1.docs.yeastar.com. - Download the wildcard SSL certificates and private keys.Note:
- Yeastar P-Series Cloud PBX uses NGINX as web server, so the downloaded SSL certificates should be compatible with NGINX server.
- RSA private key and EC private key are supported to secure the domain names.
Step 4. Deploy domain certificates
- Automatic certificate deployment
- You can directly apply for certificate on Yeastar Central Management, the system will automatically request domain certificates from Let's Encrypt via your DNS provider.
-
- Log in to Yeastar Central Management, go to , then click Add.
You are redirected to the Add Cluster Domain page.
- In the Region drop-down list, select the
region where the cluster servers are deployed.
The system automatically recognizes and displays the IP address of SBC Server and SBC Proxy Server that are deployed in the region.
- In the SBC Domain Name section, configure
domain name and certificate for SBC Server.
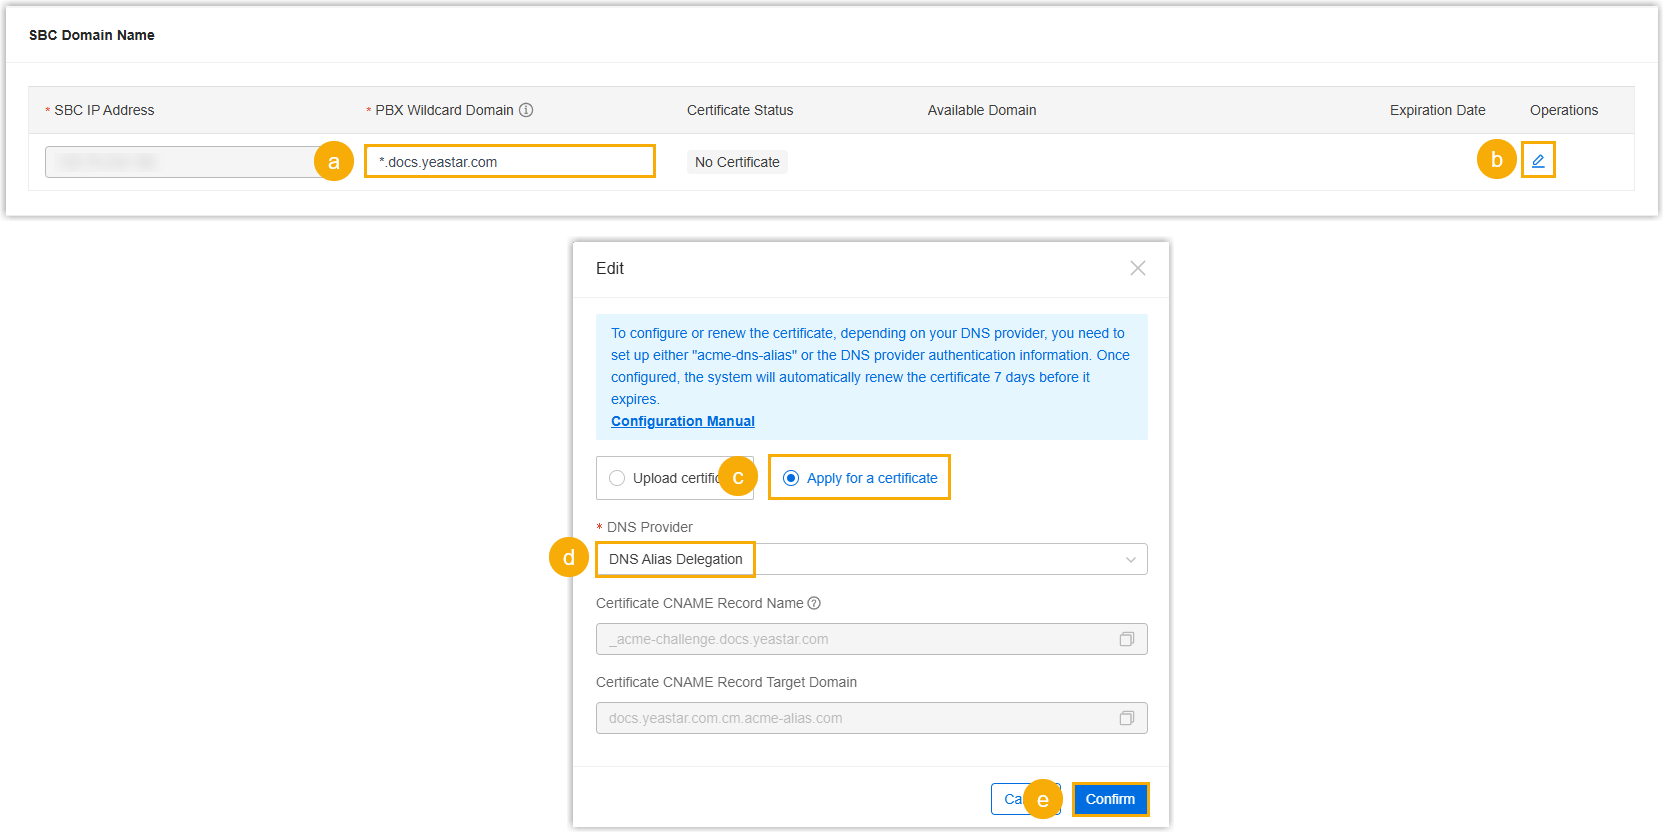
- In the PBX Wildcard Domain field, enter your SBC domain name.
- In the Operations column, click
to configure domain
certificate.
- In the pop-up window, select Apply for a certificate.
- In the DNS Provider drop-down list, select the DNS provider you added for DNS Alias mode.
- Click Confirm.
- In the SBC Proxy Domain Name section,
configure domain name(s) and certificate(s) for SBC Proxy
Server(s).
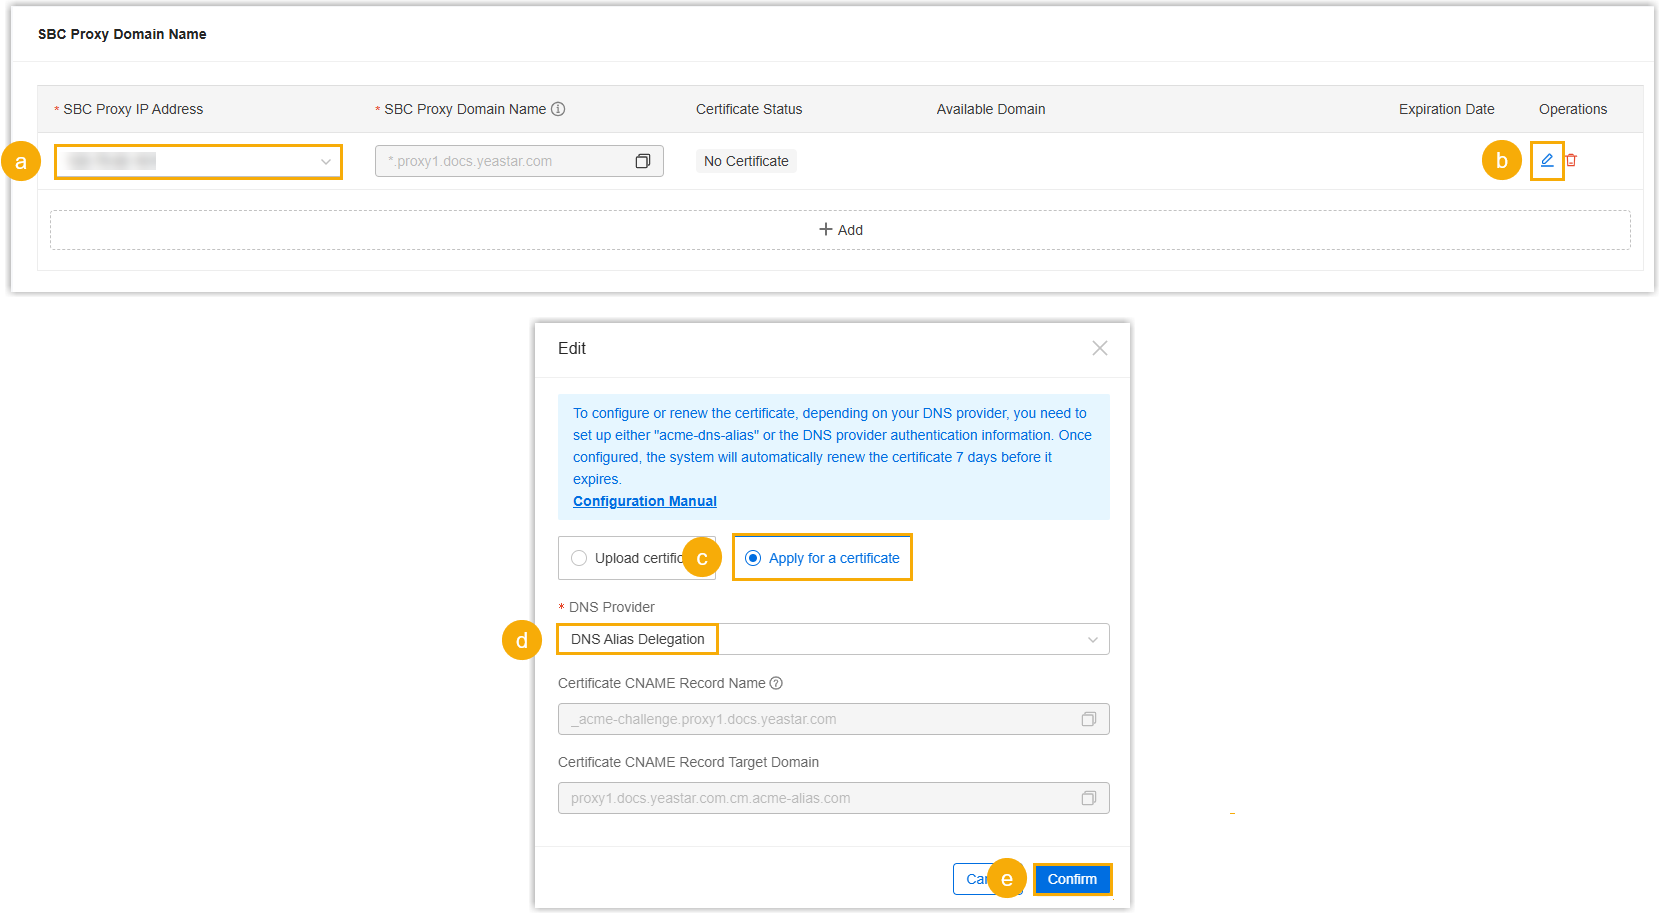
- In the SBC Proxy IP Address drop-down
list, select the IP address of a SBC Proxy Server.
A domain name is automatically generated based on the SBC wildcard domain name set in the previous step.
- In the Operations column, click
to configure domain
certificate.
- In the pop-up window, select Apply for a certificate.
- In the DNS Provider drop-down list, select the DNS provider you added for DNS Alias mode.
- Click Confirm.
- Optional: Click Add to configure domain name and certificate for additional SBC Proxy Server.
- In the SBC Proxy IP Address drop-down
list, select the IP address of a SBC Proxy Server.
- Click Save.
- Log in to Yeastar Central Management, go to , then click Add.
- Manual certificate deployment
-
- Log in to Yeastar Central Management, go to , then click Add.
You are redirected to the Add Cluster Domain page.
- In the Region drop-down list, select the
region where the cluster servers are deployed.
The system automatically recognizes and displays the IP address of SBC Server and SBC Proxy Server that are deployed in the region.
- In the SBC Domain Name section, do as
follows:
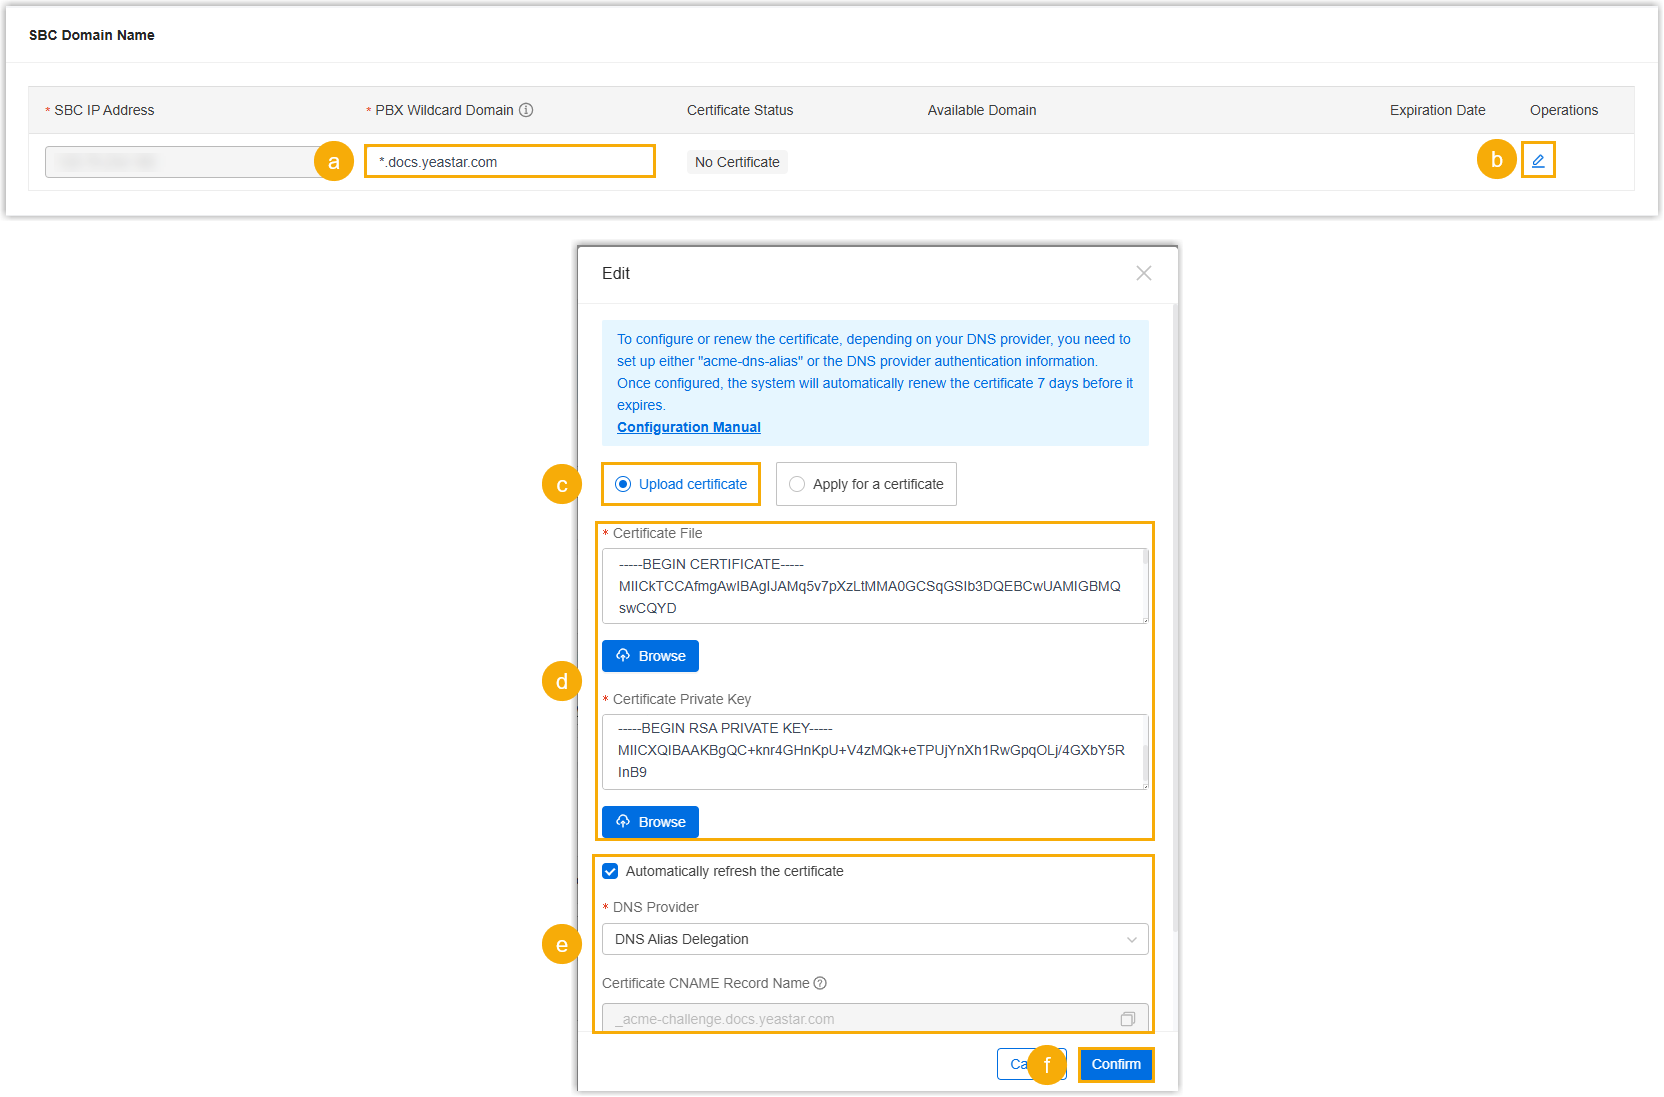
- In the PBX Wildcard Domain field, enter your SBC domain name.
- In the Operations column, click
to configure domain
certificate.
- In the pop-up window, select Upload certificate.
- Upload the certificate file and private key.
- Certificate File: Click
Browse to select the
certificate file in the format of
.cer,.crt, or.pem.Important: The certificate file must include a COMPLETE Certificate Chain, including the Root CA Certificate, the Intermediate Certificate, and the Server Domain Certificate. - Certificate Private Key:
Click Browse to select the
private key in the format of
.key.Note: The supported content formats are as follows:- Start with
-----BEGIN RSA PRIVATE
                                                  KEY-----
and end with-----END RSA PRIVATE KEY-----. - Start with
-----BEGIN PRIVATE
                                                  KEY-----
and end with-----END PRIVATE KEY-----. - Start with
-----BEGIN EC PRIVATE
                                                  KEY-----
and end with-----END EC PRIVATE KEY-----.
- Start with
- Certificate File: Click
Browse to select the
certificate file in the format of
- If you want the system to automatically refresh the
certificate, select the checkbox of Automatically
refresh the certificate, then select your
DNS provider (DNS Alias Mode) in the DNS
Provider drop-down list.Note:
- The system will automatically refresh the certificate 7 days before it expires using the provided DNS provider.
- If auto-refresh is enabled but your certificate is not from Let's Encrypt, the system will automatically apply for a new one from Let's Encrypt instead.
- Click Confirm.
- In the SBC Proxy Domain Name section, do as
follows:
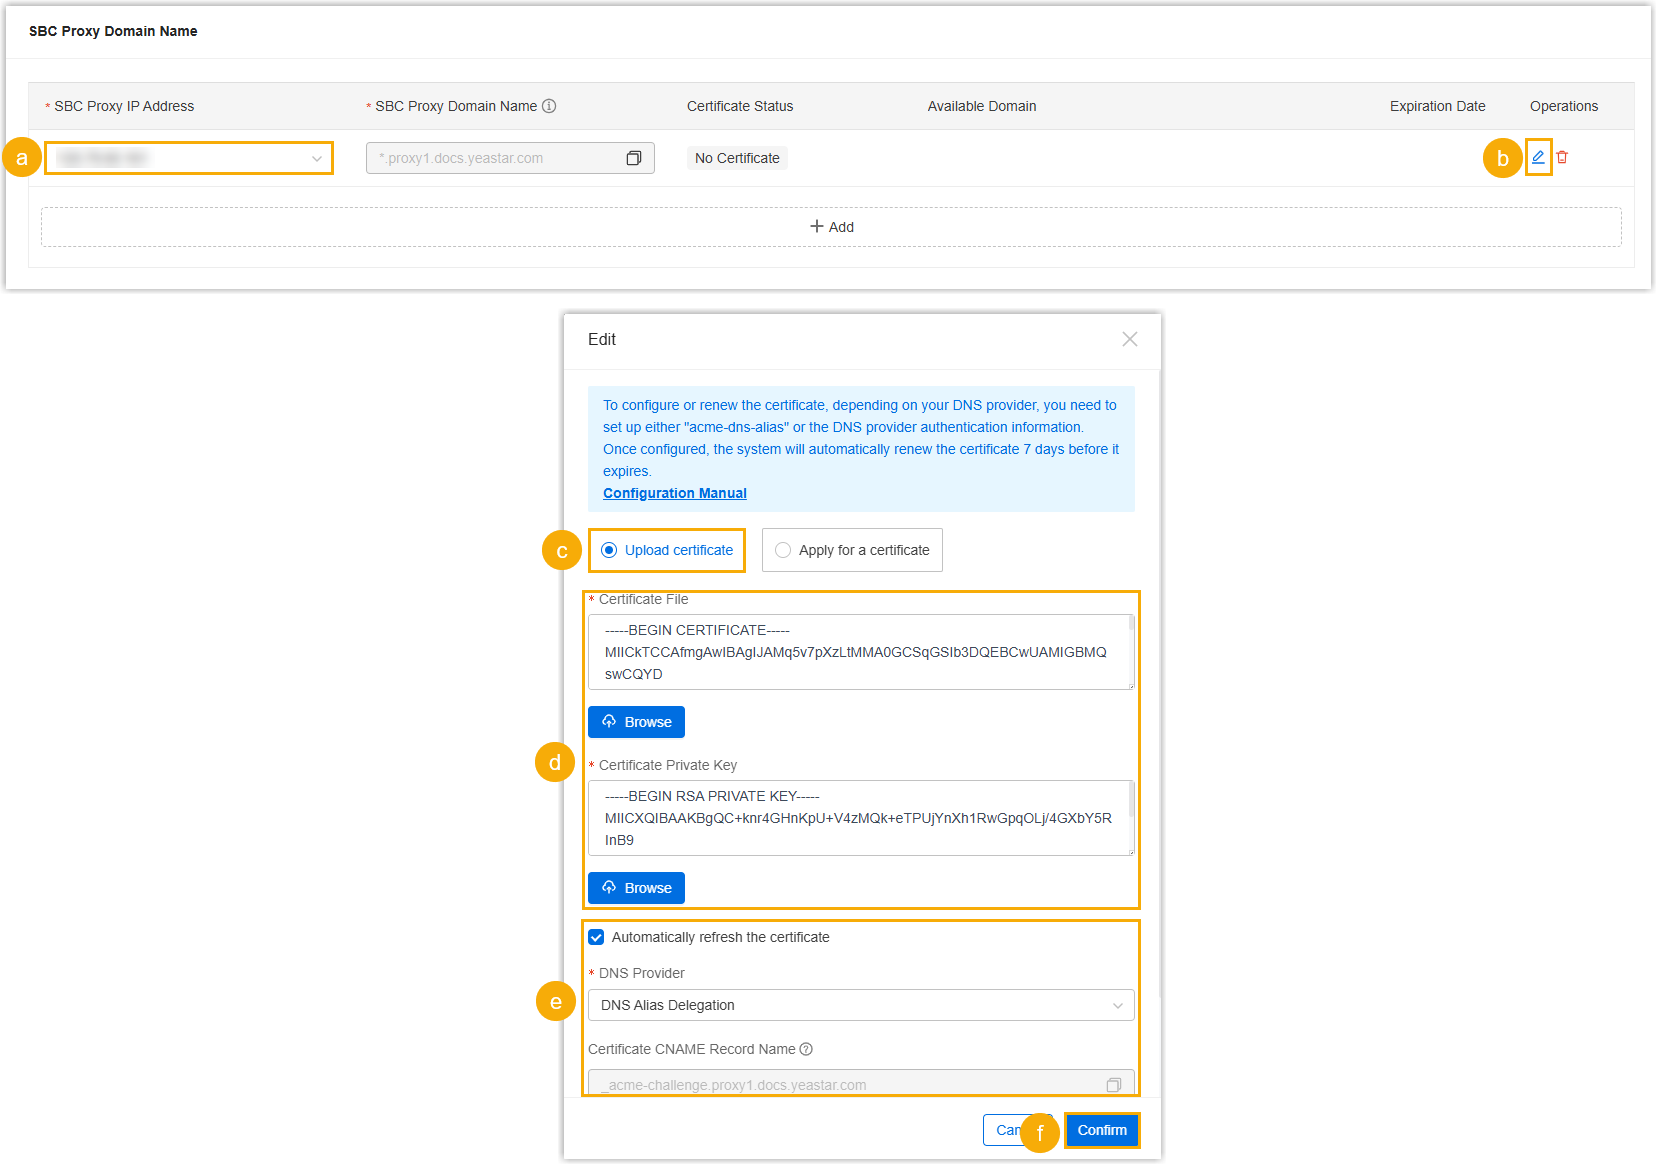
- In the SBC Proxy IP Address drop-down list, select the IP address of SBC Proxy Server.
- In the Operations column, click
.
- In the pop-up window, select Upload certificate.
- Upload the certificate file and private key.
- Certificate File: Click
Browse to select the
certificate file in the format of
.cer,.crt, or.pem.Important: The certificate file must include a COMPLETE Certificate Chain, including the Root CA Certificate, the Intermediate Certificate, and the Server Domain Certificate. - Certificate Private Key:
Click Browse to select the
private key in the format of
.key.Note: The supported content formats are as follows:- Start with
-----BEGIN RSA PRIVATE
                                                  KEY-----
and end with-----END RSA PRIVATE KEY-----. - Start with
-----BEGIN PRIVATE
                                                  KEY-----
and end with-----END PRIVATE KEY-----. - Start with
-----BEGIN EC PRIVATE
                                                  KEY-----
and end with-----END EC PRIVATE KEY-----.
- Start with
- Certificate File: Click
Browse to select the
certificate file in the format of
- If you want the system to automatically refresh the
certificate, select the checkbox of Automatically
refresh the certificate, then select your
DNS provider (DNS Alias Mode) in the DNS
Provider drop-down list.Note:
- The system will automatically refresh the certificate 7 days before it expires using the provided DNS provider.
- If auto-refresh is enabled but your certificate is not from Let's Encrypt, the system will automatically apply for a new one from Let's Encrypt instead.
- Click Confirm.
- Optional: If you want to deploy domain names for more than one SBC Proxy Server, click Add to upload the certificate for another SBC Proxy Server domain name.
- Click Save.
- Log in to Yeastar Central Management, go to , then click Add.
Result
- After the domain certificates are uploaded or successfully applied, the
Certificate Status displays
Deployed, indicating that the cluster server
domain name is set up successfully.
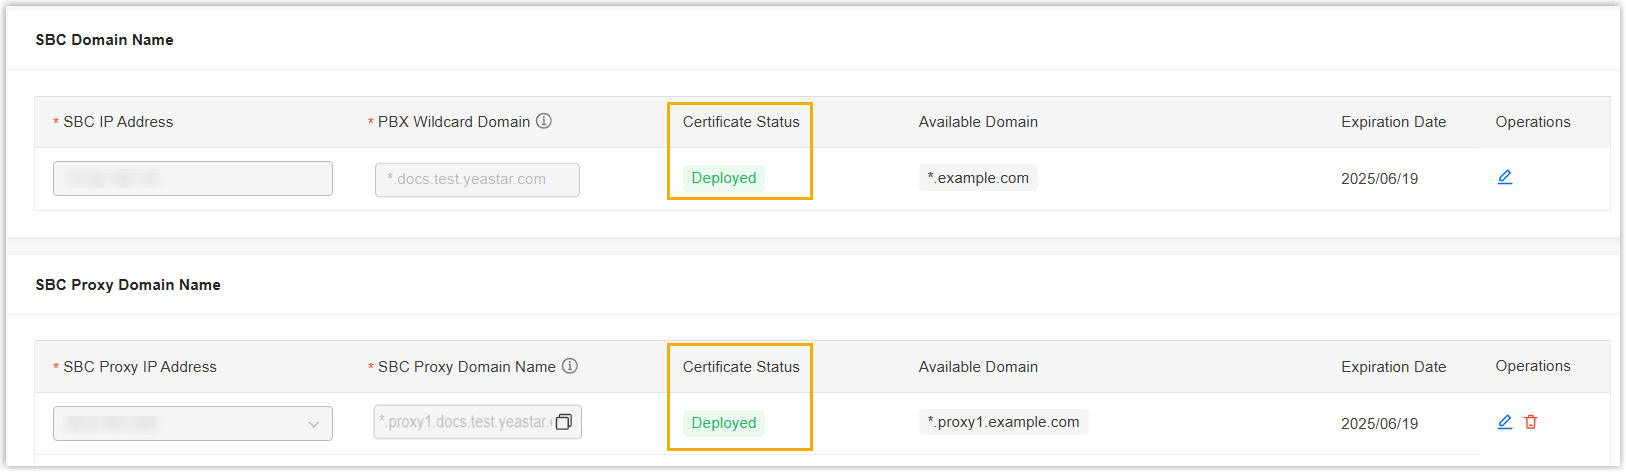
- If the domain certificates is applied by Yeastar Central Management, or you have enabled auto renewal when uploading certificates, the system will automatically refresh the certificates 7 days before it expires.
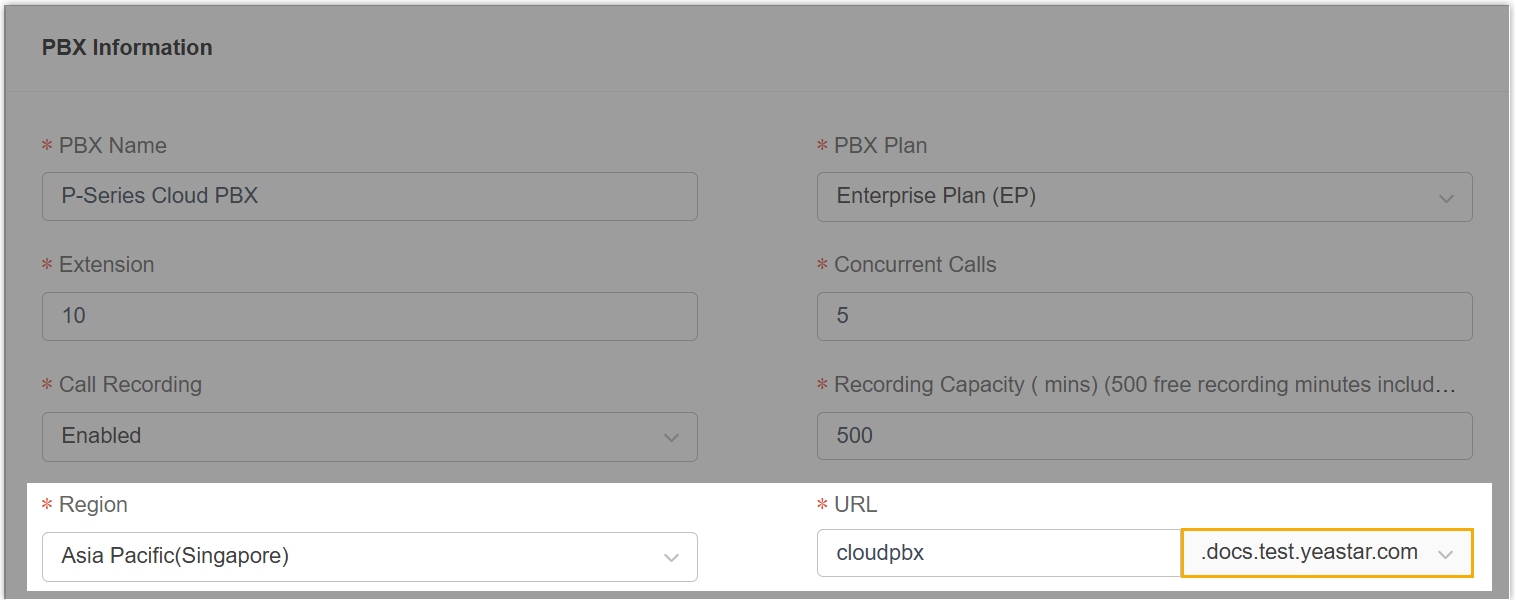
- When creating a P-Series Cloud PBX in the region on , the SBC Server domain name will be the suffix of the PBX
URL.Note: The SBC Proxy domain name will be used to compose the Cloud PBX's server address for specific PBX features automatically, including Register Trunk, Port-based Peer Trunk, DID-based Peer Trunk, LDAP / LDAPS, SSH, AMI and Database Grant.