Microsoft Teams Integration Preparation
Before the integration, you need to set up a SIP phone, and configure PBX network for remote access based on the method of integration.
Background information
Refer to the following table to check the items to be prepared based on the method of integration:
| Method of Integration | Instruction |
|---|---|
| via Yeastar FQDN | |
| via public IP address / custom domain |
Create a SIP extension
- Log in to PBX web portal, go to .
- Click Add and select Add to create a SIP extension.
- In the User Information section, configure user
information as follows:
- First Name: Enter the user's first name.
- Last Name: Enter the user's last name.
- Email Address: Leave it blank or configure it as needed.
- Mobile Number: Leave it blank or configure it as needed.
- User Password: Retain default value or configure it as needed.
- User Role: Retain default value or configure it as needed.
- In the Extension Information section, configure extension
information as follows:
- Extension Number: Enter a desired extension number.
- Caller ID: Retain default value or configure it as needed.
- Registration Name: Retain default value or configure it as needed.
- Registration Password: Retain default value or configure it as needed.
- Concurrent Registrations: Select a value from the
drop-down list. This option defines how many SIP phones are allowed to
register with the extension. Note: The maximum number of concurrent registrations is 3.
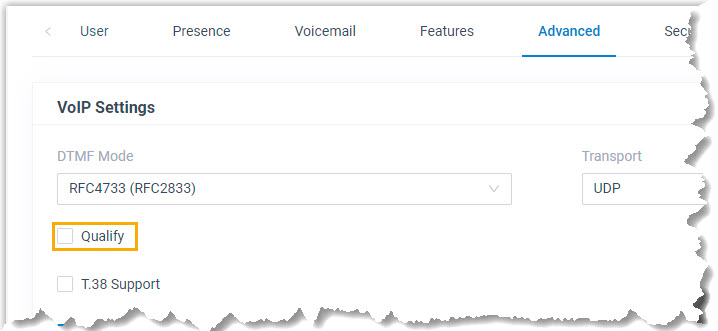
- Click Advanced tab,
unselect the checkbox of
Qualify.
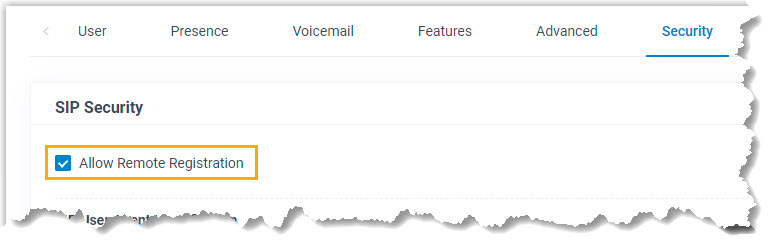
- Click Security tab, select
the checkbox of Allow Remote Registration.Note: This configuration is required only when you integrate the PBX with Microsoft Teams via public IP address / custom domain.
- Click Save and Apply.Note: The following SIP credentials are required when you configure Teams users on the configuration portal.
- Extension number
- Registration name
- Registration password
Configure Yeastar FQDN
Follow the instructions below to configure Yeastar FQDN in the PBX for remote SIP access.
- Log in to PBX web portal, go to .
- Turn on Yeastar FQDN.
- In the Fully Qualified Domain Name (FQDN) field,
select a domain name, then enter a hostname.In this example, select domain name ras.yeastar.com and enter hostname yeastardocs, you will get an FQDN yeastardocs.ras.yeastar.com.Note: Think twice before you enter the hostname. The FQDN can NOT be changed after you save the configurations.

- Enable remote SIP access feature and grant usage permissions. Note: By default, all extension accounts are restricted from using the remote SIP access feature, therefore you need to grant permission for the extension.
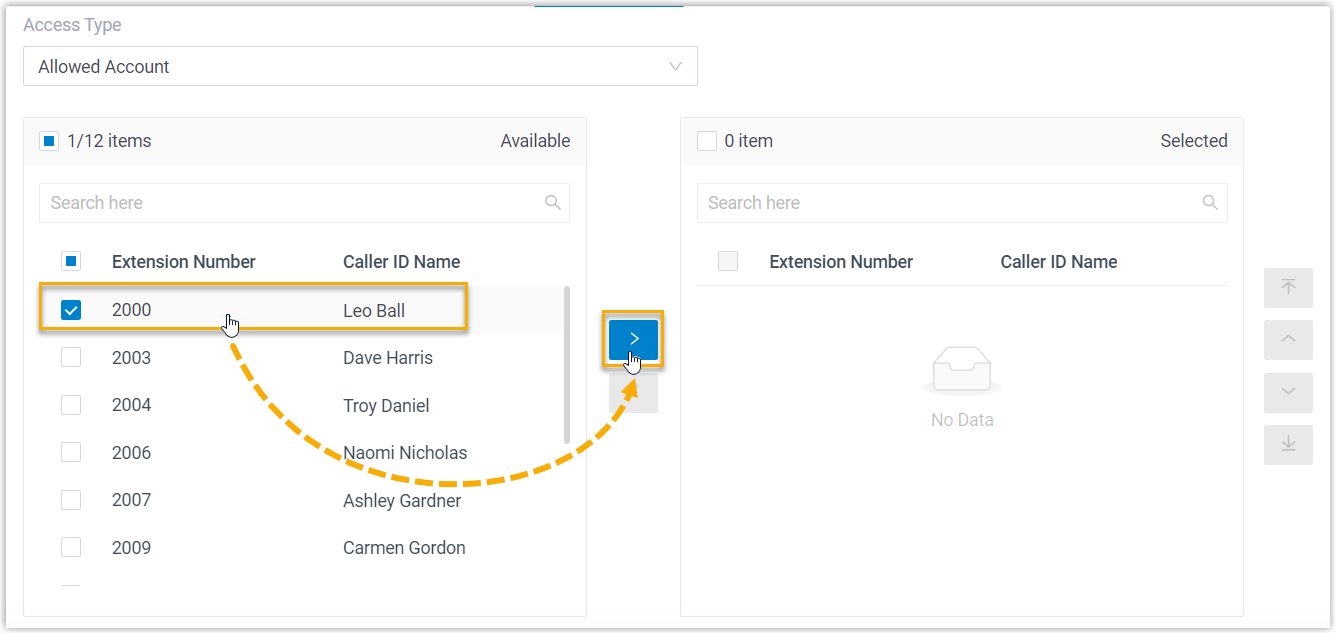
- In the Features section, go to the SIP Access tab.
- In the Status drop-down list, select Enabled.
- In the Access Type drop-down list, select Allowed Account.
- Select the desired extension from the
Available box to the
Selected box.
- Optional: Select the checkbox of Enable IP
Restriction, and add at least one permitted IP
address and subnet mask.
If you configure this option, only the permitted IP address(es) can use the remote access feature.
- Click Save.
Configure port forwarding & NAT
- Prerequisites
-
- PBX ServerIf you use Yeastar domain, make sure the following prerequisites are met.
- Firmware: 83.18.0.102 or later.
- Subscription: Enterprise Plan or Ultimate Plan.
- DNS Service Platform
- If you use external host domain, purchase both a
domain name and a valid domain certificate by
yourself.Note: If you use Yeastar domain, simply prepare a well-formed Yeastar domain name, and the PBX will automatically apply for the domain certificate.
-
Added an A record (for static public IP address) or configured DDNS (for dynamic public IP addresses) at your DNS provider to point your domain to your public IP address.
- If you use external host domain, purchase both a
domain name and a valid domain certificate by
yourself.
- Router
- If SIP ALG option is provided in your router, disable it.
- If using DDNS (Dynamic DNS), ensure that your router is configured to update the DDNS service with its current public IP.
- You have configured NAT settings and forwarded the
following ports to allow remote access of Linkus clients
and other SIP devices.
In this example, configure the port forwarding as follows:
Port Internal port External port SIP 5060 UDP 5566 UDP RTP 10000-12000 UDP 10000-12000 UDP
- PBX Server
- Procedure
-
- Log in to PBX web portal, go to .
- In the Public IP (NAT) section, complete the
following configurations:
- Public IP (NAT): Turn on this option.
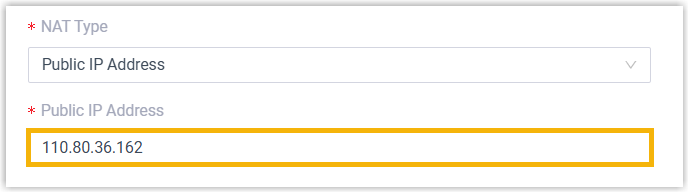
- NAT Type:
Select the desired NAT type and complete the
corresponding configurations.
NAT Type Instruction Public IP Address Configure the following settings. - Public IP Address:
Enter a public IP address.
In this example, enter 110.80.36.162.
External Host Configure the following settings. 
- External Host: Enter a
custom domain name.
In this example, enter
example.domain.com. - Refresh Interval (s): Leave the default setting or change the interval (in seconds) for PBX to request the external host for public IP.
Yeastar domain Configure the following settings. - Yeastar Domain: set up
the Yeastar domain name.
In this example, set the Yeastar domain name to
docs.cloudpbx.yeastar.com.
- Select a domain suffix from the drop-down
list.
In this example, select
cloudpbx.yeastar.com. - Enter the subdomain in the first field.
In this example, enter
docs.Note: Think twice before you enter the subdomain, as the Yeastar domain name cannot be changed after you save the configurations.
- Select a domain suffix from the drop-down
list.
- Public IP Type: select
the type of public IP as needed, and complete the
related settings.
- To use a static public IP address, do as
follows:

- Select Static Public IP Address (IP address does not change).
- In the Public IP Address field, enter your public IP address.
- To use a dynamic public IP address, do as
follows:

- Select Dynamic Public IP Address (IP changes).
- Optional: In the STUN
Server field, enter the address of
your STUN server.Note: If left empty, Yeastar's STUN server will be used by default.
- In the Refresh Interval
(s) field, specify the time interval
for the PBX to request the STUN server for public IP.Note: The supported value range is 30 to 3600.
- To use a static public IP address, do as
follows:
- Public IP Address:
Enter a public IP address.
- Local Network Identification: Add
all your local network. In this example, add
192.168.6.0/255.255.255.0.
This setting will allow all your local devices to communicate with the PBX by the local IP address instead of passing through the router.
- NAT Mode: Select a SIP NAT mode.
In this example, select Yes.
The PBX will use NAT and ignore the address information in the SIP/SDP headers and reply to the sender's IP address and port.
- In the Public Ports section, enter the
external port that you have forwarded on your router.
In this example, enter 5566 in External SIP UDP Port.
- Click Save and Apply.