Customize Your Voicemail Settings
The phone system supports voicemail feature, which helps you receive audio messages when you are unavailable to answer calls. You can retain default settings, or customize voicemail settings. This topic describes how to customize voicemail settings.
Enable or disable voicemail feature
- Log in to Linkus Web Client, go to .
- To enable voicemail feature, turn on the option Enable Voicemail.
- To disable voicemail feature, turn off the option Enable Voicemail.
- Click Save.
Configure voicemail Access PIN
- Log in to Linkus Web Client, go to .
- To access voicemail messages directly, select Disabled from the drop-down list of Voicemail PIN Authentication.
- To require a PIN code to be entered when you access voicemail, select
Enabled from the drop-down list of
Voicemail PIN Authentication, and enter a PIN
code in the Voicemail Access PIN field.Note: The PIN code must be number, and the length must be 3-15 digits.
- Click Save.
Configure new voicemail notification
- Log in to Linkus Web Client, go to .
- Specify and configure notification method(s).
- To send new voicemail notification to an email address, select the
checkbox of the New Voicemail Email
Notification and complete the following
settings.
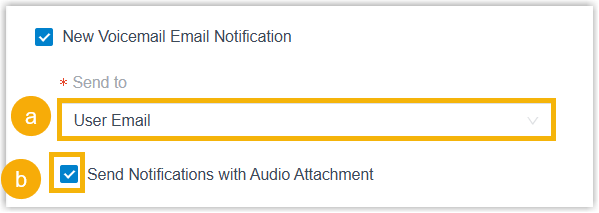
- In the Send to drop-down list,
select the target email address.
- To send voicemail message to your own email address, select User Email.
- To send voicemail message to a custom email
address, select Custom
Email.
After selected, you need to enter a custom email address in the Custom Email Address field.
- Optional: Select the checkbox of Send
Notifications with Audio
Attachment.
After selected, the system will send a notification email with the new voicemail message attached as a
.wavfile.
- In the Send to drop-down list,
select the target email address.
- To send new voicemail notification to a recipient number via SMS
channel, select the checkbox of the New Voicemail SMS
Notification and complete the following
settings.Note: This feature is available only when the following requirements are met:
- The firmware of the PBX server is version 37.25.0.23 or later.
- System administrator has enabled global new voicemail SMS notification.
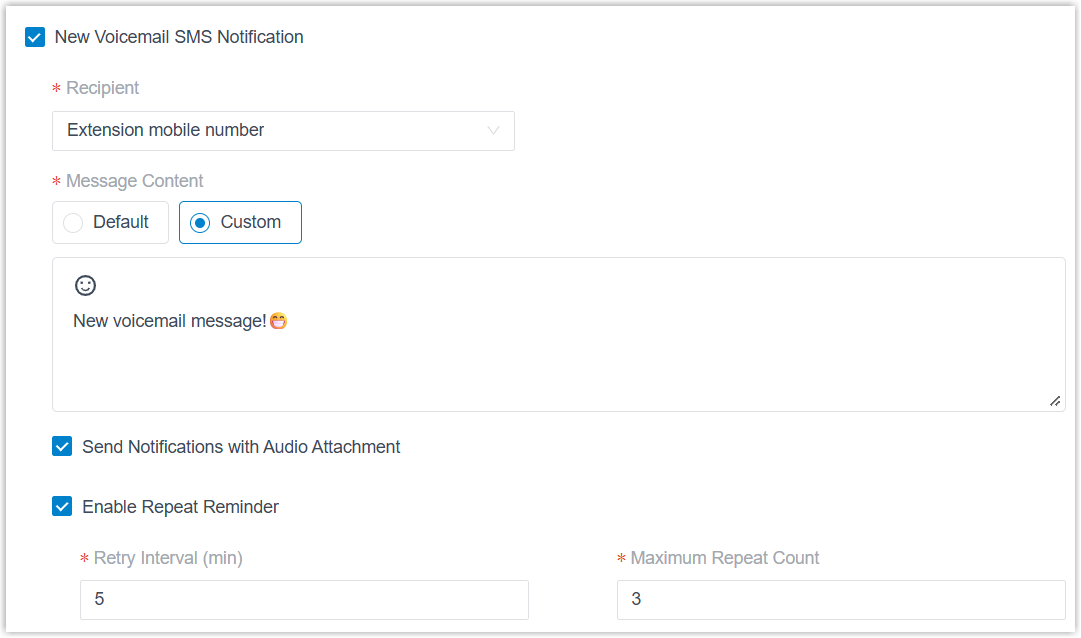
Setting Instruction Recipient Specify the recipient number. - Extension mobile number: The new voicemail notifications will be sent to your mobile number.
- Custom Number: The new voicemail
notifications will be sent to a custom
number.
After selected, you need to select the country/region code and enter the custom number.
Message Content Configure the message content. - To send the default message content, select
Default.
The content pre-configured by the system administrator is auto-filled in the text box and uneditable.
- To send the custom message content, select
Custom and fill in the content.Note: The maximum character length is 1600.
Send Notifications with Audio Attachment Optional. Select the checkbox to convert the voicemail message into a .wavaudio file and attach it to the SMS message.Enable Repeat Reminder Optional. Select the checkbox to send notifications repeatedly until either the maximum retry count is reached or the voicemail message is marked as read. After selected, enter numbers in both the Retry Interval (min) and Maximum Repeat Count fields to specify the retry interval in minutes and maximum repeat count.
For example, if Retry Interval (min) is set to "5" and Maximum Repeat Count is set to "3", after the initial reminder for a new voicemail, the system will send SMS messages every 5 minutes for three times until the voicemail message is marked as read.
- To send new voicemail notification to an email address, select the
checkbox of the New Voicemail Email
Notification and complete the following
settings.
-
In the After Notification drop-down list, set how to handle the voicemail message after the system has successfully notified the recipient by email or SMS message.
- Click Save.
Configure voicemail play options
Decide which messages will be played before playing a voicemail.
- Log in to Linkus Web Client, go to .
- Select the checkboxes of the messages to be played before playing a voicemail.
- Play Date and Time:
Enable this option to play date and time when the message is
received.
- Time Display Format: If Play Date and Time is enabled, you can specify the time format (12-hour or 24-hour) for announcing the message arrival time.
- Play Caller ID: Enable this option to play caller ID information.
- Play Message Duration: Enable this option to play duration of the message.
- Play Date and Time:
Enable this option to play date and time when the message is
received.
- Click Save.
Change voicemail greetings
Decide which greetings will be played to callers when they reach your mailbox.
- Log in to Linkus Web Client, go to .
- In the Voicemail Greeting section, configure greeting
settings according to your needs.
- Default Greeting: Select a greeting from the drop-down list
of Default Greeting.
Default greeting is played if no greeting is specified for a presence.
- Presence Greetings: Select a greeting or create a new
greeting from the drop-down list of corresponding presence.
The presence greeting is played based on extension presence.
- Default Greeting: Select a greeting from the drop-down list
of Default Greeting.
- Click Save.