Set up an IVR
This topic describes how to create and configure an IVR.
Prerequisites
- Join Announcement: Greet callers and provide the available IVR menu options when they enter the IVR.
- Repeat Announcement: Repeat IVR menu options to callers when no input is received within the response timeout.
For more information, see Add a Custom Prompt.
Procedure
- Log in to NovoOne Tenant portal, go to , click Add.
- In the Basic tab, configure the basic settings for
the IVR.
- In the General section, configure the general
settings.
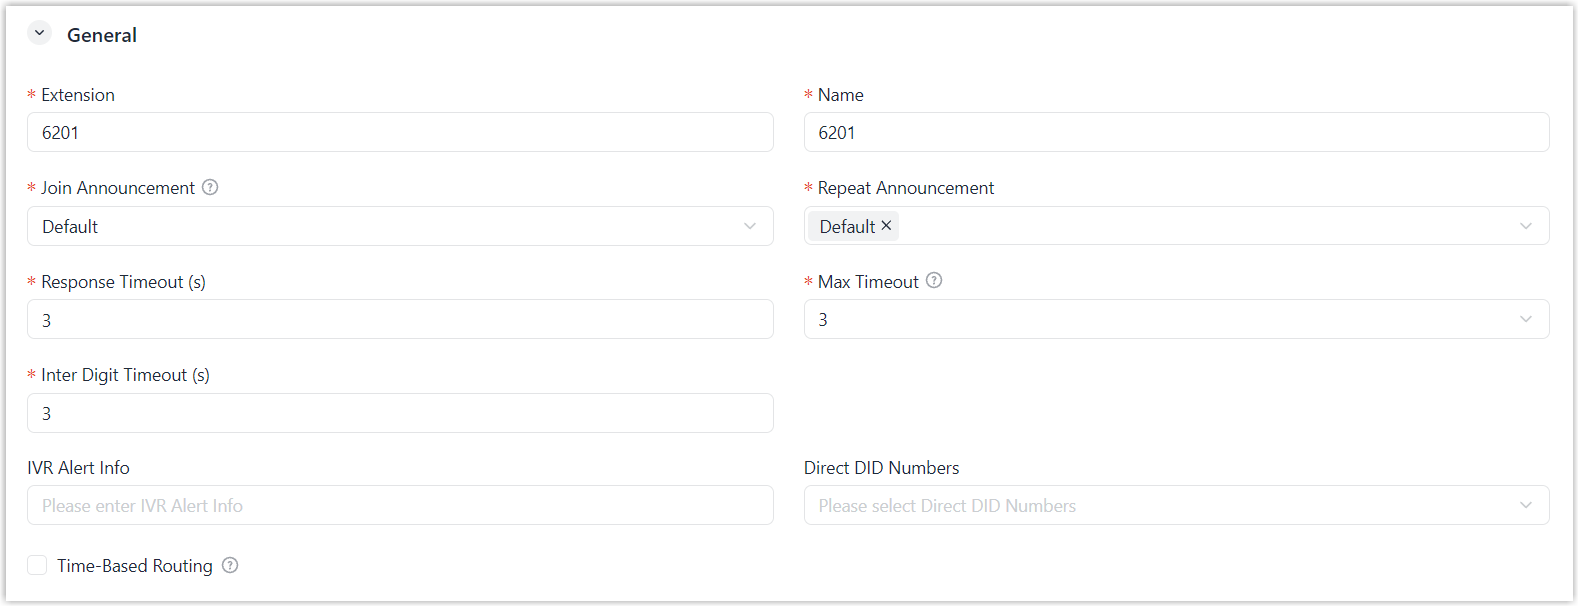
Setting Description Extension By default, the system assigns the first available virtual number from the default IVR extension range (6200 - 6299, which is defined in ) for callers to reach the IVR.
You can change the IVR extension to a number within or outside the configured range.
Name Enter a name to help identify the IVR. Join Announcement A default prompt "Please dial the extension number or press 0 for operator" is played when a caller enters the IVR.
You can use the default prompt, or select a custom prompt to greet callers and provide menu options.
Note: Available prompts are synchronized from . You can select from existing prompts, or click Create New to add a new custom prompt.For more information, see Add a Custom Prompt.
Repeat Announcement A default prompt "Please dial the extension number or press 0 for operator" is played to remind callers of the available IVR options if no input is received within the response timeout.
You can use the default announcement, or select custom prompt(s) to repeatedly announce IVR menu options to callers.
Note:- Available prompts are synchronized from . You can select from existing prompts, or click Create New to add a new custom prompt.
- Up to 10 custom prompts are supported.
Response Timeout (s) Set the number of seconds the system waits for caller input after the Join Announcement or Repeat Announcement is played. When the timeout is reached, the system repeatedly play the Repeat Announcement for the number of times defined in Max Timeout.
Max Timeout Set the maximum number of times the Repeat Announcement can be played if no input is received within the configured Response Timeout. When the maximum number of timeouts is reached, the call is routed to the Response Timeout Destination.
Valid value: 1 to 5
Note: The Join Announcement played when calls enter the IVR counts toward the max timeout limit.Inter Digit Timeout (s) Set the number of seconds the system waits for the caller to enter the next digit. When the timeout is reached, the system stops collecting digits.
Valid value: 1 to 10
Note: You can instruct callers to end input with#. In this case, the system stops collecting digits and processes the input immediately without waiting for the timeout.IVR Alert Info Enter the alert-info text to be added to the Alert-Info header of INVITE requests, which is used to trigger IP phones to play a specific ringtone when receiving an IVR call.
Note:- Only letters, numbers,
_, and-are allowed. - To enable distinctive ringtone for IVR calls,
you need to further configure distinctive
ringtones for IP phones based on the alert-info
text.
For more information, see Set Specific Ringtones for a Provisioned IP Phone.
Direct DID Numbers Select DID number(s) associated with the IVR. When callers dial the DID number, the call is routed to the IVR.
Time-Based Routing To route IVR calls received in non-business hours to different destinations, enable this option and configure the following settings. - Business Hours Profile: Select a business hours profile that defines the business hours.
- Outside Business Hours Destination: Select the destination for IVR calls received outside business hours.
- Holiday Handling:
Specify the routing strategy for IVR calls
received during holidays.
- Route to Holiday
Destination: Route IVR calls during
holidays to a specific destination.
If selected, choose a destination from Holidays Destination drop-down list.
- Ignore Holiday: Ignore holidays and route calls based on business hours setting.
- Route to Holiday
Destination: Route IVR calls during
holidays to a specific destination.
- In the Call Feature section, specify whether
callers can use the following call features through the
IVR.
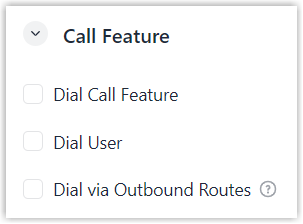
Setting Description Dial Call Feature Specify whether to allow callers to reach a ring group or queue through the IVR. If enabled, select the ring groups and queues that callers can reach.
Dial User Specify whether to allow callers to reach internal users through the IVR. If enabled, select the users that callers can reach.- All User: Allow callers to reach all users.
- Allowed User: Allow callers to reach the selected users.
- Restricted User: Allow callers to reach all users except the selected users.
Dial via Outbound Routes Specify whether to allow callers to reach external numbers through an outbound route via the IVR. If enabled, select the outbound routes that callers can use.
- In the General section, configure the general
settings.
- In the Key Press Event tab, configure key
destinations and exception destinations.
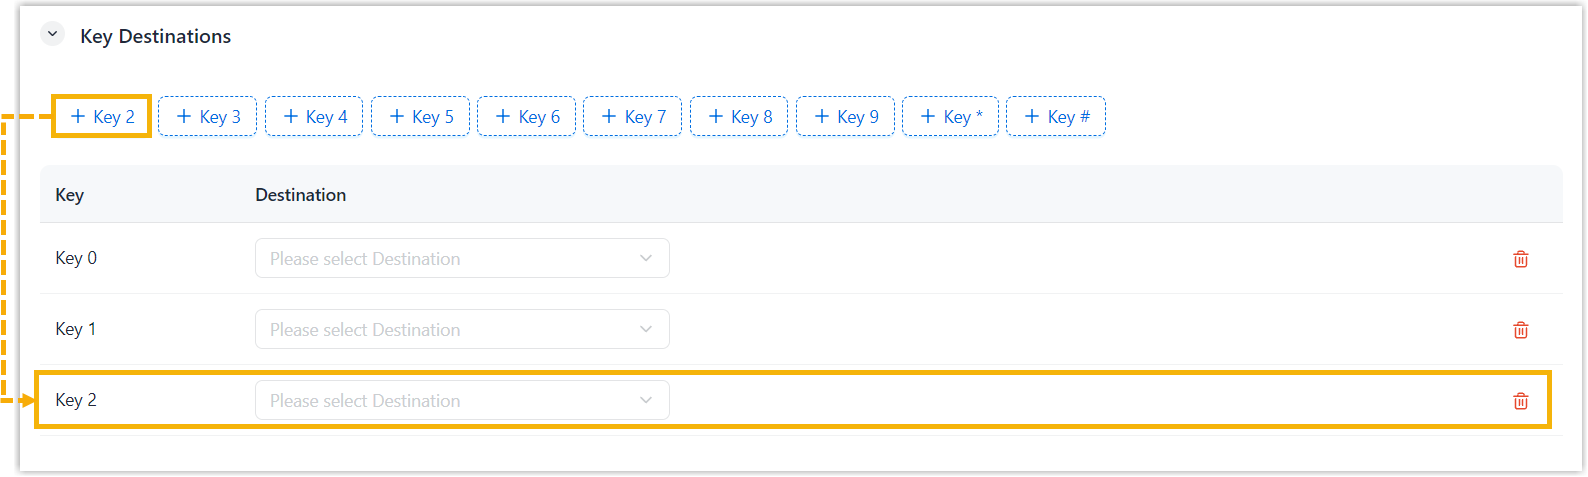
- In the Key Destinations section, add keys and
select the corresponding destinations.
 Note:
Note:- By default, Key 0 and Key 1 are added.
If you don't need these keys, click
 to remove them.
 - If Destination is set to
User, you can disable call
recording as needed.

In this case, calls routed from the IVR to the extension will NOT be recorded, event if recording is enabled for the extension.
- By default, Key 0 and Key 1 are added.
If you don't need these keys, click
- In the Exception Destinations section,
configure destinations for response timeout and invalid
input.
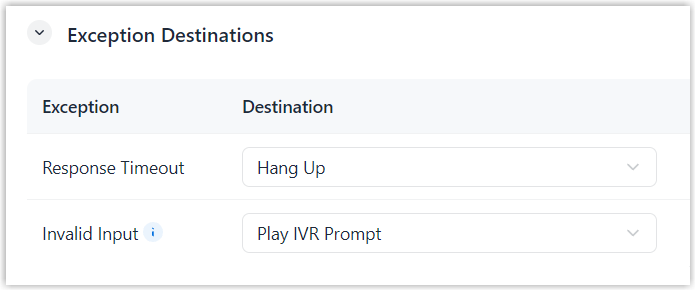
Setting Description Response Timeout Select a destination to route the call when the caller does not provide any input after Max Timeout is reached.
Invalid Input Select a destination to route the call when the caller enters a digit that is not defined in the IVR menu.
Note: For destinations with prompt playback, refer to the following details:- If you choose Play Prompt then Hang Up or Play Prompt then Return to IVR, available prompts are synchronized from . You can select from existing prompts, or click Create New to add a new custom prompt.
- If you choose Play IVR Prompt, the system plays the Join Announcement, then play the Repeat Announcement for the number of times defined in Max Timeout.
- In the Key Destinations section, add keys and
select the corresponding destinations.
- Click Save.
Result
The IVR is created.