Monitor Yeastar Central Management through SNMP using MIB Browser
This topic takes iReasoning MIB Browser Enterprise Edition as an example to describe how to monitor Yeastar Central Management through SNMP.
Requirements
- The firmware of Yeastar Central Management is 87.14.0.31 or later.
- To receive trap messages about P-Series Cloud PBXs, the PBX firmware should be 84.15.0.22 or later.
Background information
This topic assumes that the network environment is as follows:
The monitored device, Yeastar Central Management (YCM), is located on the public network, while the Network Management System (NMS) is on the private network.
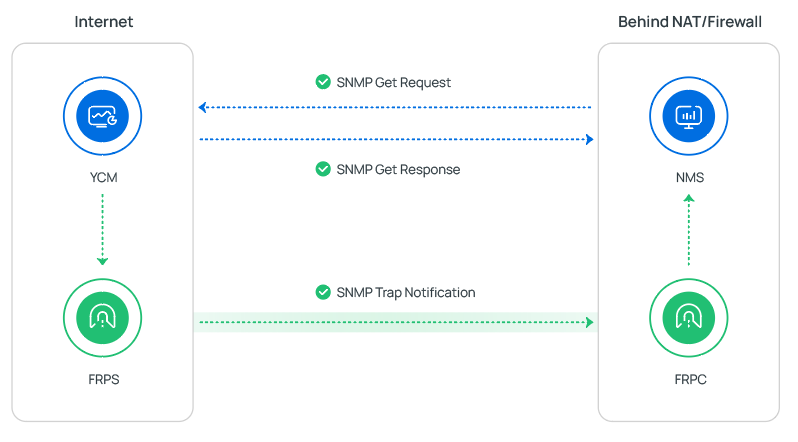
- For SNMP Get operations, the NMS initiates queries to YCM to collect data, and this communication can traverse NAT (Network Address Translation) without additional configuration.
- For SNMP Trap operations, the YCM needs to actively push event notifications
to the NMS, which requires a reverse communication channel from the public
network to the private network.
In this scenario, FRP (Fast Reverse Proxy) tunneling can be used to establish a secure tunnel between the monitored device and the NMS. The FRP Client (FRPC) runs on the NMS server in the private network, and the FRP Server (FRPS) runs on the YCM server in the public network. FRPC actively connects to FRPS, creating a tunnel that enables the monitored device to securely send SNMP Trap notifications to the NMS, bypassing network isolation and NAT restrictions.
Prerequisites
- Monitored device
-
On Yeastar Central Management, you have completed the following steps:
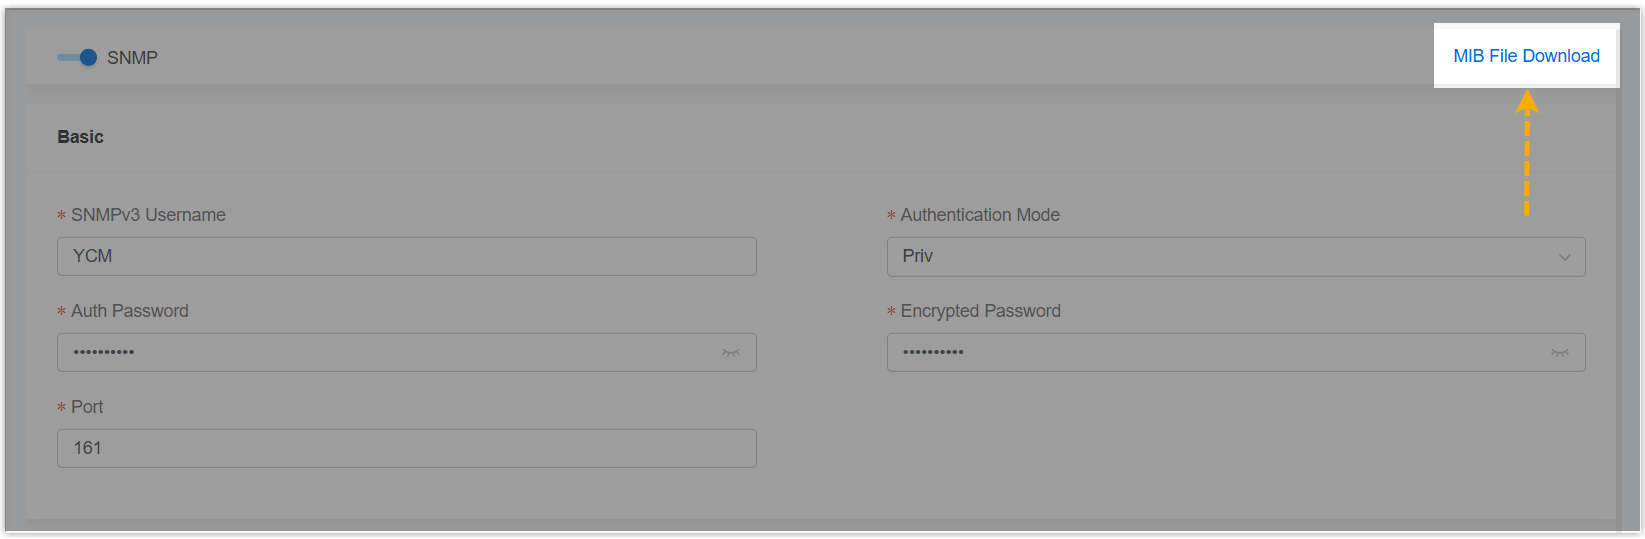
- Set up SNMP on Yeastar Central Management
- Downloaded MIB file from Yeastar Central Management (Path: ), which will be used later on MIB
Browser.
- Network Management System (NMS)
- You have download the MIB Browser and install it on your local computer.
- Firewall Configuration
-
To allow the necessary traffic for SNMP operations, you need to configure your firewall settings and permit the following ports. The traffic flow for each port is listed below:
Platform Port Yeastar Central Management (public network) -
161/UDP for SNMP Get - Permit traffic from the NMS to Yeastar Central Management (allow incoming SNMP Get requests).
-
162/UDP for SNMP Trap Receiver - Permit traffic from Yeastar Central Management to the NMS (allow outgoing SNMP Trap notifications).
-
7000/TCP for FRP Tunneling - Permit traffic from Yeastar Central Management to the NMS (allow outgoing traffic for FRP tunneling).
NMS (private network) - 7000/TCP for FRP Tunneling - Permit traffic from the NMS to Yeastar Central Management (allow incoming traffic for FRP tunneling).
-
Procedure
Set up FRP tunneling for trap communication to NMS
To enable SNMP Trap messages from public network device (i.e. Yeastar Central Management) to reach your NMS behind a firewall (e.g., MIB Browser), you can set up FRP tunneling between the Yeastar Central Management server and the NMS. This involves configuring FRPS (server) on the Ubuntu machine where the YCM server is deployed and FRPC (client) on the NMS.
- Set up FRPS on the Ubuntu Server where Yeastar Central Management is
hosted.
- Download and extract FRPS to a desired directory.
# Get the latest FRP release (check https://github.com/fatedier/frp/releases for latest version) wget https://github.com/fatedier/frp/releases/download/v0.61.1/frp_0.61.1_linux_amd64.tar.gz # Extract the package tar -zxvf frp_0.61.1_linux_amd64.tar.gz # Move to installation directory sudo mv frp_0.61.1_linux_amd64 /ysdata/server/cmenv/frp-0.34.3 cd /ysdata/server/cmenv/frp-0.34.3 - Enter
vi frps.tomland press Enter key, then edit the FRPS configuration filefrps.tomlas follows:bindPort=7000 kcpBindPort=7000 auth.token = "AuThP@SsW0rd" # Authentication token, which must matches the token in FRPC configuration. - Start the FRPS service.
./frps -c ./frps.tomlThe FRPS service should now be running on port 7000.

- Download and extract FRPS to a desired directory.
- Set up FRPC on the server where the MIB Browser is hosted.
- Press keys
Win + X, then press A to open PowerShell as Admin.Note: If a User Account Control (UAC) prompt appears, click Yes to allow changes. - Download and extract FRPC.
# Download FRPC ZIP file Invoke-WebRequest -Uri "https://github.com/fatedier/frp/releases/download/v0.61.2/frp_0.61.2_windows_arm64.zip" -OutFile "D:\Install software here\frp.zip" # Extract the ZIP file Expand-Archive -Path "D:\Install software here\frp.zip" -DestinationPath "D:\Install software here\frp" -Force - Find the extracted files in the File Explorer, then use a text
editor (e.g. Notepad++) to edit the FRPC configuration file
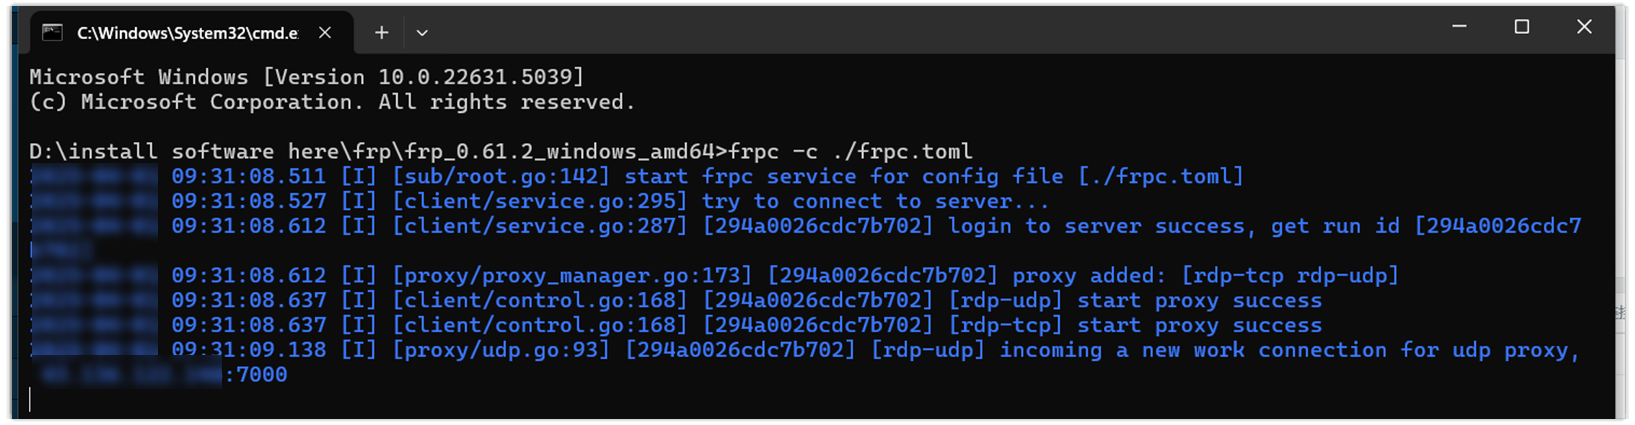
frpc.tomlas follows:Note: On the monitored device (i.e. Yeastar Central Management), set the SNMP Trap Receiver IP address to 127.0.0.1, which corresponds to the local IP of the tunnel, as set in[proxies]section below. This ensures that the Trap notifications are correctly forwarded from Yeastar Central Management (FRP server) to the NMS (FRP client) through FRP.serverAddr = "114.xxx.xxx.104" # The public IP address of Yeastar Central Management. serverPort = 7000 # The port of FRPS service. auth.token = "AuThP@SsW0rd" # Authentication token, which must matches FRPS token. #The following configuration enables both TCP and UDP tunneling of SNMP Trap port 162 from public devices to the internal NMS. [[proxies]] name = "rdp-tcp" type = "tcp" localIP = "127.0.0.1" localPort = 162 remotePort = 162 [[proxies]] name = "rdp-udp" type = "udp" localIP = "127.0.0.1" localPort = 162 remotePort = 162 - Open a terminal and run the following command to start the FRPC service.
cd "D:\Install software here\frp\frp_0.61.2_windows_amd64"
.\frpc -c .\frpc.toml
The FRPC client should now be connected and listening.
- Press keys
Configure SNMP agent and import MIB files on MIB Browser
- Run the MIB Browser.
- Add Yeastar Central Management as an SNMP agent.
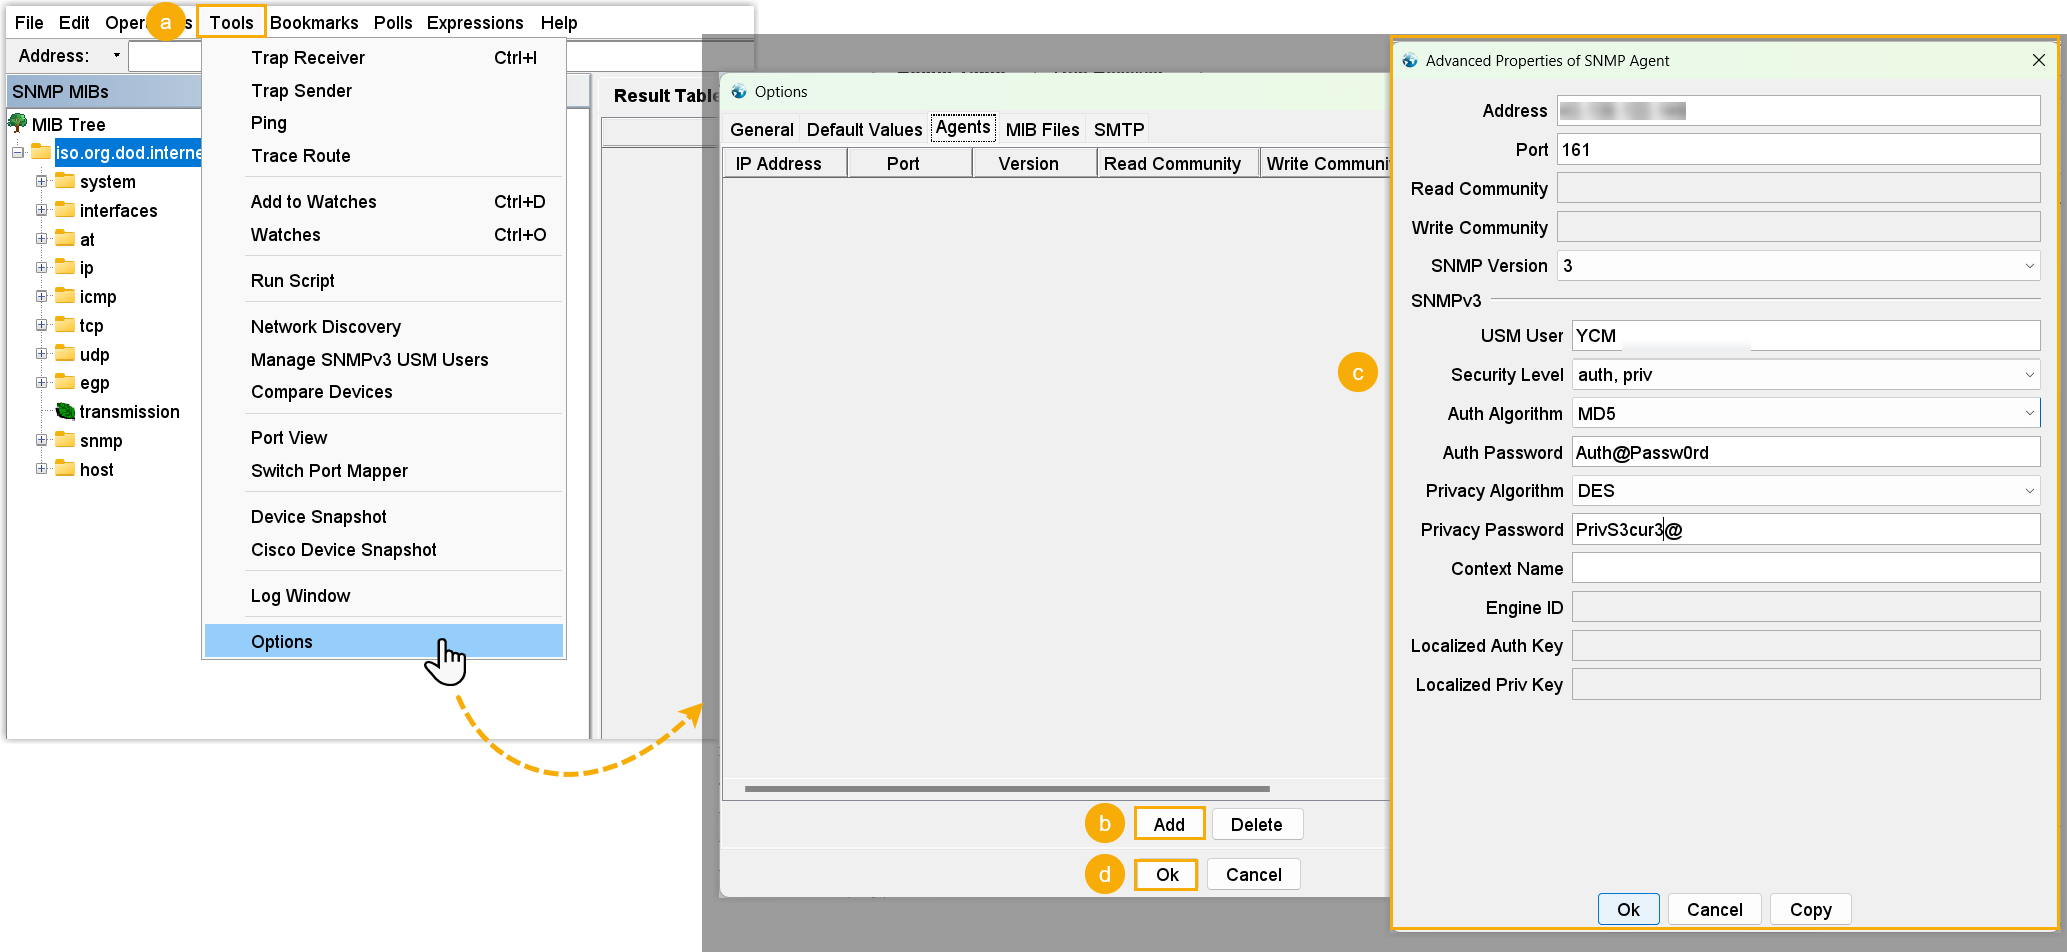
- At the tool bar, click .
- In the Options window, go to the Agents tab, then click Add.
- In the pop-up window, enter the SNMP agent information of Yeastar
Central Management, then click OK.
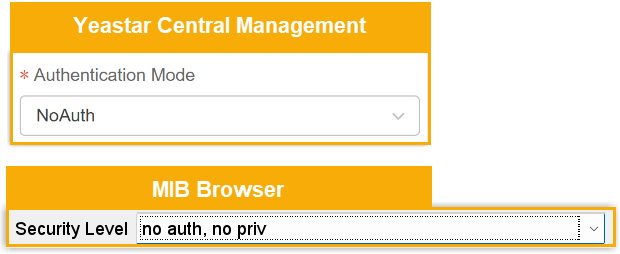
Setting Description Address Enter the public IP address of YCM Server. Port Enter the SNMP port that is configured on Yeastar Central Management. In this example, retain 161. SNMP Version Select 3, indicating that SNMPv3 is used. USM User Enter the SNMPv3 username that is configured on Yeastar Central Management. In this example, enter YCM. Security Level Select the authentication mode that is specified on Yeastar Central Management. - no auth, no priv: This
option corresponds to NoAuth on Yeastar
Central Management.
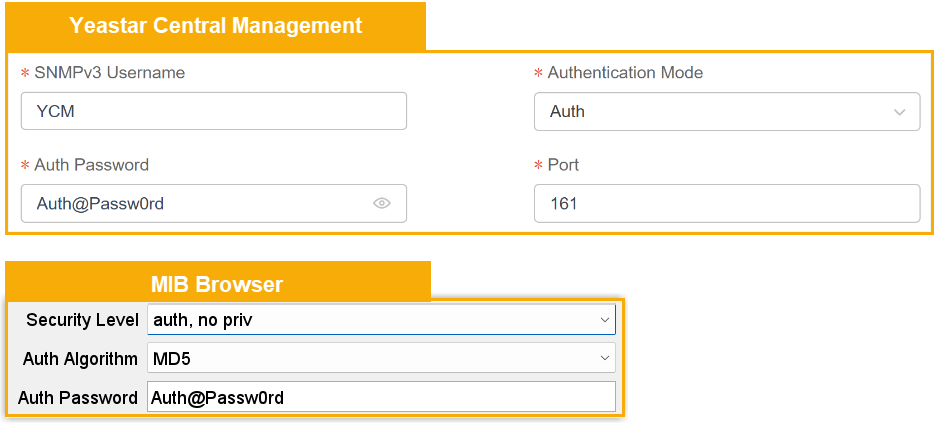
- auth, no priv: This
option corresponds to Auth
on Yeastar Central Management.
If you choose this option, you need to set Auth Algorithm to MD5, and enter the password.
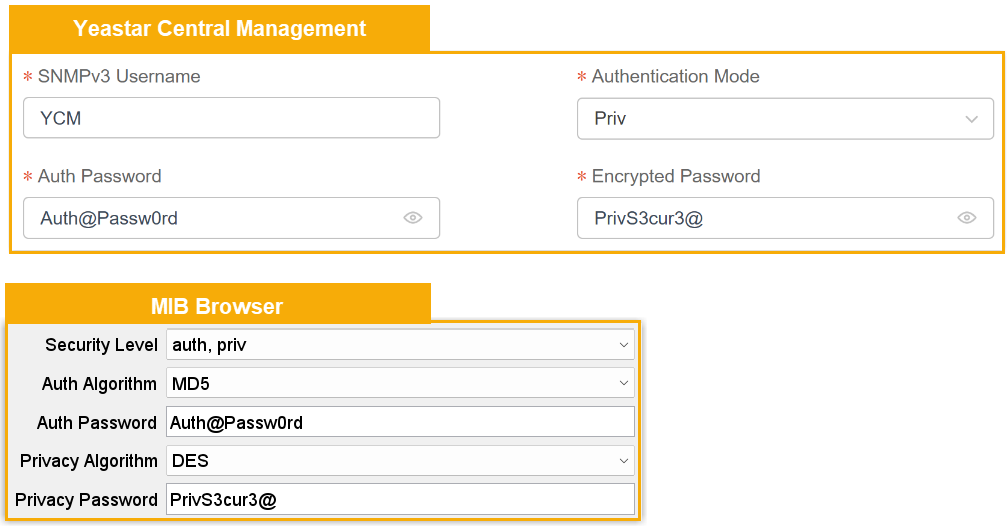
- auth, priv: This option
corresponds to Priv on
Yeastar Central Management.
If you choose this option, you need to set Auth Algorithm to MD5 and Privacy Algorithm to DES, and enter the passwords.
- no auth, no priv: This
option corresponds to NoAuth on Yeastar
Central Management.
- At the bottom of the Options window, click
OK.
The agent is added successfully.

- Configure the trap receiver.
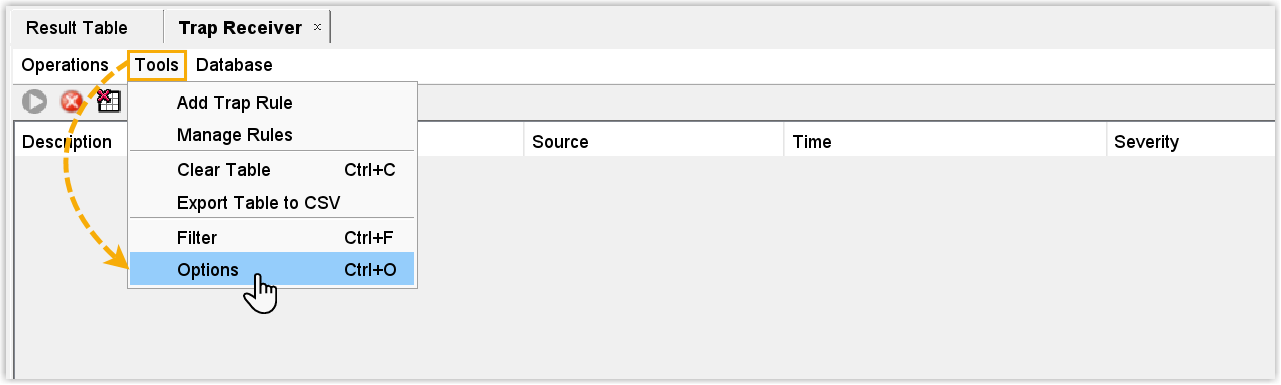
- At the tool bar, click .
A trap receiver window is displayed at the right pane.
- In the Trap Receiver window, go to .
- In the General tab of the Trap
Receiver Settings window, complete the following
settings.

- Trap Port: Set the port number of trap receiver.
In this example, retain the default port
162. - Bind IP: Select the IP of the trap receiver. In this example, select All.
- Transport: Select the transport protocol. In this example, select UDP.
- Trap Port: Set the port number of trap receiver.
In this example, retain the default port
- In the SNMPv3 Trap Receiver tab of the
Trap
Receiver Settings window, add the
trap sender information to filter and receive only traps from the
monitored device.
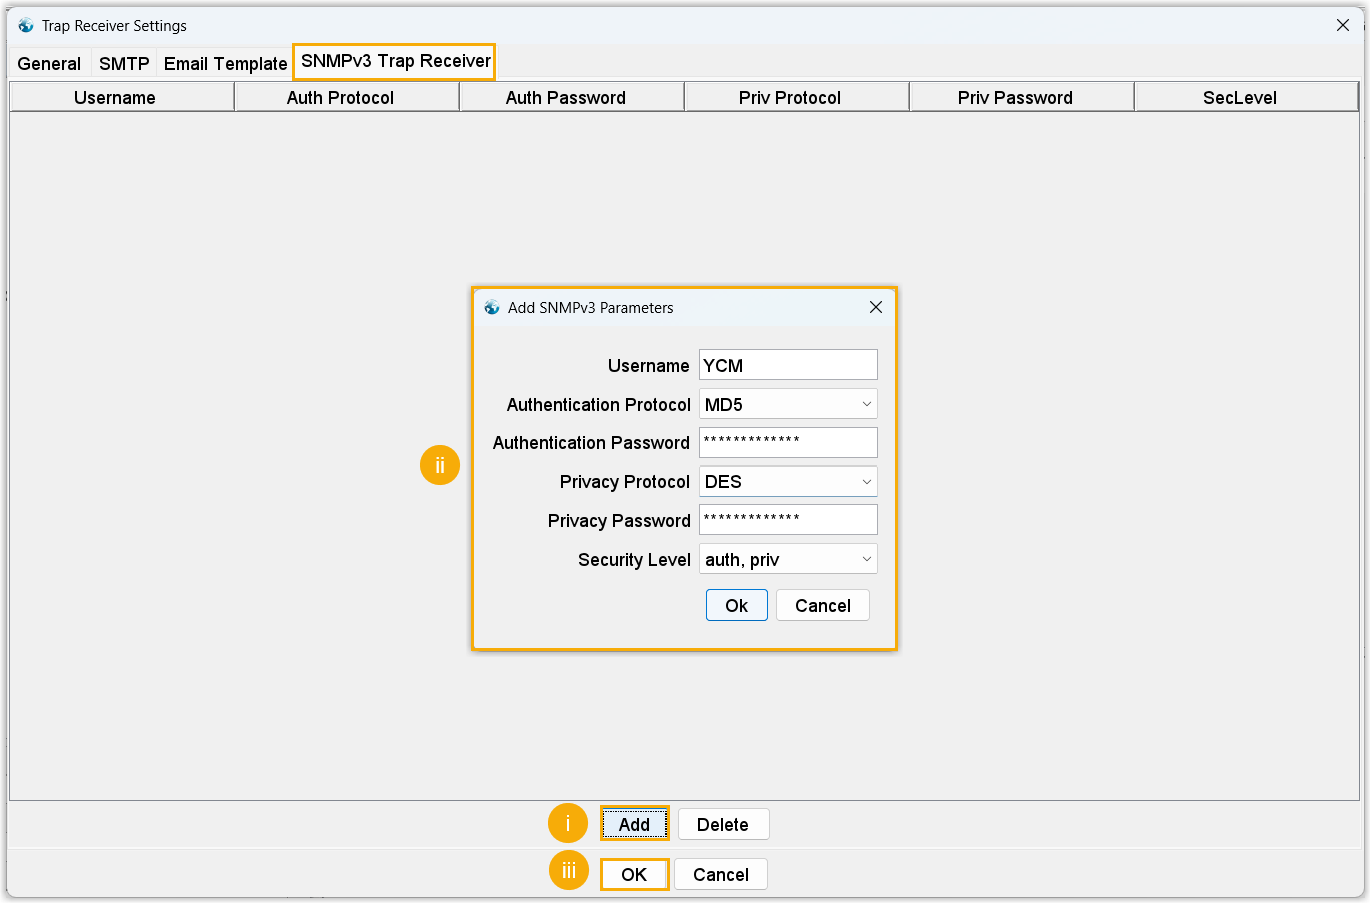
- Click Add.
- Enter the information set in the Yeastar Central Management,
then click Ok.
Setting Description Username Enter the SNMPv3 username that is configured on Yeastar Central Management. In this example, enter YCM. Security Level Select the authentication mode that is specified on Yeastar Central Management. - no auth, no priv: This
option corresponds to NoAuth on Yeastar
Central Management.
- auth, no priv: This
option corresponds to Auth
on Yeastar Central Management.
If you choose this option, you need to set Auth Algorithm to MD5, and enter the password.
- auth, priv: This option
corresponds to Priv on
Yeastar Central Management.
If you choose this option, you need to set Auth Algorithm to MD5 and Privacy Algorithm to DES, and enter the passwords.
- no auth, no priv: This
option corresponds to NoAuth on Yeastar
Central Management.
- At the bottom of the window, click
OK.
The information of Yeastar Central Management is added as the trap sender in the MIB browser.

- At the tool bar, click .
- Add the monitoring items of Yeastar Central Management.
- At the tool bar, click .
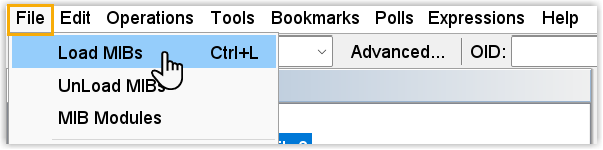
- Select the MIB file you have downloaded from Yeastar Central
Management to upload.
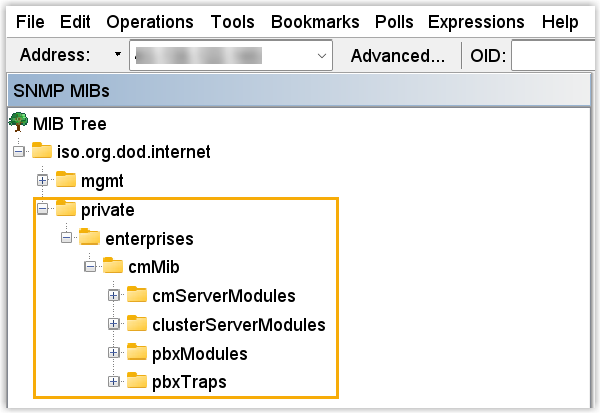
The MIB file is uploaded and displayed under the private MIB tree.
- At the tool bar, click .
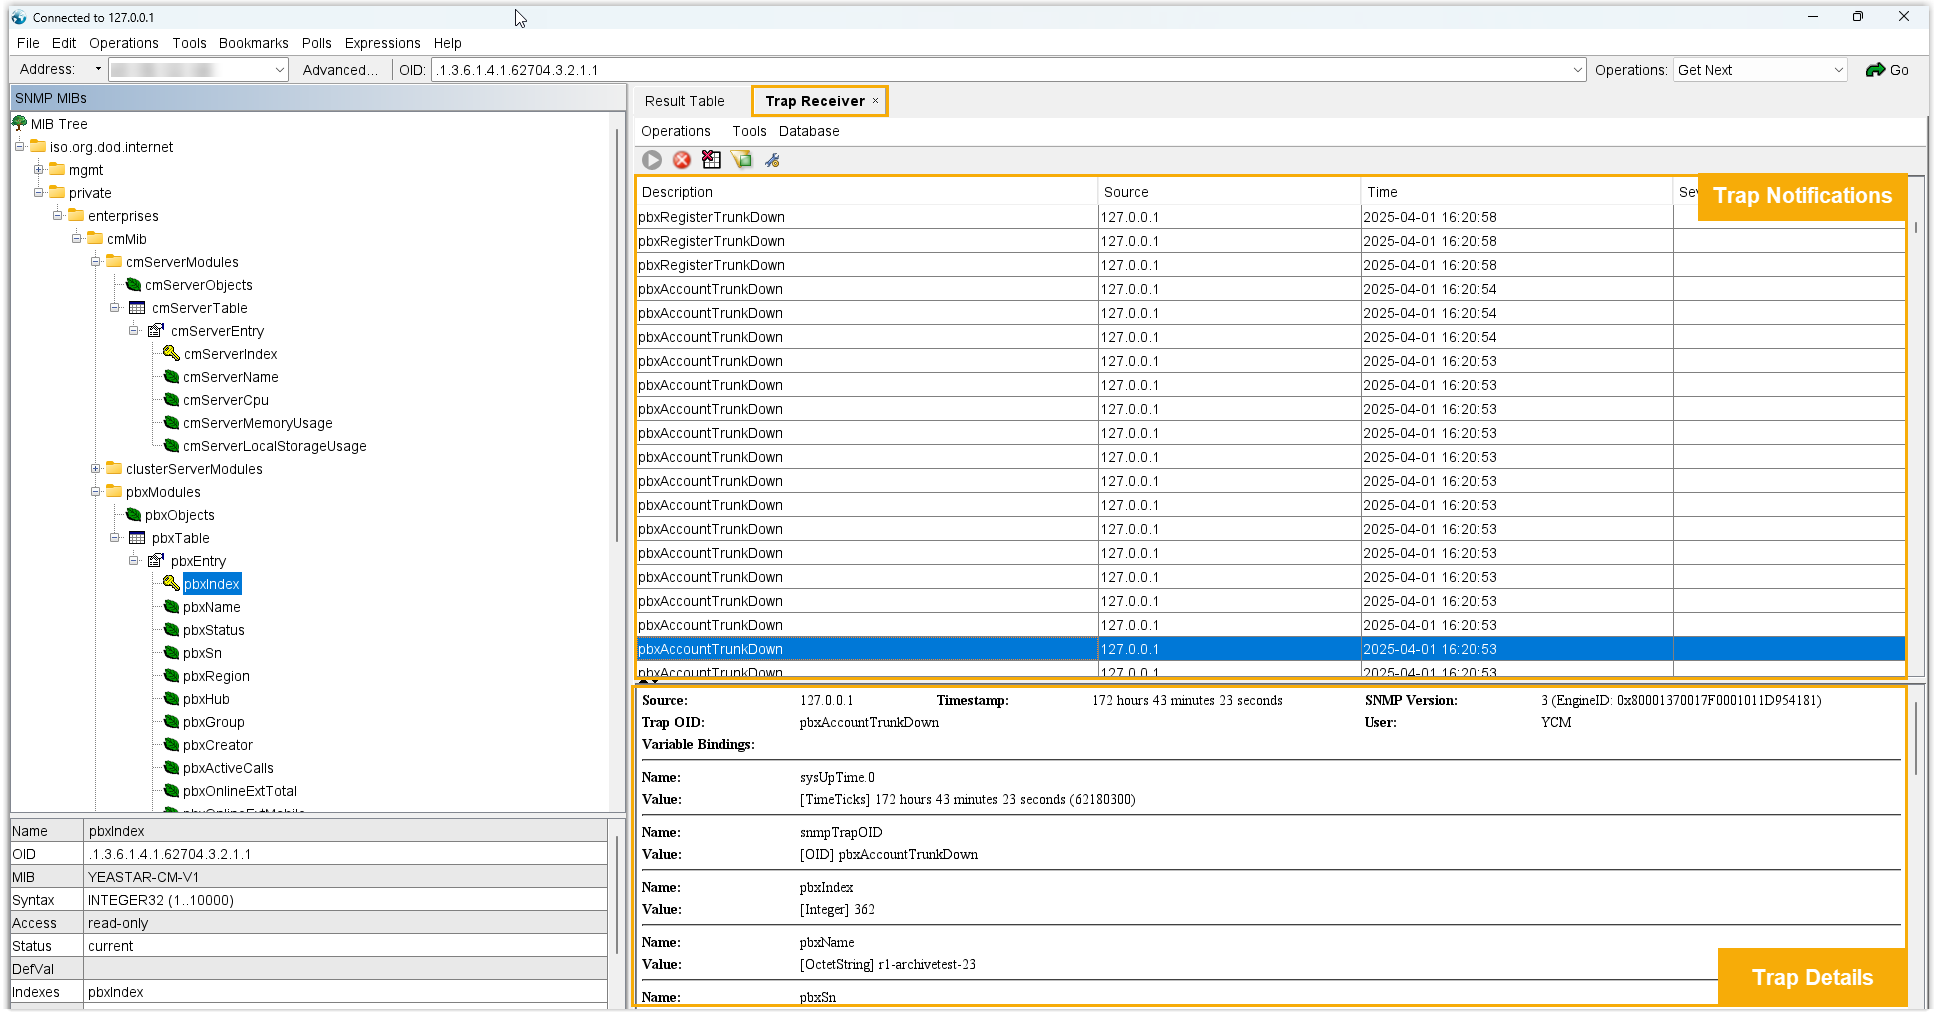
Result
- You can view the latest data collected by items on MIB Browser.
OID-based query MIB tree-based query 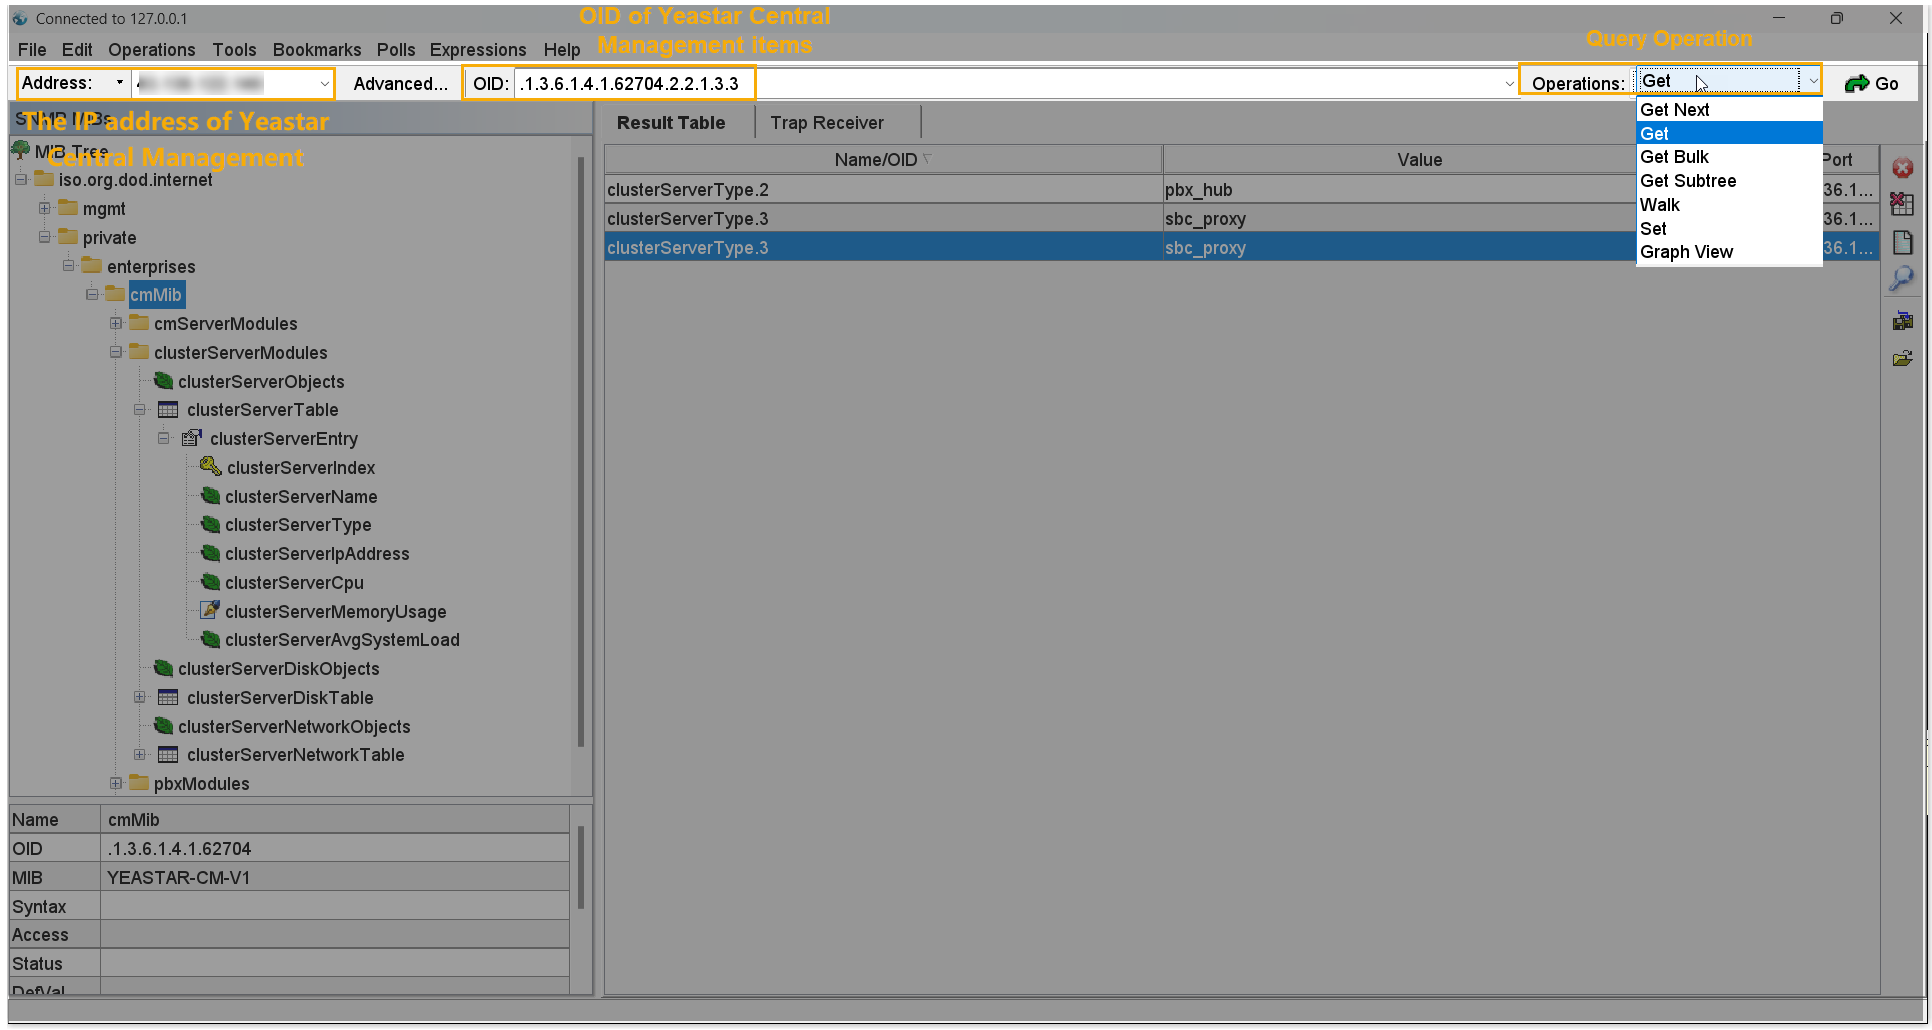

- When a PBX trap event occurs, the corresponding notification will be sent to
the MIB browser.