Manage Skills for an AI Receptionist
This topic describes how to configure different skills for an AI receptionist.
Supported skills
 to order the
skills by default sequence or enable status, allowing quick location of specific
skills.
to order the
skills by default sequence or enable status, allowing quick location of specific
skills.| Skill | Description |
|---|---|
| Greeting | Enable and configure a fixed greeting or time-based
greetings. The greeting will be played first when the AI
receptionist answers a call. If disabled, the AI receptionist
will wait for the caller to speak first. For more information, see Configure greetings. |
| Knowledge Base | Assign a knowledge base to the AI receptionist so it can
retrieve information from the FAQs, documents, and other content
you've uploaded to answer caller questions accurately; Unassign
specific knowledge base content when it is no longer needed for
a specific AI receptionist. For more information, see Assign or unassign knowledge base. |
| Dial By Name | Enable this feature so the AI receptionist can recognize when
callers say an extension user's name and transfer the call to
the designated extension. For more information, see Enable dial by name feature. |
| Intent-Based Transfer | Set up rules to route calls based on caller intent. The AI
receptionist analyzes what the caller says and transfers them to
the appropriate destinations. The supported destination
includes:
For more information, see Set up intent-based transfer. |
| Information Collection | Enable and define the caller information you want to capture.
The AI receptionist analyzes the conversation to identify and
extract specific information. When the call is transferred, the
system passes the extracted data to human agents, helping to
provide more efficient support. For more information, see Configure information collection. |
| Send SMS | Enable this feature to allow the AI receptionist to
automatically send SMS messages via the PBX's SMS messaging
channel during a call, delivering key information (order
confirmations, verification codes, appointment details, etc.)
directly to the caller's phone. For more information, see Configure SMS delivery. |
| Tools | Assign custom tools to AI receptionist, so that it can
interact with external systems to get real-time information or
implement specific actions during the call. For more information, see Assign or unassign tools. |
| MCP Server | Assign MCP servers to the AI receptionist so it can access
external tools and data sources in bulk through a single
connection. The AI receptionist will then be able to invoke the
available tools from the MCP server automatically during
calls. For more information, see Assign or unassign MCP servers. |

Configure greetings
- Log in to PBX web portal, go to .
- Click the desired receptionist.
You are redirected to the details page of the receptionist.
- Under the Skills tab, click the Greeting skill card.
- Configure greeting(s) according to your needs:
- Configure a fixed greeting
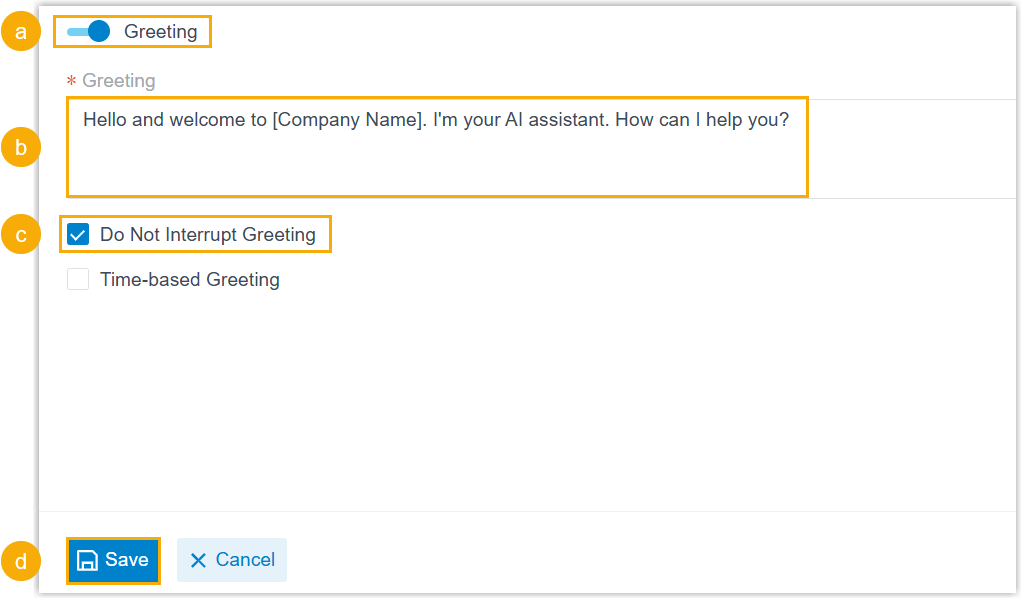
- Configure time-based greetings
-
- Turn on the switch of Greeting.
- Optional: Select the checkbox of Do Not Interrupt Greeting to prevent callers from interrupting the greeting.
- Select the checkbox of Time-based Greeting.
- In the Time Zone drop-down list,
select a desired time zone.
The AI receptionist will play greetings according to the business hours and holidays configured in the selected time zone.
- To play different greetings based on business hours,
select the checkbox of Based on business
hours, then configure the following
settings using the receptionist's primary
language.

Setting Description Greeting for Business Hours Specify a greeting to be played when the AI receptionist answers call during business hours and break hours. Greeting for Outside Business Hours Specify a greeting to be played when the AI receptionist answers calls outside the business hours, break hours, and holidays. - To play greetings based on holidays, select the checkbox
of Based on holidays, then select
one of the following options:
Option Instruction Same Greeting for All Holidays
If selected, enter a greeting in the Greeting for Holidays field using the receptionist's primary language.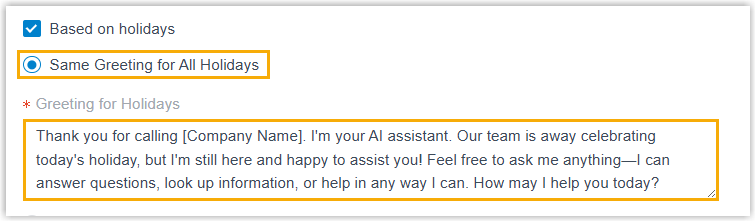
The AI Receptionist will play this greeting on all holidays.
Greeting for Specific Holidays
If selected, enter a general holiday greeting in the Default Greeting for Holidays field using the receptionist's primary language, then add specific greetings for individual holidays in the Specific Holidays section using the same language.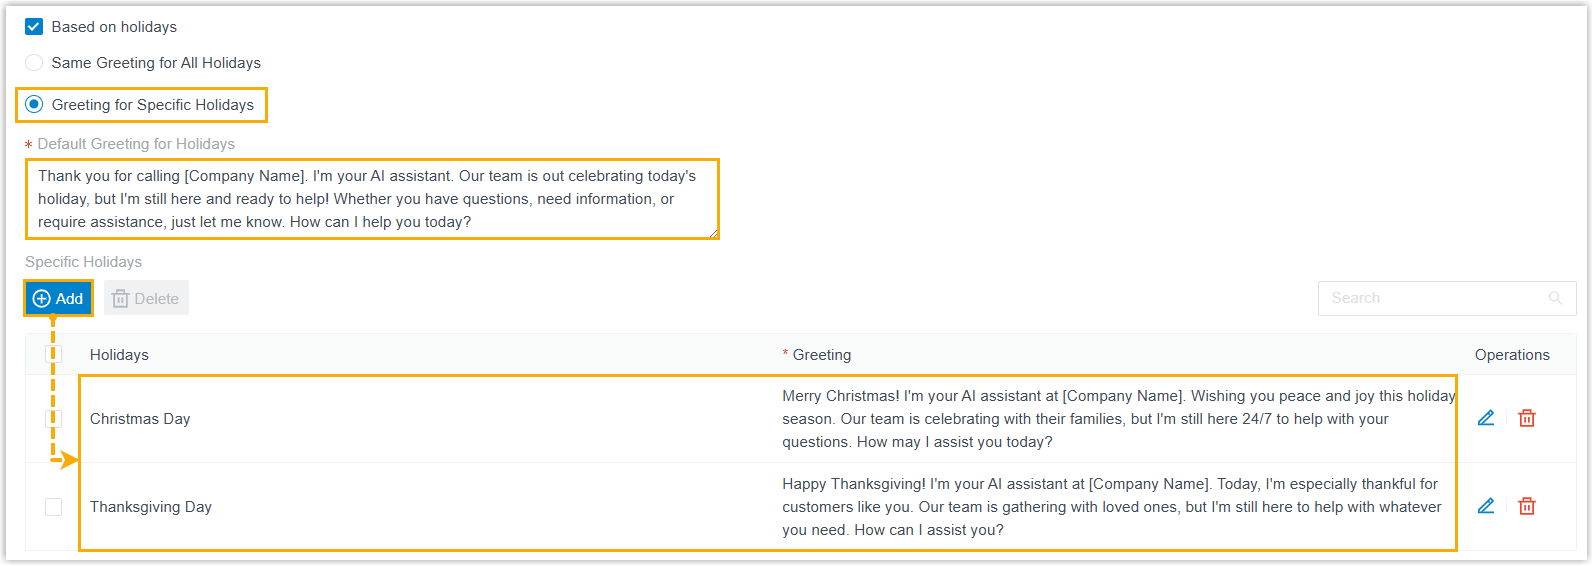
The AI Receptionist will play the specific greeting for specified a holiday; otherwise, it will play the default holiday greeting.
- Click Save.
Assign or unassign knowledge base
- Prerequisites
- If you want to assign knowledge base to an AI receptionist, ensure that you have added desired contents to the Knowledge Base.
- Procedure
-
- Log in to PBX web portal, go to .
- Click the desired receptionist.
You are redirected to the details page of the receptionist.
- Under the Skills tab, click the Knowledge Base skill card.
- To assign knowledge base, do as follows:
- Turn on the switch of Knowledge Base.
- Click Add.
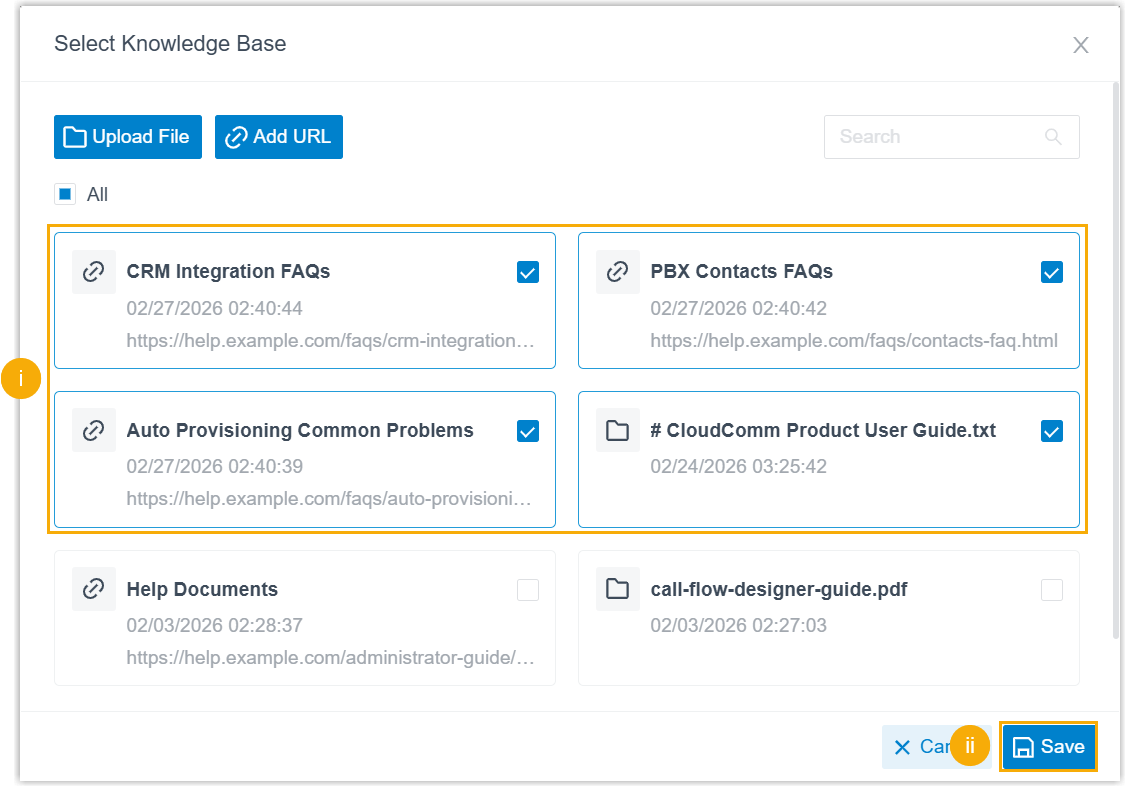
A window pops up, showing all content entries in the knowledge base.
- Search and select the desired content entries, then
click Save.Note: If you can not find the knowledge base content you need, you can add it directly by clicking Upload File or Add URL, and the uploaded content will be automatically added to the global knowledge base.
- At the bottom of the page, click
Save.
The selected knowledge base content is assigned to the AI receptionist. The AI will reference the included information when answering caller questions.
- To unassign knowledge base, do as follows:
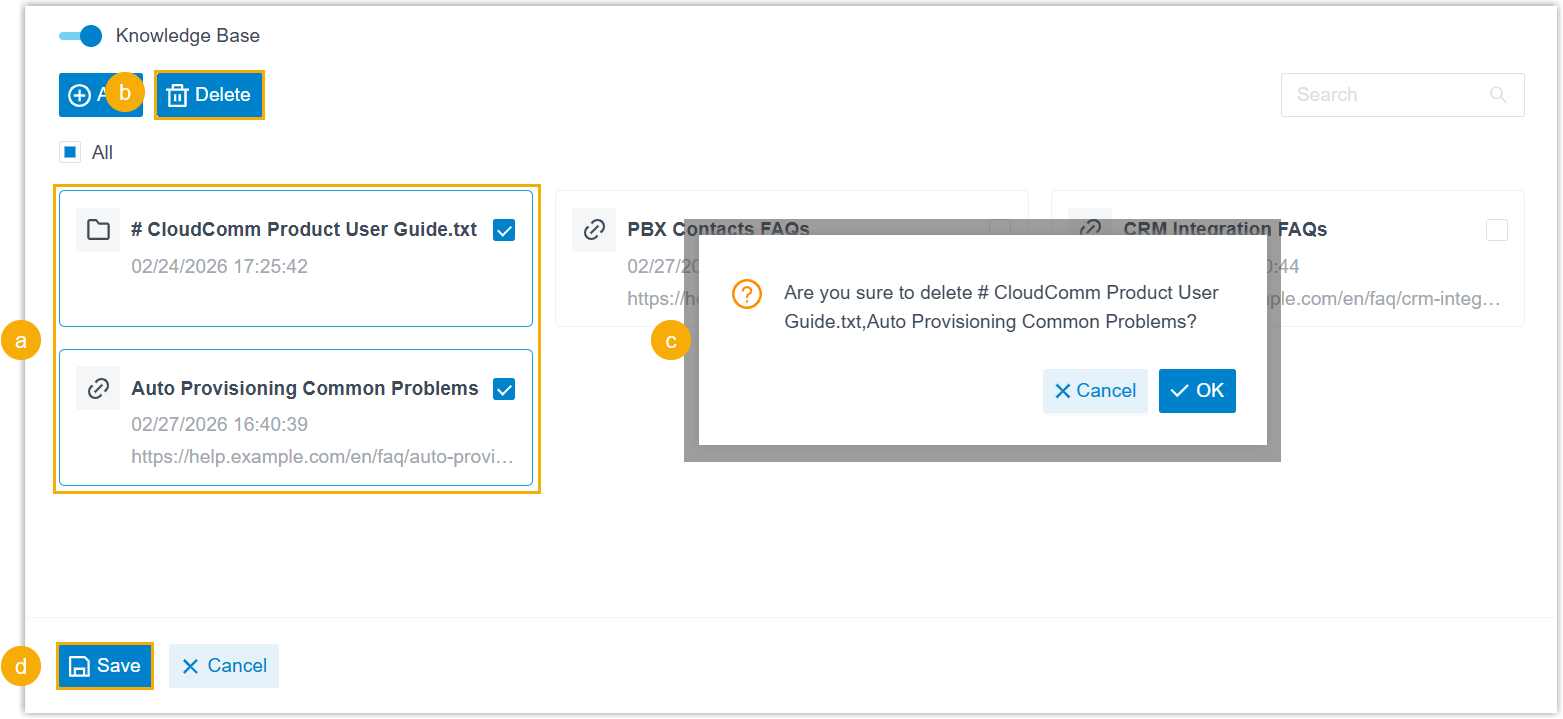
- In the existing knowledge base list of the AI receptionist, select the checkbox of one or more content entries that are no longer needed.
- At the top of the list, click Delete.
- In the pop-up window, click OK.
- At the bottom of the page, click
Save.The specified knowledge base contents have been unassigned from the AI receptionist.Note: This operation only removes the association and does not delete the content from the global knowledge base.
Enable dial by name feature
- Procedure
-
- Log in to PBX web portal, go to .
- Click the desired receptionist.
You are redirected to the details page of the receptionist.
- Under the Skills tab, click the Dial By Name skill card.
- Configure the following settings.
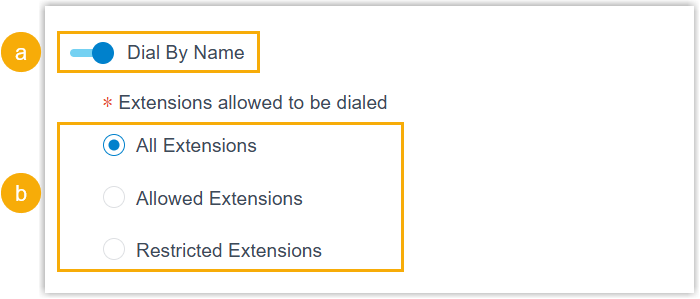
- Turn on the switch of Dial By Name.
- In the Extensions allowed to be
dialed section, specify the range of extensions.
Setting Description All Extensions All extensions can be dialed. Allowed Extensions Only selected extensions can be dialed. If selected, add the desired extensions from Available box to the Selected box.
Restricted Extensions The selected extensions can not be dialed; all other extensions are allowed. If selected, add the desired extensions from Available box to the Selected box.
- Click Save.
- Result
-
The Dial by Name skill is enabled for the AI receptionist. When callers say an extension name, the AI receptionist will recognize it and transfer the call to the corresponding extension.
Set up intent-based transfer
- Prerequisites
-
You have prepared the desired transfer destinations (extension, inbound queue, ring group, etc.).
- Procedure
-
- Log in to PBX web portal, go to .
- Click the desired receptionist.
You are redirected to the details page of the receptionist.
- Under the Skills tab, click the Intent-Based Transfer skill card.
- Turn on the switch of Intent-Based Transfer.
- Click Add to create a transfer rule.Note: You can add up to 200 transfer rules for each AI receptionist.
- In the pop-up window, configure the following settings:
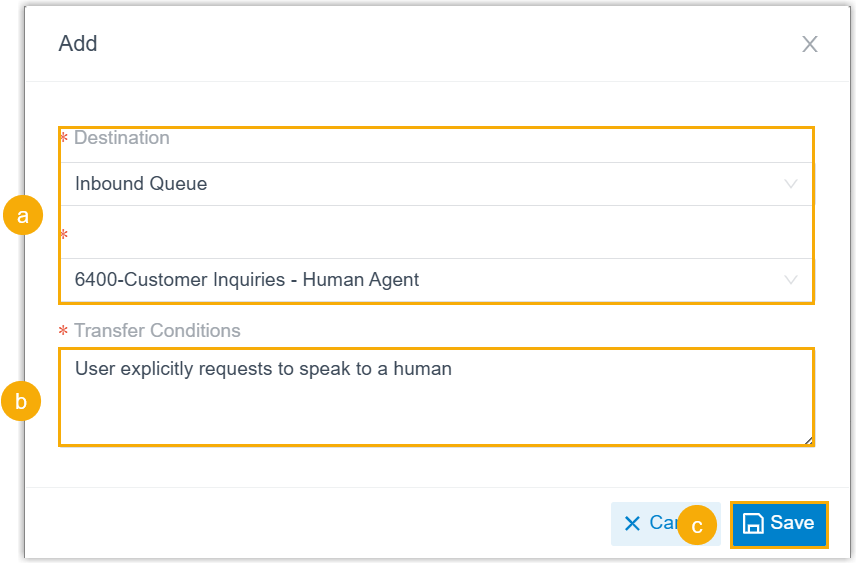
- In the Destination drop-down list, select a destination type, then select the specific destination.
- In the Transfer Conditions field,
enter a natural language description of the circumstances
under which the transfer should occur.
For example, User explicitly requests to speak to a human or User asks a question that the AI cannot answer.
- Click Save.
- At the bottom of the page, click Save.
- Result
-
The AI receptionist will analyze callers' speech and transfer calls based on the specified conditions.
Configure information collection
- Procedure
-
- Log in to PBX web portal, go to .
- Click the desired receptionist.
You are redirected to the details page of the receptionist.
- Under the Skills tab, click the Information Collection skill card.
- Turn on the switch of Information Collection.
- Click Add to create a data collection
rule.Note: You can add up to 20 collection rules for each AI receptionist.
- In the pop-up window, configure the following settings:
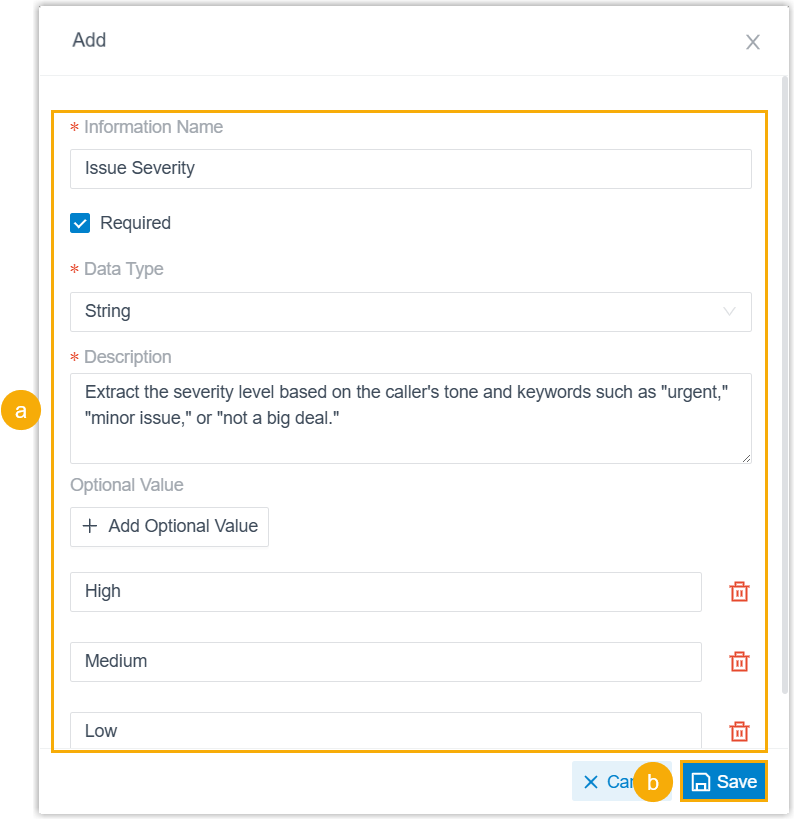
- Specify the rule.
Setting Description Information Name Specify the name of the information to be collected. For example, Name, Email, Phone Number. Required Decide whether the information is mandatory. If selected, the AI receptionist will repeatedly prompt the caller until the required information is successfully collected.
Date Type Select the data type for the information to ensure proper data formatting. - String: Text-based information such as names, emails, and addresses. Letters, numbers, and special characters are allowed.
- Boolean: Yes/no values, such as subscription consent or terms acceptance.
- Integer: Whole numbers without decimals, such as quantity, age, or ratings.
- Number: Numeric values that can be integers or decimals, such as order amount, discount rate, or product weight.
Description Enter a natural language description to instruct the AI receptionist to collect the data from the call. Examples:Ask the caller for their email addressIdentify the order number when the caller says "My order number is XXX".Extract the severity level based on the caller's tone and keywords such as "urgent," "minor issue," or "not a big deal.".
Optional Value Optional. Click Add Optional Value to add predefined values that the AI receptionist can select from when the information matches one of the specified options. For example, define options such as
High,Medium,Lowfor a Issue Severity information field.Note: This setting is only available only for the String data type. - Click Save.
- Specify the rule.
- At the bottom of the page, click Save.
- Result
-
The Information Collection skill is successfully configured. The AI receptionist will automatically capture the specified information from calls based on the defined rules.
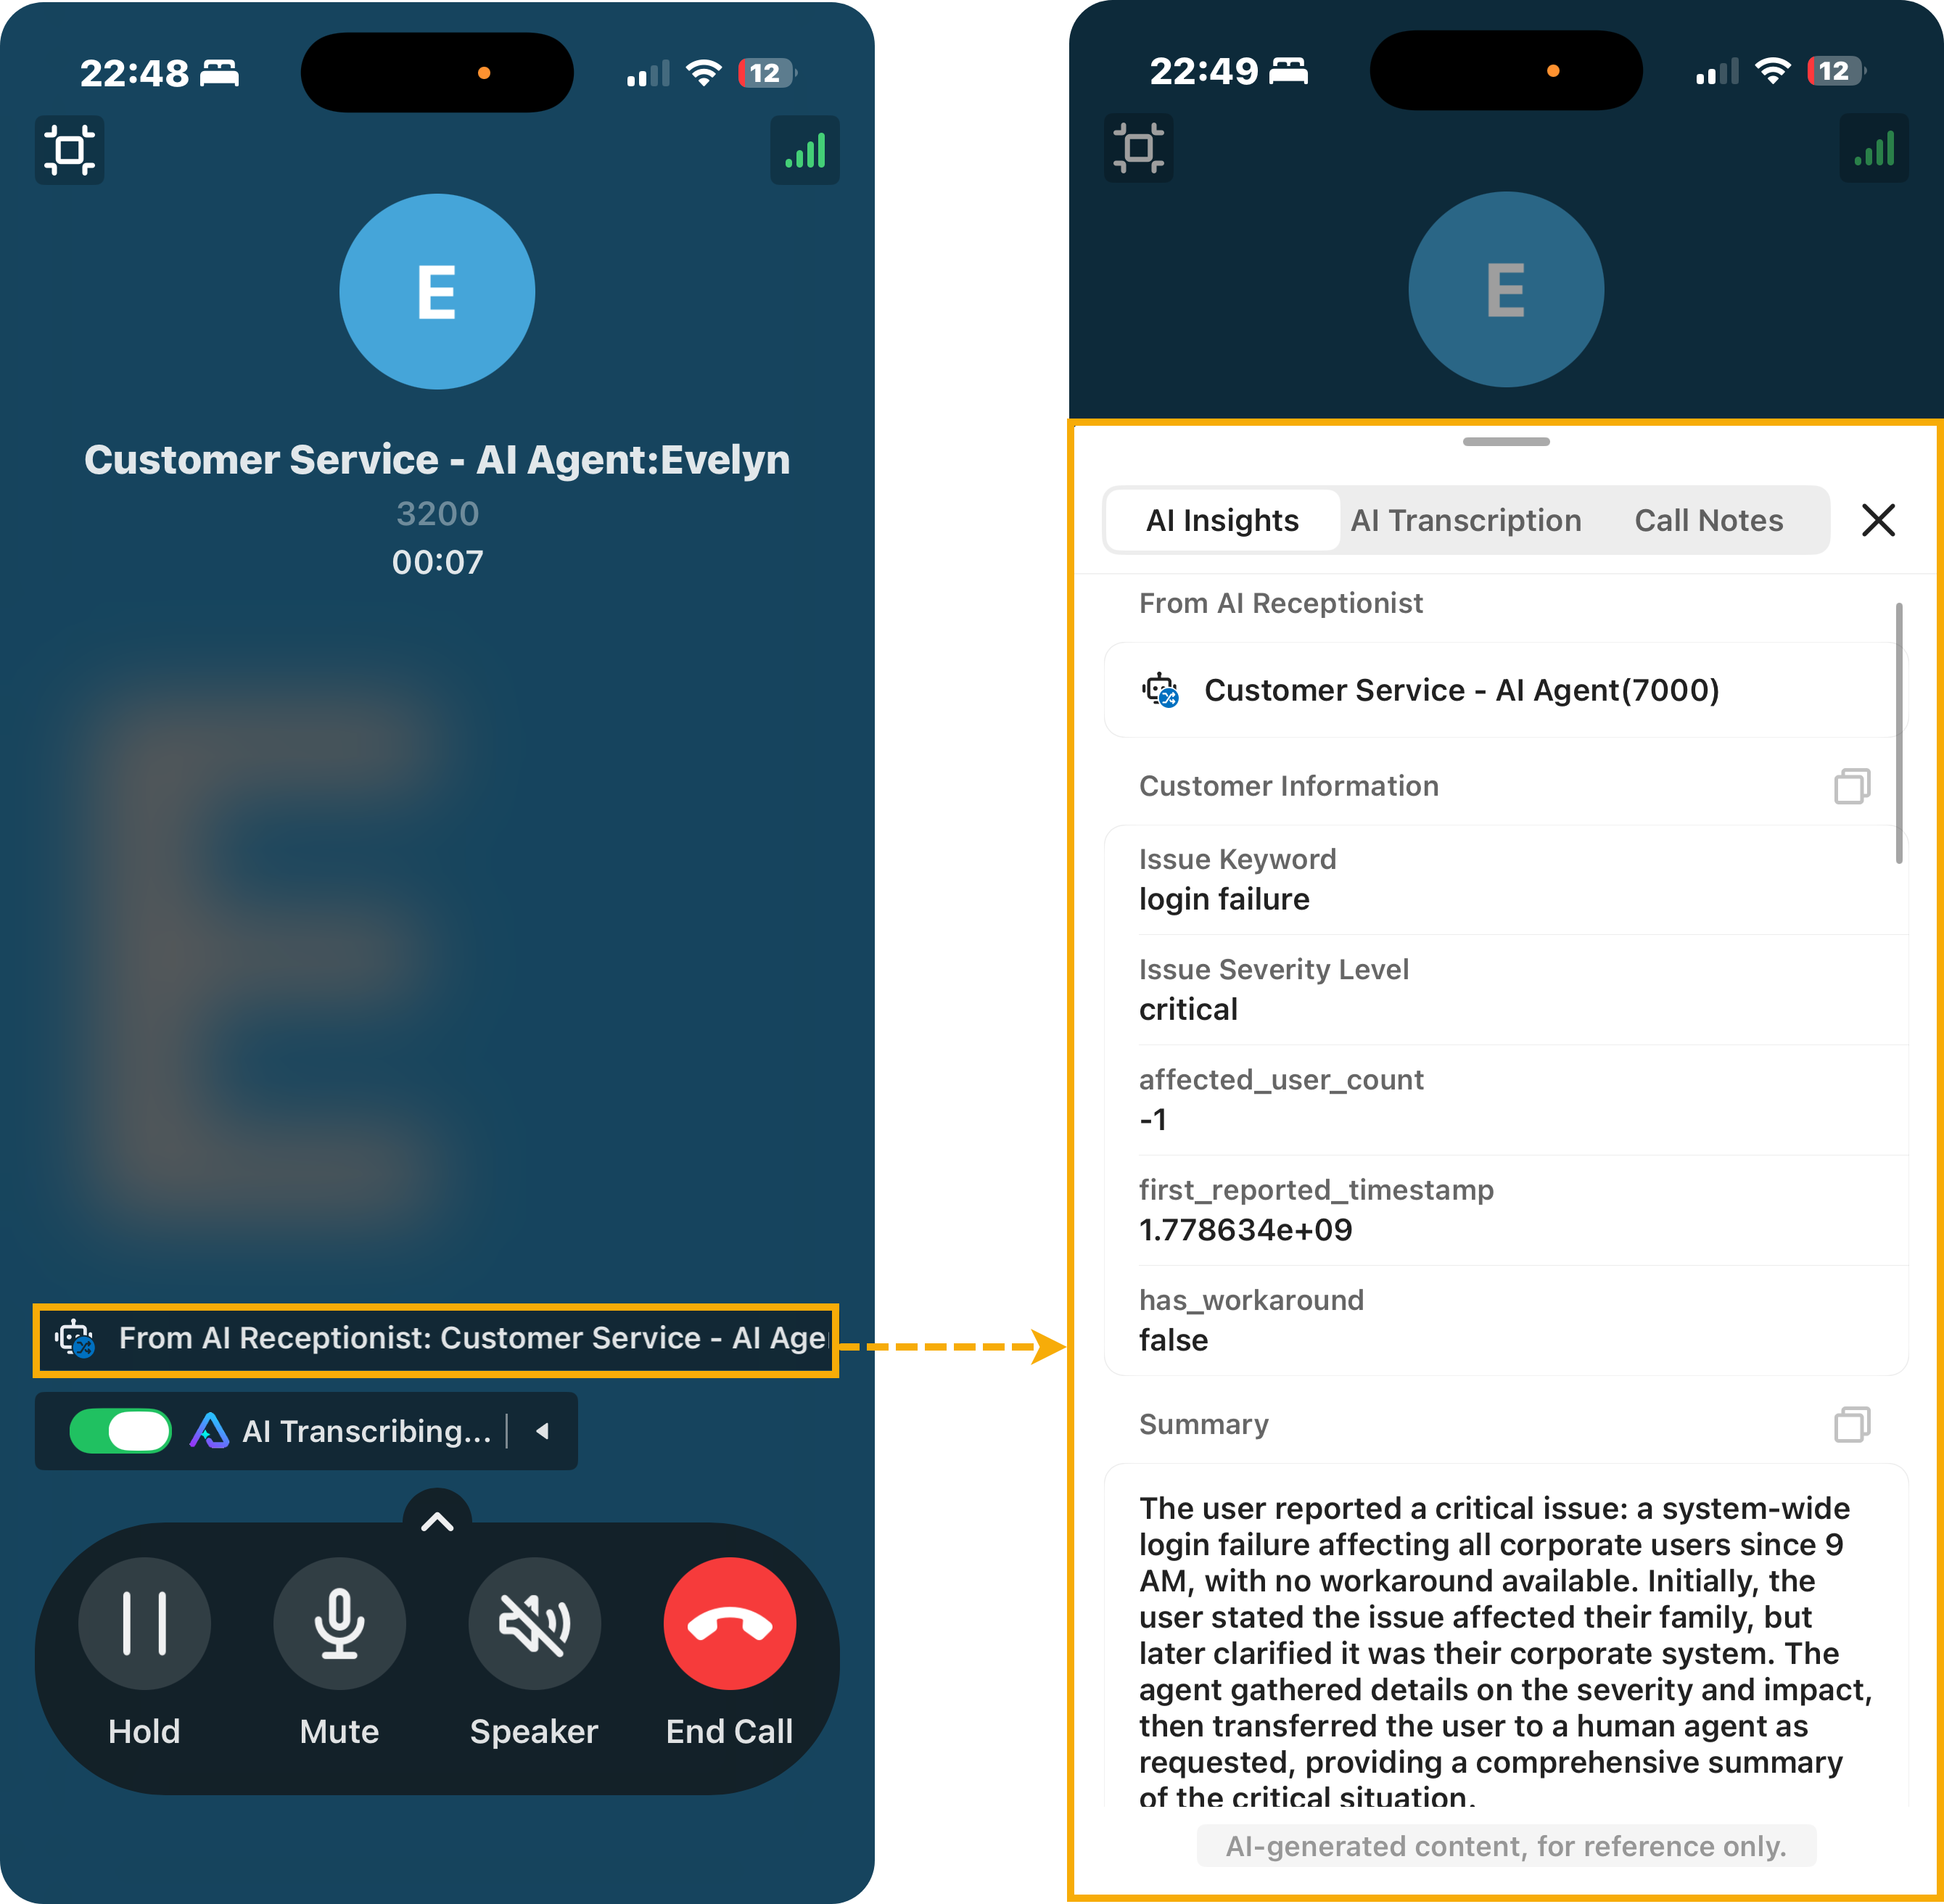
When the call is transferred to a human agent, the agent who answers the call will see the collected data as well as the AI receptionist-generated call transcript and summary on the Linkus client, enabling more efficient support.Note:- To implement this on Linkus Mobile / Desktop Client, the App
version should be updated:
- Linkus Android Client: 5.26.10 or later
- Linkus iOS Client: 5.26.15 or later
- Linkus Windows Desktop: 1.23.3 or later
- Linkus Mac Desktop: 1.23.3 or later
- The collected data is displayed only to the first human agent who answers the transferred receptionist call. Agents who join later via call transfer or multi-party calls will not see the data.
-
When sending an email from a call window on Linkus Web Client / Desktop Client, the collected data will also be included in the email.
- The call transcripts generated by the AI Receptionist do NOT consume minutes from the AI Call Transcription feature.
Linkus Web/Desktop Client Linkus Mobile Client 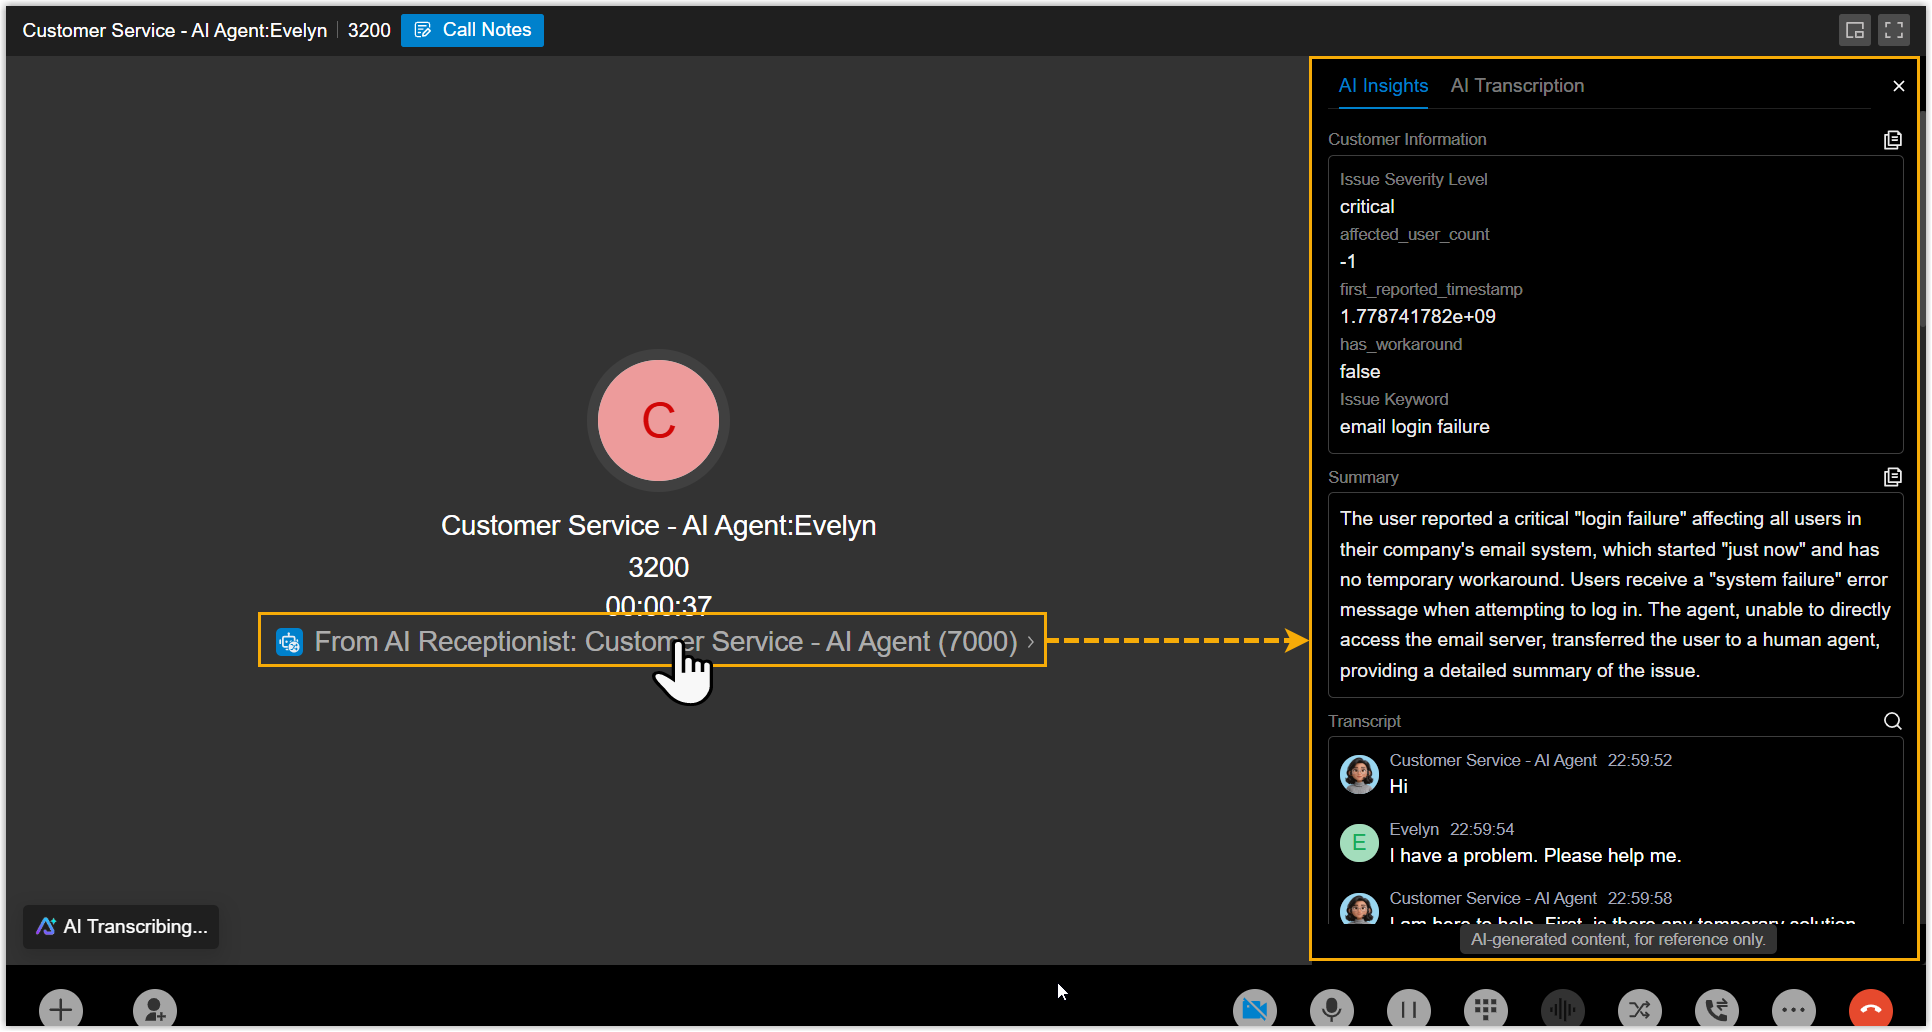
- To implement this on Linkus Mobile / Desktop Client, the App
version should be updated:
Configure SMS delivery
- Prerequisites
-
- Ensure that the firmware version of PBX is 84.24.0.30 or later.
- Ensure that at leaset one SMS messaging channel is configured on the PBX (Path: ).
- Procedure
-
- Log in to PBX web portal, go to .
- Click the desired receptionist.
You are redirected to the details page of the receptionist.
- Under the Skills tab, click the Send SMS skill card.
- Turn on the switch of Send SMS.
- Click Add to add am SMS sending
rule.Note: You can add up to 10 sending rules for each AI receptionist.
- To quickly add an SMS sending rule using a built-in
template provided by the PBX, do as follows:
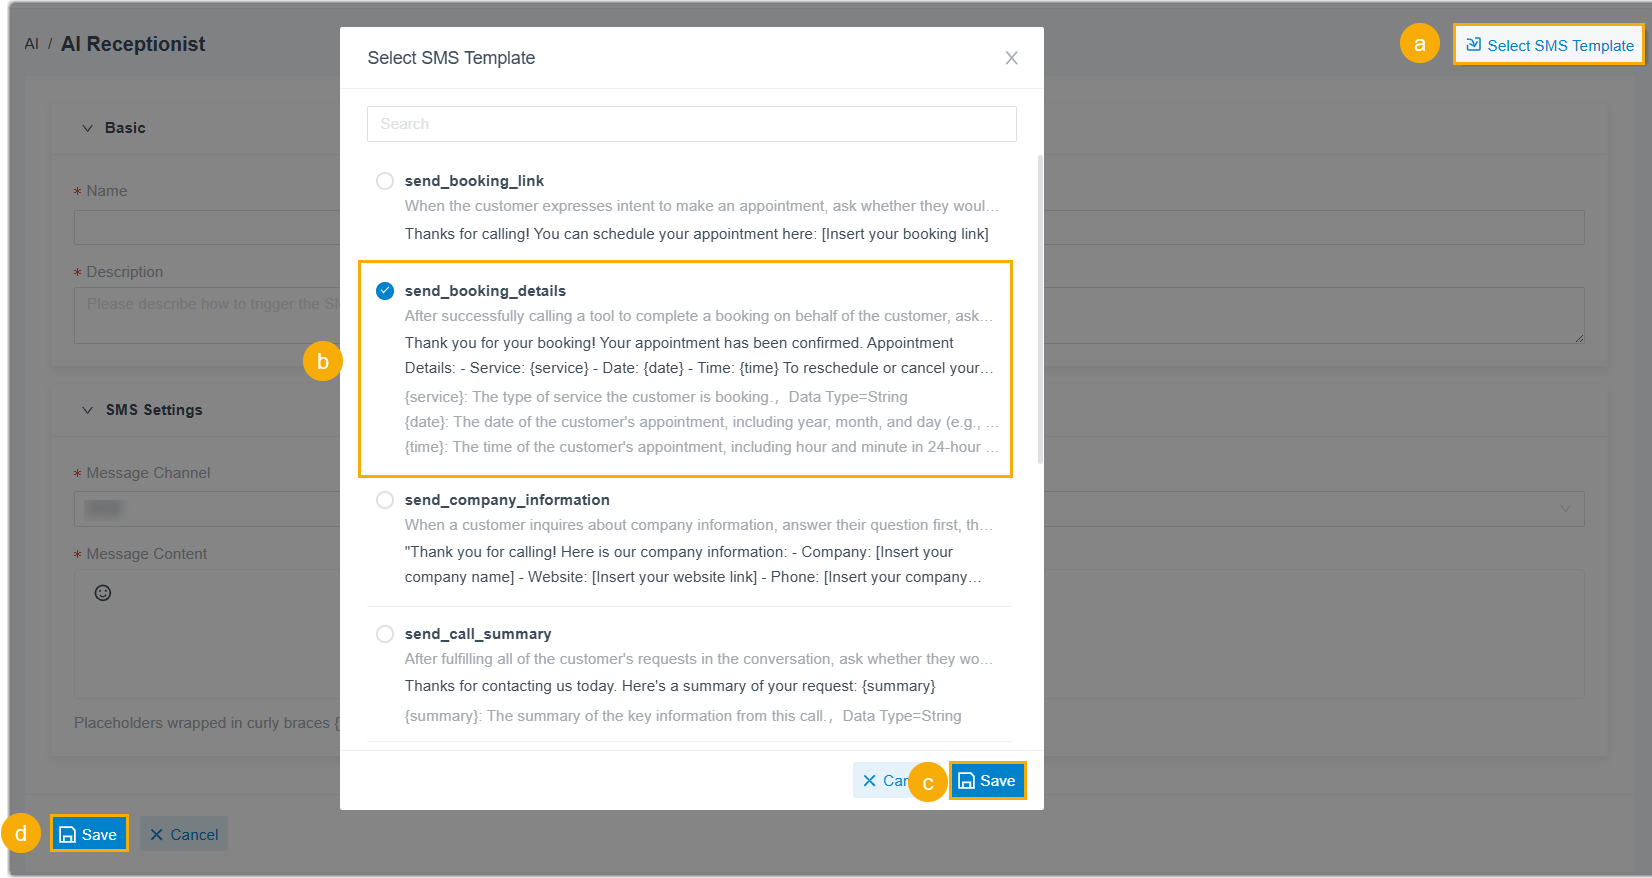
- At the top-right corner of the page, click Select SMS Template.
- In the pop-up window, search and select a desired template.
- Click Save.
The configuration of the selected built-in template is automatically populated into the settings. You can then modify the settings and content as needed.
- At the bottom of the page, click Save.
- To manually configure the rule, do as follows:
- In the Basic section,
enter the basic information of the rule.
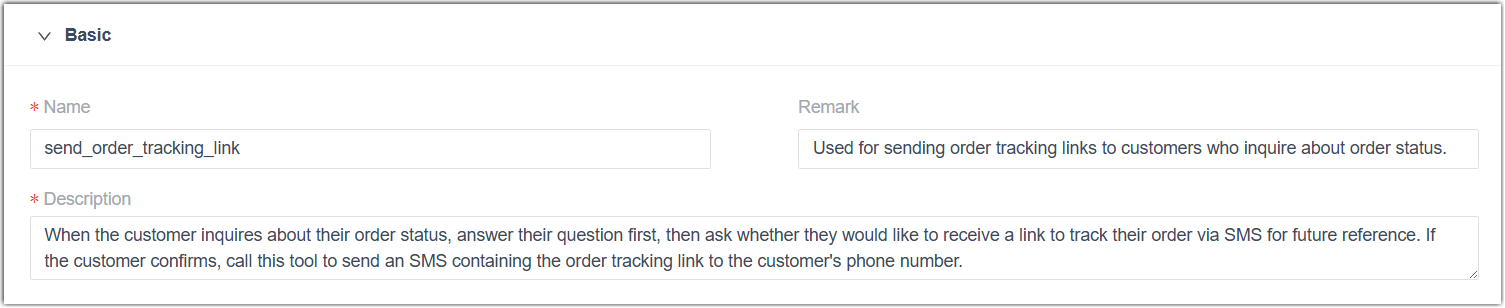
Table 1. Setting Description Name Specify a name to help you identify the rule. Remark Optional. Enter a note for quick reference, such as the purpose or use case of this rule. Description Enter a natural language instruction to guide the AI receptionist on when and how to trigger the SMS delivery. - In the SMS Settings
section, configure the following SMS settings.
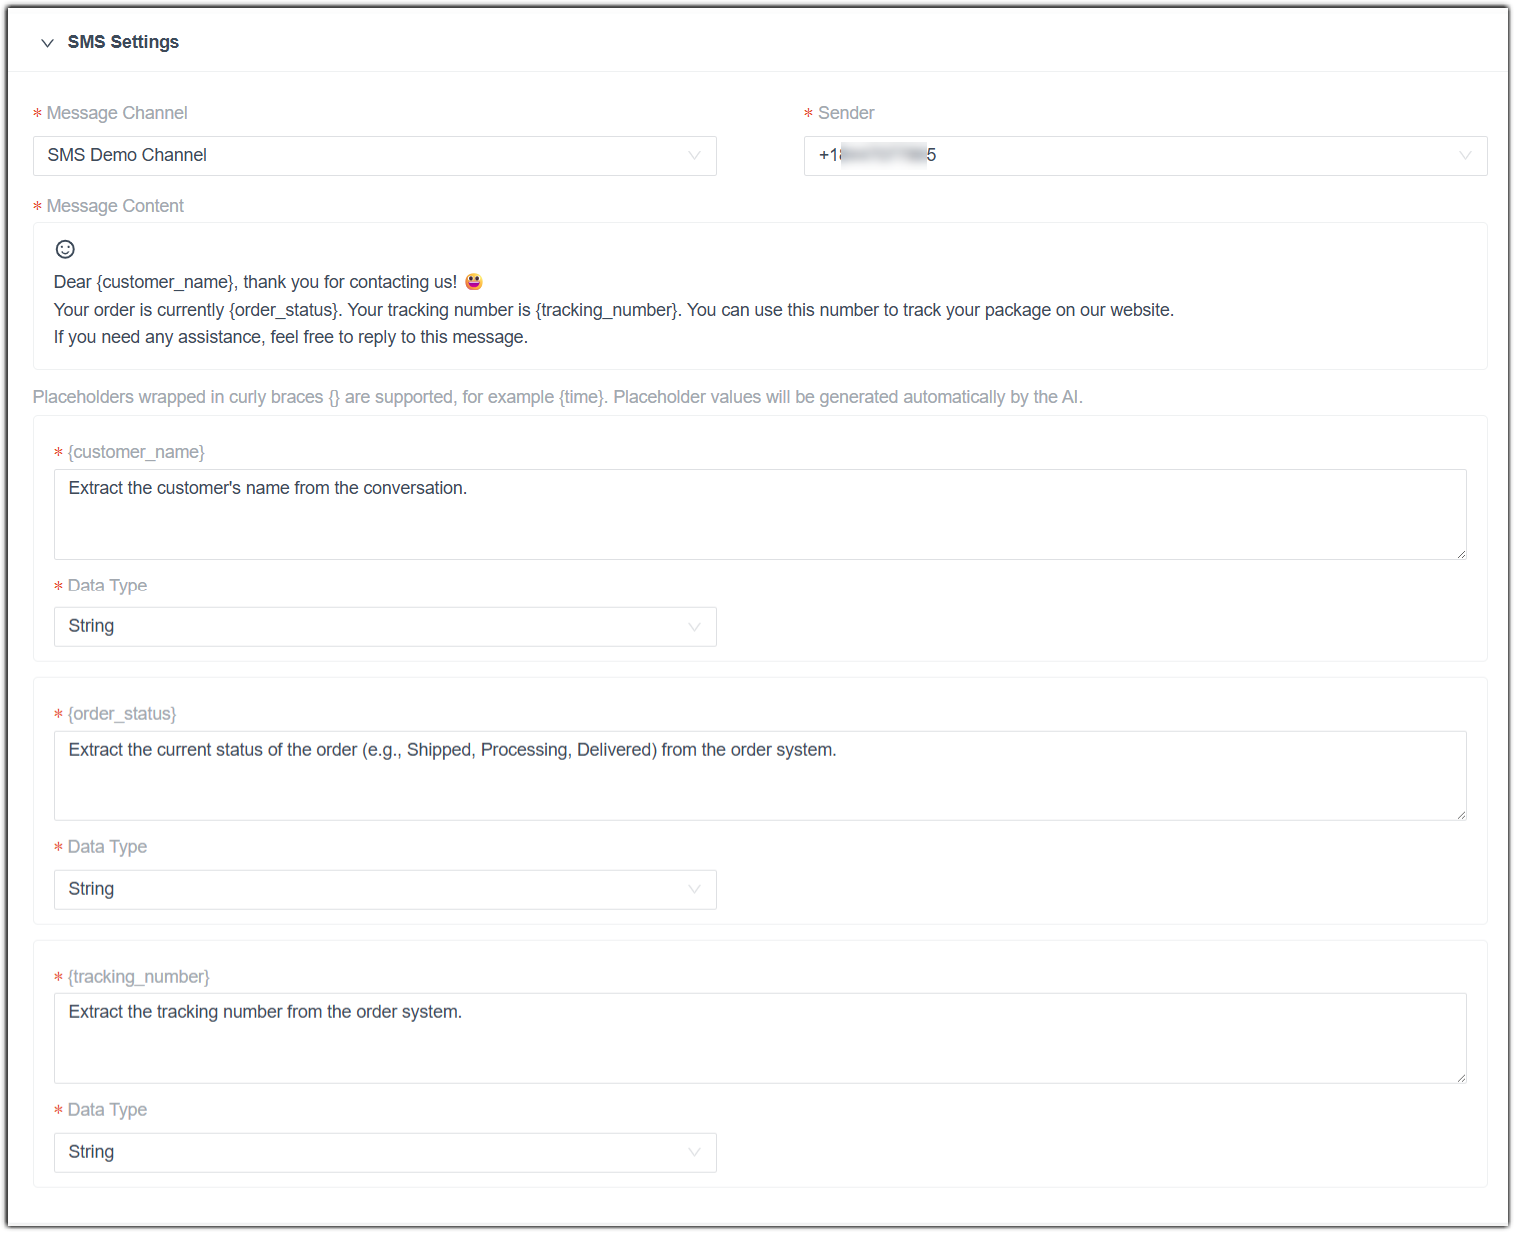
Table 2. Setting Description Message Channel Select an available SMS message channel. Sender Select a number associated with the selected SMS channel for message sending. Message Content Enter the message content and add emojis as needed. Note:- You can include up to 5 variables in
the format
{variable}(e.g.{customer_name}). The AI receptionist will extract these values based on the conversation context and the prompt configuration. - The variable name may only contain numbers,
letters, underscore (
_), non-consecutive dots, and symbol@.
{variable}Enter a natural language instruction to guide the AI receptionist on how to extract the variable value. Note: This setting is available only when the Message Content contains variables, and its title is automatically generated from the variable name.Data Type Select the data type of the variable value. Note: This setting is available only when the Message Content contains variables.- String: Text-based information such as names, emails, and addresses. Letters, numbers, and special characters are allowed.
- Boolean: Yes/no values, such as subscription consent or terms acceptance.
- Integer: Whole numbers without decimals, such as quantity, age, or ratings.
- Number: Numeric values that can be integers or decimals, such as order amount, discount rate, or product weight.
- You can include up to 5 variables in
the format
- Click Save.
- In the Basic section,
enter the basic information of the rule.
- To quickly add an SMS sending rule using a built-in
template provided by the PBX, do as follows:
- At the bottom of the page, click Save.
- Result
- The Send SMS skill is configured for the AI receptionist. During calls,
the AI receptionist will automatically extract the caller's phone number
and send SMS messages via the PBX's SMS channel based on the configured
rules.Note:
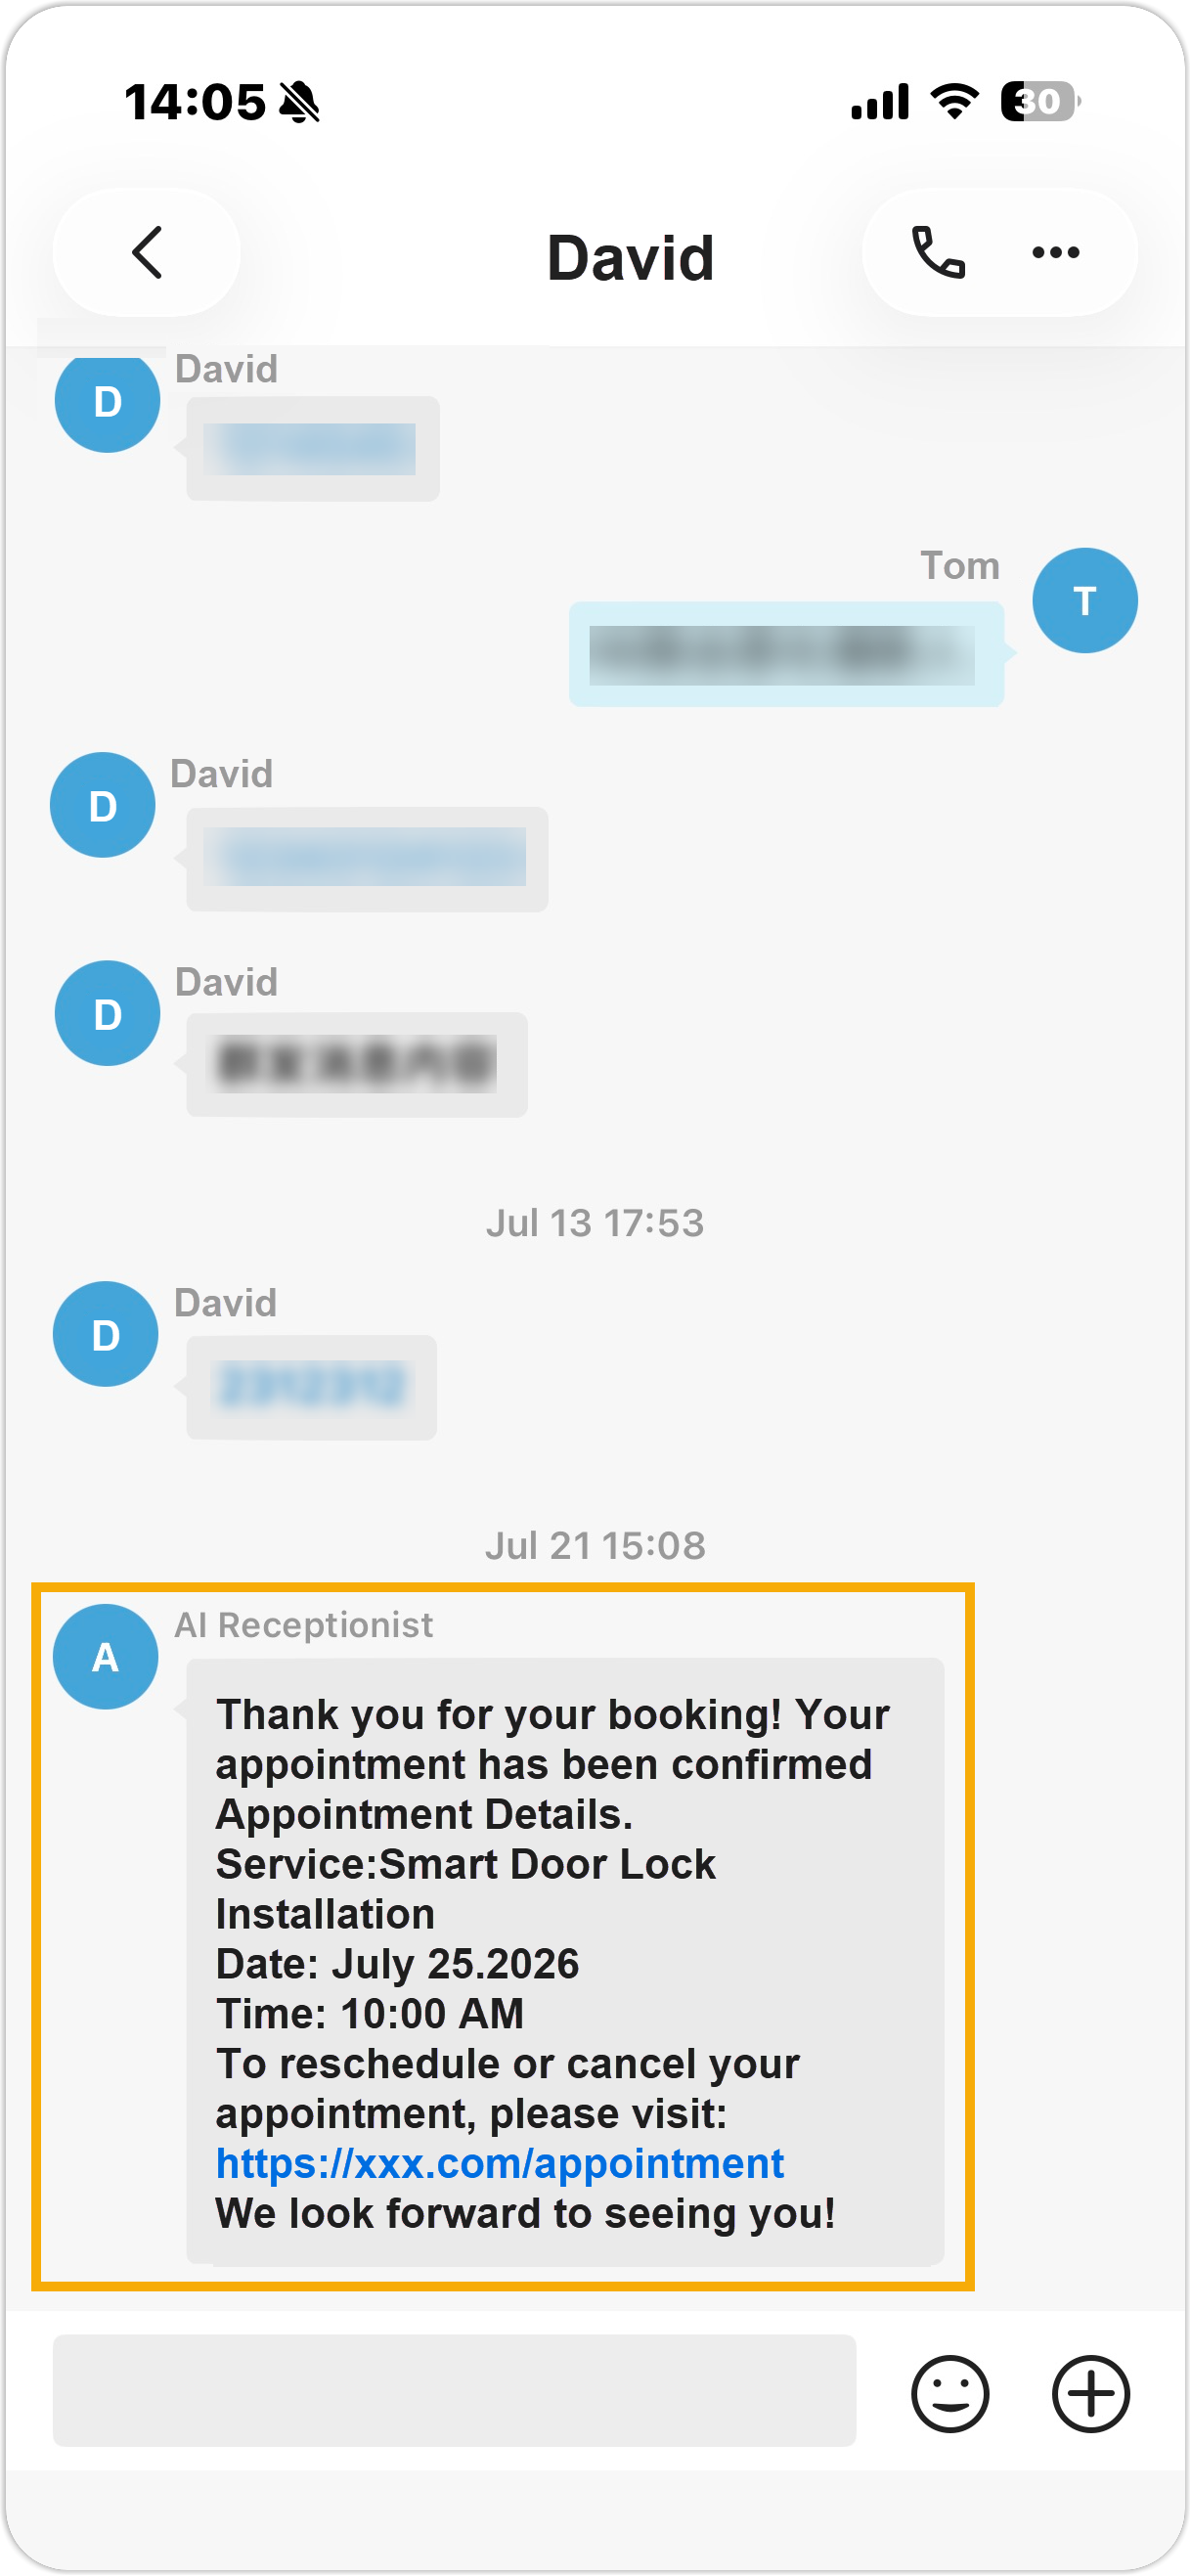
- The message is sent directly without creating a message
session. However, if an active session with the same sender
and recipient already exists, the message will be sent
within that existing session with the sender name displayed
as AI Receptionist. In such case, you
can view the message content in the specific session on .
Linkus Web/Desktop Client Linkus Mobile Client 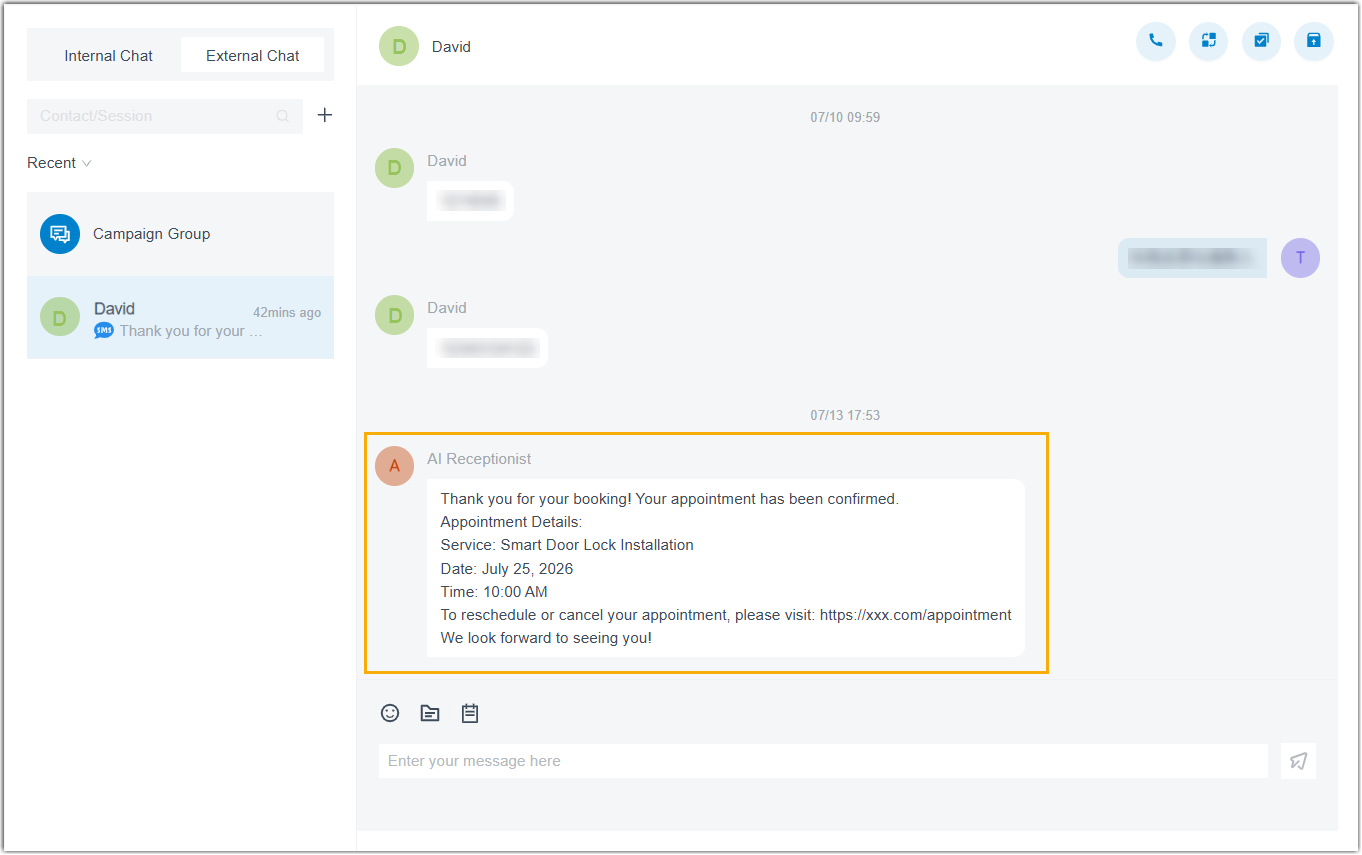
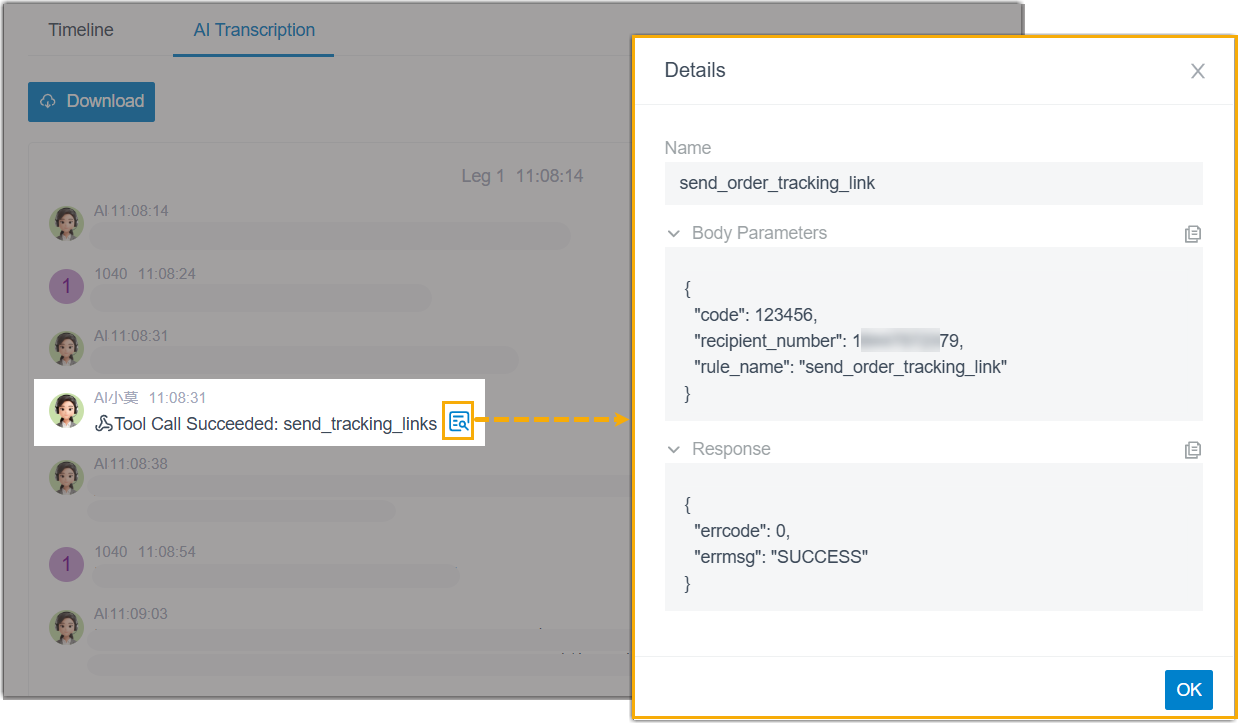
- The Call Detail Records (CDR) records each SMS sending
attempt initiated by the AI receptionist, allowing you to
check the execution details, including the recipient number
and the delivery status.
- The message is sent directly without creating a message
session. However, if an active session with the same sender
and recipient already exists, the message will be sent
within that existing session with the sender name displayed
as AI Receptionist. In such case, you
can view the message content in the specific session on .
Assign or unassign tools
- Prerequisites
- If you want to assign tools to an AI receptionist, ensure that you have added the desired tools to the PBX.
- Procedure
-
- Log in to PBX web portal, go to .
- Click the desired receptionist.
You are redirected to the details page of the receptionist.
- Under the Skills tab, click the Tools skill card.
- To assign tools, do as follows:
- Turn on the switch of Tools.
- Click Add.
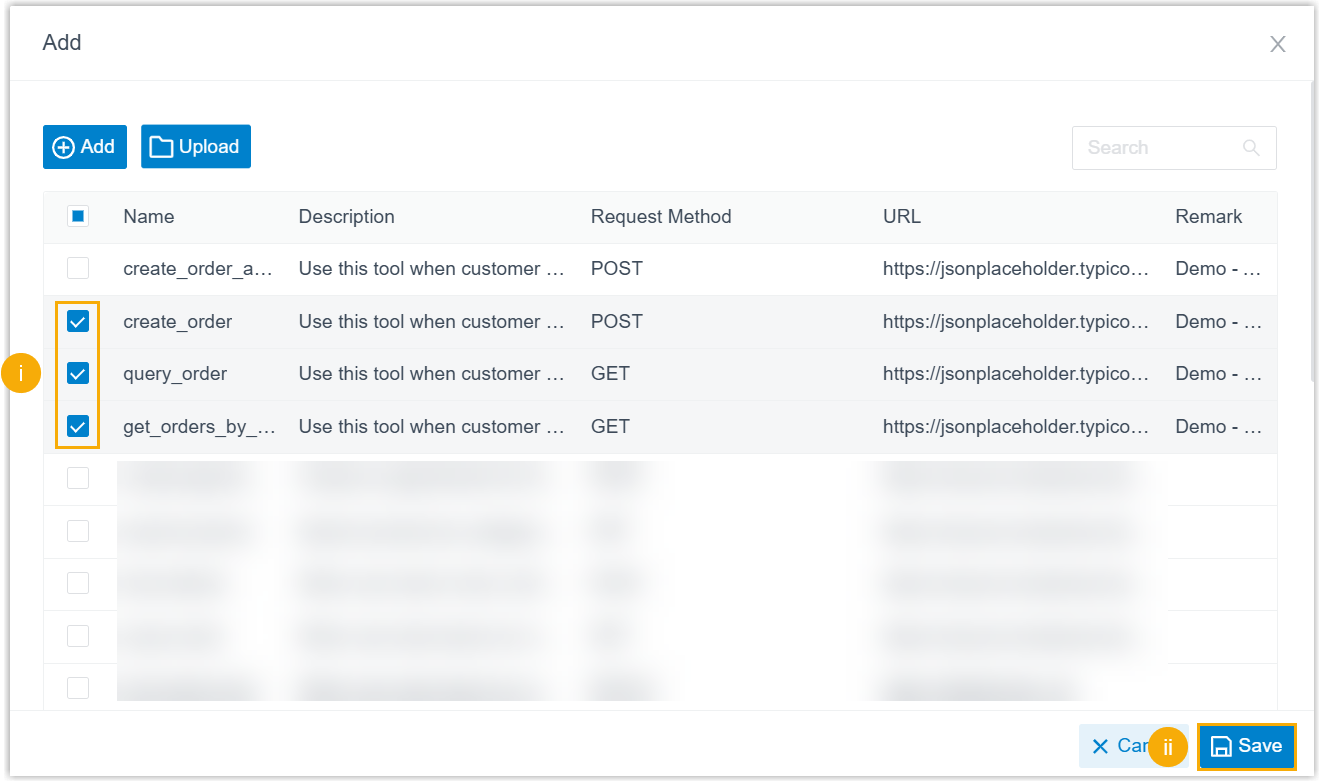
A window pops up, showing all the available tools.
- Search and select the desired tools, then click
Save.Note: If you can not find the tool you need, you can add it directly by clicking Add or Upload, and the newly-added tool will be automatically synchronized to the global tool list (Path: ).
- At the bottom of the page, click
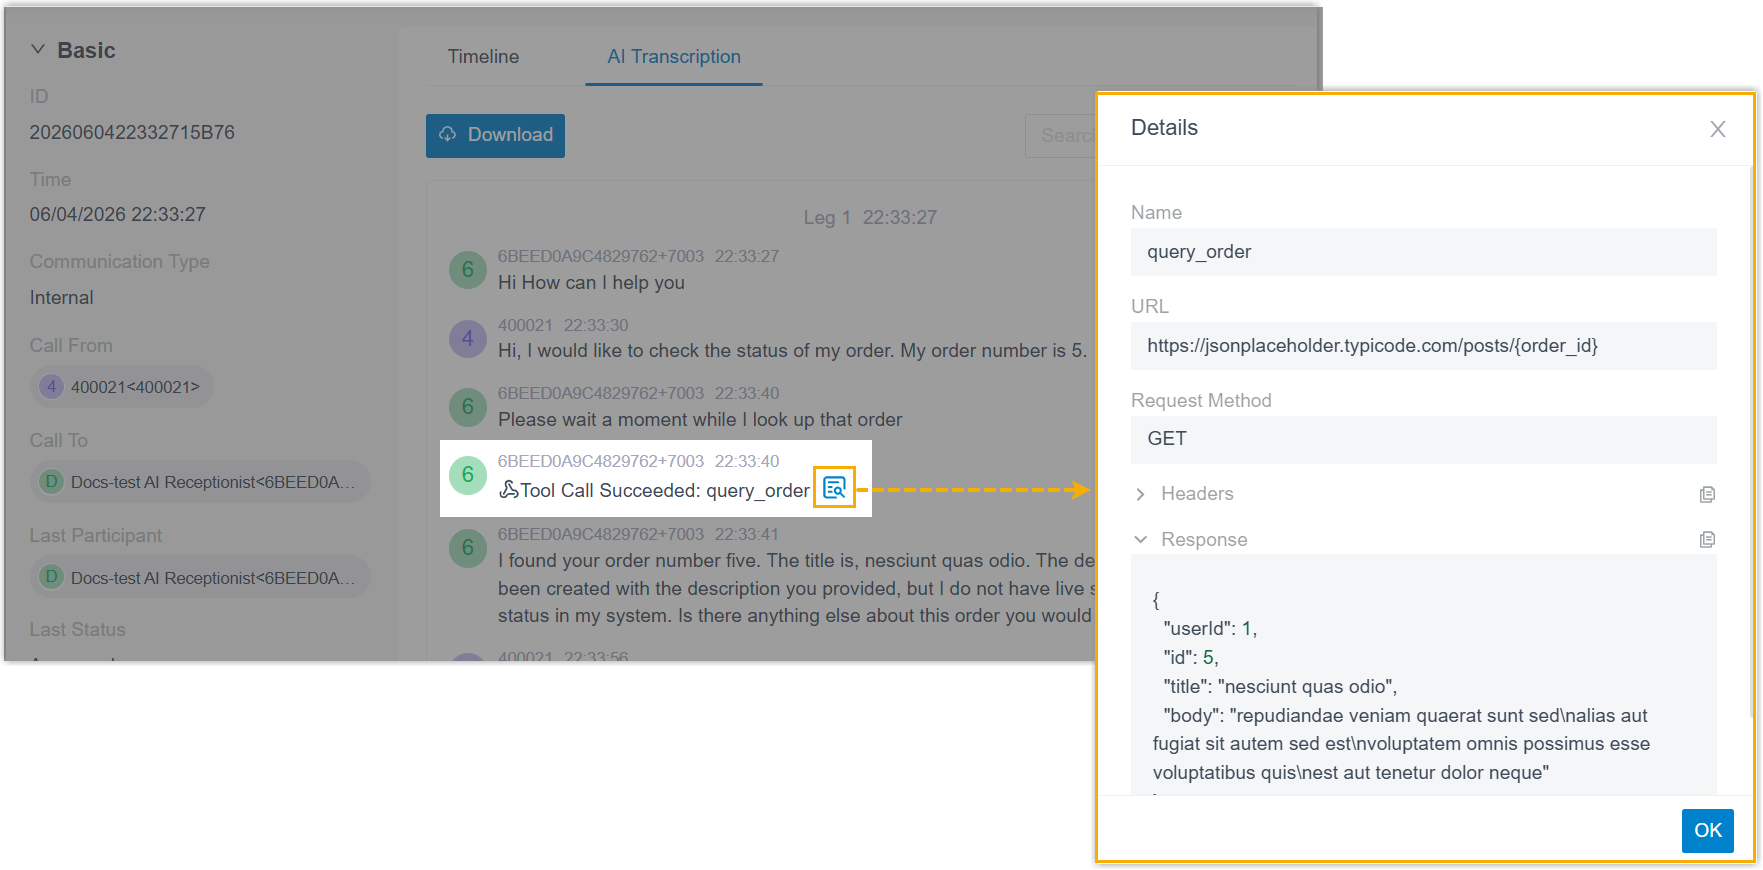
Save.The selected tool(s) are assigned to the AI receptionist. During conversations, the AI receptionist will automatically trigger the appropriate tool based on customer requests.Tip: After assigning tools, you can add more detailed tool-calling instructions to the AI receptionist's prompt. This can guide the AI receptionist to use the tools more precisely and improve response quality.Note: The Call Detail Records (CDR) logs every tool call initiated by the AI receptionist during a call. You can view each record, including the tool name, execution status, and the full request parameters and response results, helping you understand the call details for debugging or troubleshooting purposes.
- To unassign tools, do as follows:
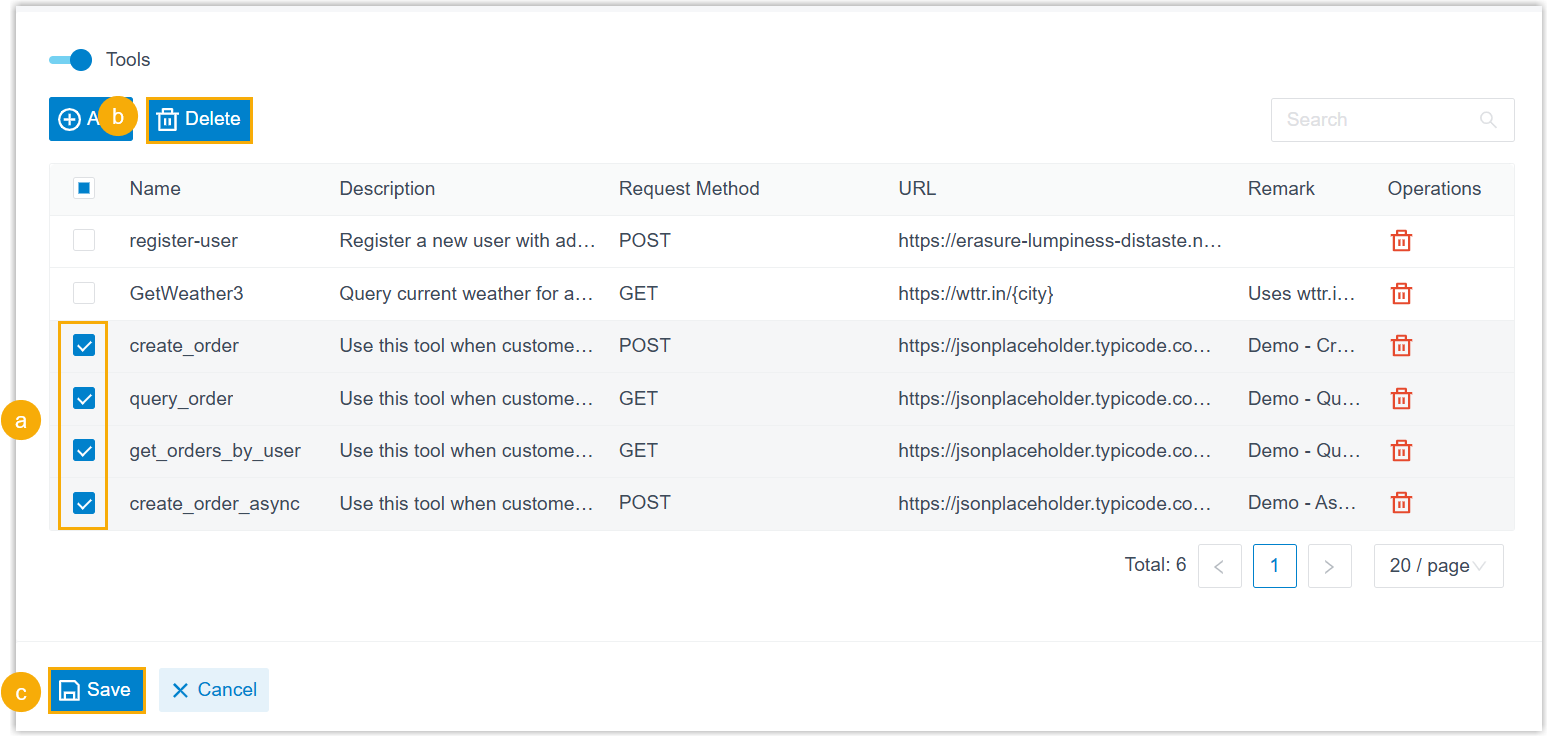
- In the existing tool list of the AI receptionist, select the checkbox of one or more tools that are no longer needed.
- At the top of the list, click Delete.
- At the bottom of the page, click
Save.The specified tools have been unassigned from the AI receptionist.Note: This operation only removes the association and does not delete the tools from the global tool list.
Assign or unassign MCP servers
- Prerequisites
- If you want to assign MCP servers to an AI receptionist, ensure that you have added the desired MCP servers to the PBX.
- Procedure
-
- Log in to PBX web portal, go to .
- Click the desired receptionist.
You are redirected to the details page of the receptionist.
- Under the Skills tab, click the MCP Server skill card.
- To assign MCP servers, do as follows:
- Turn on the switch of MCP Server.
- Click Add.
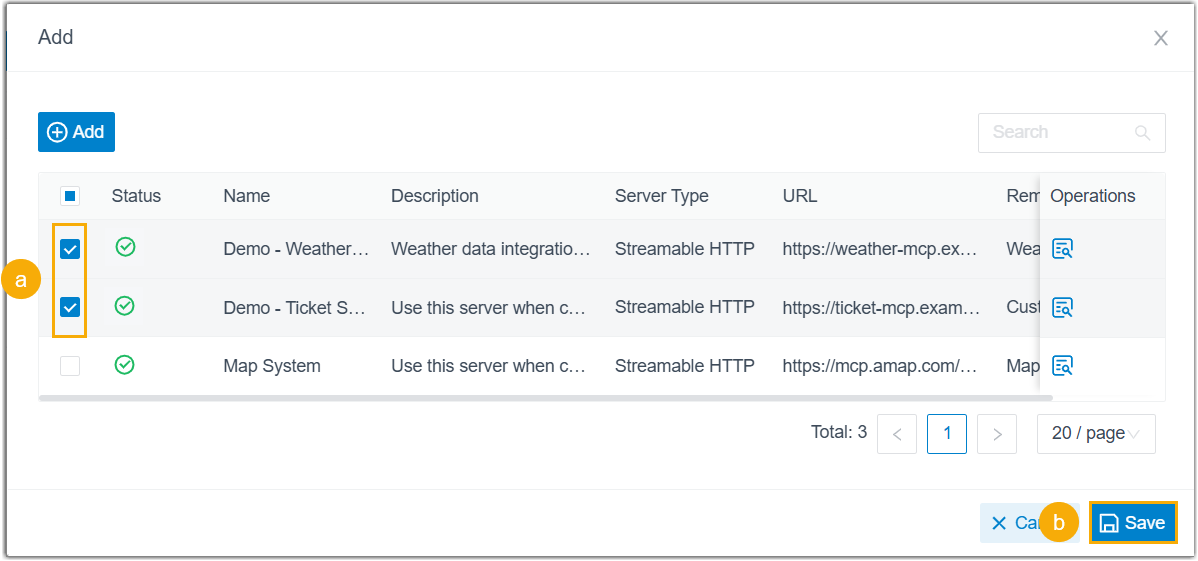
A window pops up, showing all the available MCP servers.
- Search and select the desired MCP servers, then
click Save.Note:
- You can assign up to 5 MCP servers to each AI receptionist.
- If you can not find the MCP server you need, you can add it directly by clicking Add, and the newly-added one will be automatically synchronized to the global MCP server list (Path: ).
- At the bottom of the page, click
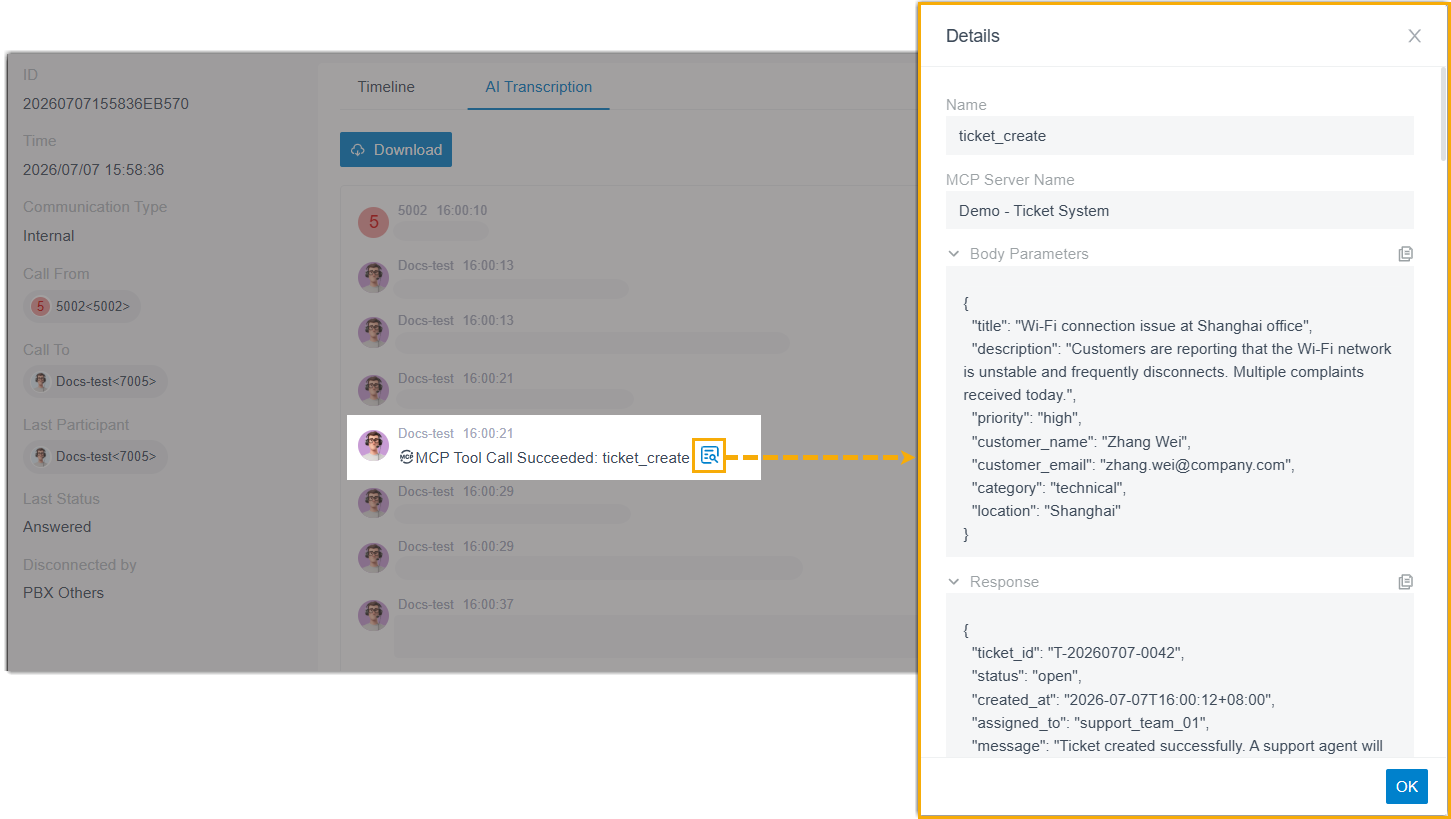
Save.The selected MCP server(s) are assigned to the AI receptionist. During conversations, the AI receptionist will automatically invoke the available tools from the MCP server to query data or perform actions based on customer requests.Tip: After assigning MCP servers, you can add more detailed instructions to the AI receptionist's prompt to guide it in invoking the tools provided by the MCP servers more precisely, thereby improving response quality.Note: The Call Detail Records (CDR) logs every MCP tool call initiated by the AI receptionist during a call. You can view each record, including the MCP server name, tool name, execution status, the full request parameters, and response results, helping you trace tool invocations for debugging or troubleshooting purposes.
- To unassign MCP servers, do as follows:
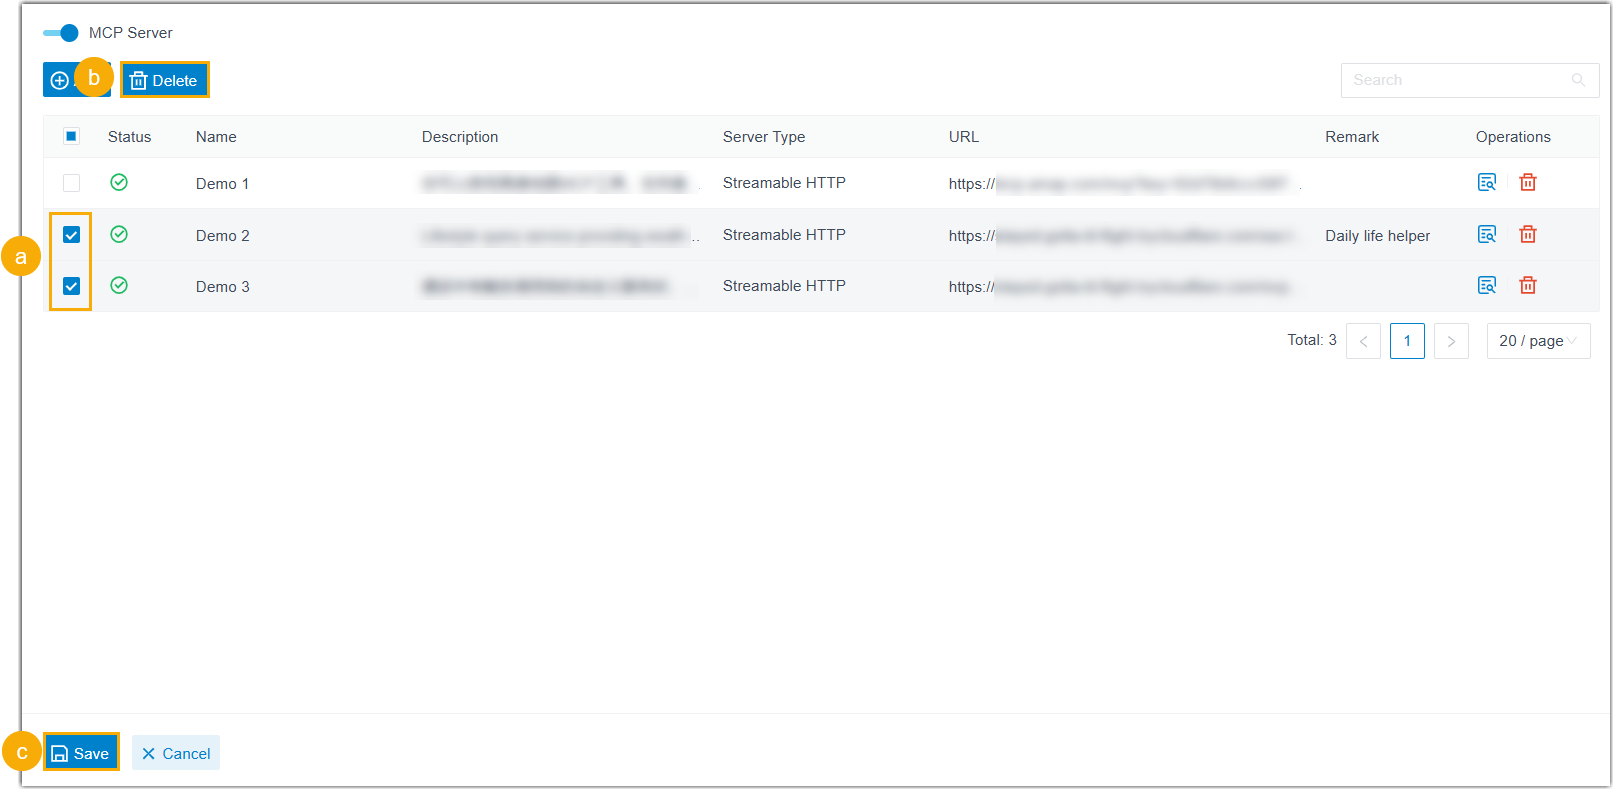
- In the existing MCP server list of the AI receptionist, select the checkbox of one or multiple MCP servers that are no longer needed.
- At the top of the list, click Delete.
- At the bottom of the page, click
Save.The specified MCP server(s) have been unassigned from the AI receptionist.Note: This operation only removes the association and does not delete the MCP server from the global list.