Set up Hot Standby
This topic describes how to set hot standby on the primary server and secondary server.
Prerequisites
The primary server and secondary server in the failover pair must meet the following requirements:
- Same model
- Same firmware version
- The same expansion board and module are installed in
the same position and slot.Note: When setting up a Hot Standby pair, DO NOT connect the FXS module with a splitter, as it may cause a short circuit and damage the PBX during failover.
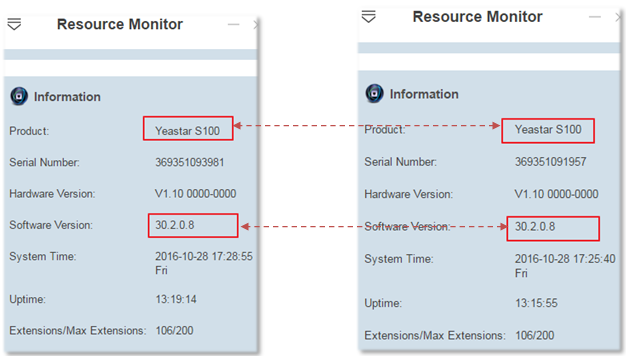
Step 1. Check the basic information of the two PBXs
- Log in to the PBX web interface, click Resource Monitor icon at the
top-right corner to check PBX information.
Make sure the Product model and Software Version are the same.
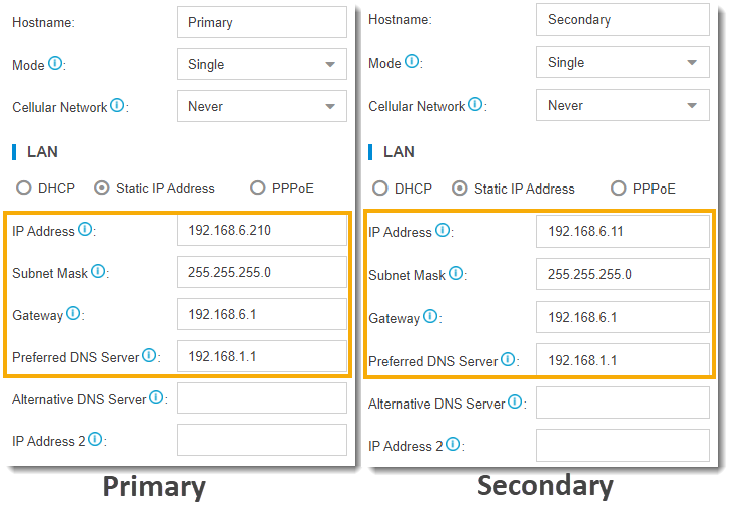
- Check the network information of the two PBXs.
- Go to .
- Note down the network information of the two PBXs.Note:
- Hot standby only works for LAN port. If the network Mode of the PBX is Dual, set the default interface to LAN port.
- Make sure the two PBXs are in the same subnet with private IP address.
In this example, the network information of the primary server and the secondary server is shown as below:
Step 2. Set up hot standby for primary server and secondary server
Go to , set up hot standby for the two servers respectively.
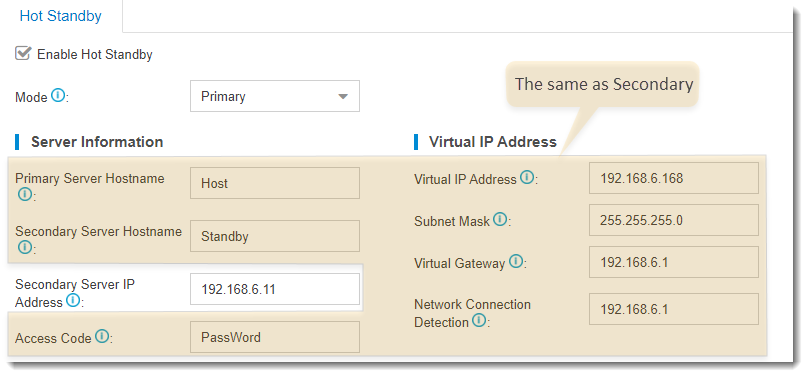
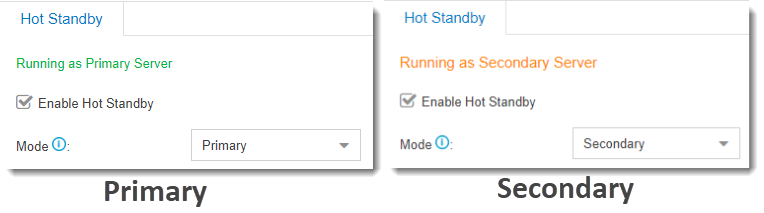
- Set up primary server
In the Hot Standby page, configure the network information of secondary server.
- Set up secondary server
In the Hot Standby page, configure the network information of primary server.
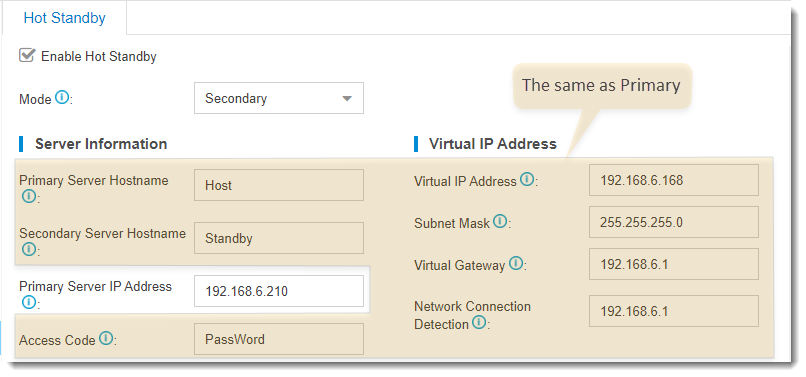
- Hot standby settings
-
Setting Description Enable Hot Standby Check this option to enable hot standby. Mode Select a server mode. Server Information - Primary Server Hostname: Enter the hostname of the primary PBX. It's used in the event notification to help you identify the server.
- Secondary Server Hostname: Enter the hostname of the secondary PBX. It's used in the event notification to help you identify the server.
- Primary Server IP Address: Enter the IP address of the primary server.
- Secondary Server IP Address: Enter the IP address of the secondary server.
- Access Code: Enter an
access code. Note: The two PBXs must have the same access code to authenticate connection.
Virtual IP Address - Virtual IP Address:
Virtual IP address is a shared IP for the two
PBXs. The virtual IP always points to the on-site PBX.Note:
- Set the same virtual IP address on the primary server and secondary server.
- Use the virtual IP address as server IP address when registering extensions in the local network.
- Subnet Mask: Enter a valid subnet for the interactions between the PBX server and the virtual IP network.
- Virtual
Gateway: Enter a gateway address for
the virtual IP network.
If left blank, the interactions between the PBX server and the virtual IP network would fail when they are under different network segments.
- Network Connection
Detection: If all nodes failed to be
detected by the secondary server, it means that
Internet outage(s) has occurred; both the primary
and the secondary server of your PBX system have
abnormal internet connection. In this case, the
PBX failover would not work.Note: We recommend that you enter the gateway address.
Advanced Advanced settings only work when the server runs as a standby system. - Keep Alive(s): Define
the frequency to send heartbeat keep-alive
packets.
The default value is 2 seconds, which means that the standby server sends packets every 2 seconds to detect whether the primary server is alive or not.
- Dead Time(s): Define
the maximum time interval before the primary
server responds to the standby server.
The default value is 120 seconds. If the standby server receives no response after timeout, it takes over automatically.
Note: Set the Dead Time longer than the server rebooting time, or the standby server will take over when the primary server is rebooting.
Disk Synchronization If you have installed a hard disk, check this option and all data stored in the disk will be synchronized. Enable unilateral WAN Port Enable only one WAN port. When the port is switched, the IP address will be switched synchronously.Note: Enable unilateral WAN Port is not available for S412, S412 Lite, and S20 with single Ethernet port.
Step.3 Test if hot standby works
- Reboot the two servers to make hot standby take effect.
- Log in to the PBX web interface, check the status of the primary server and
secondary server.Note: The password setting is also synchronized, so you need to log in to the secondary server using the same login password as the primary server.
- Test if hot standby works.
- On primary server, create an extension, save and apply the changes.
- On secondary server, check if the hot standby configurations are
correct.
You can see the same extension is added automatically in the secondary server.
Note:- The extensions and trunks created on the secondary server are invalid, because the secondary server is in the "standby" state.
- If you want to upgrade the PBX firmware, you must DISABLE hot standby feature first.