Auto Provisioning
Auto Provisioning App helps you set up your IP phones and Yeastar TA VoIP gateways in bulk.
Using auto provisioning, you can instruct phone or Yeastar gateway to retrieve its configuration from Yeastar PBX. Once you provision your phones or gateways, the phones or gateways will automatically configure themselves correctly. In this way, you can manage your phones or gateways centrally without having to configure your phones one by one.
Auto Provisioning Method
Yeastar S-Series VoIP PBX supports 2 provisioning methods:
- PnP (Plug and Play) – apply to Yeastar gateways and IP phones that support PnP feature.
- DHCP – Yeastar gateways and all supported IP phones could use this method. This method is typically for legacy phones (from a previous PBX installation, e.g. Cisco or Polycom) can be provisioned via DHCP method only.
PnP Method
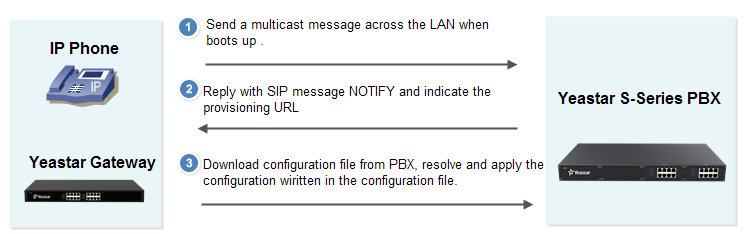
- Plug the phone/gateway into the same network with the PBX.
- Make sure that the phone/gateway's PnP feature is enabled.
- Configure the phone/gateway on the Auto Provisioning page.
- Click Save and reboot the phone/gateway.
- The phone/gateway will send a multicast message across the LAN when boots up.
- The PBX will send a provisioning URL to the phone.
- The phone download configuration file from the URL, resolve and apply the settings.
DHCP Method
If your phone does not support plug and play, you can use DHCP mode to do auto provisioning.
Note: For cisco, Polycom phones, you should provision the phones by DHCP mode.
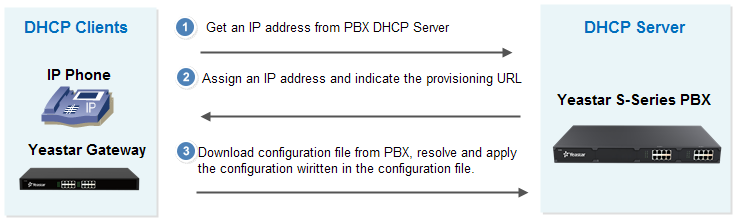
- Disable DHCP server in your local network.
- Enable DHCP Server in Yeastar S-Series VoIP PBX ().
Make sure that the PBX is the only DHCP server in your local network.
- Set the phone network mode as "DHCP".
- Configure the phone on the Auto Provisioning page.
- Click Save and reboot the phone.
- The PBX will assign an IP and send a provisioning URL to the phone.
- The phone download configuration file from the URL, resolve and apply the settings.