Add a Callback rule and set Inbound Route destination to the Callback
rule.
Note: Make sure that the Caller ID service is enabled on the callback trunk. If the
PBX cannot recognize the inbound caller ID, callback will fail.
-
Add a Callback rule.
-
Go to , click Add.
-
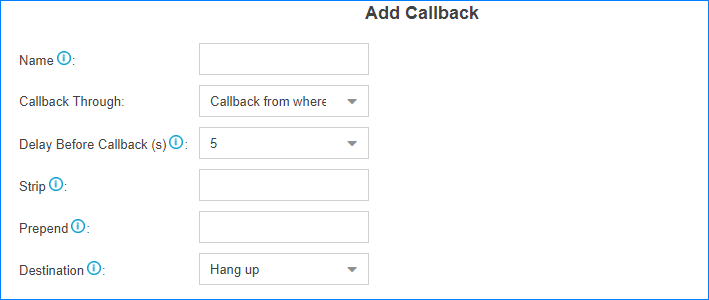
On the Callback configuration page, finish the callback settings.

- Name: Set a name for the Callback.
- Callback Through: Select which trunk to
use when calling back.
Note: Make sure that you have set up an outbound route for
the trunk, or callback will fail.
If
the Register-Trunk is used for Callback, make sure the
From User is configured, or
callback would fail.
- Delay Before Callback: How long to wait
before calling back the caller.
- Strip: Optional. How many digits will be
stripped from the call in number before the callback is placed.
Note: You do not need to configure
Strip if the trunk supports
calling back with the Caller ID directly.
For example,
user 5503301 calls in the PBX, the caller ID
displays 05503301. To call back to the user, you
should set strip 1 digit so that the PBX will call
back to 5503301.
- Prepend: Optional. The digits added
before a callback number before the callback is placed.
Note: You do not need to configure
Prepend if the trunk supports
calling back with the Caller ID directly.
For example,
user 15880232154 calls in the PBX, the caller ID
displays 15880232154. To call back to the
long-distance number 15880232154 through the
selected trunk, you should add digit 9 before the
number. In this case, set
Prepend to
9.
- Destination: Where the callback will
direct the caller to.
-
Click Save and
Apply.
-
Set Inbound Route destination to callback.
-
Go to , edit your inbound route.
-
Set the Inbound Destination to the
Callback.
-
Click Save and
Apply.
-
Test callback.
Make an inbound call to the PBX trunk, after you hear the ring tone, hangup
the call, the PBX will call back to you.

