Create a SIP Extension
Yeastar S-Series VoIP PBX supports Session Initiation Protocol (SIP). SIP is used in VoIP communications allowing users to make and receive voice calls for free over the Internet. Before registering a SIP account on phones, you need to create a SIP account.
Procedure
- Go to , click Add.
- On the Basic page, go to General
section, and set the general settings of the extension.
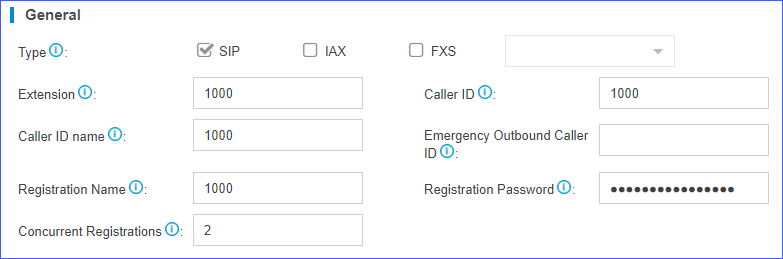
- Type: Select the checkbox of SIP.
- Extension: Enter the extension number.
- Caller ID: Enter the caller ID number. The called party will see this caller ID number when the extension user makes an outgoing call.
- Caller ID name: Enter the caller ID name. The called party will see this caller ID name when the extension user makes an outgoing call.
- Emergency Outbound Caller
ID: Enter the outbound caller ID for emergency calls.
The PSAP (Public Safety Answering Point) can pinpoint the user's
location based on the caller ID.Note: The setting takes effect only when the extension uses enhanced emergency calling. You don't have to configure the option if the extension uses basic emergency calling.
- Registration Name: The name used to register a SIP extension.
- Registration
Password: The password is used to register the
extension. The PBX automatically generates a random password by
default. You can modify it if
needed.Note: If you choose to set a custom registration password, it must meet the following requirements depending on whether the Allow Weak Password option is enabled (Path: ).
Strong password (The "Allow Weak Password" option is disabled)
Basic password (The "Allow Weak Password" option is enabled)
- At least 16 characters
- At least 1 uppercase letter
- At least 1 lowercase letter
- At least 1 digit
- Allowed special characters include only
~,^,*,-,_, and?
- At least 8 characters
- At least 1 uppercase letter
- At least 1 lowercase letter
- At least 1 digit
- Allowed special characters include only
~,^,*,-,_, and?
- Concurrent Registrations: Yeastar S-Series VoIP PBX supports to register one SIP extension number on multiple phones. When a call reaches the extension number, all phones will ring. The maximum number of concurrent registrations is 5.
- On the Basic page, go to User
Information section, and set the user information.

- Email: Extension user can reset his/her login password, receive voice mails, faxes, or PBX notifications via this email address.
- User Password: The password is
used to log in the PBX or log in Linkus client. The password is
generated randomly by
default.Note: If you choose to set a custom user password, it must meet the following requirements depending on whether the Allow Weak Password option is enabled (Path: ).
Strong password (The "Allow Weak Password" option is disabled)
Basic password (The "Allow Weak Password" option is enabled)
- At least 10 characters
- At least 1 uppercase letter
- At least 1 lowercase letter
- At least 1 digit
- Allowed special characters include only
~,^,*,-,_, and? - Consecutive
numbers are not allowed (e.g.,
4567) - The extension number and the caller ID are not allowed
- At least 6 characters
- At least 1 uppercase letter
- At least 1 lowercase letter
- At least 1 digit
- Allowed special characters include only
~,^,*,-,_, and?
- Prompt Language: The language of voice prompts.
The default prompt language is the same as the system language. If the
extension user speaks foreign language, you can set a specific system prompt.Note: Before selecting other system prompts, go to to download online prompts.
- Mobile Number: Extension user can receive the PBX notifications or forwarded calls on this mobile number.
- Click Presence, Features, Advanced, or Call Permission tab to configure other settings.
- Click Save and Apply.