Import PBX Data from a Database into Power BI
When PBX data is synchronized to a third-party database, you can add the database as a data source in Power BI, then use the Yeastar-provided template to import and visualize your data on Power BI.
Import PBX data from PostgreSQL into Power BI
- Prerequisites
-
- Download and unzip the Power BI template, which includes templates for different databases, and select the appropriate one based on your database.
- Download and install Power BI desktop and PostgreSQL ODBC driver.
- Procedure
-
- Connect to the database.
- Open ODBC Data Sources (64-bit).
- In the User DSN tab, click
Add.
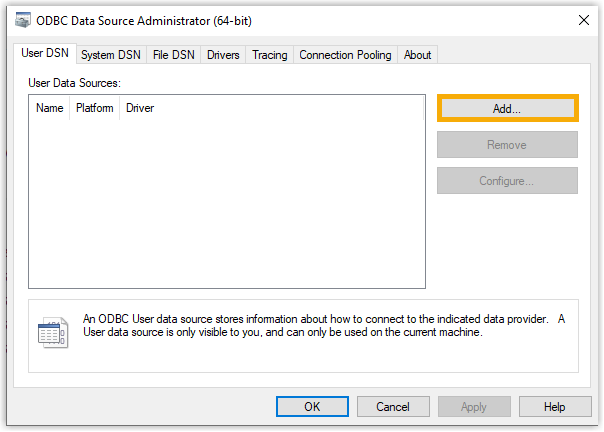
- In the pop-up window, select PostgreSQL
Unicode(x64), then click
Finish.
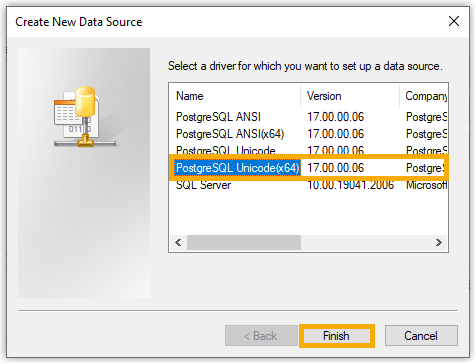
- Fill in the following information, then click
Save.
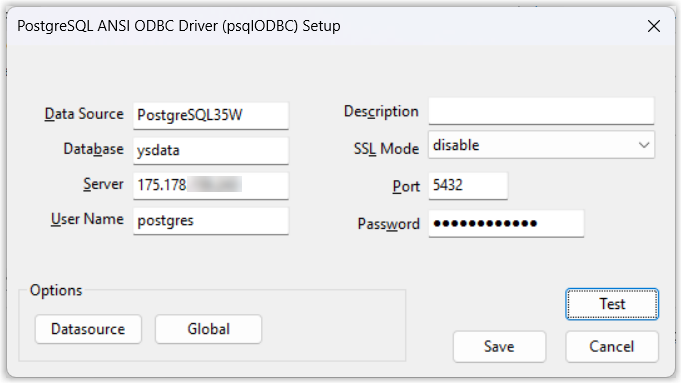
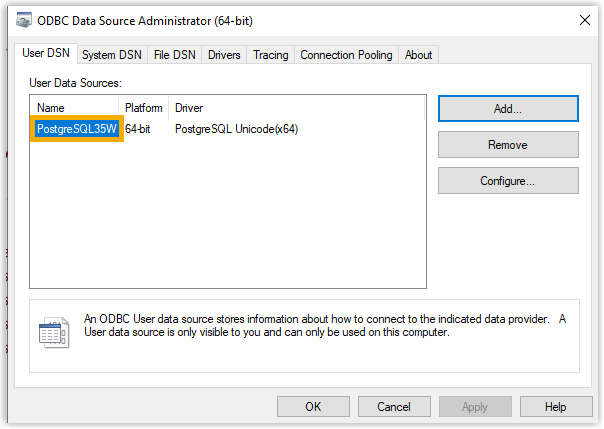
Item Description Database Enter the name of the database. Server Enter the IP address or domain name of the host on which the database is installed. Port Enter the database port. User Name Enter the username used to connect to the database. Password Enter the password used to connect to the database. - Remember the DSN name on the list, which will be used
later.
- Launch Power BI desktop.
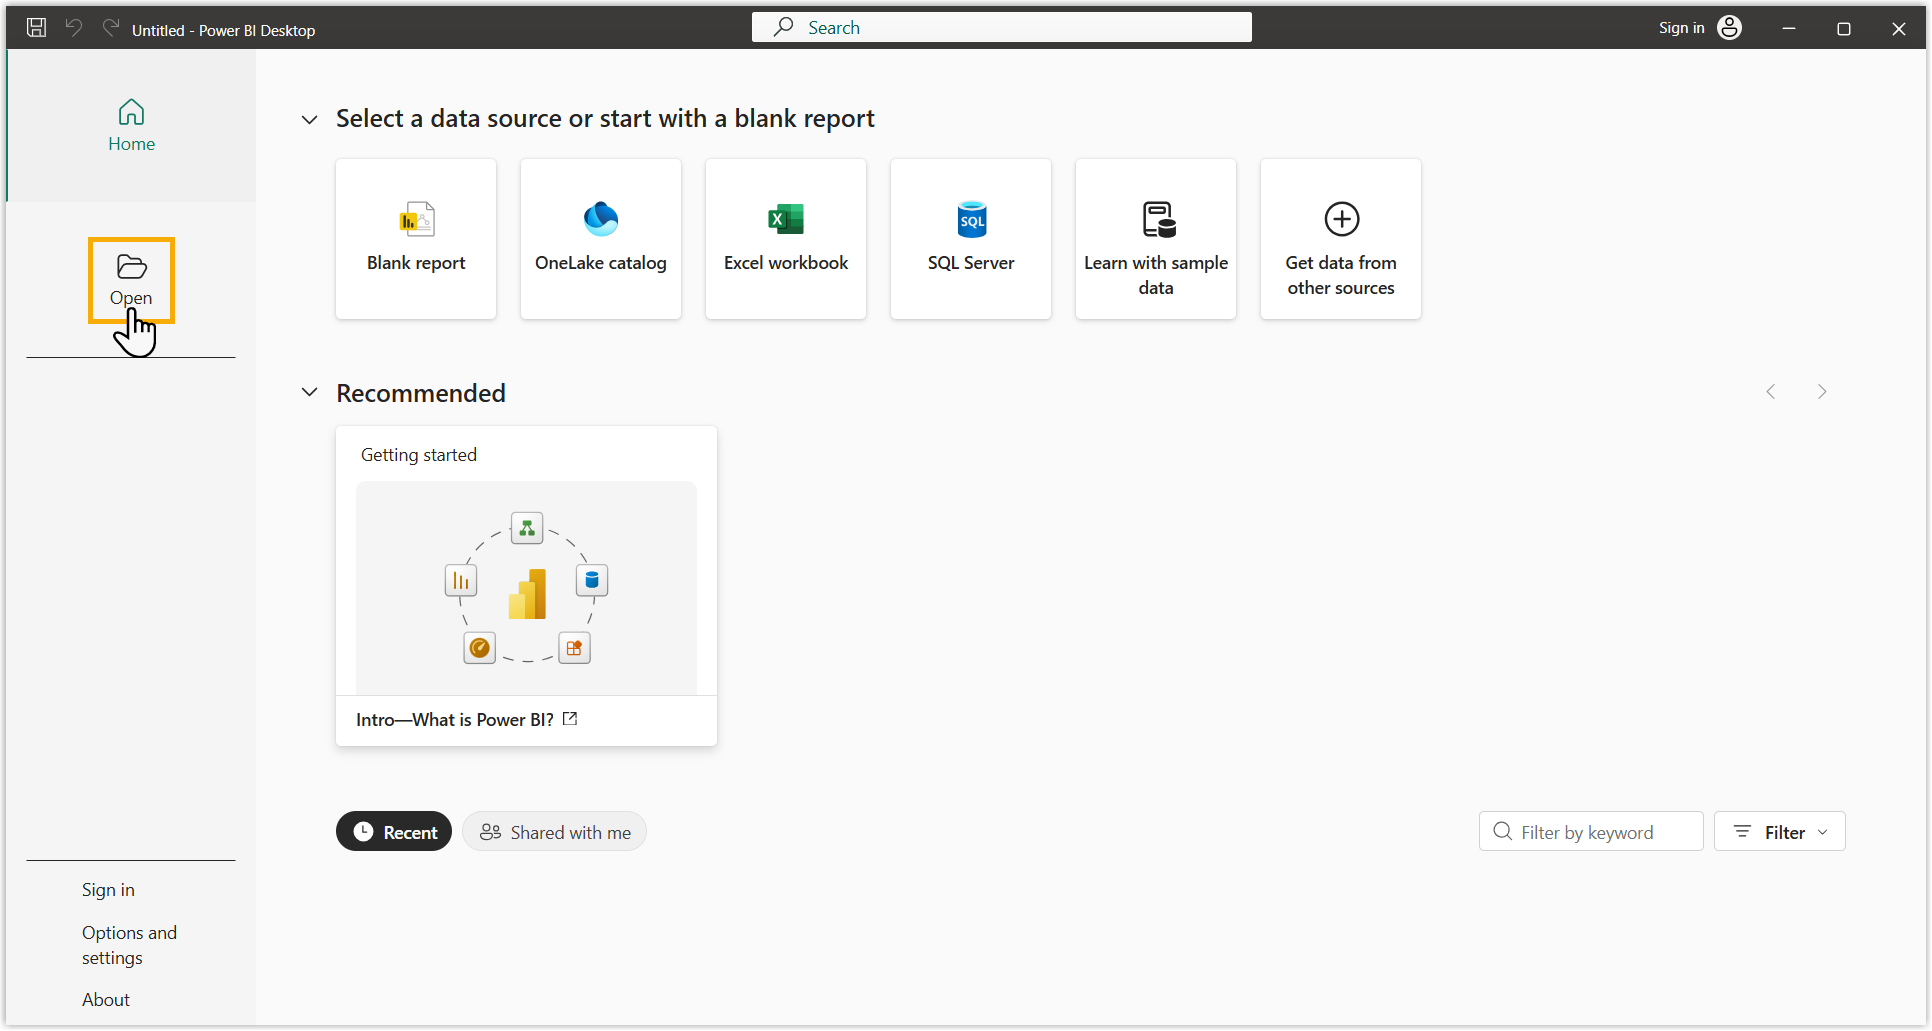
- Click Open to select and open the
Yeastar-provided template.
- Change the data source and configure database access.
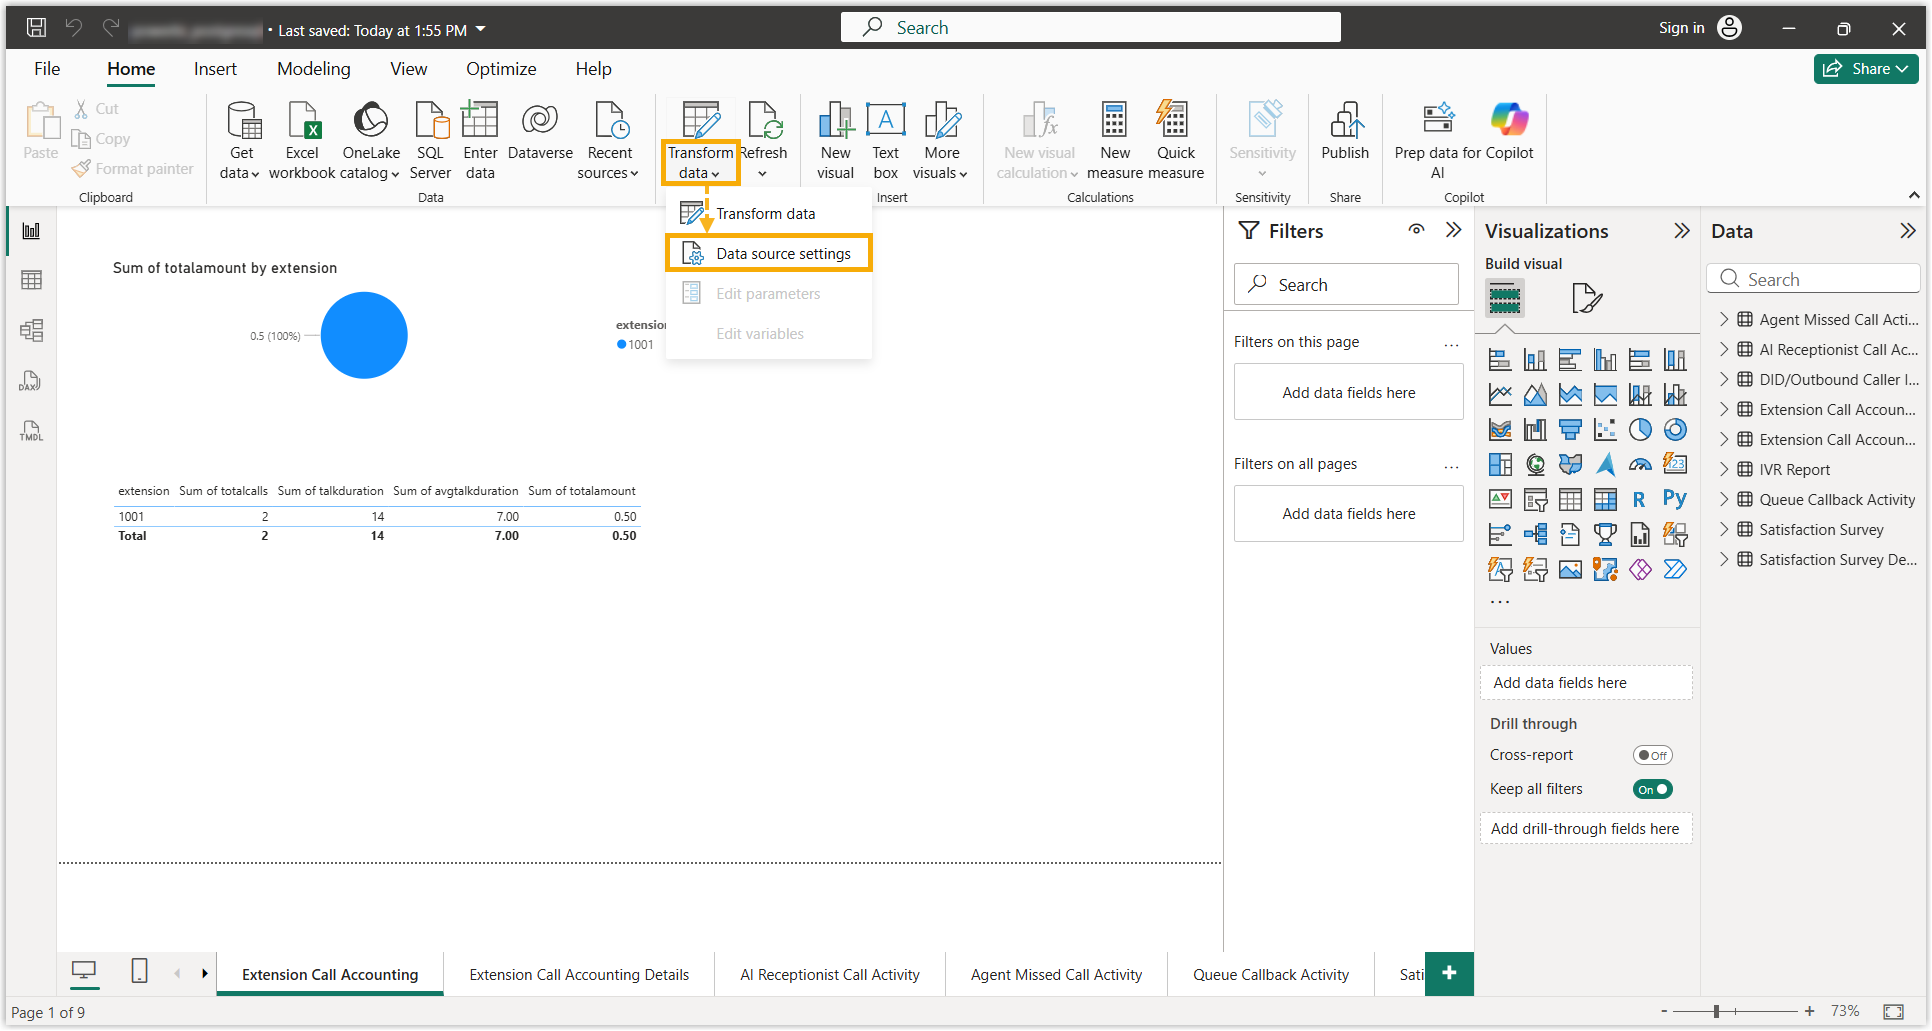
- On the top toolbar, click
Transform data and select
Data source
settings.
- Change the data source.
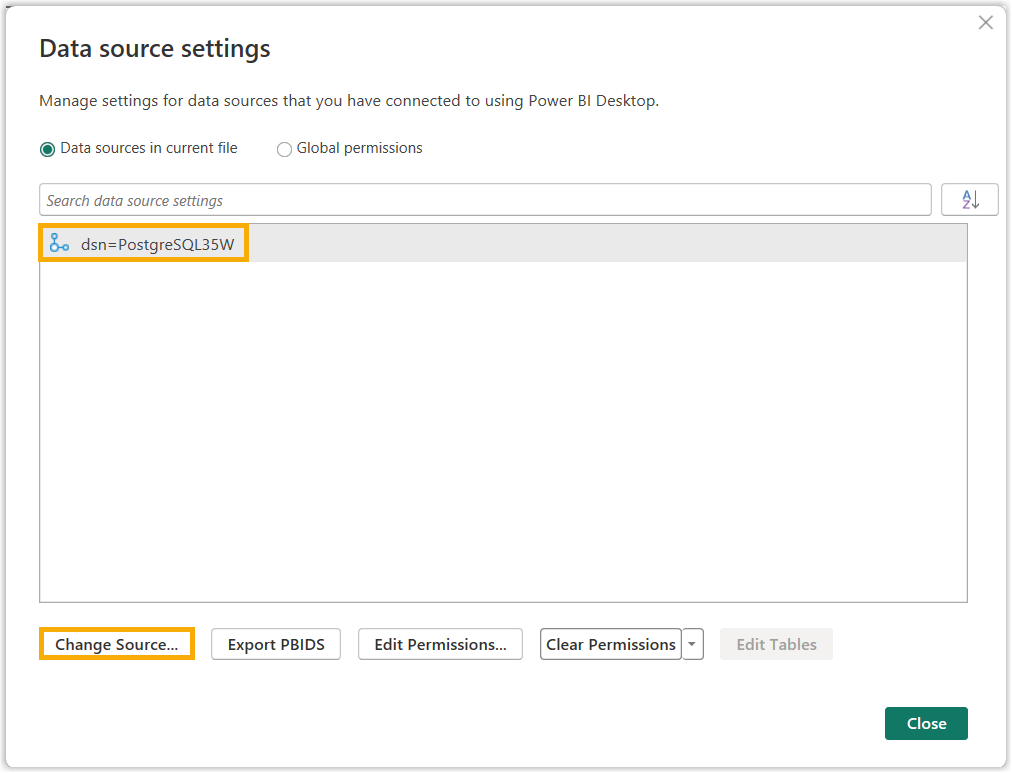
- Select the default data source, then click
Change Source.
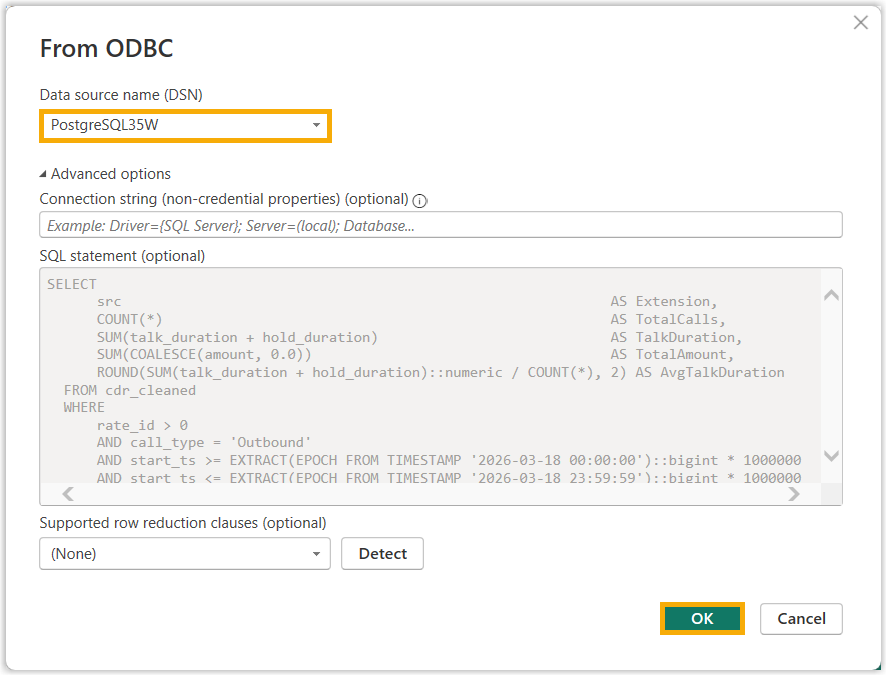
- In the Data source name
(DSN) drop-down list, select the one
for the database, then click
OK.
- Select the default data source, then click
Change Source.
- Configure database access credentials.
- Click Edit
Permissions.
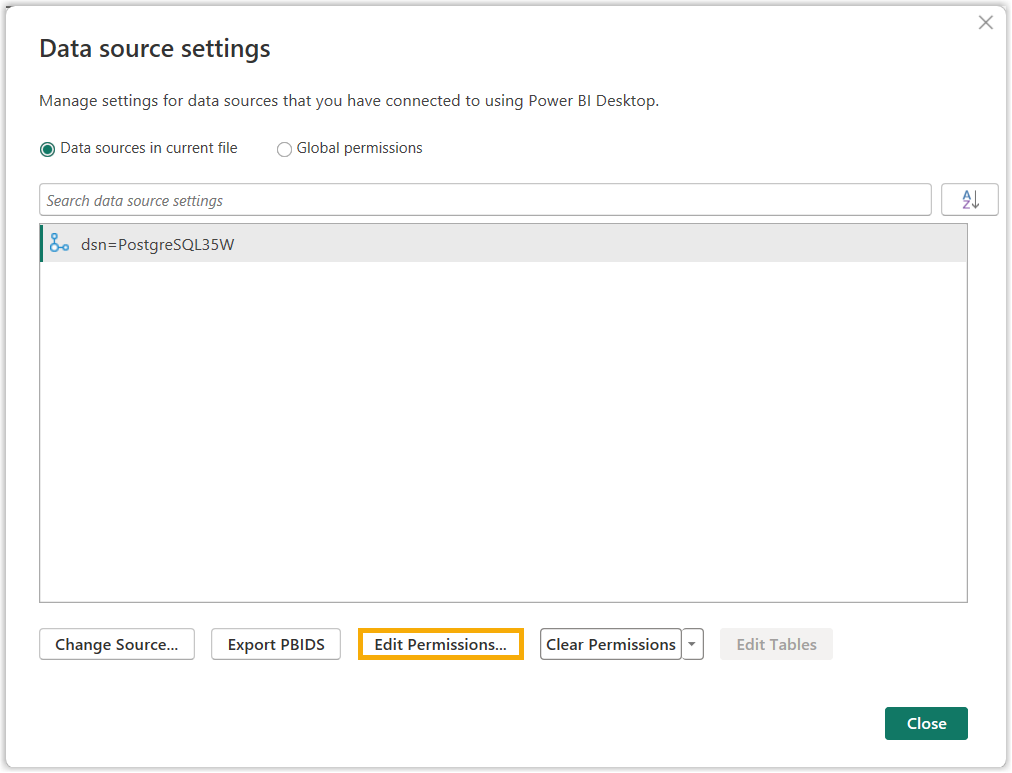
- In the pop-up window, click
Edit.
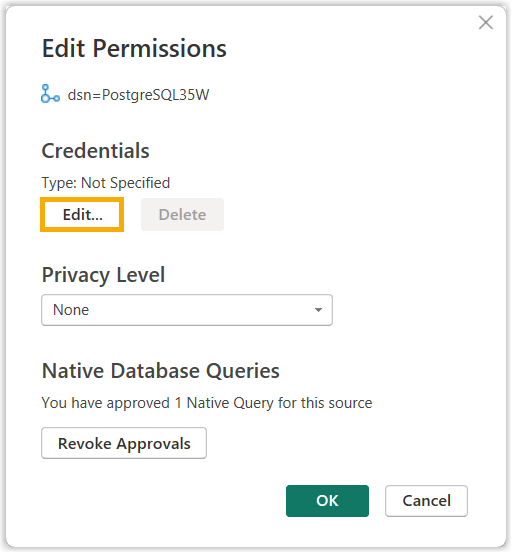
- Select Database and fill
in the authentication information, then click
Save.
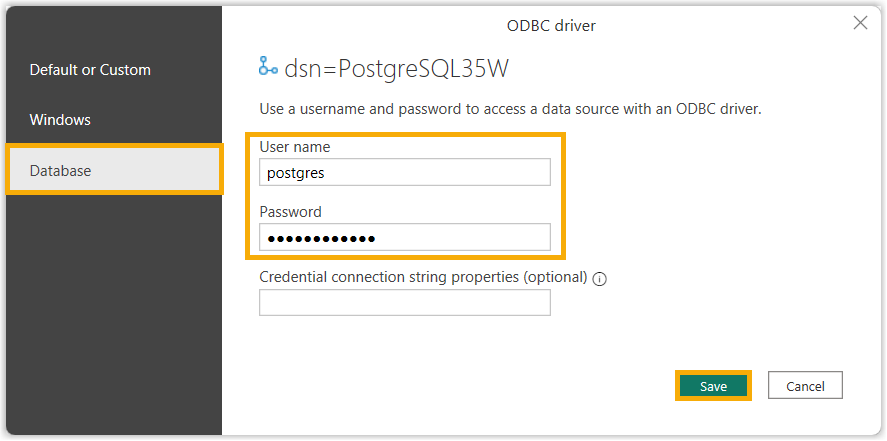
Item Description User name Enter the username to connect to the database. Password Enter the password to connect to the database.
- Click Edit
Permissions.
- Save your setting .
- On the top toolbar, click
Transform data and select
Data source
settings.
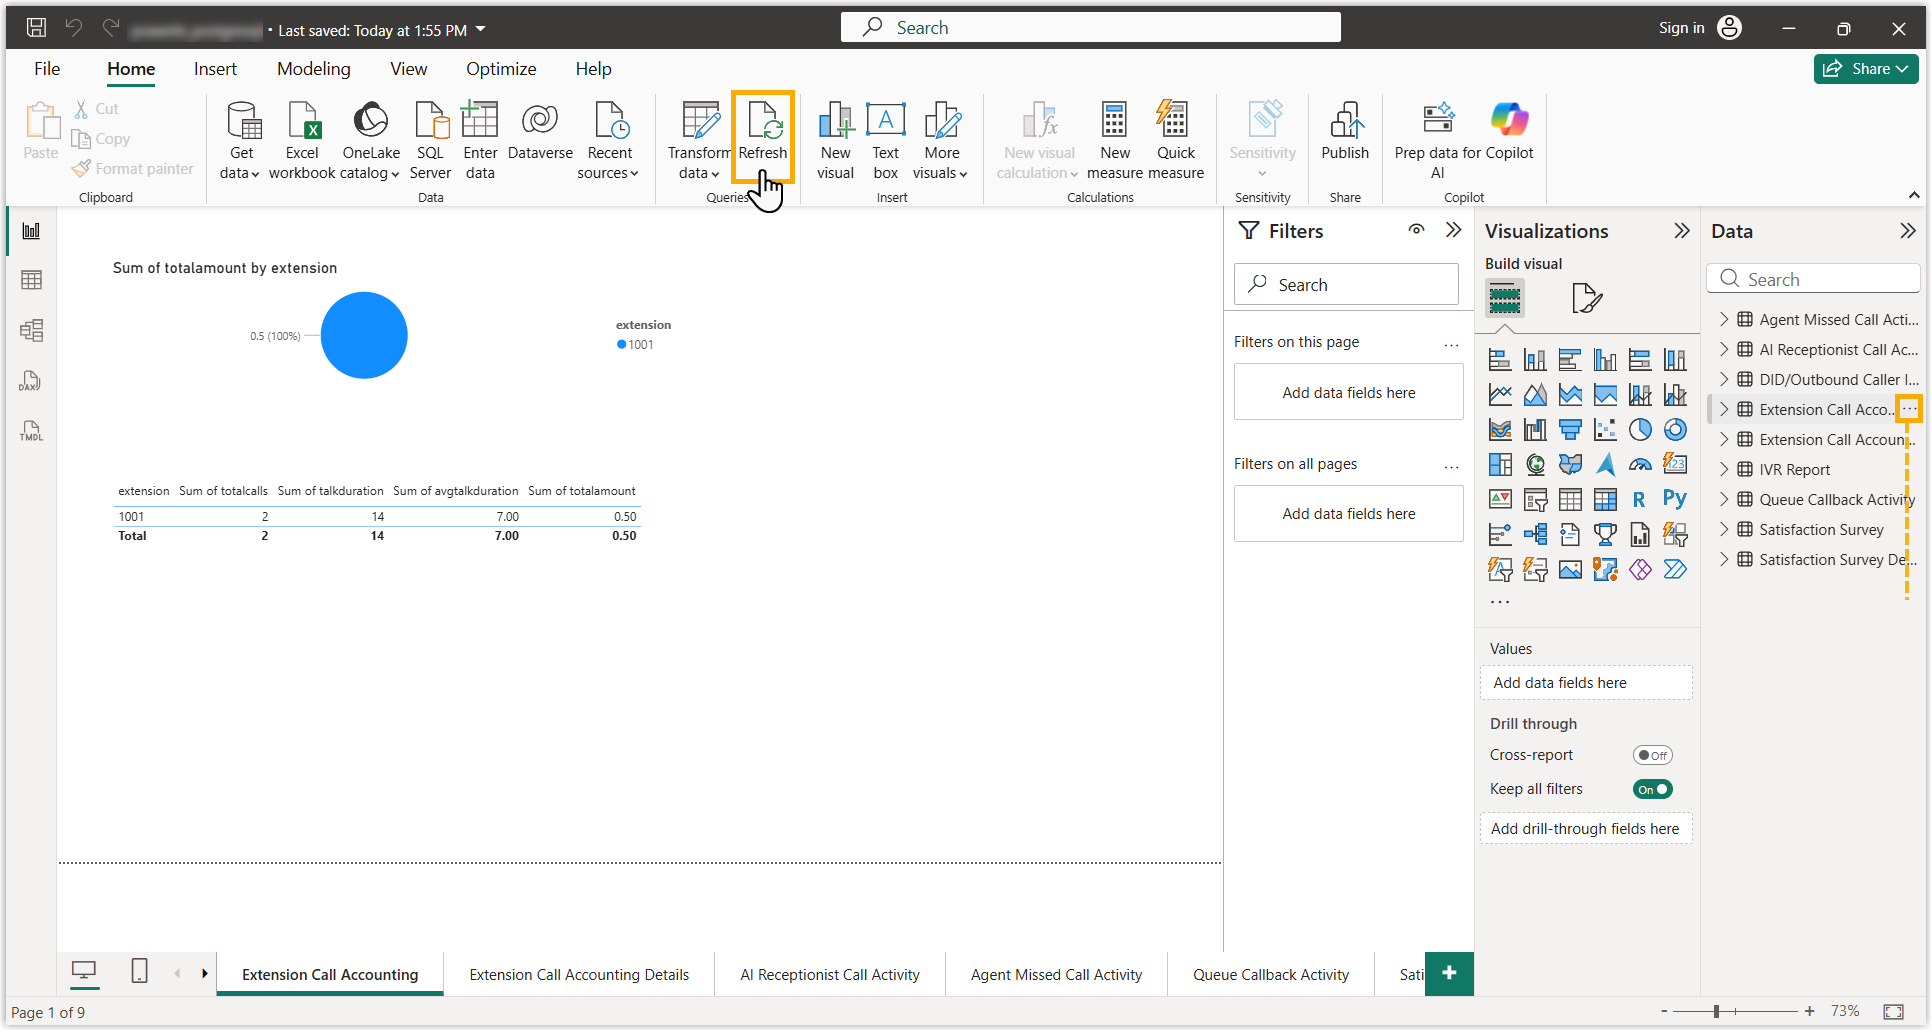
- On the top of the page, click
Refresh to run all SQL
queries.
- Connect to the database.
- Result
-
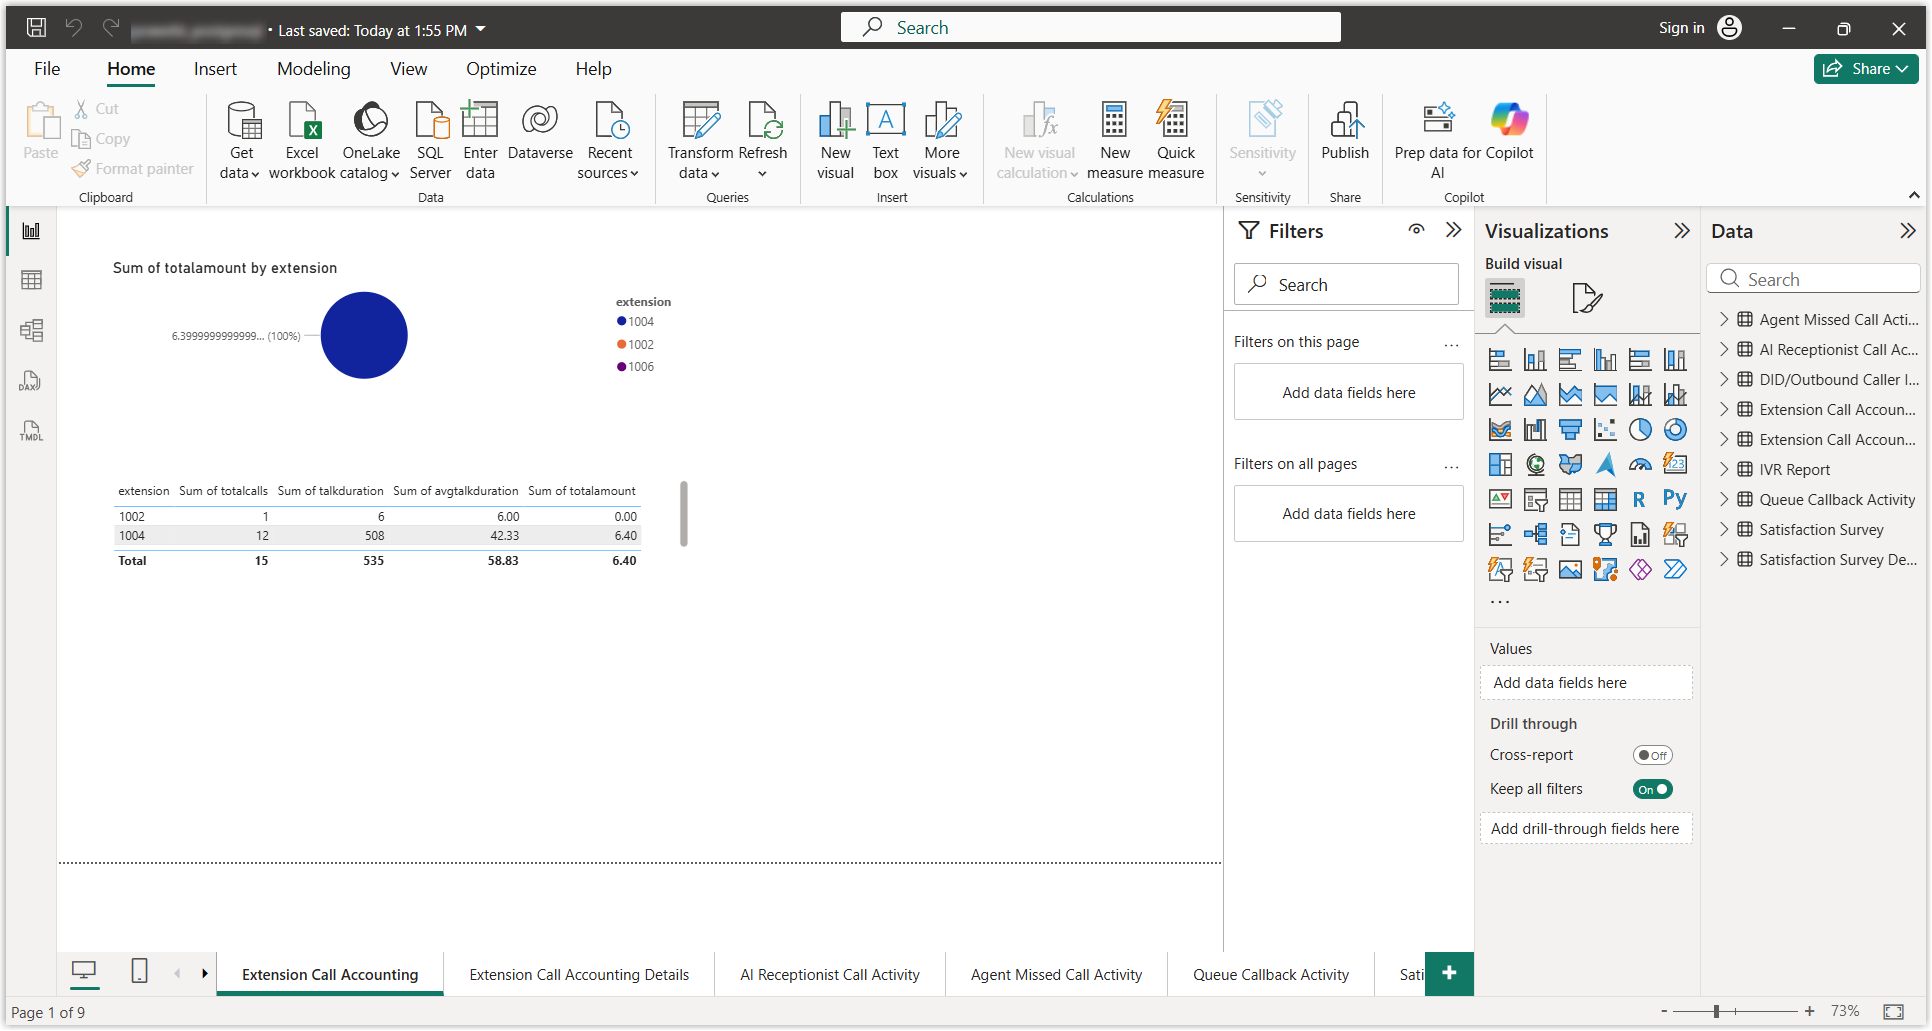
The data are successfully imported and visualized in the panel.
- What to do next
- Add or modify the SQL queries to customize the data to be displayed.Note: By default, the template for Power BI displays data only for the following call reports, as Power BI doesn't support incorporating multiple queries from a single source.
-
Extension Call Accounting
-
Extension Call Accounting Details
-
AI Receptionist Call Activity
-
Agent Missed Call Activity
-
Queue Callback Activity
-
Satisfaction Survey
-
Satisfaction Survey Details
-
IVR Report
-
DID/Outbound Caller ID Activity
To display additional call reports, you can add SQL queries as needed. Refer to Call Report Calculations with Multiple SQL Queries for more details on the related data logic.
-
Import PBX data from MySQL into Power BI
- Prerequisites
-
- Download and unzip the Power BI template, which includes templates for different databases, and select the appropriate one based on your database.
- Download and install Power BI desktop and MySQL Connector/NET.
- (Optional) If SSL is enabled on the MySQL server, install the
certificate.
- Download the SSL public certificate.
- Install the SSL certificate in Trusted Root
certification authorities store.
- Run
certmgr.mscon your computer to open the Certificate Manager.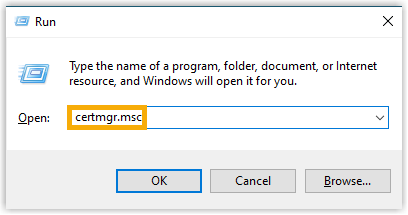
- Right click Trusted Root Certification
Authorities and select Import from
All Tasks.
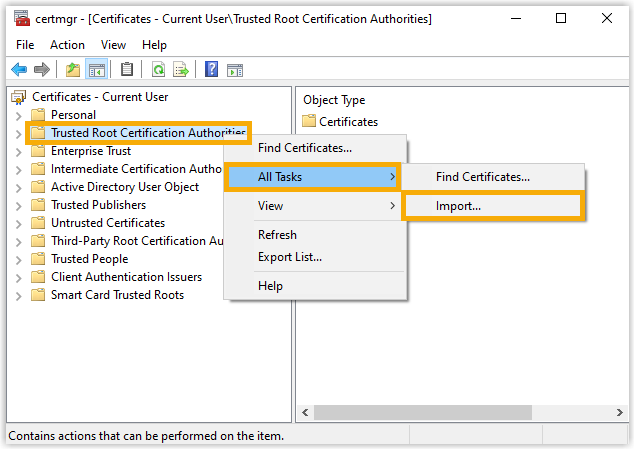
- Follow the prompts in the wizard to import the root certificate, then click OK.
- Run
- Procedure
-
- Launch Power BI desktop.
- Click Open to select and open the
Yeastar-provided template.
- Change the data source and configure database access.
- On the top toolbar, click
Transform data and select
Data source
settings.
- Change the data source.
- Select the default data source, then click
Change Source.
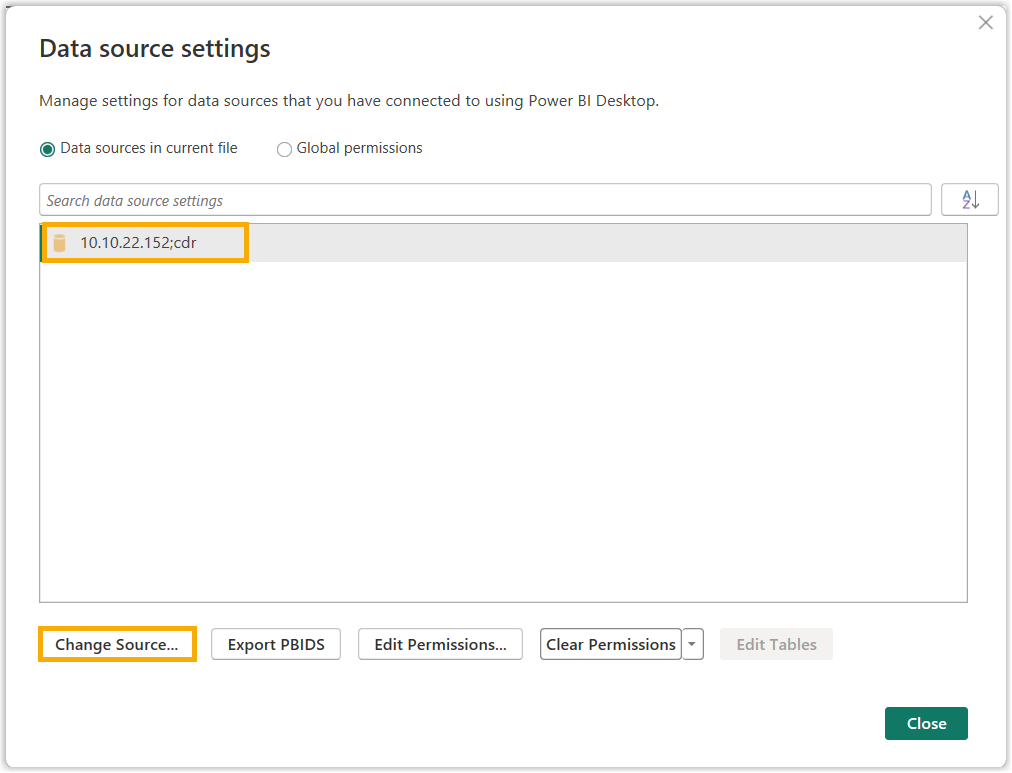
- Update the database connection information, then
click OK.
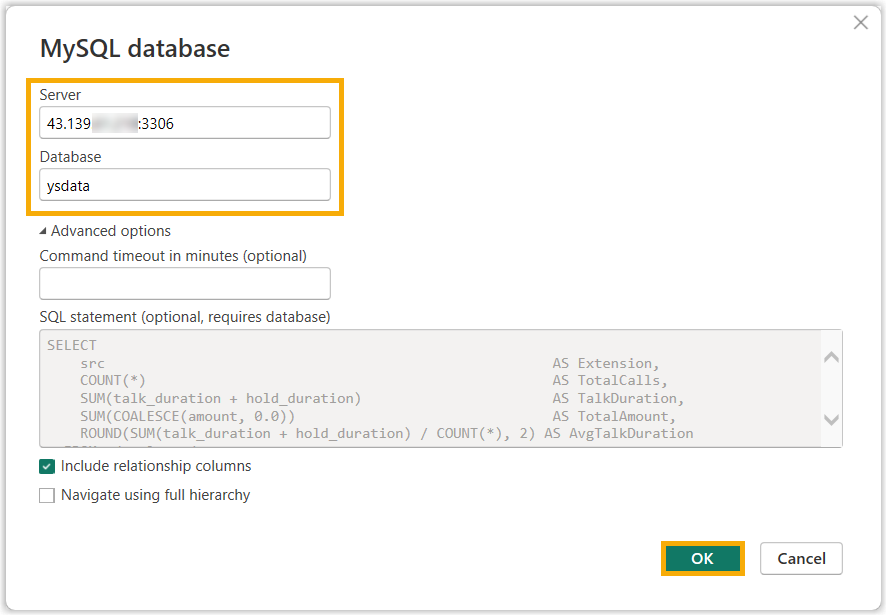
Item Description Server Enter the IP address or domain name of the host on which the database is installed, as well as the database port. Database Enter the name of the database.
- Select the default data source, then click
Change Source.
- Configure database access credentials.
- Click Edit
Permissions.
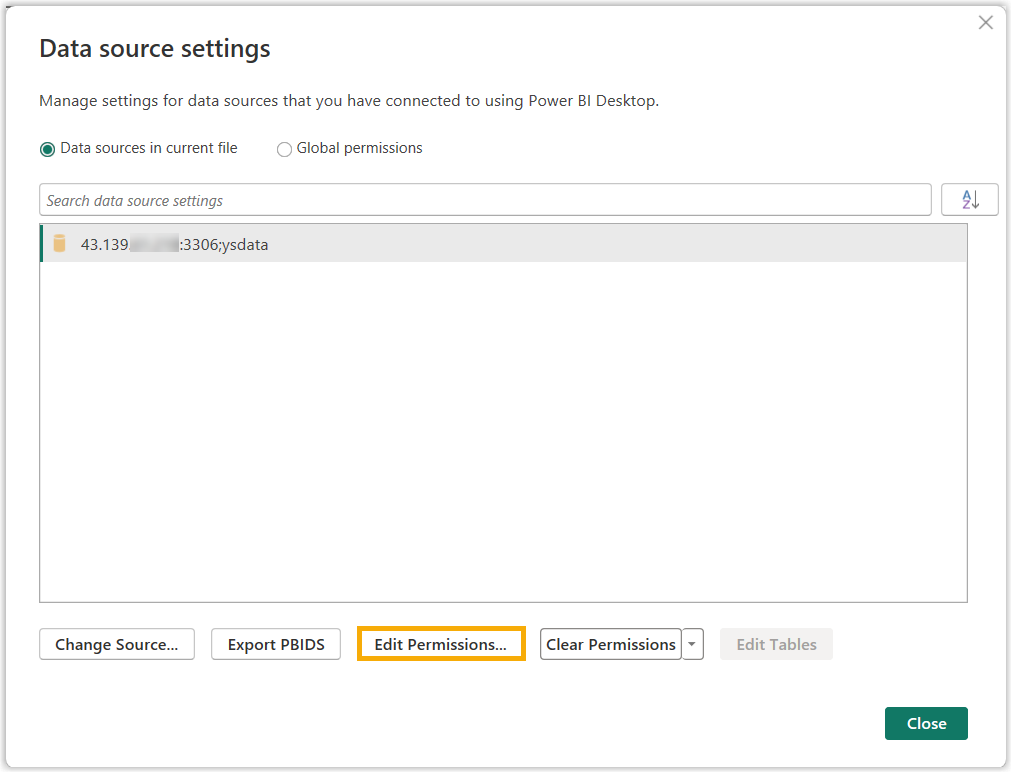
- In the pop-up window, click
Edit.
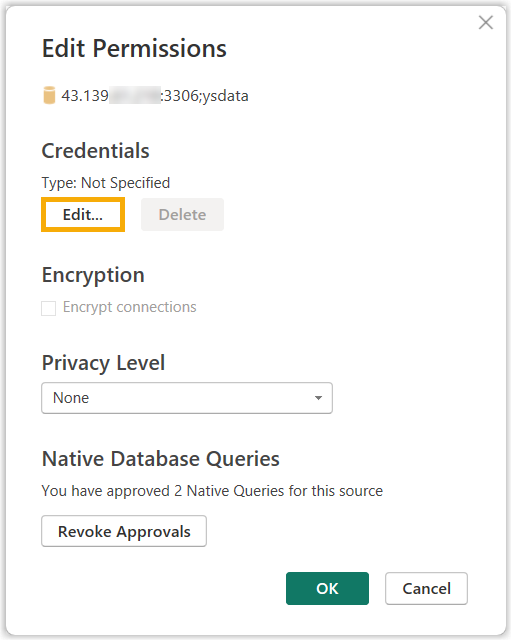
- Select Database and fill
in the authentication information, then click
Connect.
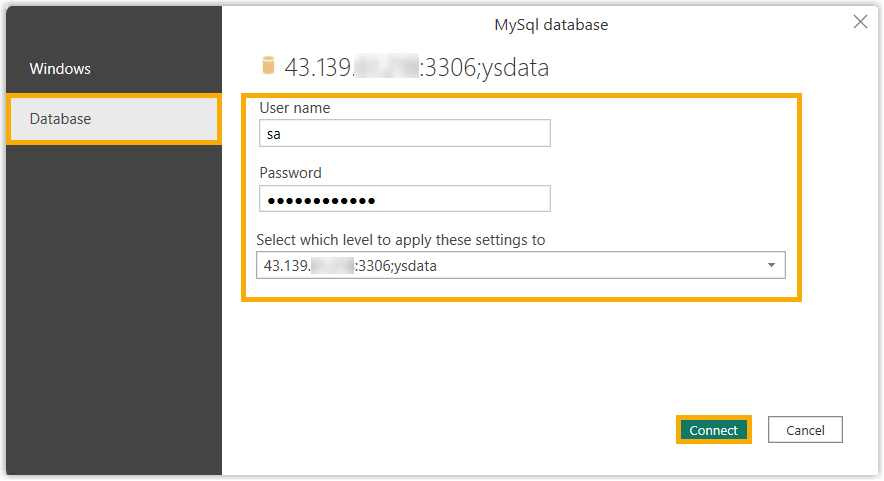
Item Description User name Enter the username to connect to the database. Password Enter the password to connect to the database. Select which level to apply these settings to Select the database that the account can access.
- Click Edit
Permissions.
- Save your setting .
- On the top toolbar, click
Transform data and select
Data source
settings.
- On the top of the page, click
Refresh to run all SQL
queries.
- Result
-
The data are successfully imported and visualized in the panel.
- What to do next
- Add or modify the SQL queries to customize the data to be displayed.Note: By default, the template for Power BI displays data only for the following call reports, as Power BI doesn't support incorporating multiple queries from a single source.
-
Extension Call Accounting
-
Extension Call Accounting Details
-
AI Receptionist Call Activity
-
Agent Missed Call Activity
-
Queue Callback Activity
-
Satisfaction Survey
-
Satisfaction Survey Details
-
IVR Report
-
DID/Outbound Caller ID Activity
To display additional call reports, you can add SQL queries as needed. Refer to Call Report Calculations with Multiple SQL Queries for more details on the related data logic.
-
Import PBX data from Microsoft SQL into Power BI
- Prerequisites
-
- Download and unzip the Power BI template, which includes templates for different databases, and select the appropriate one based on your database.
- Download and install Power BI desktop.
- (Optional) If SSL is enabled on the Microsoft SQL server,
install the certificate.
- Download the SSL public certificate.
- Install the SSL certificate in Trusted Root
certification authorities store.
- Run
certmgr.mscon your computer to open the Certificate Manager. - Right click Trusted Root Certification
Authorities and select Import from
All Tasks.
- Follow the prompts in the wizard to import the root certificate, then click OK.
- Run
- Procedure
-
- Launch Power BI desktop.
- Click Open to select and open the
Yeastar-provided template.
- Change the data source and configure database access.
- On the top toolbar, click
Transform data and select
Data source
settings.
- Change the data source.
- Select the default data source, then click
Change Source.
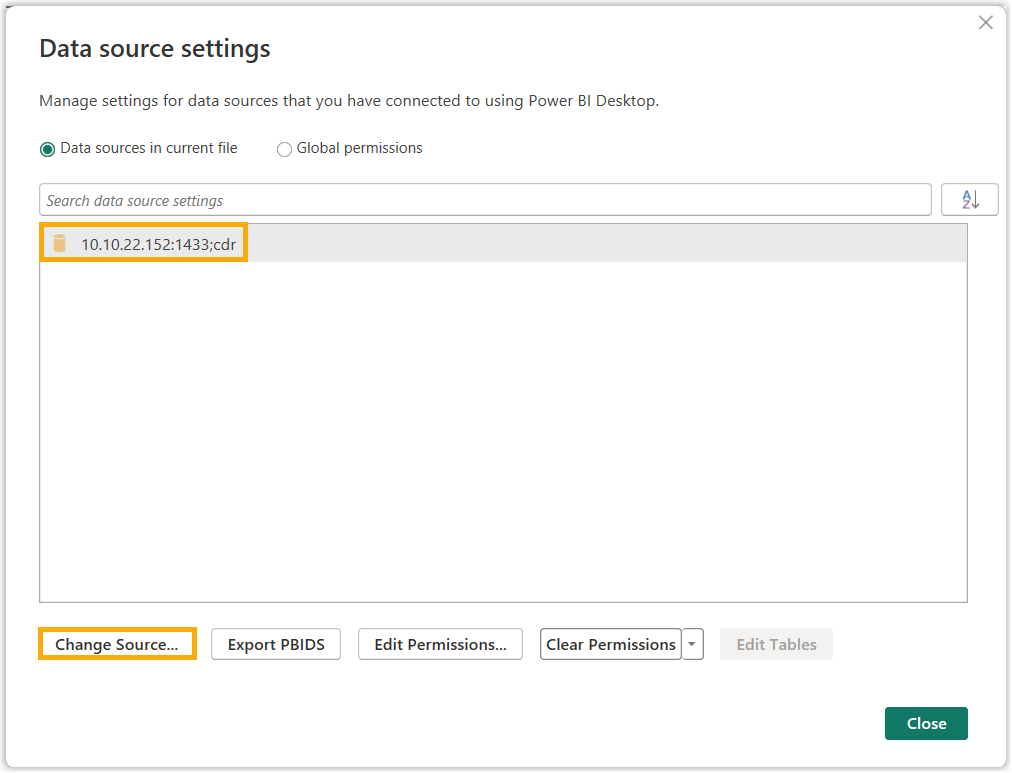
- Update the database connection information, then
click OK.
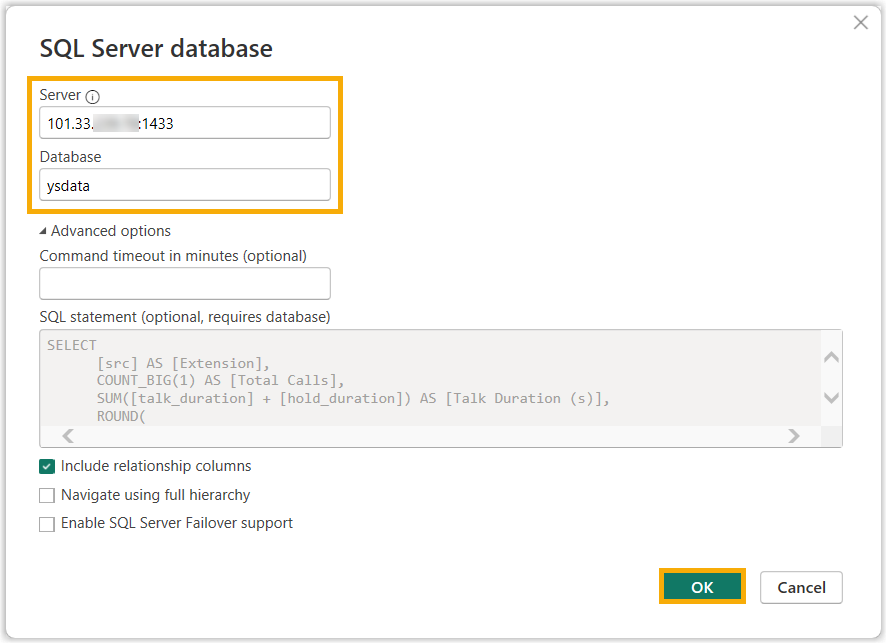
Item Description Server Enter the IP address or domain name of the host on which the database is installed, as well as the database port. Database Enter the name of the database.
- Select the default data source, then click
Change Source.
- Configure database access credentials.
- Click Edit
Permissions.
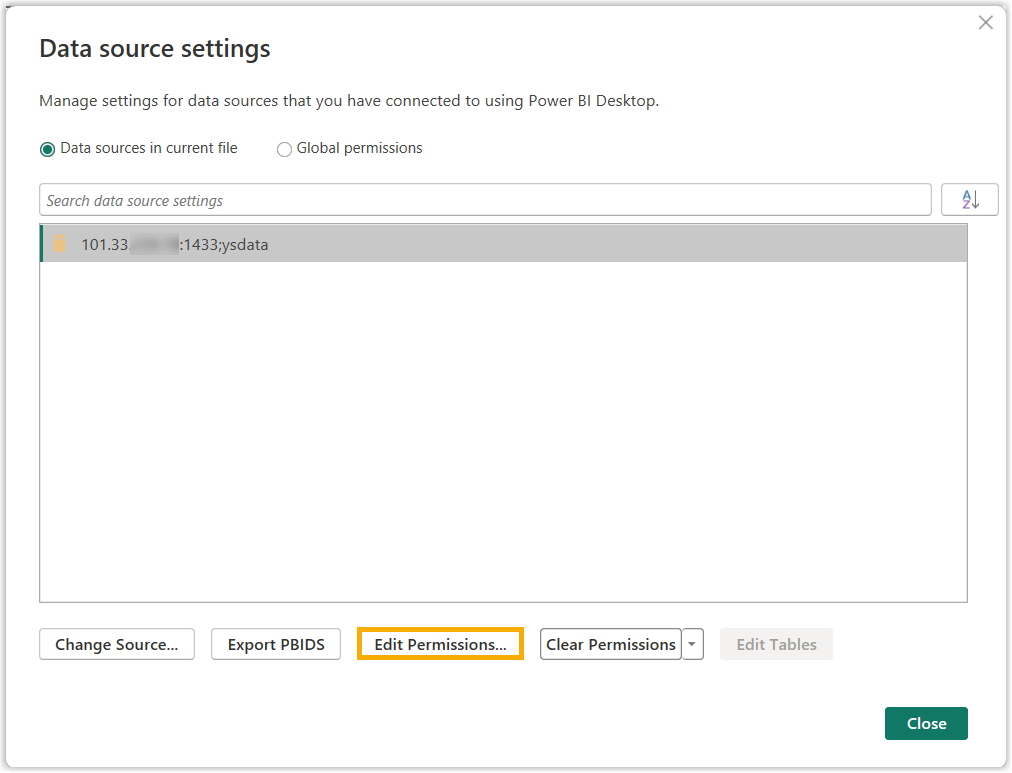
- In the pop-up window, click
Edit.
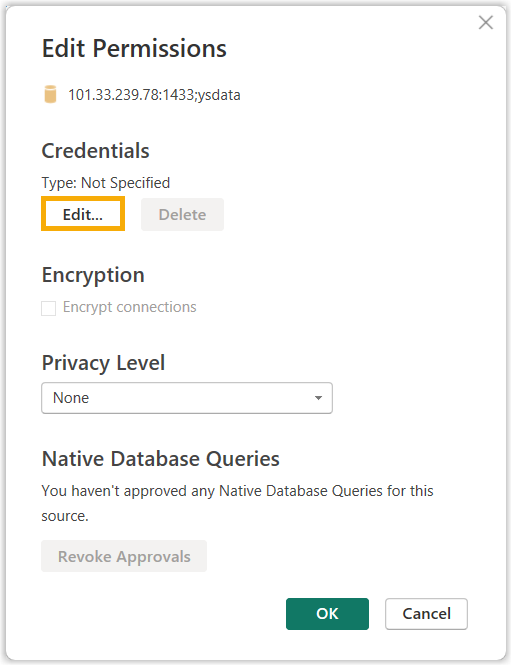
- Select Database and fill
in the authentication information, then click
Save.
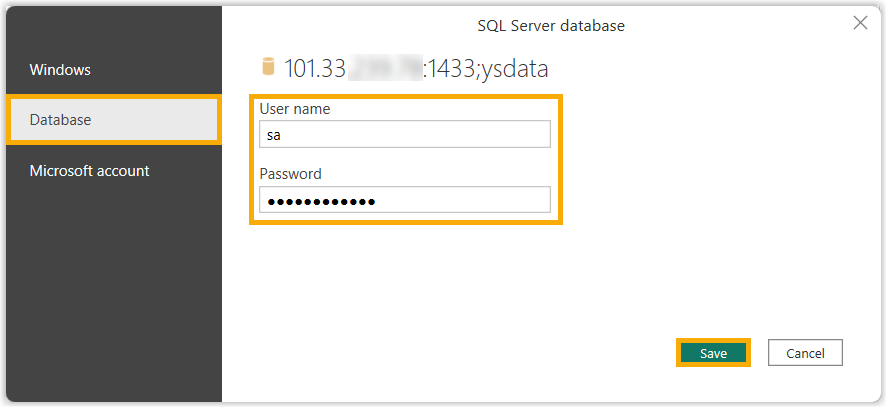
Item Description User name Enter the username to connect to the database. Password Enter the password to connect to the database.
- Click Edit
Permissions.
- Save your setting .
- On the top toolbar, click
Transform data and select
Data source
settings.
- On the top of the page, click
Refresh to run all SQL
queries.
- Result
-
The data are successfully imported and visualized in the panel.
- What to do next
- Add or modify the SQL queries to customize the data to be displayed.Note: By default, the template for Power BI displays data only for the following call reports, as Power BI doesn't support incorporating multiple queries from a single source.
-
Extension Call Accounting
-
Extension Call Accounting Details
-
AI Receptionist Call Activity
-
Agent Missed Call Activity
-
Queue Callback Activity
-
Satisfaction Survey
-
Satisfaction Survey Details
-
IVR Report
-
DID/Outbound Caller ID Activity
To display additional call reports, you can add SQL queries as needed. Refer to Call Report Calculations with Multiple SQL Queries for more details on the related data logic.
-