Allow Users to Request a Callback in a Queue
A queue callback allows callers waiting in a queue to opt out of the queue and be called back when an agent becomes available. With callback feature, customers can save time while keeping their positions in the queue, and you can reduce the number of abandoned calls and ensure queue performance.
Allow users to request a callback by pressing a digit
- Procedure
-
- Log in to PBX web portal, go to .
- Click
 beside a desired queue.
 -
Click Preferences tab, then scroll down to the Callback section to enable and set up queue callback.

- Turn on Callback.
- In the Request Callback Method drop-down list, select Triggered by caller input.
- In the Digit to press drop-down list,
select a value.Note: The value can NOT conflict with the Key Press Event value of the queue.
Customers can press the digit to request a callback while in queue waiting for being answered.
- Optional: In the
Callback Outbound Prefix field,
enter the prefix of an outbound route, which will be used to
make the callback.Note: Make sure all agents in this queue have permission to use the outbound route, or the callback would fail.
- In the Callback
Timeout drop-down list, set how long a
callback request can be reserved in the queue. If there are
no available agents in the queue within the timeout period,
the callback request will be cancelled.Note: The default timeout period is the queue's Maximum Waiting Time (Path: ). You can also select Custom to customize a timeout period.
- Click Basic tab, then scroll down to the
Prompt section to select a prompt,
instructing customers to press the specified digit to request a
callback.

- In the Periodic Announcement
drop-down list, select a prompt.Note: The available prompts are the ones that you have recorded or uploaded to the system. For more information, see Record a Custom Prompt and Upload a Custom Prompt.
- Optional: In the Frequency (s) field, select or enter a value to set the time interval to play the prompt.
- In the Periodic Announcement
drop-down list, select a prompt.
- Click Save and Apply.
- Result
- Customers can press the specified digit to request a callback while waiting in the queue.
- What to do next
-
- Read the provided example to know the callback flow.
For more information, see Queue Callback Example.
- Enable email notifications to queue managers when a callback request
is made or a callback failed.
For more information, see Customize Queue Notification.
- Query callback statistics of the queue as needed.
For more information, see Queue Callback Summary Report and Queue Callback Activity Report.
- Read the provided example to know the callback flow.
Allow users to request a callback after timeout
- Procedure
-
- Log in to PBX web portal, go to .
- Click
 beside a desired queue.
 - Click Preferences tab, then scroll down
to the Callback section to enable and set
up queue callback.

- Turn on Callback.
- In the Request Callback Method drop-down list, select Auto triggered after the timeout.
- In the Timeout (s) field, select
or enter a value.Note:
- The value can NOT be greater than Maximum Waiting Time (s) of the queue.
- The Timeout is calculated as soon as customers call to the queue.
After waiting the specified duration of time in a queue, the system plays the callback option to the caller automatically.
- Optional: In the
Callback Outbound Prefix field,
enter the prefix of an outbound route, which will be used to
make the callback.Note: Make sure all agents in this queue have permission to use the outbound route, or the callback would fail.
- In the Callback
Timeout drop-down list, set how long a
callback request can be reserved in the queue. If there are
no available agents in the queue within the timeout period,
the callback request will be cancelled.Note: The default timeout period is the queue's Maximum Waiting Time (Path: ). You can also select Custom to customize a timeout period.
- Click Save and Apply.
- Result
-
After waiting the specified duration of time in a queue, the system plays the callback option to the caller automatically. Customers can press a specific digit to request a callback.
- What to do next
-
- Read the provided example to know the callback flow.
For more information, see Queue Callback Example.
- Enable email notifications to queue managers when a callback request
is made or a callback failed.
For more information, see Customize Queue Notification.
- Query callback statistics of the queue as needed.
For more information, see Queue Callback Summary Report and Queue Callback Activity Report.
- Read the provided example to know the callback flow.
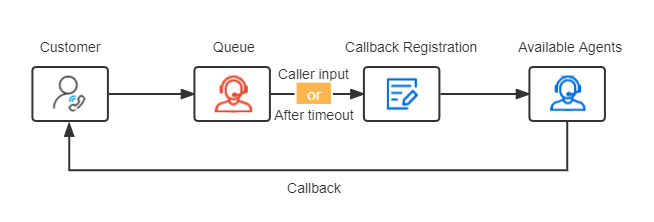
Queue callback example
We provide an example to help you understand the callback flow:

- A customer makes a call to a queue, but there are no agents available to answer the call.
- The customer requests a callback in either of the following methods:
- After the periodic announcement, the customer presses the specified digit.
- After waiting a specified duration of time, the customer presses the specified digit.
- The customer registers a callback number, then hangs up the call.Note:
- By default, the callback number is the phone number from which the customer is calling the queue.
- The customer can register another phone number as needed. The callback number must be at least 5 digits.
The customer's position in the queue is reserved.
- Upon an agent is available, the system makes a call to the agent and the
customer successively.If the agent and the customer both answer the call, the queue call is established.Note: If there are no available agents in the queue within Callback Timeout, the callback request will be cancelled.