Set up a WhatsApp Channel
This topic describes how to set up a WhatsApp channel on Yeastar P-Series PBX System, so that agents in your business can receive and reply to WhatsApp messages from customers on their Linkus UC Clients.
Requirements
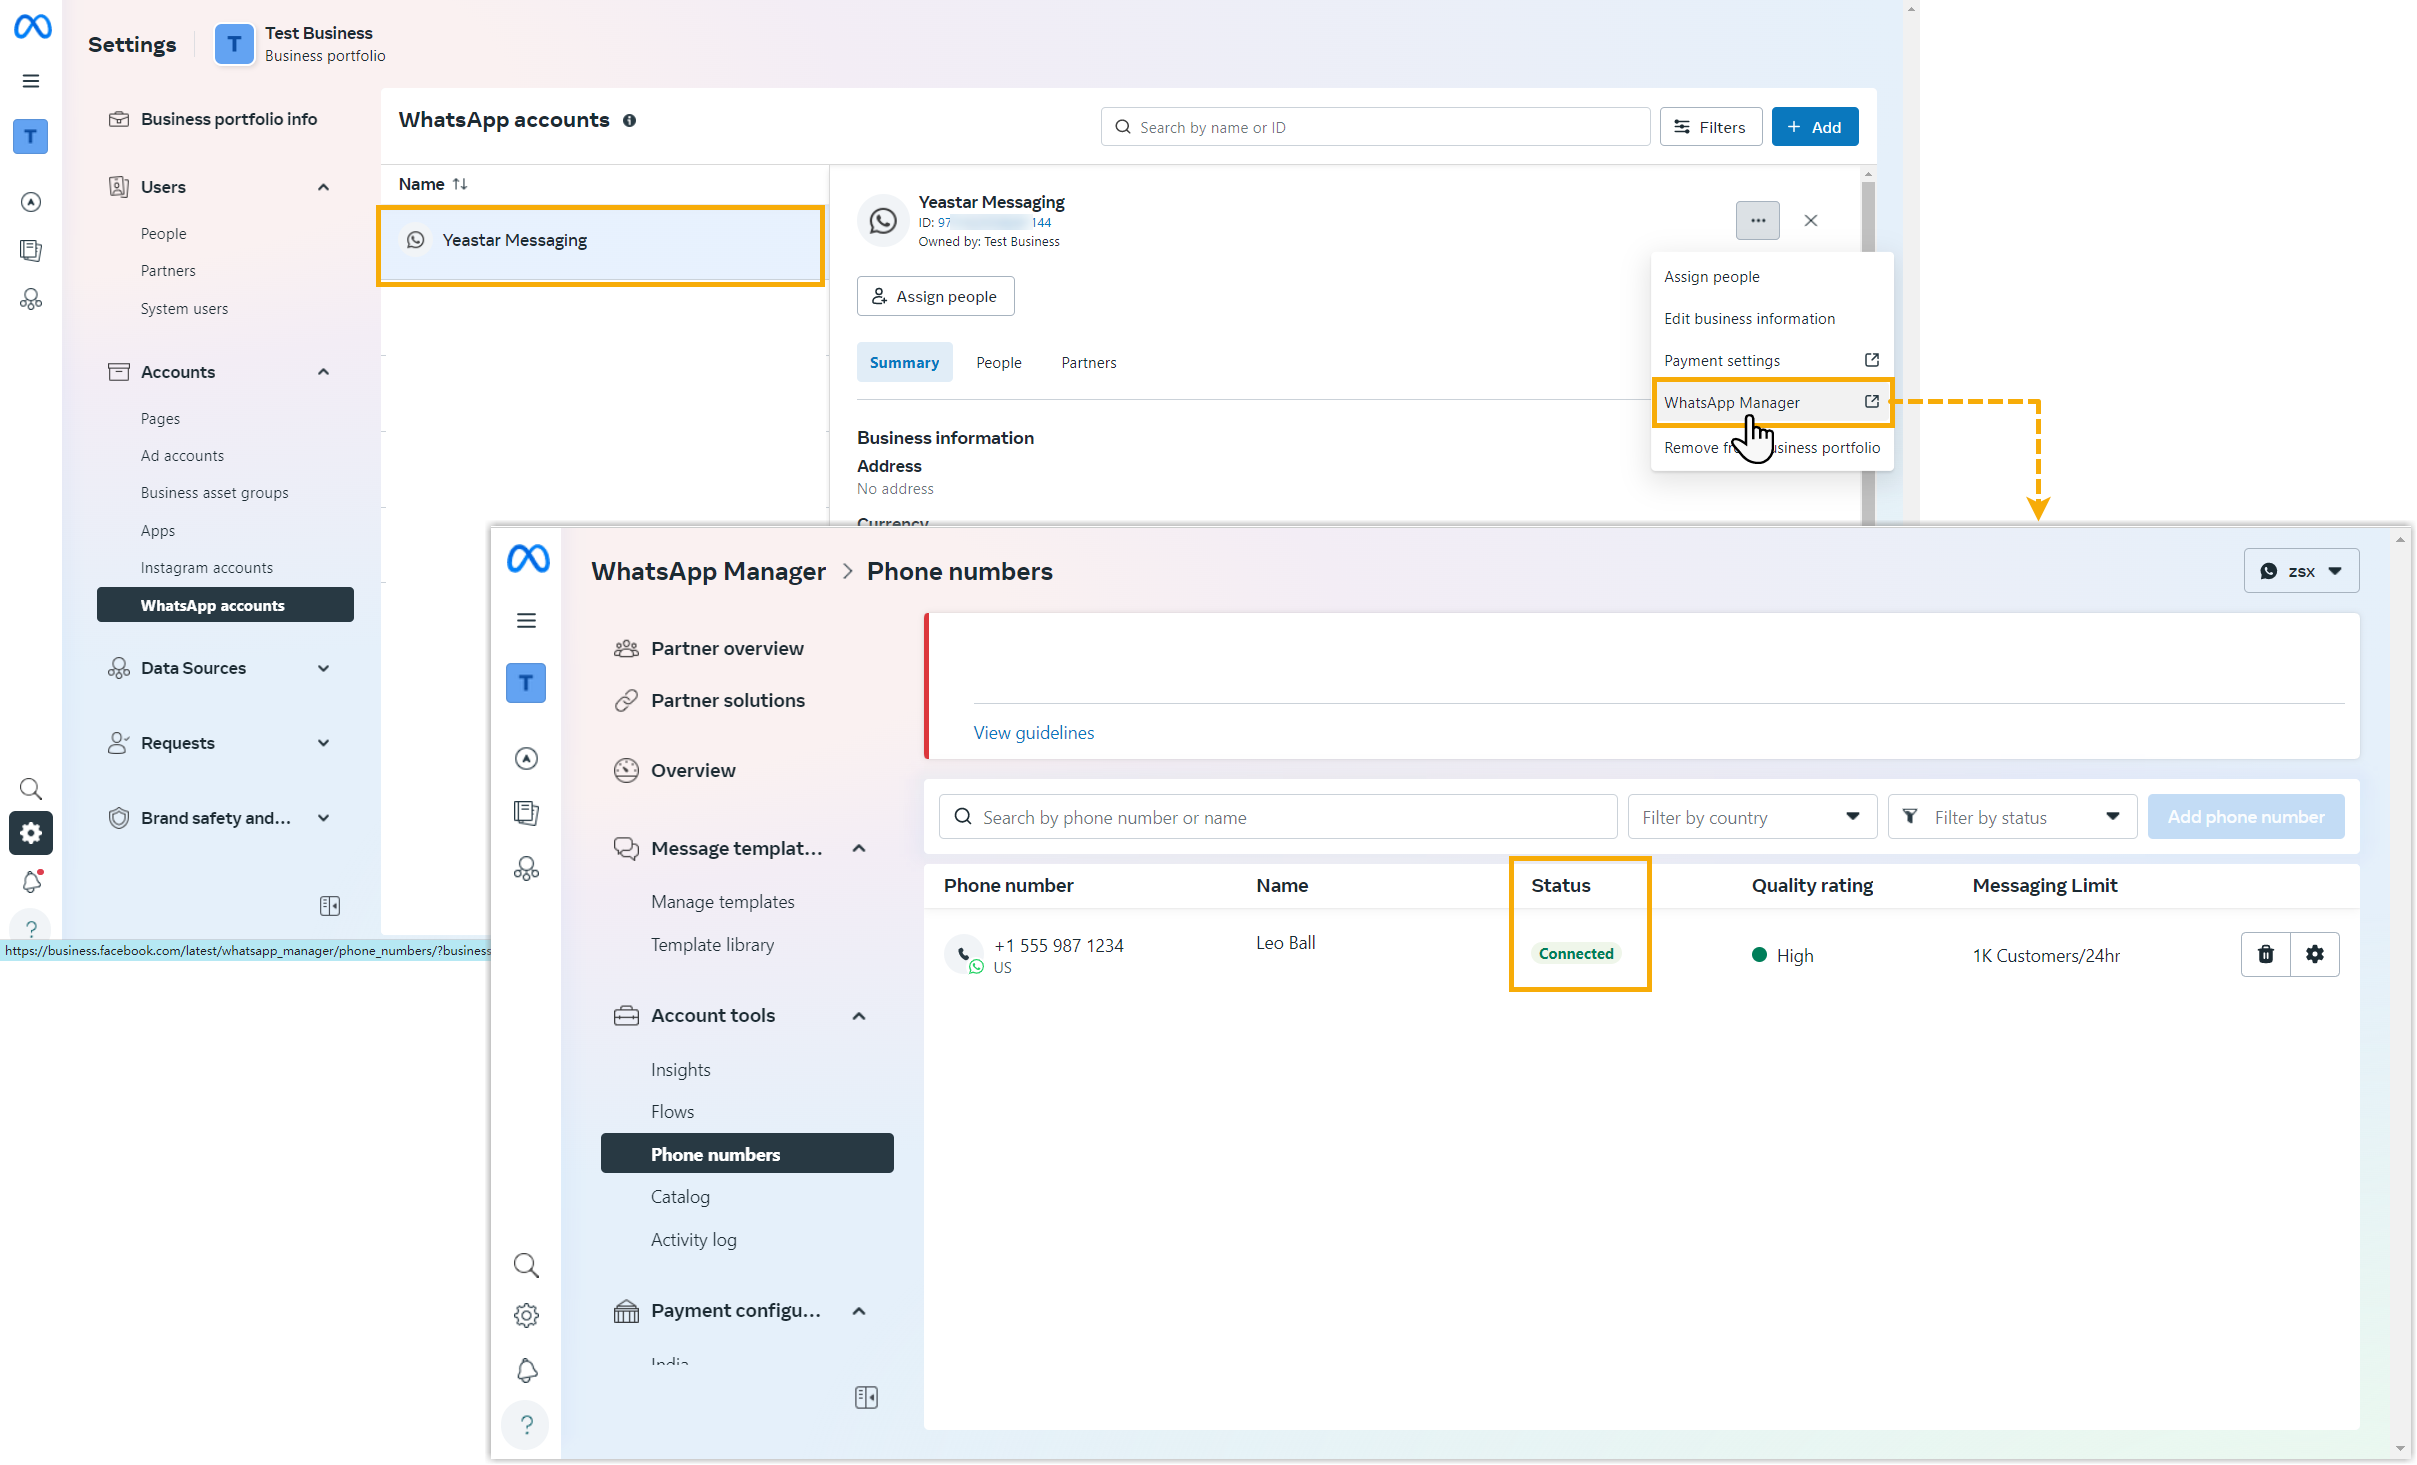
Make sure the following resources are ready.| Platform | Requirement |
|---|---|
| Yeastar PBX |
|
|
Limitations
Learn about the limitations of WhatsApp messaging channel.
| Item | Description |
|---|---|
| Message type | Supports text messages and multimedia messages, where the
multimedia message types are determined by WhatsApp. For more
information, see WhatsApp supported media
types. Important: When sending multimedia messages (such as images), WhatsApp
downloads the file from a link provided by the PBX.
Therefore, if you have set Allowed Country/Region IP Access Protection rule, make
sure that you have allowed the IP access from the country
where the WhatsApp server is located, otherwise the file
transmission would fail. |
| Messaging mechanism | You can receive and reply to customers' inbound messages, or proactively initiate a messaging session using a WhatsApp message template. |
| Message sending rate | Supports to send up to 80 messages per second. |
| File size | Supports to send a file with a maximum size of 100 MB. |
| File retention period | Files can be retained for up to 7 days. Note: You can configure the retention
period at .
|
Procedure
Video Tutorial
Step 1. Create a Meta app on 'Meta for Developers' portal
On 'Meta for Developers' portal, create a Meta app on the Meta for Developers portal, add phone number to the app, and obtain a phone number ID as well as the app secret, which is required later when configuring the WhatsApp channel on the PBX.
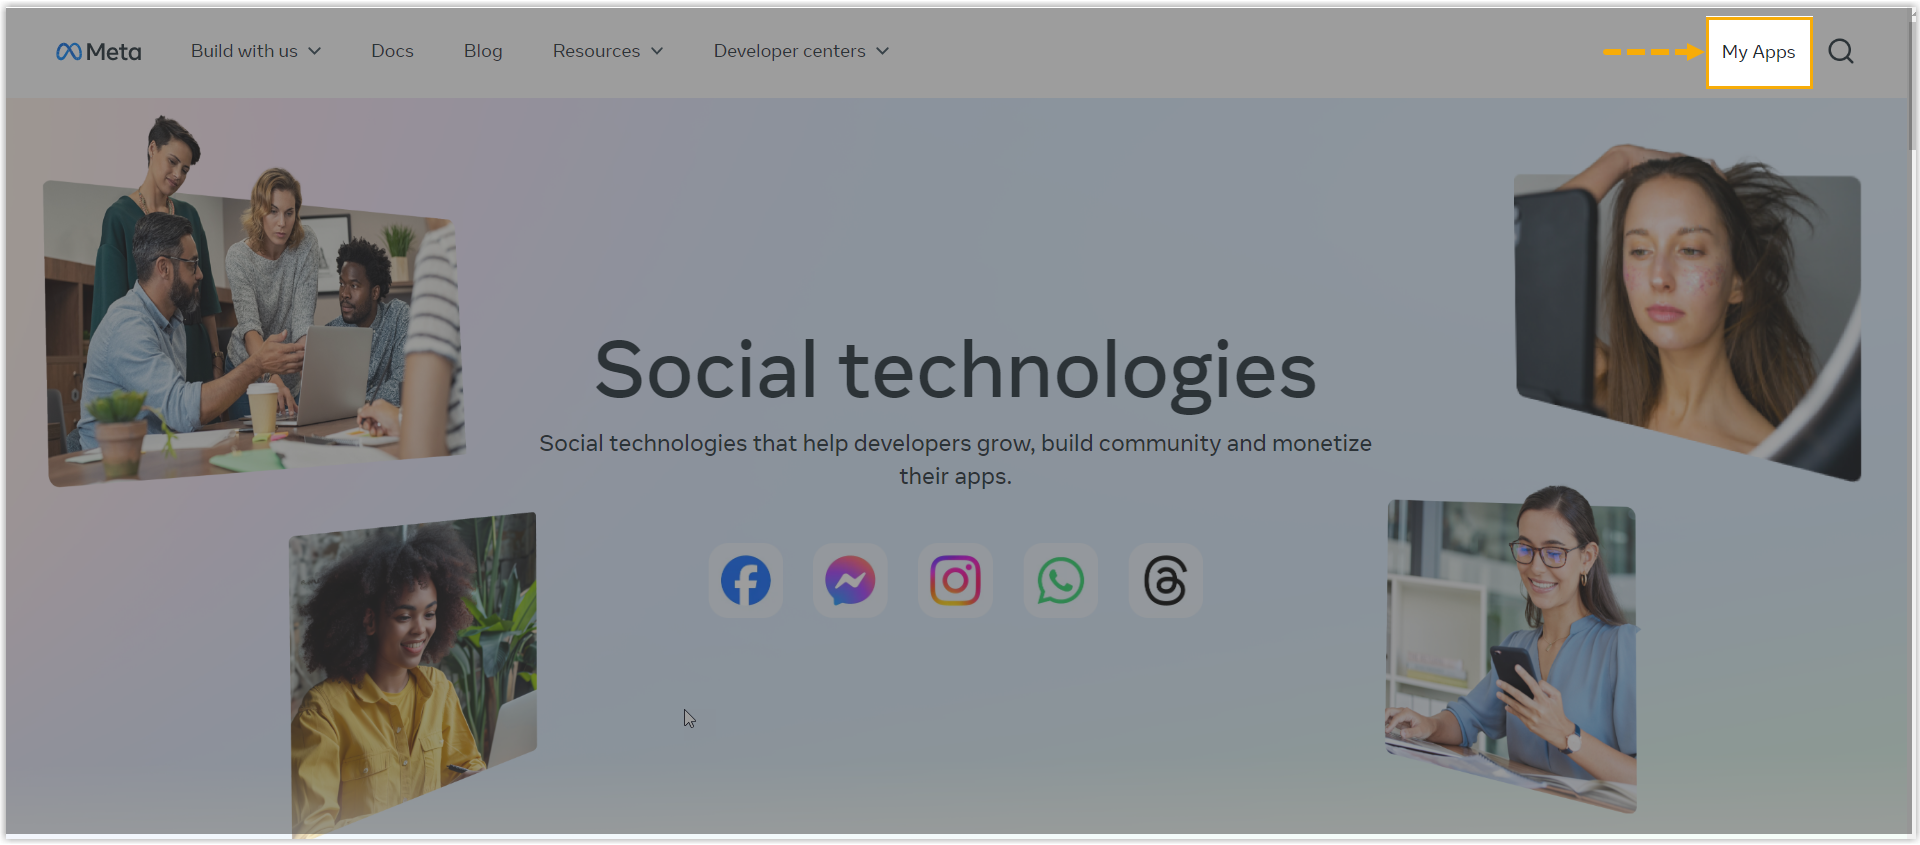
- Log in to 'Meta for Developers' portal with your Meta
Developer account, then go to My Apps from the top
menu.
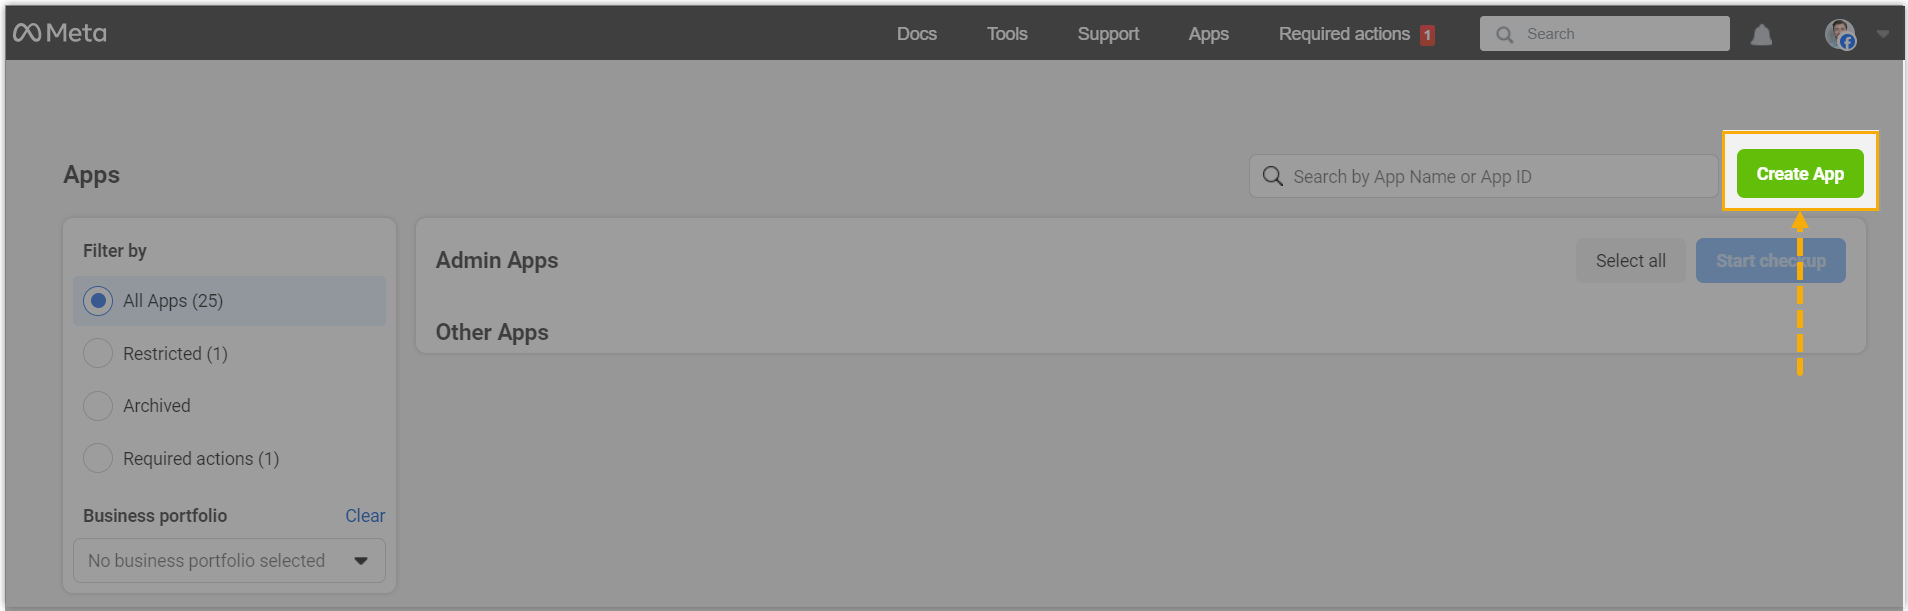
- Create an app of the Business type.
- Click Create App.
- Complete the app settings.Note: In the Business Portfolio field, select your Business Account to connect the app with your business, as apps that need advanced access for permissions must be connected to a verified business entity.
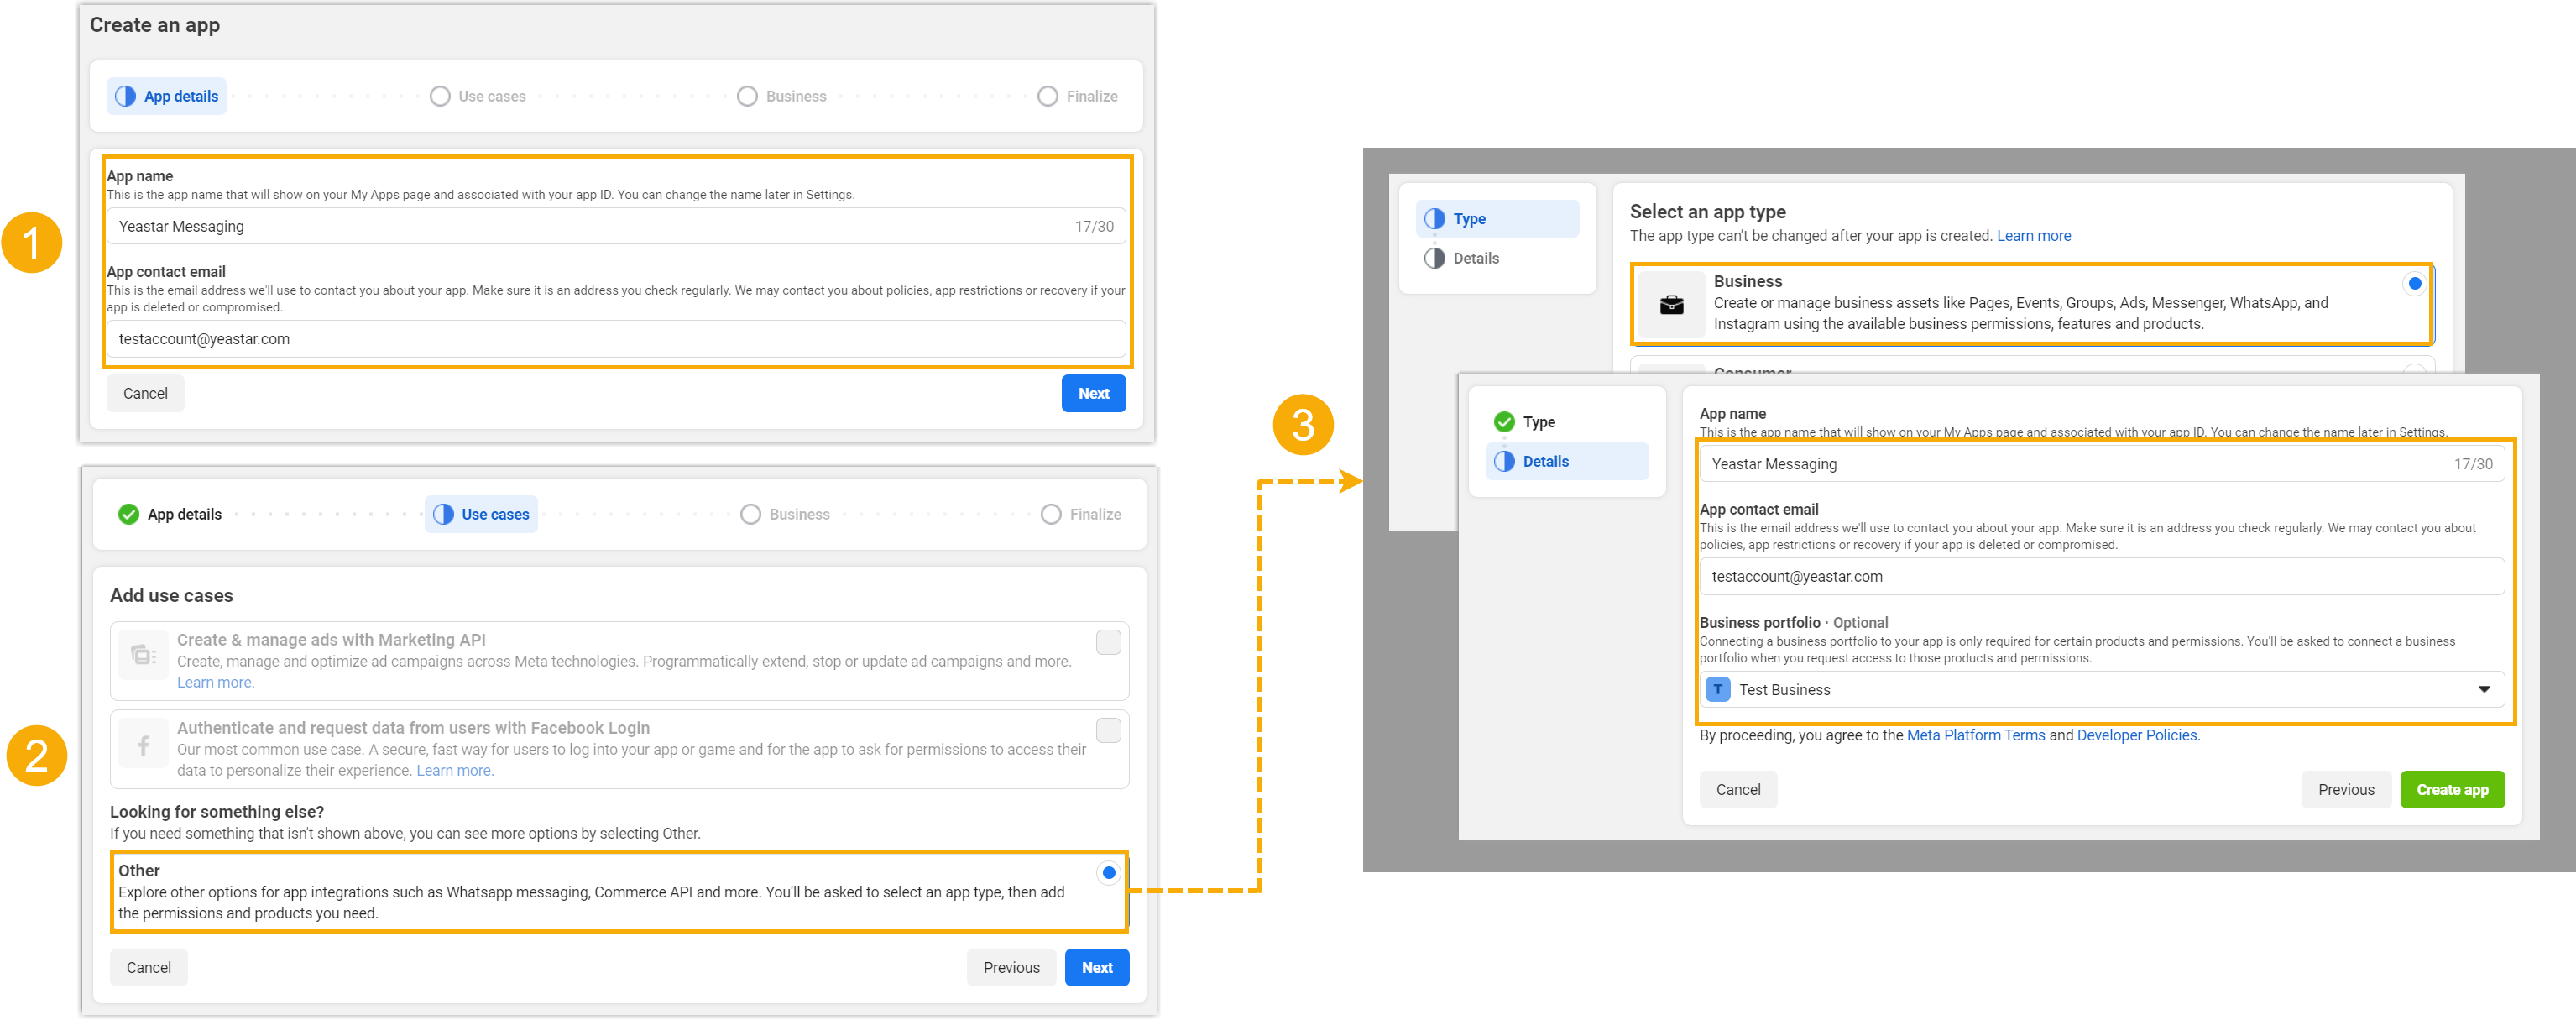
- Click Create App.
- In the
Available
products section, scroll down to find
WhatsApp and click Set
up.
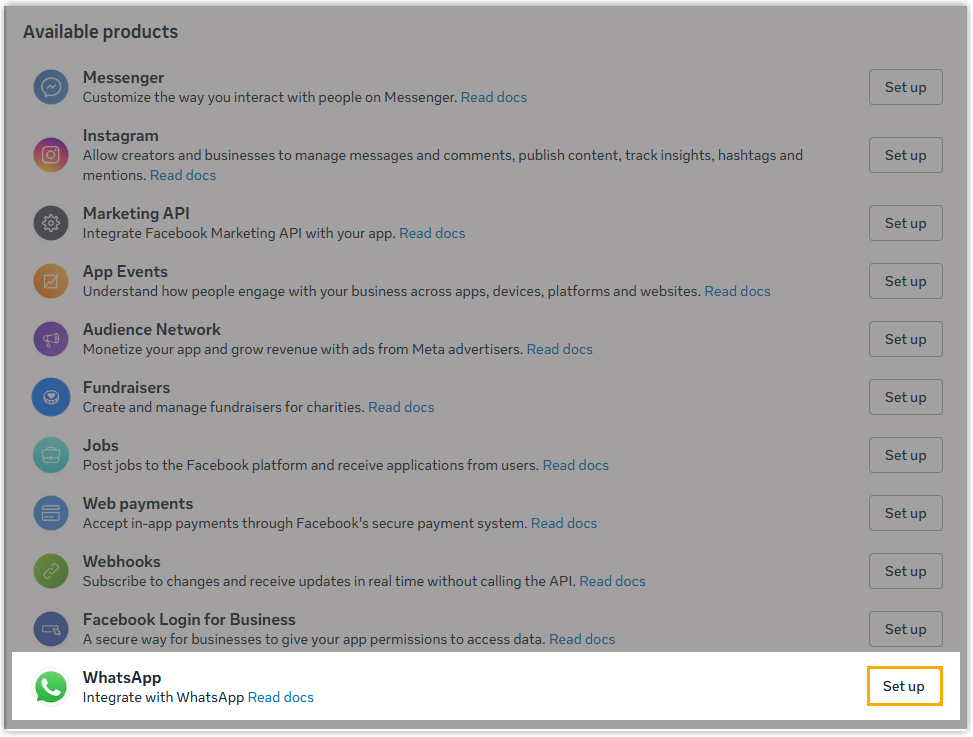
You are redirected to the configuration page of the WhatsApp product.
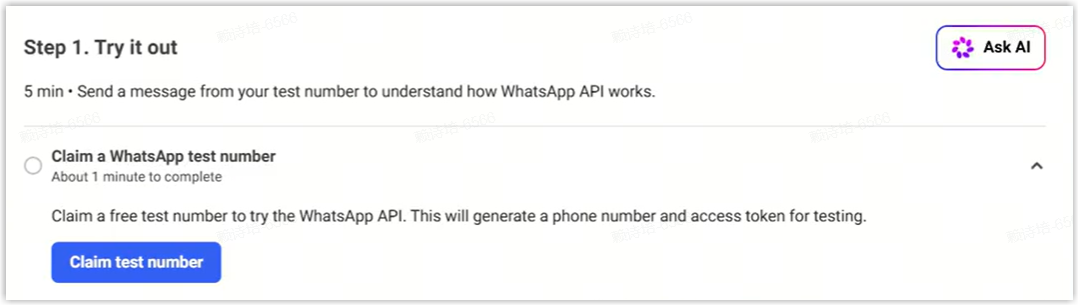
- Optional: At the left navigation bar, go to , test the message sending using the test number.
- Claim a free test number.
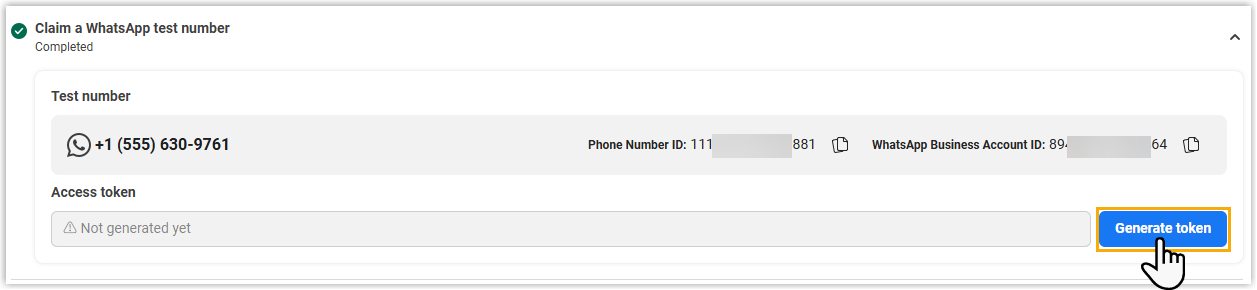
- Generate a temporary access token.Note: The access token is valid for 24 hours only and can not be used in production.
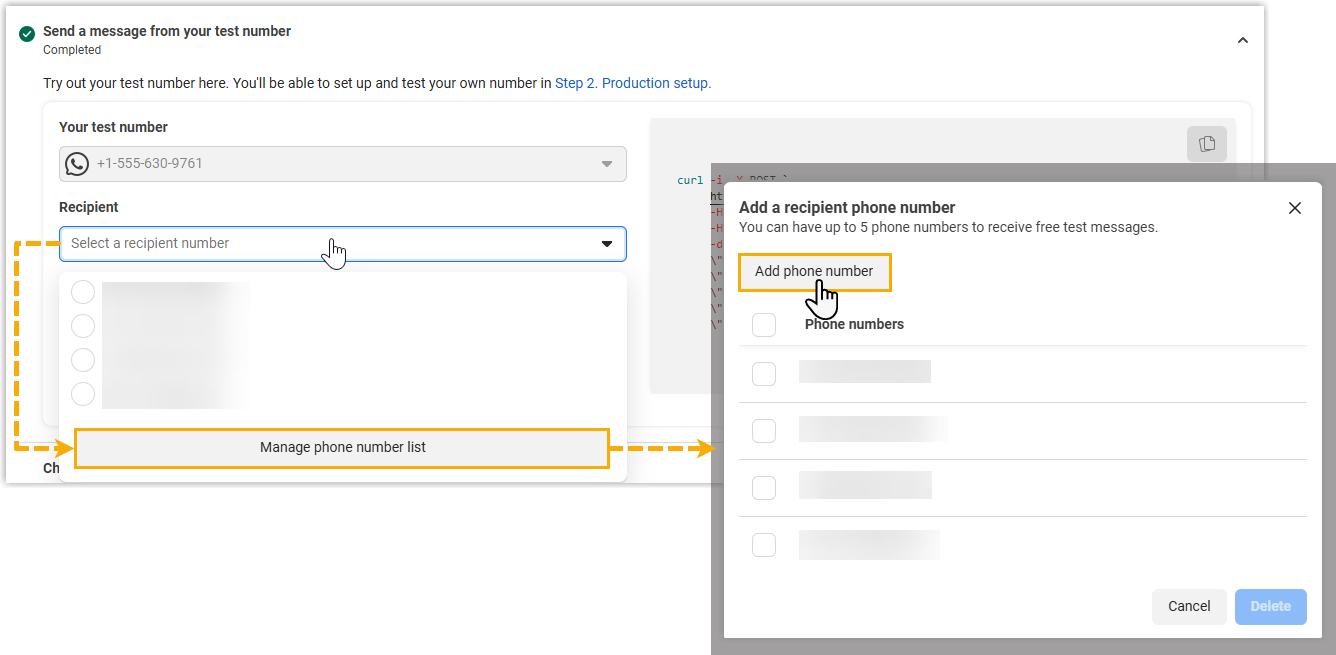
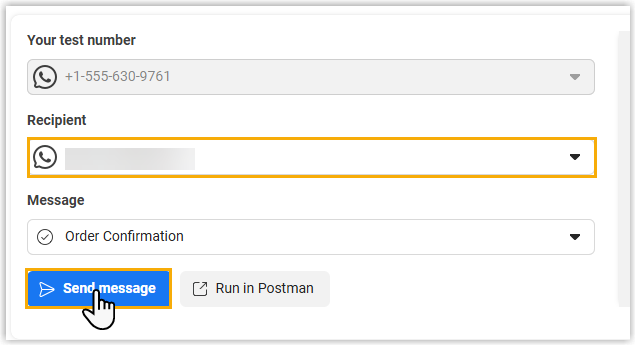
- Add a recipient number to receive the test message.
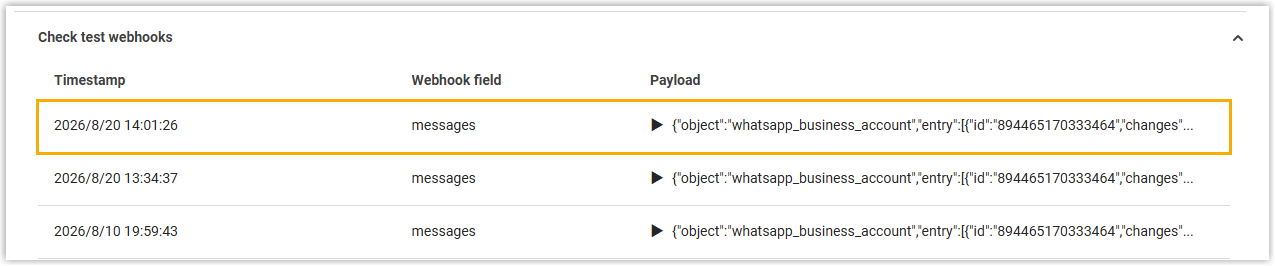
- Send a test message to the specified number, then check the webhook
records below.
You can check the webhook record to see the message delivery details.
- Claim a free test number.
- On the left navigation bar, go to , add your business number(s) and obtain the required number
information for the channel integration:
- In the Register your WhatsApp phone
number section, click Add new
number to add your WhatsApp phone number for
messaging.
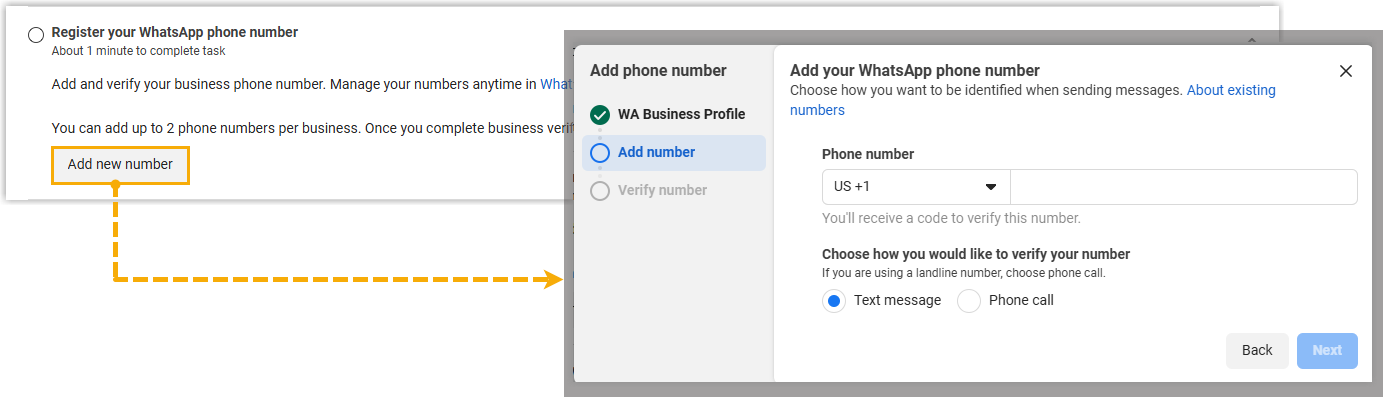
Note down the corresponding Phone Number ID of the number you added as you will need to add it on the PBX later.
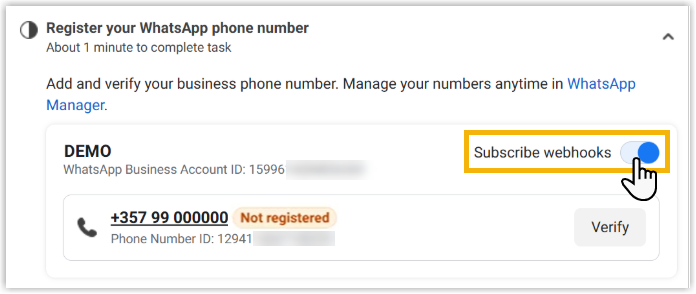
- Enable Subscribe
webhooks to allow the PBX to receive
messages from external users and update the corresponding chat
sessions.
- In the Register your WhatsApp phone
number section, click Add new
number to add your WhatsApp phone number for
messaging.
- On the left navigation bar, go to , note down the App secret of the app for
the channel integration.

Step 2. Obtain essential credentials on 'Meta Business Suite' portal
- Log in to 'Meta Business Suite' portal with your Business Manager account.
- On the left navigation bar, go to Settings.
- Go to , create a system user and grant app permission to the
user.
- Click Add to create a system user with
Admin role.
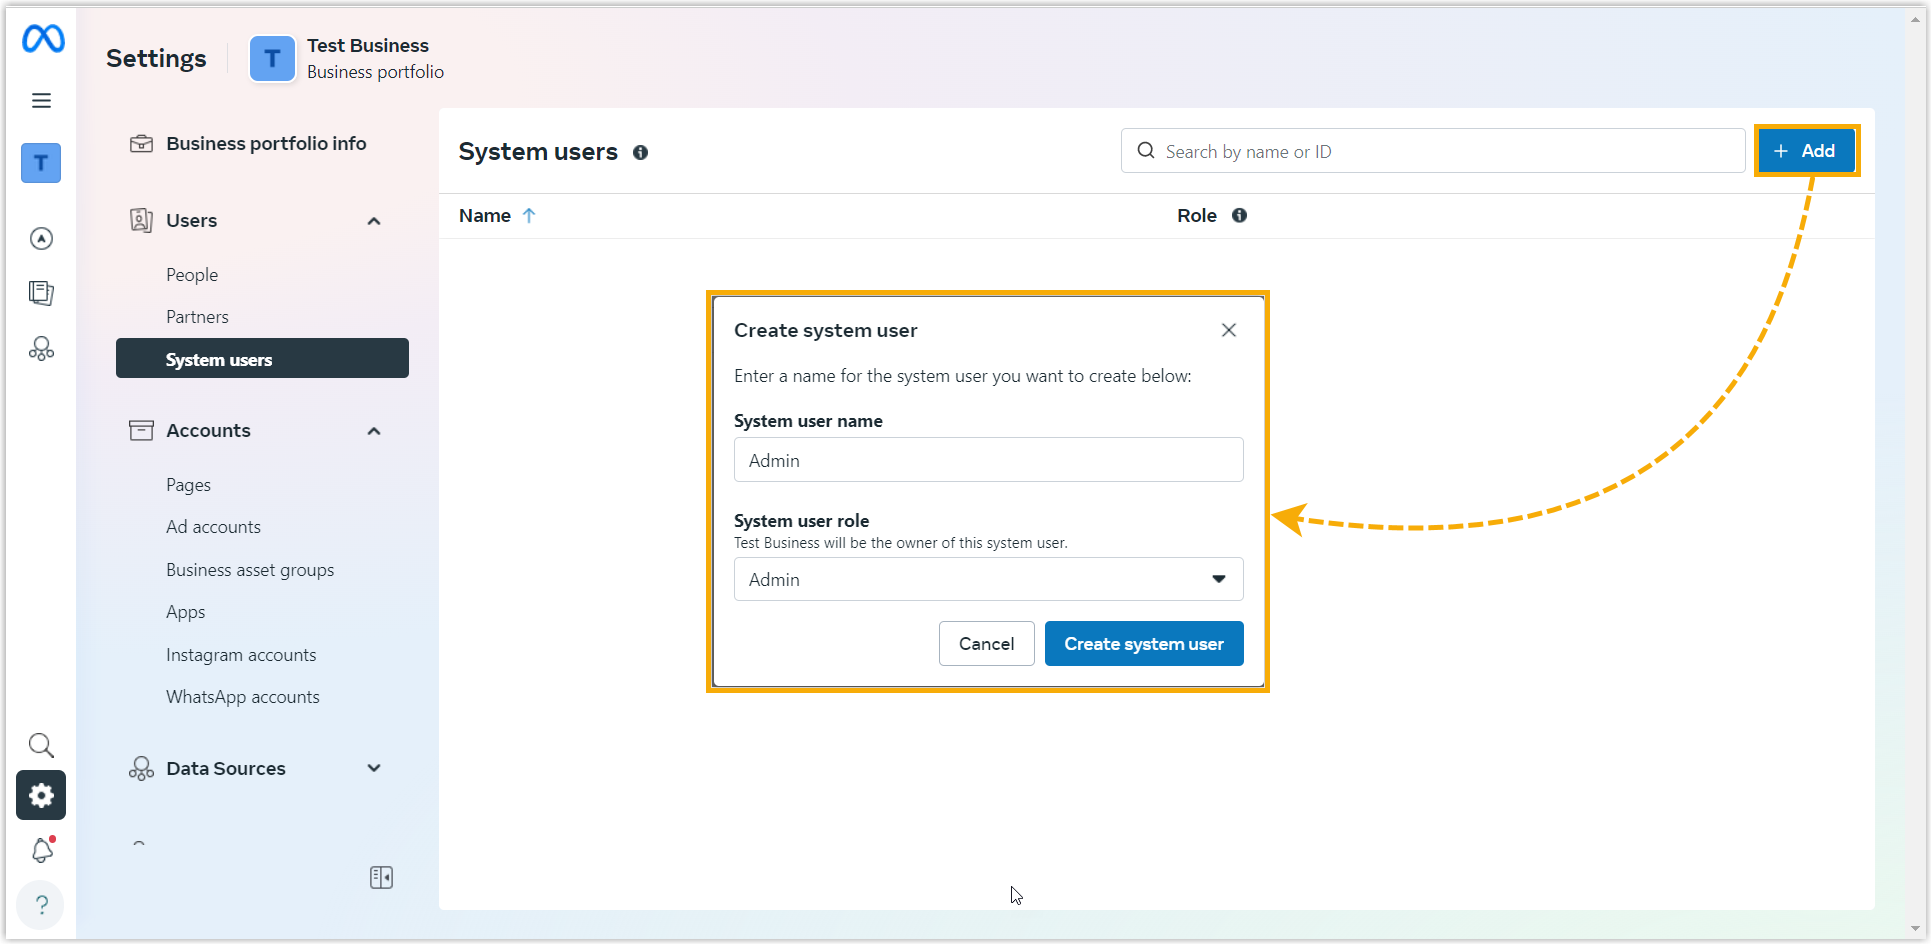
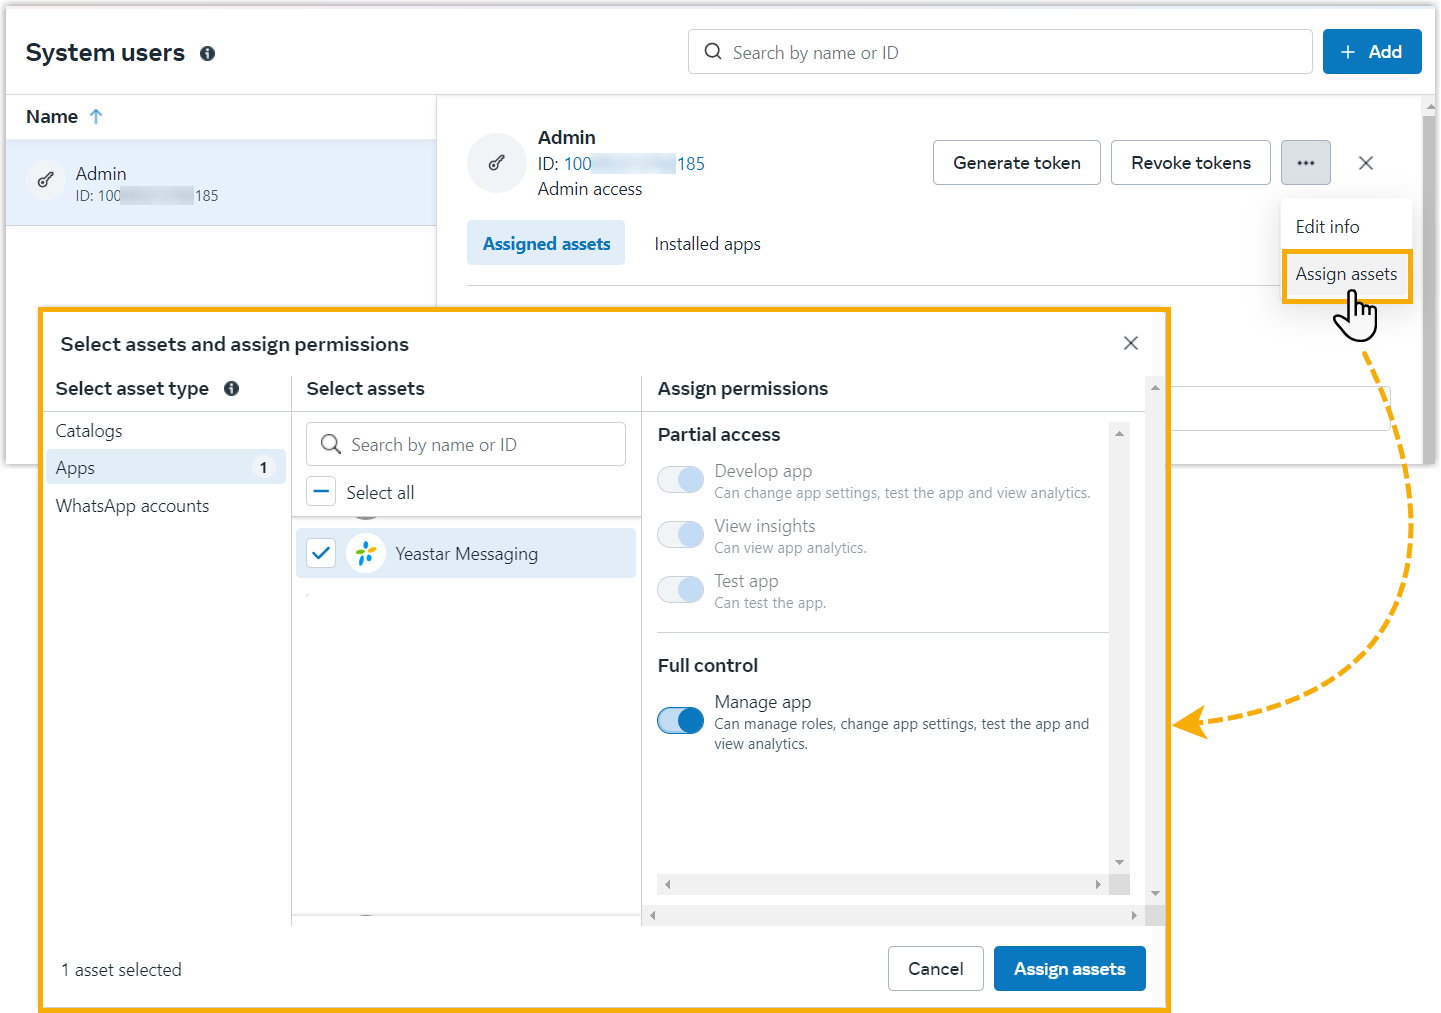
- Select the created user, click Add assets and
grant
the
full access permission of the app you created to the created
user.
- Click Add to create a system user with
Admin role.
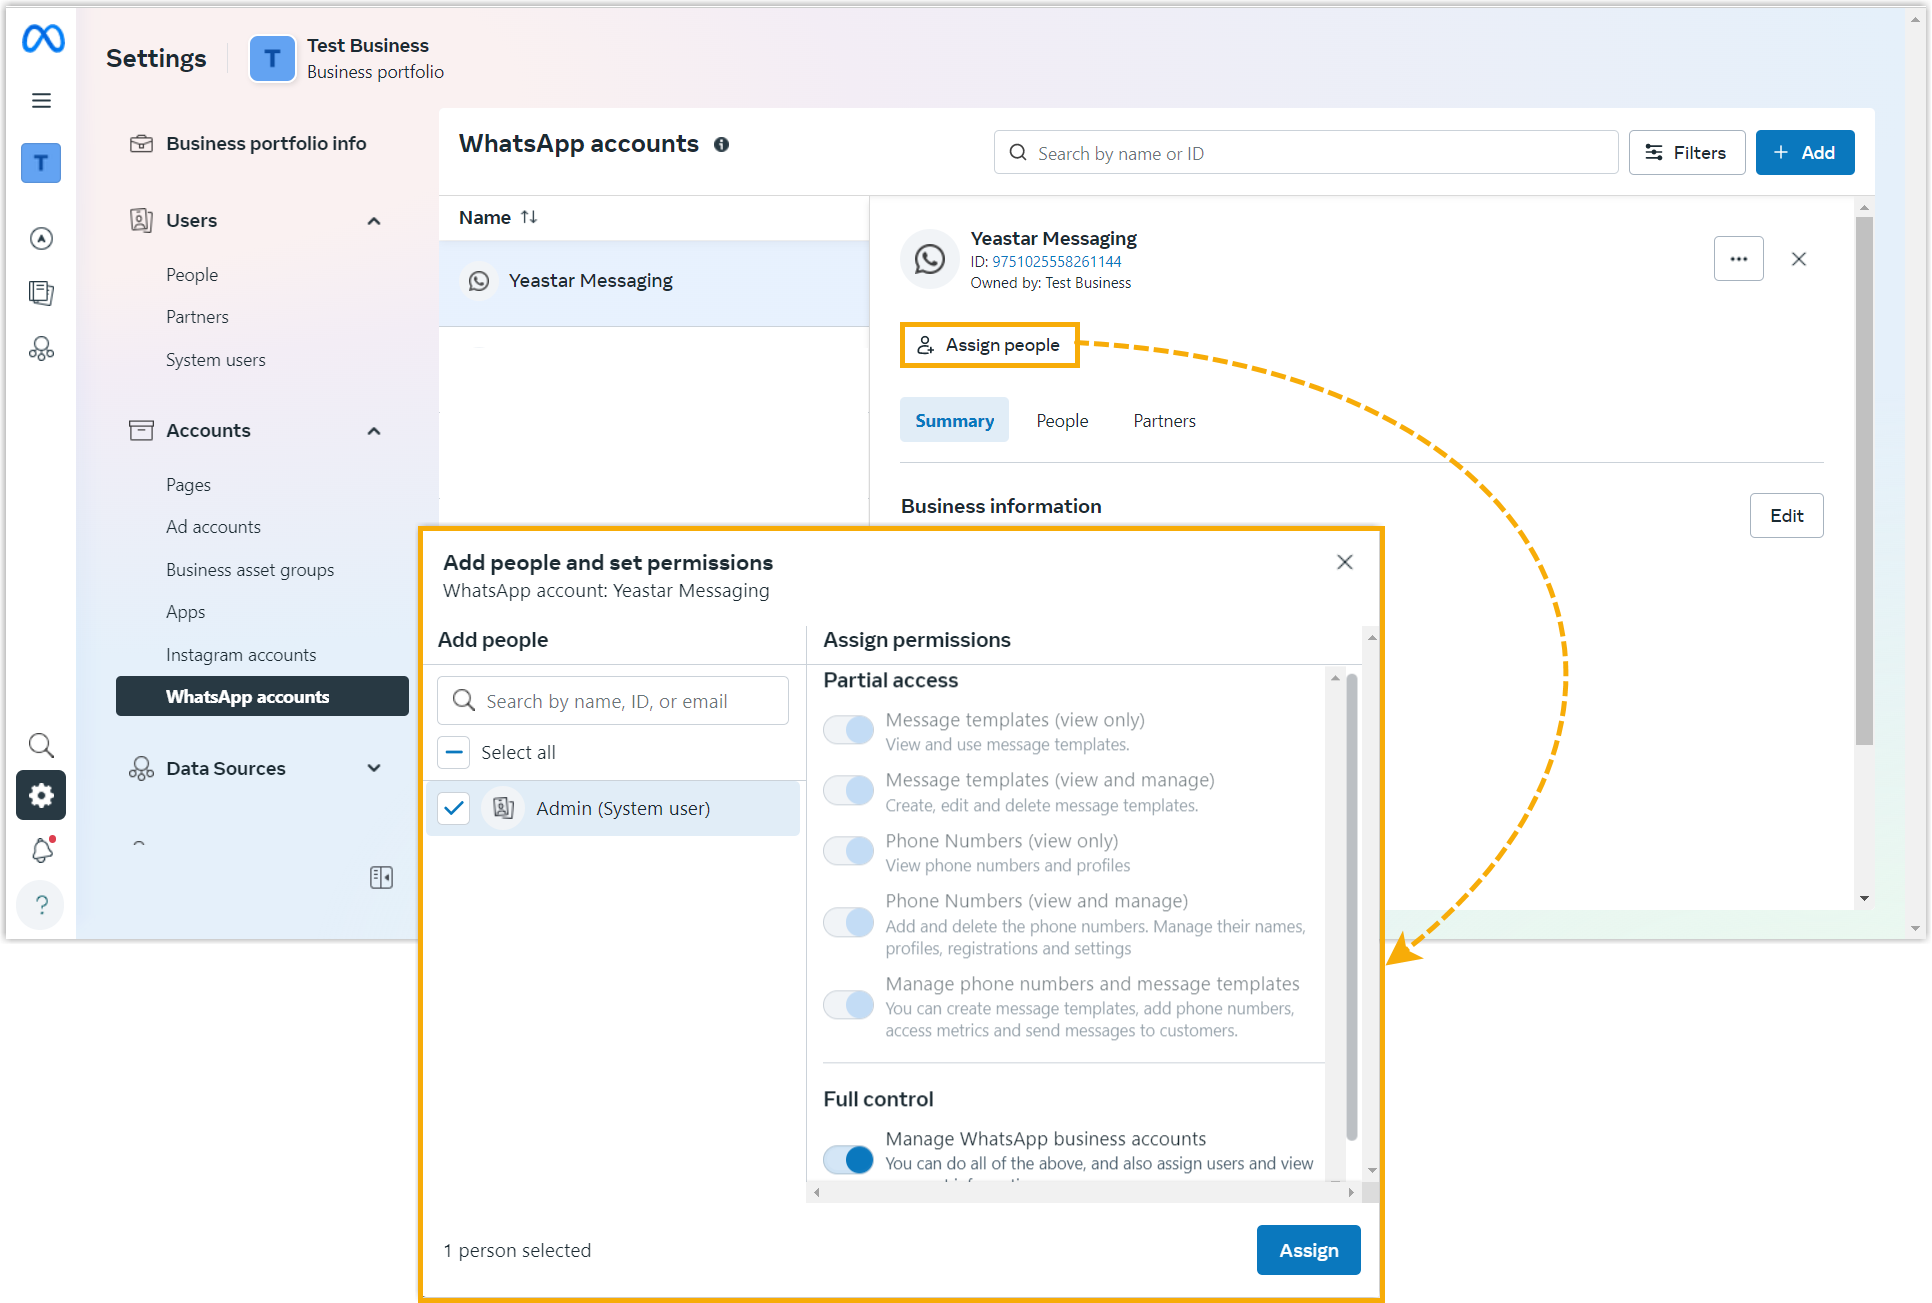
- Go to , add the created user to your WhatsApp Business account and
grant the user full
access
permission.
- Go back to , generate an access token with the
whatsapp_business_messagingandwhatsapp_business_managementpermissions enabled.Note: By default, the token expires after 60 days. You can set it to Never if you don't want the token to expire.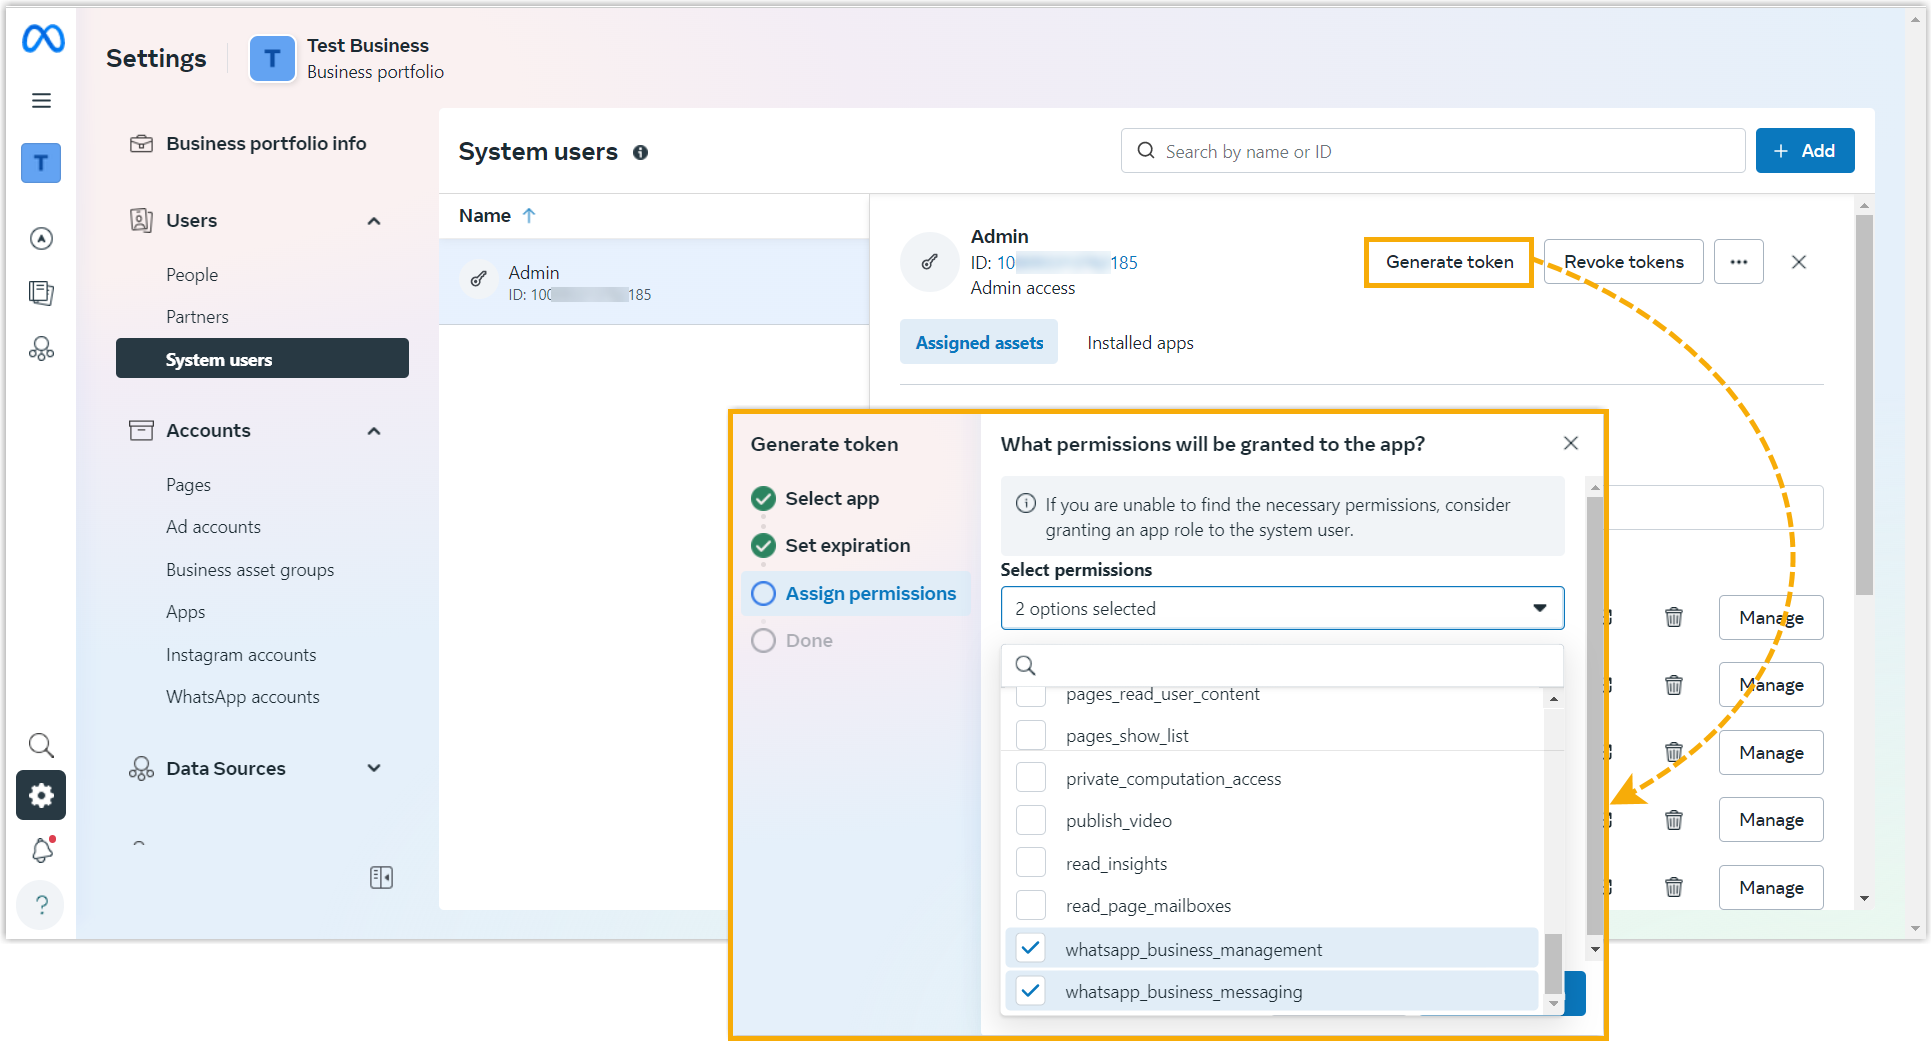 The pop-up window shows the generated access token.Important: Make sure that you have copied and properly saved the access token before closing the pop-up window, as it is only displayed ONCE.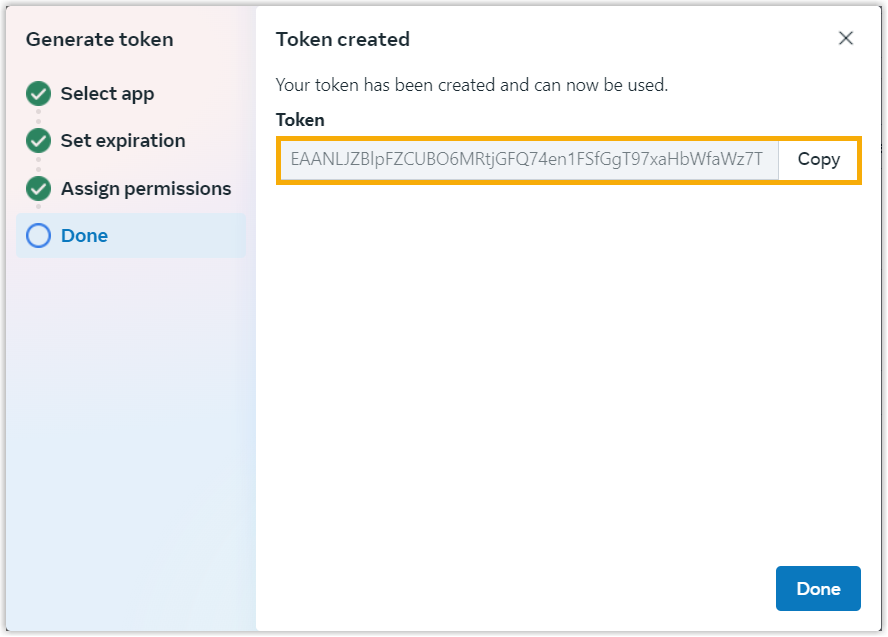
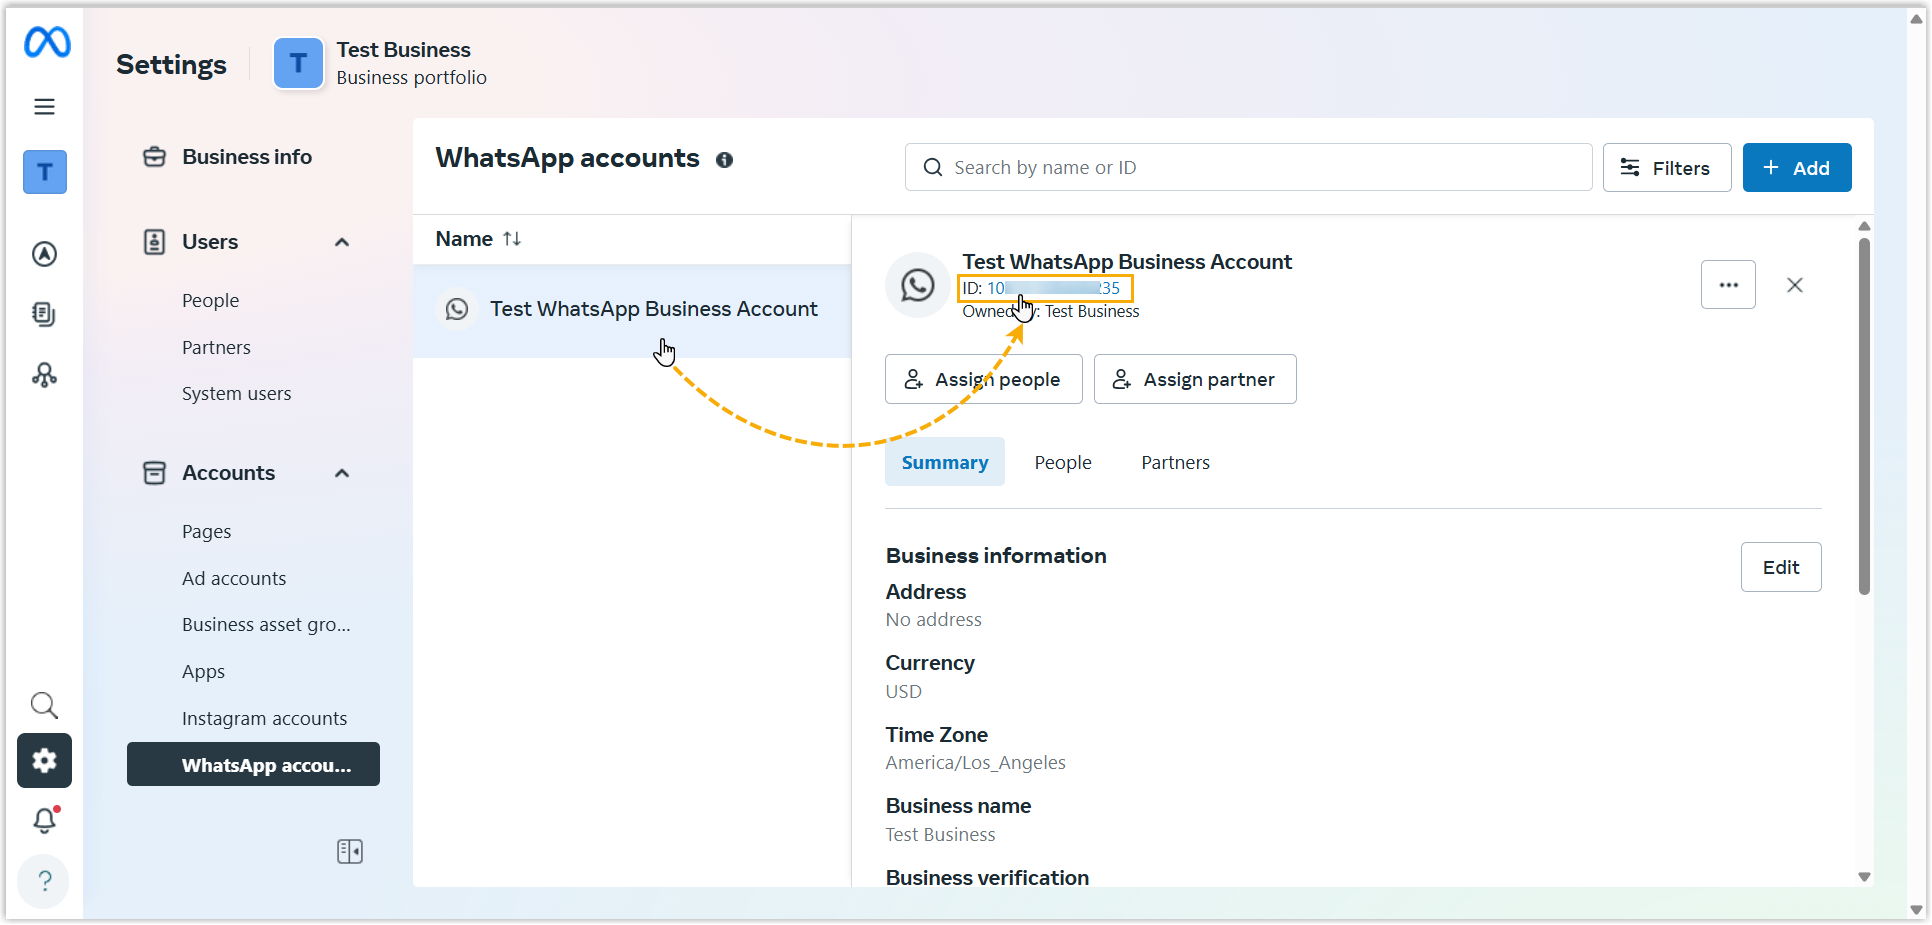
- Go to , click your WhatsApp Business Account, then copy the account
ID.
Step 3. Create and configure a WhatsApp channel on PBX
On the PBX, create a WhatsApp channel and configure it using the information obtained in the previous steps. This ensures that the PBX can connect to the WhatsApp for messaging.
- Log in to PBX web portal, go to .
- Click Add, and select WhatsApp.
- In the Authentication tab, enter the authentication
information of WhatsApp.
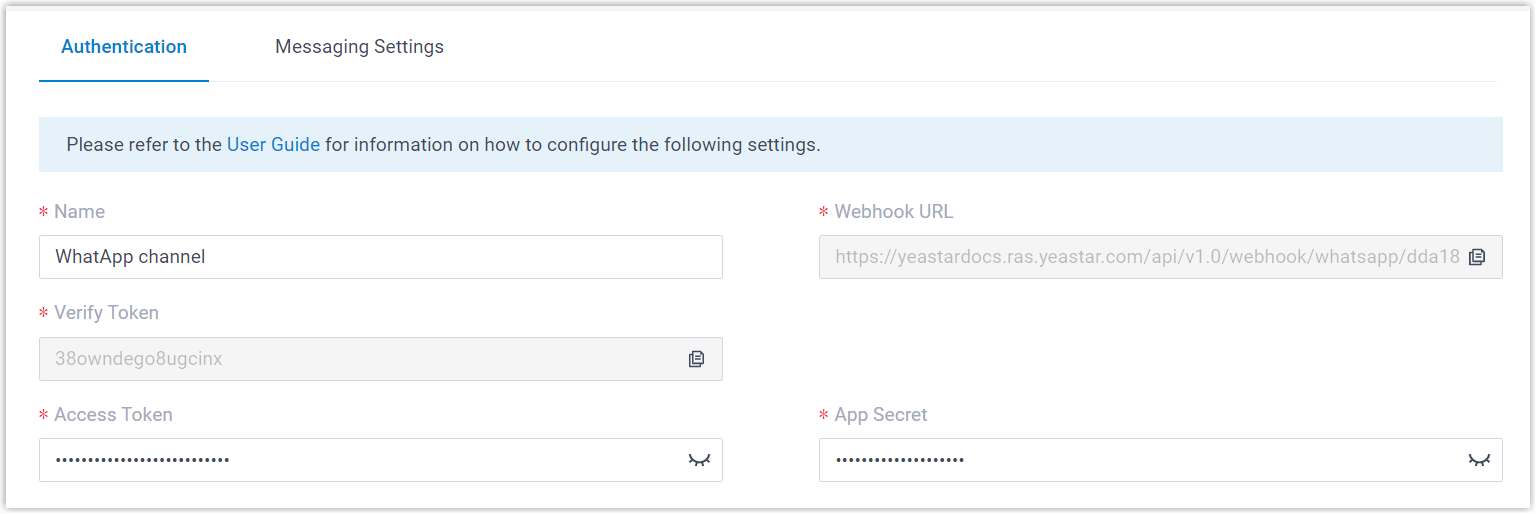
- Name: Enter a name to help you identify the channel.
- Webhook URL: Select and note down the Webhook URL, as you will need it later on WhatsApp.
- Verify Token: Note down the verify token, as you will need it later on WhatsApp.
- Access Token: Paste the Access Token obtained from 'Meta Business Suite' portal.
- App Secret: Paste the App Secret obtained from 'Meta for Developers' portal.
- In the Messaging Settings tab, configure the channel.
- Enter WhatsApp phone number information.

- Phone Number: Enter the WhatsApp phone number in E.164 format
(
[+][country code][phone number]). For example,+15559871234. - Country/Region:
Select the country/region where the agents provide
services.
When messages are triggered during a call (e.g., those triggered by keypress event or missed extension calls), the system uses this code to automatically populate customer phone numbers that are not in E.164 format, and then sends messages to this number.
- Phone Number ID: Paste the phone number ID.
- Phone Number: Enter the WhatsApp phone number in E.164 format
(
- In the WhatsApp Business Account ID
field, paste the account ID obtained from 'Meta Business Suite'
portal.

PBX will automatically synchronize the message templates associated with the WhatsApp account to the channel.
- In the Destination for Inbound Messaging
drop-down list, specify the destination of inbound messages from
the number.

Option Description Extension If selected, choose an extension from the Extension drop-down list. Only the extension user can receive inbound messages from the number.
Message Queue If selected, choose a queue from the Message Queue drop-down list. All the agents in the selected message queue can receive inbound message(s) of new sessions in the queue. However, only the user who picks up a session will be able to receive and respond to the follow-up inbound messages in the session.
Third-Party Message Analytics Platform (Transmitted via API) If selected, inbound messages will be automatically forwarded to a third-party message analytics platform via API for advanced processing. Note: To enable automatic forwarding of inbound messages to a third-party message analytics platform, ensure that your PBX server has been integrated with the third-party message analytics platform via API. Once this option is selected, the PBX system will automatically transmit inbound messages to the designated platform. You can get notified by monitoring the API event (30031) New Message Notification. Additionally, the PBX provides a comprehensive Message API suite for advanced message interaction with the integrated third-party message analytics platforms.Message Flow If selected, choose a message flow from the Message Flow drop-down list.
All inbound messages will be routed to the selected message flow.Note: Make sure that you have set up a message flow applicable to WhatApp session type. - In the Extensions
Allowed to Create Messaging Sessions section,
select the extensions that are allowed to initiate a messaging
session with customers.

- Configure the following session settings as needed.
Setting Description Close Session Automatically If you want the system to automatically close the sessions that have been inactive for a specific period of time, select the checkbox, then set the timeout in the Session Timeout (Days) field. 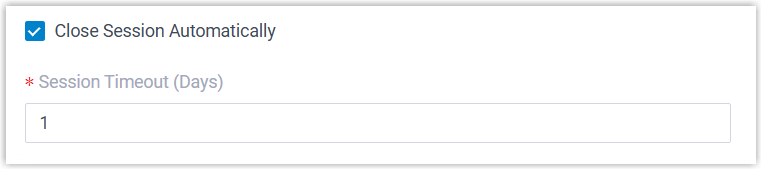
Allow the Creation of Duplicate Active Sessions To allow creating a new session when an active session with the same sender and receiver already exists, select the checkbox. When enabled, if an extension user creates a session on Linkus client and an active session with the same sender and receiver already exists in the system, a pop-up prompt will appear. If the user chooses to continue creating the new session, the original session will be removed from the previous handler's session list, and taken over by the creator, along with the complete chat history.
- Enter WhatsApp phone number information.
- Click Save.
Step 4. Configure webhook in the Meta app
On the 'Meta for Developers' portal, set up a webhook for your Meta app to receive real-time message events. This allows the PBX to process incoming messages from WhatsApp.
- Log in to 'Meta for Developers' portal with your Meta
Developer account, then go to My Apps from the top
menu.
- Click the created app to enter the details page.
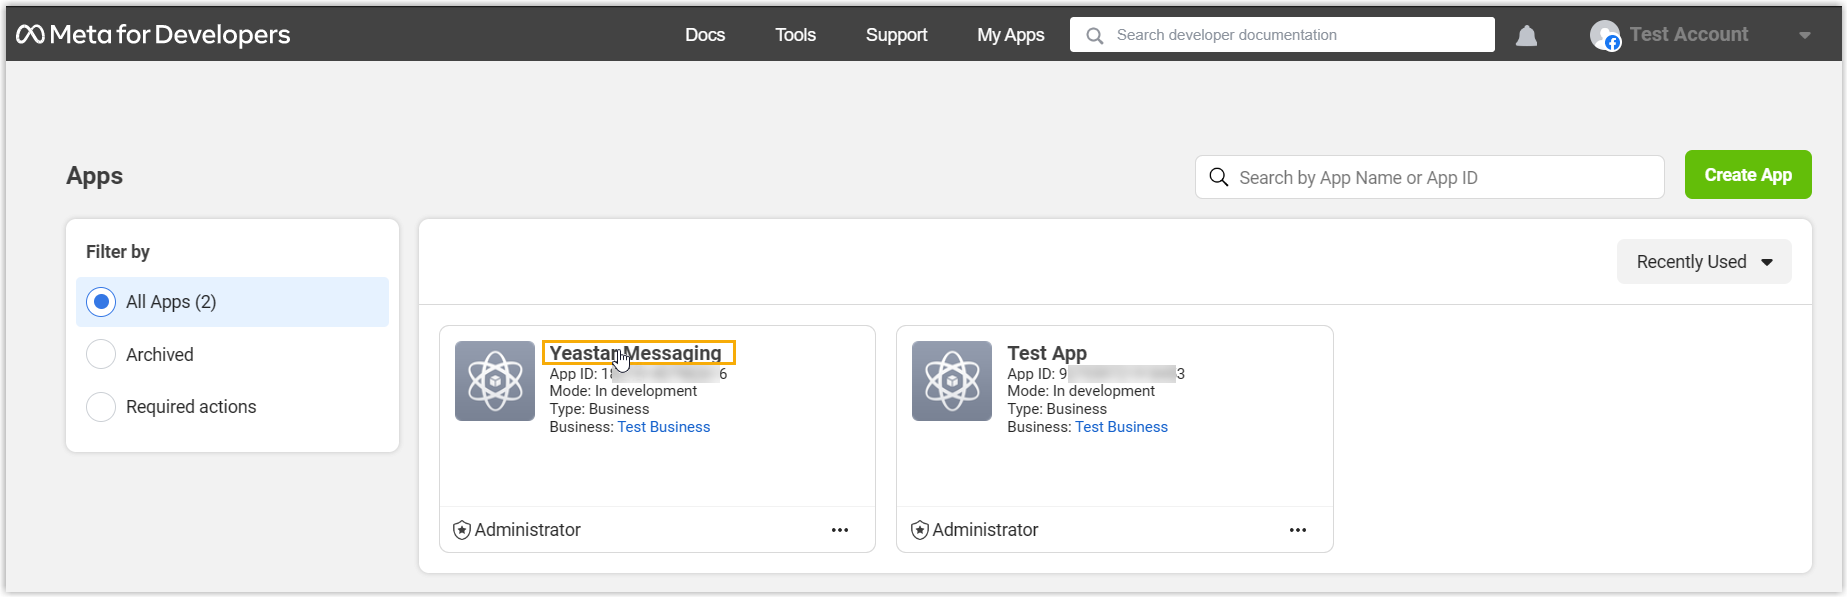
- In
the left navigation bar, go to , configure the messaging webhook and subscribe to webhook
field, so that PBX can get notified upon receiving WhatsApp messages.
- In the Configure Webhooks
section, paste the Webhook URL and verify token obtained from the PBX, then click
Verify and save.
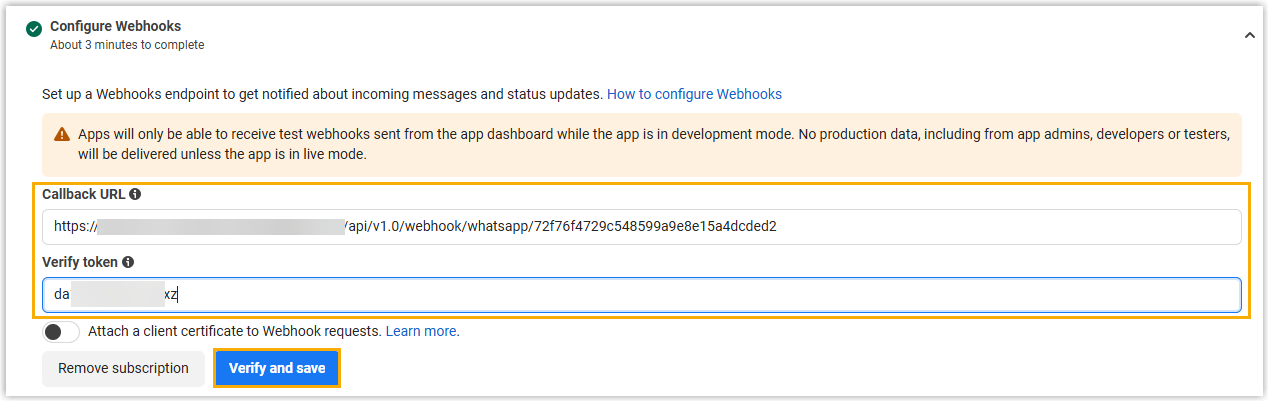
- In the Webhook fields section, subscribe to
messages webhook
field.

- In the Configure Webhooks
section, paste the Webhook URL and verify token obtained from the PBX, then click
Verify and save.
Result
- The Status of the WhatsApp channel shows
 , which
indicates that you have successfully created a WhatsApp channel.
, which
indicates that you have successfully created a WhatsApp channel.
- PBX automatically tracks and records the number of messages sent and
received on the channel, where the Total column
displays the total amount of the sent messages, including both successfully
sent messages and failed ones.Tip: You can filter the statistics by a time period using the time filter.

What to do next
Send text messages to the phone number and see if the specified agent can receive messages on his or her Linkus UC Client.