Create a Register Trunk
This topic gives a configuration example to describe how to create a generic SIP Register Trunk, which can be used with various SIP trunk providers that require registration.
Limitations
You can create up to 50 SIP
trunks.
Note: The number
of trunks created by your colleagues is also included.
Prerequisites
You have purchased a SIP account and
obtained the relevant credentials from your Internet Telephony Service Provider
(ITSP). The example below shows the information typically provided:
-
Provider domain / IP address:
sip.voipglobal.net -
Registration port: 5060
-
Transport protocol: UDP
-
SIP username:
vguser789 -
Authentication name:
vguser789 -
Password:
05JsOmsIS54SYh
Procedure
- Log in to NovoOne Platform portal, go to .
- Click Add.
- In the Basic section, enter the
general information of the trunk.

Setting Description Name Enter a name to identify the trunk. Trunk Status Select Enabled. Select ITSP Template Select General. - In the Detailed Configuration section, enter the SIP
information provided by the ITSP.
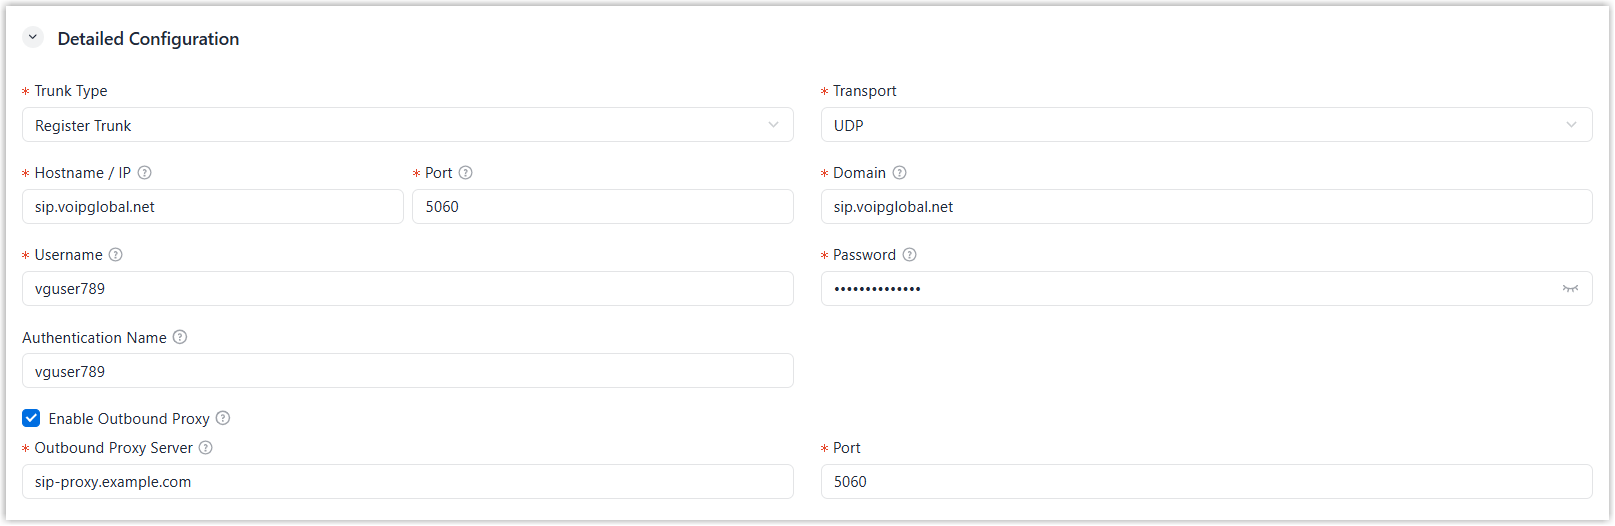
Setting Description Trunk Type Select Register Trunk. Transport Select the transport provided by your ITSP. In this example, select UDP. Hostname / IP Enter the domain name or IP address of the ITSP. In this example, enter sip.voipglobal.net. Port Enter the provided registration port. In this example, enter 5060. Domain Enter the domain name of the ITSP, which will be used in the SIP URI (e.g., in the FromorToheader).Note: If the ITSP does not provide a domain, enter the same value as Hostname/IP.Username Enter the provided user name. In this example, enter vguser789. Password Enter the provided password. In this example, enter 05JsOmsIS54SYh. Authentication Name Enter the provided authentication name. In this example, enter vguser789. Enable Outbound Proxy Optional. Enable this option if your ITSP requires an outbound proxy server, then configure the Outbound Proxy Server and Port with the information provided by your ITSP. When configured, all SIP packets from outbound calls through this trunk will be sent to the outbound proxy server.
- In the Inbound SIP Security
section, specify source IP addresses or domain names that are allowed to
send inbound calls to this trunk, and configure the ports they use.Note:
- The IP address / domain configured in Hostname / IP is trusted by default.
- You can add up to 30 allowed source addresses.
- CIDR notation (e.g.
192.168.1.0/24) is not supported.

- Optional: Go to the Advanced, Inbound Caller ID Reformatting, and SIP Headers tab to configure advanced trunk settings according to your needs.
- Click Save.
Result
- The trunk is created and displayed in the trunk list.
- If the status shows
 (Registered), it
indicates that the trunk has been successfully registered and is ready for
use.
(Registered), it
indicates that the trunk has been successfully registered and is ready for
use.