Connect PBX System to Yeastar Central Management Using Authentication Code
If an end user has in-house IT staffs for routine maintenance of PBX system, but the IT staff has difficulty handling specific system errors, you can connect the PBX system to your Yeastar Central Management using an authentication code. In this way, you can remotely connect to the PBX system without exposing your credential.
Supported devices
Only the following PBX systems can be added and remotely connected to Yeastar Central Management.
| Device Type | Requirement |
|---|---|
| P-Series Appliance Edition | 37.19.0.110 or later |
| P-Series Software Edition | 83.19.0.110 or later |
Prerequisites
Go to My Subscription to check if the capacity of remote management connections is sufficient.
Procedure
Step 1. Generate an authentication code on Yeastar Central Management
- Log in to Yeastar Central Management, go to .
- Click Add to add a device.
- In the pop-up window, complete the following settings:
Setting Description Device Name Enter a name to help you identify the device. Group Optional. To have a group-based control over the device, select a group from the drop-down list. The device will be added to the selected group.
Note: The groups are synchronized from the ones that you have created. For more information, see Add a Device Group.Comment Optional. Add a note. Allow Passwordless Login to PBX To allow your colleagues and yourself to passwordless login to the PBX from Yeastar Central Management, enable the option. Allow Provisioning via Template To allow the remotely connected P-Series Appliance Edition or P-Series Software Edition to be provisioned via a template, enable the option. Note: This feature is mainly used when you need to configure common settings for end user's NEW P-Series PBX. If the PBX is already in use, we recommend that you back up the PBX first as the existing PBX settings will be OVERRIDDEN after provisioning.Verify Serial Number and MAC Address To add a specific device by the authentication code, enable the option and enter corresponding Serial Number and MAC address.Note: If you enable Allow Provisioning via Template, this option will be enabled automatically. You must enter the required information to add the device to Yeastar Central Management.Provisioning Template Optional. Select a template for the P-Series PBX as needed. Important: The system will automatically provision the PBX with the selected template when it is connected to Yeastar Central Management for the first time. The existing PBX settings will be OVERRIDDEN after provisioning.Note:- This option appears only if you have enabled the Allow Provisioning via Template option.
- Templates displayed in the drop-down list are
synchronized from .
For more information about the template, see Create a Provisioning Template.
- Click Save.
The device is added, and an authentication code is generated. You can click
 to copy
the authentication code, or click Send to Email
to send the code to a desired email address.
to copy
the authentication code, or click Send to Email
to send the code to a desired email address.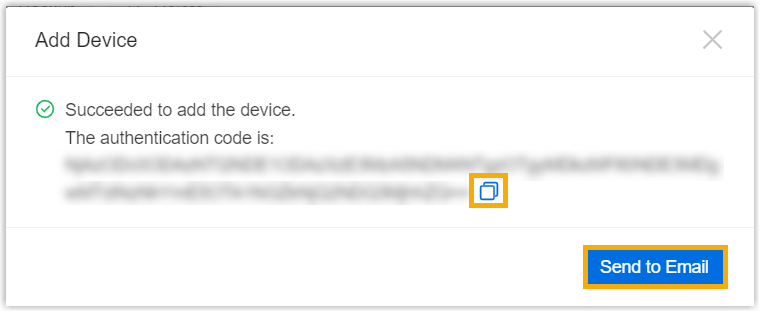
Step 2. Connect PBX system to Yeastar Central Management
Contact end user's IT staff to complete the following settings on PBX management portal.
- Log in to PBX management portal, go to .
- In the Authentication section, do as
follows:

- Remote Connection Server Type: Select Custom.
- Server Address: Enter the IP address or domain of your Yeastar Central Management.
- Activation Method: Select Authentication Code.
- Authentication Code: Paste the authentication code that is generated on Yeastar Central Management.
- Optional:
Configure
remote
login method for secure access to the PBX web
portal as needed.
Method Instruction Account Login If the end user's IT staff want to enable secure remote collaboration without exposing existing account credentials, set an account dedicated for remote access in the Account section.

You can use the credentials set here to log in to the PBX web portal.
Note: Permissions of the account are the same as that of extensions with Administrator role assigned.Passwordless Login For a simplified remote login experience and improved operational efficiency, the IT staff can enable passwordless login in the Password Login section, eliminating the need for entering credentials repeatedly. 
You can log in to the PBX web portal with a Passwordless account via an encrypted link from Yeastar Central Management.
 Note:
Note:- Permissions of the Passwordless account are the same as that of PBX super administrator.
- The PBX system automatically logs out the account after 15 minutes if no operation is performed on the web page.
- Click Save.
Result
PBX System is connected to Yeastar Central Management. You can check connection status as follows:
- On PBX management portal, the connection status is displayed as Connected.
- On Yeastar Central Management, the connection status is displayed as
 .Note: If the PBX device has enabled Hot Standby feature, both the Primary Server and Secondary Server will be added to the device list with a status indicator of Active (
 ) or Standby (
 ); The Hot Standby pair only
occupies one remote management connection.
); The Hot Standby pair only
occupies one remote management connection.
What to do next
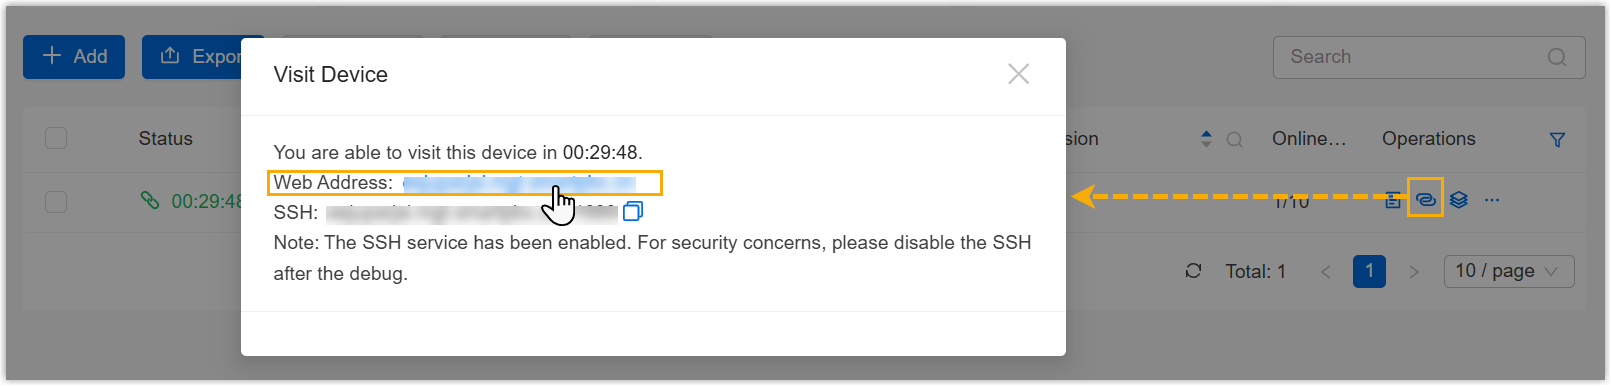
You can access PBX management portal through Yeastar Central Management for further troubleshooting or management.
For more information, see Remotely Visit a PBX System.