Add a CRM Integration Template
Yeastar P-Series PBX System allows you to create and configure custom integration templates, which can be used to seamlessly integrate the PBX with a CRM system via API, enabling data exchange and synchronization. This topic describes how to create a CRM integration template and configure the necessary settings to meet specific operational requirements.
Requirements and restrictions
- Requirements
-
- PBX Server
- Firmware: Version 37.23.0.123 or later.
- Plan: Enterprise Plan (EP) or Ultimate Plan (UP)
- CRM System: Supports REST API.
- PBX Server
- Restrictions
- Supports to add up to 10 custom CRM integration templates.
Prerequisites
- You have basic coding skills.
- You have obtained the REST API documentation of your desired CRM for
reference, and get the following information:
- Authentication method: Identify the
authentication method used by your desired CRM (None, basic, OAuth2,
or Bearer token authentication method are supported).
If OAuth2 or Bearer token authentication method is used, gather the following necessary API endpoints and data specification.
Function Description Authorization The authorization URL to redirect users to the authorization page for authentication and consent. Get access token The API request URL for obtaining an access token. Refresh access token Optional. The API request URL for obtaining a refresh token. - API request information: Collect the
necessary API request URLs and data specification for the following
functions based on the capabilities of the CRM and your specific requirements.
Function Description Search contacts The API request URLs to search contacts within the CRM using specific criteria. Get users Optional. The API request URL to retrieve user information from the CRM. Note: If you need to fetch a large number of users, you should also collect the relevant pagination parameters (such aspage,pageSize,limit, oroffset) to retrieve user information in batches.Create contacts Optional. The API request URL to add new contacts to the CRM. Call journaling Optional. The API request URL to create and/or update call records in the CRM. Chat journaling Optional. The API request URL to create an object (such as a task) in the CRM to store the synced chat data.
- Authentication method: Identify the
authentication method used by your desired CRM (None, basic, OAuth2,
or Bearer token authentication method are supported).
Procedure
- Log in to PBX web portal, go to .
- In the CRM list, click Custom.
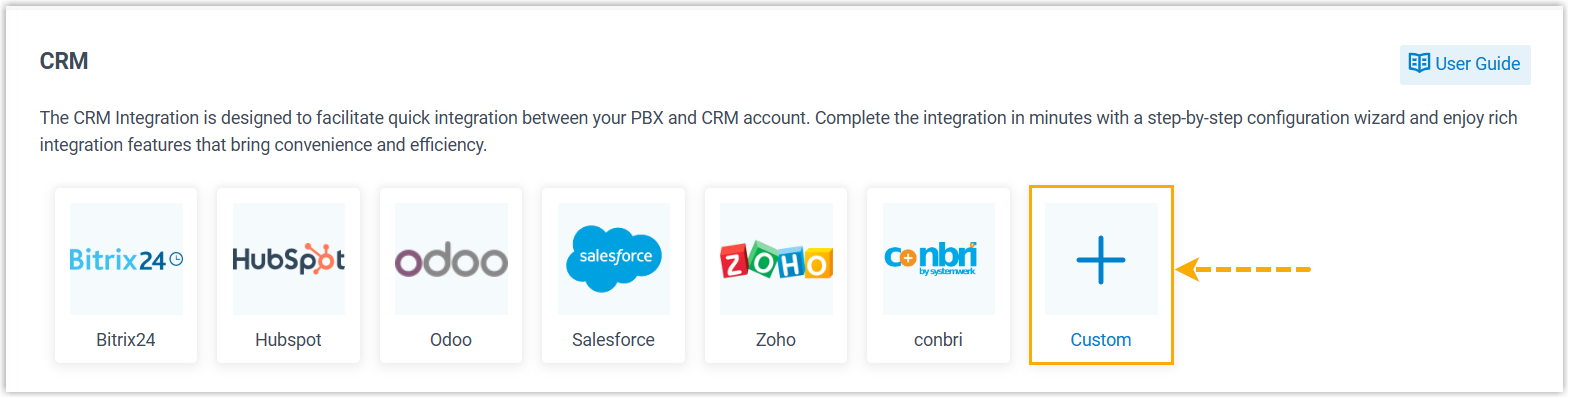
You are redirected to the Template Management page.
- Click Add to add a template.
- In the pop-window, complete the following template settings according to the
capabilities the CRM system and your specific requirements.
- Configure general settings
- (Optional) Configure user association
- Configure authentication method
- (Optional) Configure request headers
- (Optional) Add follow-up requests
- (Optional) Enable connection keepalive
- Configure contacts searching for synchronization and call popup
- (Optional) Configure new contact creation
- (Optional) Configure call journaling
- (Optional) Configure chat journaling
- Click Save to generate a custom CRM integration template.
Configure general settings
In the General section, complete the basic settings for the template.

- Logo: Upload a logo for the CRM, which will be displayed
in the CRM list on the Integration page.Note: The logo file should meet the following requirements:
- File format: PNG (recommended), JPG, or JPEG
- Suggested Resolution: 150 × 150
- File size: Less than 500KB
- CRM Name: Enter the name of the CRM.
- Max Concurrent Request: Specify the maximum number of concurrent HTTP requests allowed to the CRM.
- Remark: Optional. Enter a description for the CRM template, which will be displayed in the Template Management page.
(Optional) Configure user association
In the User Association section, enable and configure the feature to support associating CRM users with PBX extensions.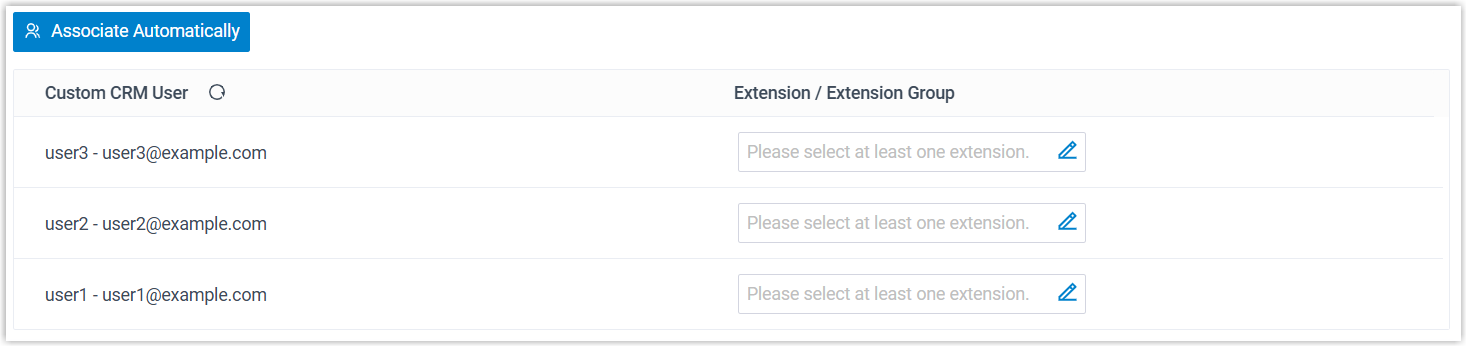
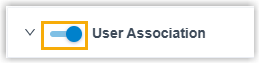
- Turn on the switch of User Association.
- In the Get User field, enter the CRM API request URL for
getting the list of CRM users.
 Note:
Note:- The default HTTP request method is
GET, if you need to use a different request method, you can manually change it in the template later. For more detailed descriptions about the template parameters in this scenario, see XML Description - User Association Scenario. - The values input by the users during the integration authentication process can be used as variables in the template if necessary.
For example,https://www.api.example.com/v1/users?type=ActiveUsers - The default HTTP request method is
- In the Pagination Type drop-down list, select the
appropriate pagination mode according to the CRM requirements.Note: For the pagination modes that require multiple requests, a maximum of 100 requests are supported in a single synchronization operation.
Mode Description Disabled PBX only sends one request and no pagination parameters are required. This mode can be used when the API returns all records in a single response or does not implement pagination.
Page Number Pagination PBX sends multiple requests to retrieve user data based on page number and page size. It automatically increments the page number with each subsequent request until all data is retrieved.
If selected, you need to configure the pagination parameters as follows:

- Page Parameter Name: Enter the parameter name used to specify the page number in API requests.
- Page Start Value: Specify the initial page number from which to start querying data.
- Page Size Parameter Name: Enter the parameter name used to specify the number of records per page in API requests.
- Page Size Value: Specify the maximum number of records to return in a single page.
Offset Pagination PBX sends multiple requests to retrieve user data based on a starting offset and record limit. It automatically increases the offset value by the limit value with each subsequent request until all data is retrieved. If selected, you need to configure the pagination parameters as follows:
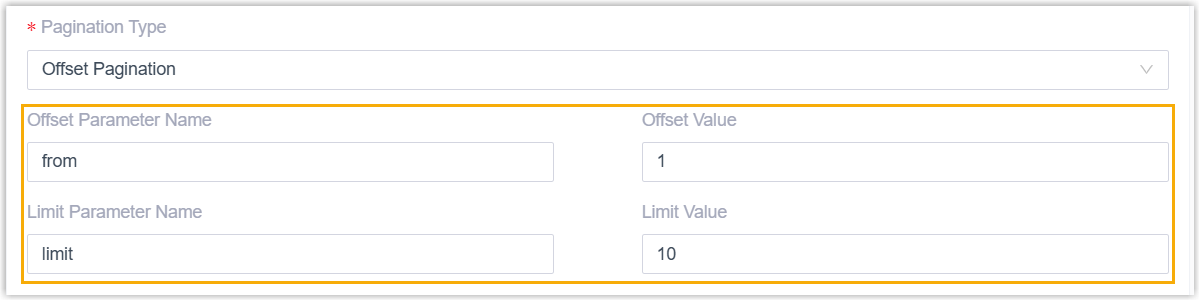
- Offset Parameter Name: Enter the parameter name used to specify the initial offset position for pagination.
- Offset Value: Specify the
starting position for data retrieval.
For example, a value of
1starts from the first record, while100starts retrieval from the 100th record. - Limit Parameter Name: Enter the parameter name used to specify the number of records per page in API requests.
- Limit Value: Specify the maximum number of records to return in a single page.
Link Pagination PBX sends multiple requests to retrieve user data by using the URL pointing to the next page of data in the API response, continuing this process until all data has been retrieved. If selected, you need to specify the JSON path (e.g.
links.next) in the Next Page Link Path field to obtain the link for the next page of data.
- In the User Field Mapping section, map the CRM fields to
the required PBX fields by specifying the JSON path (e.g.
data.#(key=="value").field) for the corresponding fields in the CRM response.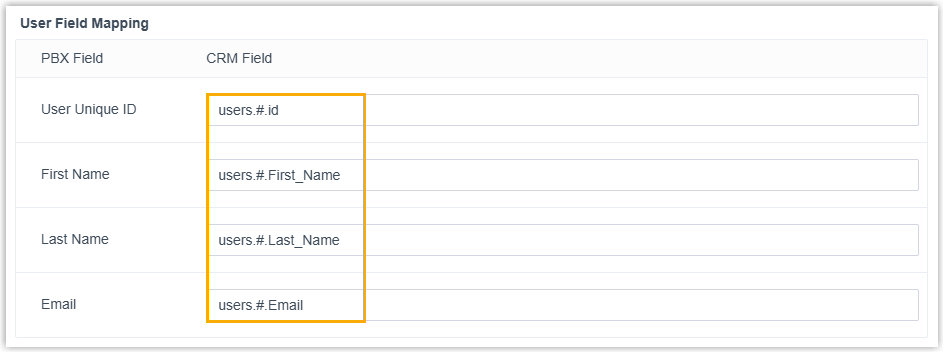 Tip: For more information about the path syntax, see GJSON Path Syntax.
PBX Field Description User Unique ID The unique ID of the user. For example,
users.#.id.First Name The first name of the user, which will be displayed in the CRM user list. For example,
users.#.First_Name.Last Name The last name of the user, which will be displayed in the CRM user list. For example,
users.#.Last_Name.Email The email of the user, which will be displayed in the CRM user list, and can be used for automatic association of CRM users and PBX extensions. For example,
users.#.Email.
Configure authentication method
In the section, configure the authentication method based on the CRM system's requirements.- None authentication
-
This method is used when there is no authentication required, or when the CRM only requires relevant variables for the integration, such as an API Key for the request, or a webhook URL for real-time data delivery.
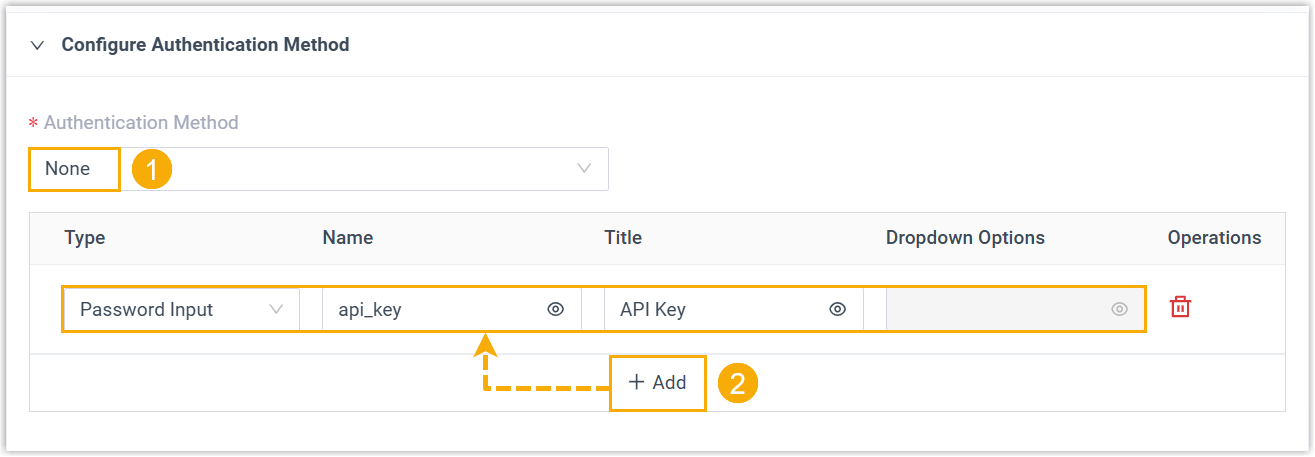
- In the Authentication Method drop-down list, select None.
- Optional: Click Add to add
custom fields, which will be displayed as input field on the
integration page, requiring users to provide the necessary
information for the integration.Note:
- If no fields are added, the CRM will be integrated directly without requiring any additional settings or input from the users.
- Supports up to 5 custom fields.
- The values input by users during the authentication process can be stored as global variables and referenced throughout the integration.
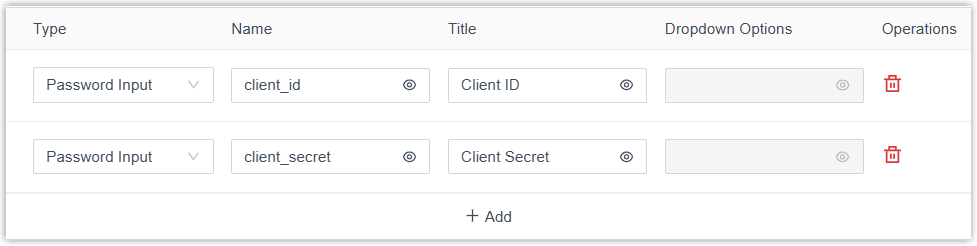
Setting Description Type Select the type of the custom field. - Text Input: A standard input field where users can enter plain text.
- Password Input: A specialized input field for sensitive information, with text masked for privacy.
- Dropdown List: A selectable list that allows users to choose from a pre-defined list of options.
Name Specify the variable name for the field, which can be referenced within the template as needed. Title Specify the title for the field, which will be display above the input component. Dropdown Options If the Type is set to Dropdown List, enter the options in this field. Note: Use commas to separate multiple options. For example,option1,option2.
- Basic authentication
- This method authenticate requests using credentials, such as username
and password or an API key. In this case, every HTTP request sent to the
CRM will include a header field in the format of
Authorization:
                                Basic {{.basic_string}}
, where {{.basic_string}} is the Base64-encoded combination of the username and password or API key specified during the integration.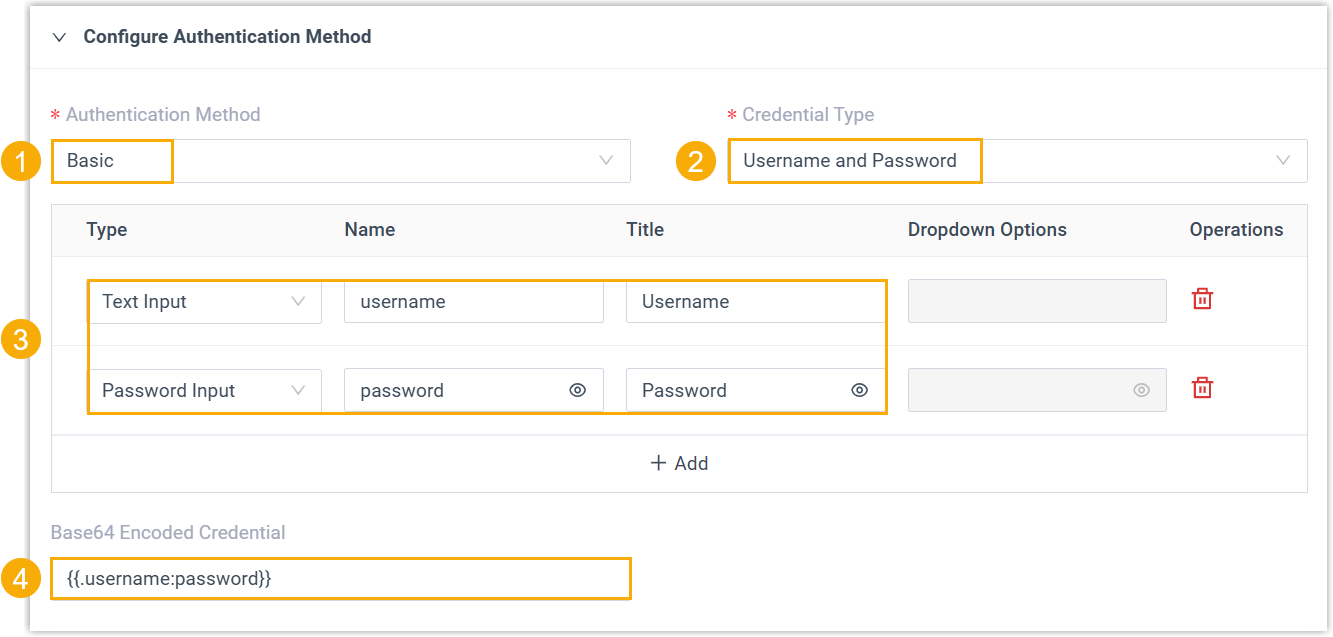
- In the Authentication Method drop-down list, select Basic.
- In the Credential Type drop-down list, select Username and Password or API Key according to the CRM system's requirements.
- Configure the required fields for users to enter credentials,
and add additional custom fields if needed.Note:
- Supports up to 5 fields.
- The values input by users during the authentication process can be stored as global variables and referenced throughout the integration.
Setting Description Type Select the type of the custom field. - Text Input: A standard input field where users can enter plain text.
- Password Input: A specialized input field for sensitive information, with text masked for privacy.
- Dropdown List: A selectable list that allows users to choose from a pre-defined list of options.
Name Specify the variable name for the field, which can be referenced within the template as needed. Title Specify the title for the field, which will be display above the input component. Dropdown Options If the Type is set to Dropdown List, enter the options in this field. Note: Use commas to separate multiple options. For example,option1,option2. - In the Base64 Encoded Credential field,
define the combination format of the credential variables, which
will be used to generate the basic authentication string
(basic_string).
For example,
{{.username}}:{{.password}}or{{.api_key}}.
- OAuth2 authentication
-
This method uses tokens to grant access without sharing credentials. It requires obtaining the necessary header and other parameters (e.g. OAuth access token) using specific API requests to the CRM. OAuth2 authentication supports both the Standard Authorization Code flow and the Authorization Code with PKCE (Proof Key for Code Exchange) flow.
- Set the authentication method and the authorization
mode.
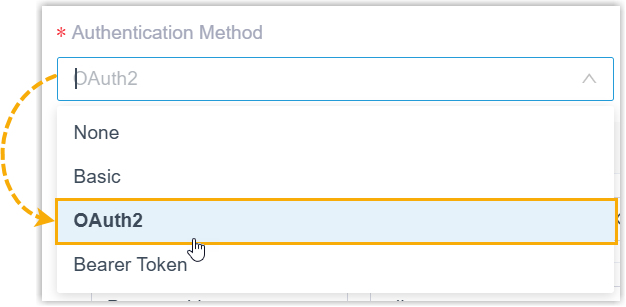
- In the Authentication Method drop-down list, select OAuth2.
- In the Authorization Mode
drop-down list, select the appropriate mode.
Mode Description Standard Authorization Code This mode requires client_secret. Use it when the CRM expects aclient_secretfor authentication.Authorization Code (PKCE) This mode makes the client_secretoptional. Use it when the CRM supports PKCE authorization, as this provides an extra layer of security in addition toclient_secret.In this mode, the client (i.e. PBX) generates a
code_verifier, hashes it with SHA256 and encodes it with Base64URL to create acode_challenge, and sends this value to the authorization server upfront. The client stores the originalcode_verifierlocally and presents it later during token exchange. The authorization server hashes the submittedcode_verifierusing the same method and compares it to the storedcode_challenge. If they match, it proves that the client holds the originalcode_verifier, and only such a client can exchange the authorization code for an access token, effectively preventing interception attacks.
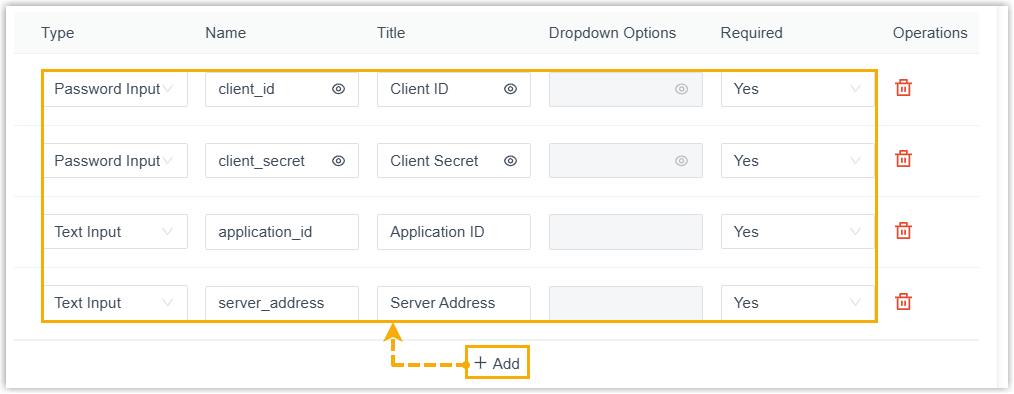
- Configure the required fields for users to enter
credentials.
 Note:
Note:- Supports to add up to 10 fields. If more fields are required, you need to manually add custom fields in the template later. For more detailed descriptions about the template parameters in this scenario, see XML Description - Authentication Scenario.
- The values input by users during the authentication process can be stored as global variables and referenced throughout the integration.
Setting Description Type Select the type of the custom field. - Text Input: A standard input field where users can enter plain text.
- Password Input: A specialized input field for sensitive information, with text masked for privacy.
- Dropdown List: A selectable list that allows users to choose from a pre-defined list of options.
Name Specify the variable name for the field, which can be referenced within the template as needed. Title Specify the title for the field, which will be display above the input component. Dropdown Options If the Type is set to Dropdown List, enter the options in this field. Note: Use commas to separate multiple options. For example,option1,option2.Required Specify whether the field is mandatory. - Yes: The field is required.
- No: The field is optional and can be left blank.
- Configure the OAuth2 Authorization settings.
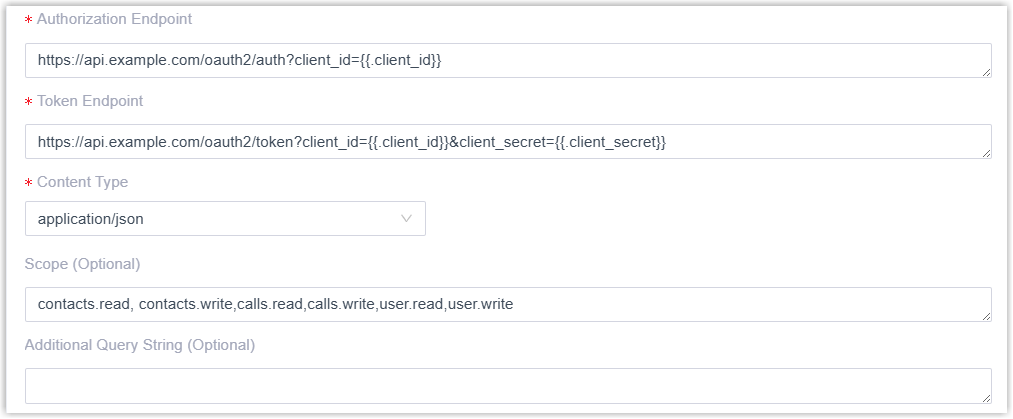
Setting Description Authorization Endpoint Enter the CRM authorization URL, to which users will be redirected for authorization during integration. For example,
https://www.api.example.com/auth/v2/authorize?client_id={{.client_id}}Token Endpoint Enter the CRM API request URL for obtaining an access token and refresh token. For example,
https://www.api.example.com/oauth/v2/token?client_id={{.client_id}}&client_secret={{.client_secret}}Content Type Select the content type of the token retrieval request. PKCE Verification Method Select how to transform the code_verifierintocode_challenge.Note: This setting is available only when the Authorization Mode is set to Authorization Code (PKCE).- S256: Hash the
code_verifierwith SHA256 and encode it with Base64URL to generate thecode_challenge(recommended). - Plain: Use the
code_verifierdirectly as thecode_challengewithout hashing or encoding. Compatible with systems that do not support SHA256.
Scope Optional. Enter the scope to specify the data in the CRM that the PBX is allowed to access. Note: Use comma to separate multiple fields.For example,
contacts.read,contacts.write,calls.read,calls.write,user.read,user.writeAdditional Query String Optional. If the CRM system authenticates requests using query parameters instead of scope, add the query parameters in this field. For example,
client_id={{.client_id}}&redirect_uri={{.redirect_uri}}. - S256: Hash the
- Optional: Configure token refresh
settings as needed.
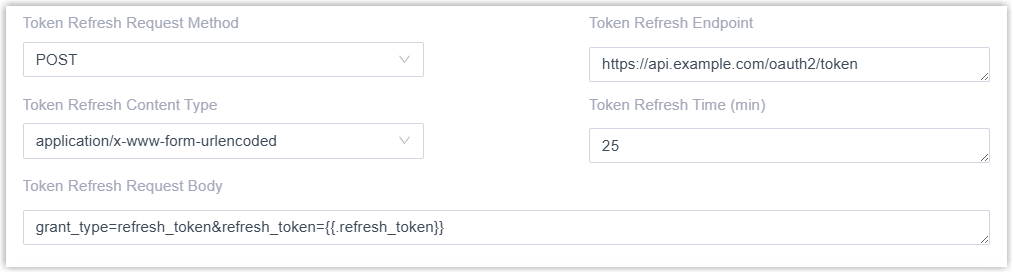
Setting Description Token Refresh Request Method Select the HTTP request method for the token refresh API. Token Refresh Endpoint Enter the API request URL for refreshing the access token. Token Refresh Content Type Select the content type of the token refresh request. Token Refresh Time (min) Specify how often (in minutes) the system should automatically refresh the access token. Note:- If set to 0, the system will not refresh the token automatically.
- If left blank, the system will automatically refresh the access token every 25 minutes by default.
Token Refresh Request Body The request body for the token refresh API.
- Set the authentication method and the authorization
mode.
- Bearer Token authentication
- This method authenticates requests using a bearer token, which is
typically obtained through an authorization process (such as OAuth2).
Every HTTP request sent to the CRM must include a header field in the
format of
Authorization: Bearer {{.AccessToken}}, where{{.AccessToken}}is the token value granted by the CRM. -
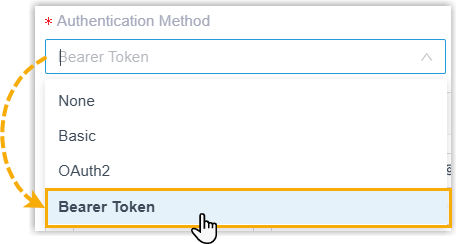
- In the Authentication Method drop-down
list, select Bearer Token.
- Configure the required fields for users to enter credentials,
and add additional custom fields if needed.
 Note:
Note:- Supports up to 10 fields.
- The values input by users during the authentication process can be stored as global variables and referenced throughout the integration.
Setting Description Type Select the type of the custom field. - Text Input: A standard input field where users can enter plain text.
- Password Input: A specialized input field for sensitive information, with text masked for privacy.
- Dropdown List: A selectable list that allows users to choose from a pre-defined list of options.
Name Specify the variable name for the field, which can be referenced within the template as needed. Title Specify the title for the field, which will be display above the input component. Dropdown Options If the Type is set to Dropdown List, enter the options in this field. Note: Use commas to separate multiple options. For example,option1,option2. - Configure token retrieval settings according to the API
specification.

Setting Description Token Endpoint Enter the CRM API request URL to request an access token. For example,
The token obtained from the endpoint will be stored in the variable {{.AccessToken}}.https://www.api.example.com/oauth/v2/token?client_id={{.client_id}}&client_secret={{.client_secret}}&grant_type=client_credentialsContent Type Select the content type of the token retrieval request. - Optional: Configure token refresh
settings as needed.
Setting Description Token Refresh Request Method Select the HTTP request method for the token refresh API. Token Refresh Endpoint Enter the API request URL for refreshing the access token. Token Refresh Content Type Select the content type of the token refresh request. Token Refresh Time (min) Specify how often (in minutes) the system should automatically refresh the access token. Note:- If set to 0, the system will not refresh the token automatically.
- If left blank, the system will automatically refresh the access token every 25 minutes by default.
Token Refresh Request Body The request body for the token refresh API.
- In the Authentication Method drop-down
list, select Bearer Token.
(Optional) Configure request headers
-
Supports to add up to 20 custom headers.
-
These custom headers will not be applied to the authentication-related requests (e.g. obtaining or refreshing an access token) and custom-configured requests.
- Avoid defining the
Authorizationheader here, as it will override the header values obtained through the Basic, OAuth2, or Bearer Token authentication flow.
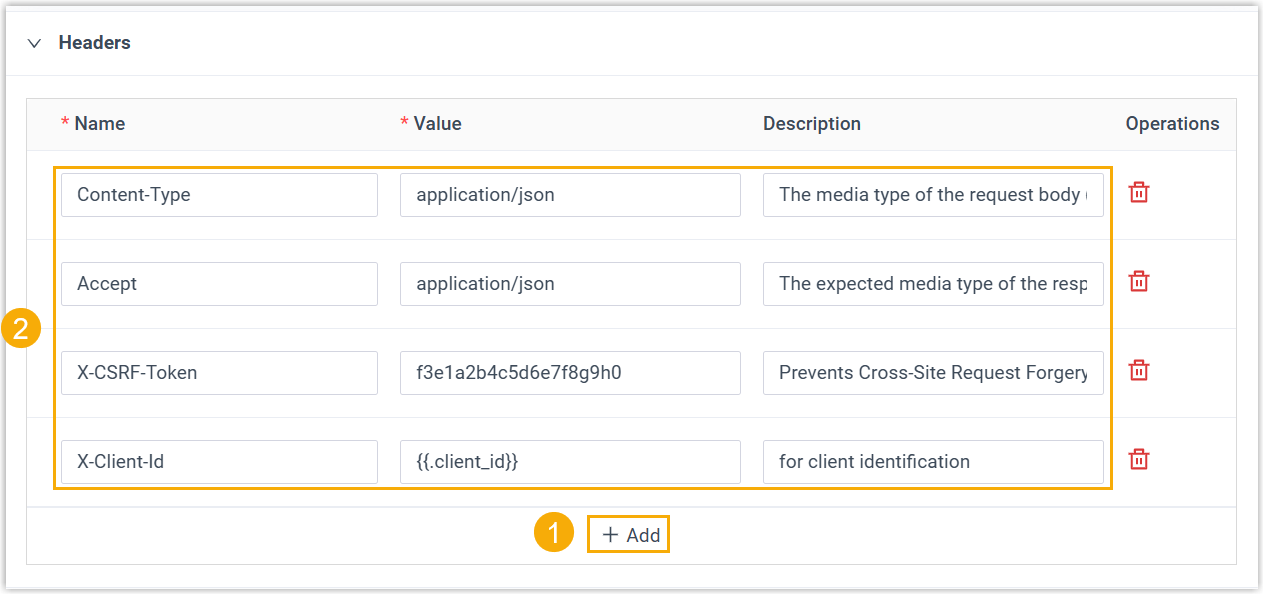
- In the section, click Add.
- Add and configure the desired header.
Setting Description Name Header name, such as Content-Typefor content type orAcceptfor expected data format.Value Header value, either a specific value or a variable. Note: The variables defined in the Authentication Method can also be used. For example, if a variable namedclient_idis set, you can reference it in the header value as{{.client_id}}.Description A brief explanation of the header’s function or purpose for reference.
(Optional) Add follow-up requests
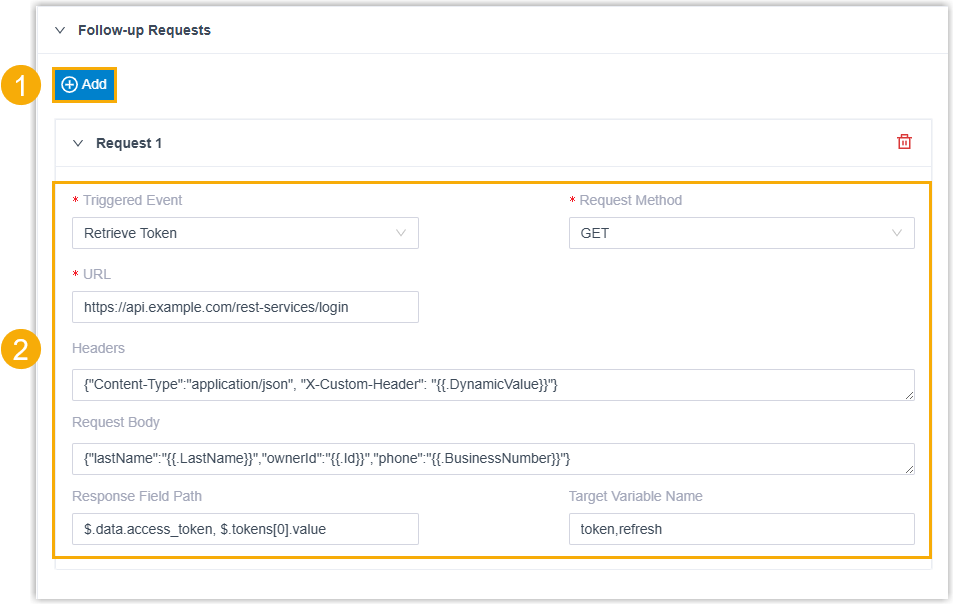
- In the section, click Add.
- Configure the details of the follow-up request.
Setting Description Triggered Event Specify the event that triggers this follow-up request. Request Method Select the HTTP method for the API request. URL Enter the endpoint URL for the subsequent operation. For example,https://api.example.com/rest-services/loginHeaders Define HTTP headers of the request as a JSON object. You can use {{.varname}} to insert dynamic values. For example,
{"Content-Type":"application/json", "X-Custom-Header": "{{.DynamicValue}}"}Request Body Define the data payload of the request as a JSON object. You can use {{.varname}} to insert dynamic values. For example,{"lastName":"{{.LastName}}","ownerId":"{{.Id}}","phone":"{{.BusinessNumber}}"}Response Field Path Define the JSON path to extract data from the response of this follow-up request. Note: Use commas,to separate multiple paths. For example,.data.access_token, .tokens[0].valueTarget Variable Name Define the name of the system variable to store the value extracted from the response, which can be existing variables or new custom variables. The variable value can be stored as global variables and referenced throughout the integration. Note:- Use commas
,to separate multiple variable names. For example,token,refresh. -
The variables are assigned in the same order as the fields specified in the Response Field Path. For example, the first variable receives the value from the first JSONPath, the second variable receives the value from the second JSONPath, and so on.
- Use commas
(Optional) Enable connection keepalive
Configure connection keep-alive to prevent the connection from being closed due to network timeout or inactivity. When enabled, the system will send keep-alive requests to the CRM at the specified interval to monitor connection status and authentication validity.

- Turn on the switch of Connection Keepalive.
- In the Keepalive Interval (minutes) field, set the interval for sending keep-alive request.
Configure contacts searching for synchronization and call popup
- Add and configure contact types and specify the corresponding API
requests.

- Contact Type: Enter the
name of the contact type. For example
Contacts.The name set here will appear as an option for automatic contact synchronization when users configure the integration features.
- Contact Match Query URL: Enter the CRM API
request URL used to search for contacts with specific criteria.
In this scenario, the following variables can be used as the values of criteria parameters:
- The variables obtained from user input during the integration authentication process.
- The target variables extracted from the response of follow-up requests.
- {{.Phone}}: The phone number associated with inbound or outbound calls, or the number entered by users for contact searching.
For example,https://www.api.example.com/crm/v1/Contacts/search?criteria=((Phone:equals:{{.Phone}})or(Home_Phone:equals:{{.Phone}})or(Mobile:equals:{{.Phone}})or(Asst_Phone:equals:{{.Phone}}))
- Contact Type: Enter the
name of the contact type. For example
- Configure the URL for call popup using one of the following methods.
- Specify URL Format
- Configure the call popup URL by specifying the URL format, where you can use variables to dynamically construct the URL.

- Retrieve from Contact Fields
- Extract the Contact URL directly from a specific field in
the contact search response, where the contact URL can be
retrieved.

- In the Contact Popup URL drop-down list, select Retrieve from Contact Fields.
- In the Contact Field for URL
field, specify the JSON path for the corresponding
field in the response. For example,
data.#.contactUrl.
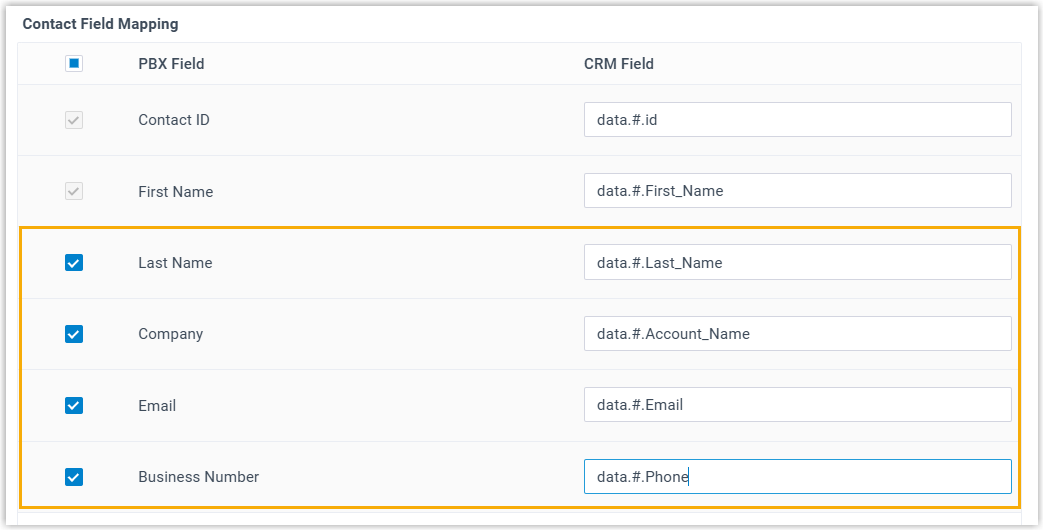
- In the Contact Field Mapping section, map the CRM
fields to the required PBX fields by specifying the JSON path (e.g.
data.#(key=="value").field) for the corresponding fields in the CRM response.Note:- The mapped field values retrieved from a call are stored as variables and can be referenced across modules throughout the call until it ends.
- If more than one variable need to be retrieved for a field, use
commas to separate the variables. This applies only to phone
number fields, for example,
data.#(phone=="{{.Phone}}")#.phone,data.#(mobile=="{{.Phone}}")#.mobile.
- Map the following required fields.
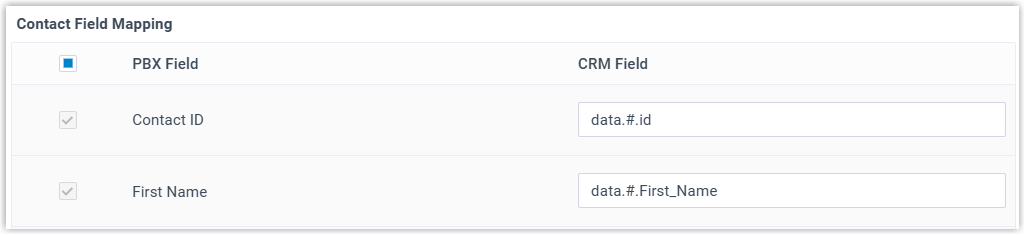
- Contact ID: The ID of
the searched contact. For example,
data.0.id. - First Name: The first name of the
searched contact. For example,
data.0.First_Name.
- Contact ID: The ID of
the searched contact. For example,
- Enable and map the respective PBX fields according to your
needs.Note: You need to enable and map at least one phone number.
- If the existing PBX fields do not provide the
variables you need, enable and map the desired response field to the
Custom Value field, which can be
referenced in the template with the variable name
{{.CustomValue}}.Note: This variable is specially used for constructing the Contact URL, and will not appear in the PBX contact details.

(Optional) Configure new contact creation
If you want to enable the creation of a new contact in the CRM when the caller’s number does not match any existing CRM contact, enable and configure the Create New Contact settings.

- Turn on the switch of Create New Contact.
- Add and configure the contact types available for users to select when
configuring integration features.
- Contact Type: Specify the type of the
contact. For example,
Contacts. - Contact Creation URL (POST): Enter the CRM
API request URL used to create a new contact.For example,
https://www.api.example.com/crm/v1/Contacts - Contact Creation Request Body: Enter the
request body (in JSON format) to pass the contact information.In this scenario, the following variables can be used:
- The variables obtained from user input during the integration authentication process.
- The target variables extracted from the response of follow-up requests.
- {{.LastName}}: Required. The last name of the contact.
- {{.FirstName}}: Required. The first name of the contact.
- {{.BusinessNumber}}: Required. The phone number of the contact.
Note: If the provided variables do not meet your requirements, you can manually edit the template later to define additional custom variables and retrieve the corresponding values. For more detailed descriptions about the template parameters in this scenario, see XML Description - Retrieve Additional Variables.For example,{ "data": [ { "Last_Name": "{{.LastName}}", "First_Name": "{{.FirstName}}", "Phone": "{{.BusinessNumber}}" } ] }
- Contact Type: Specify the type of the
contact. For example,
(Optional) Configure call journaling
If you want to enable call journaling to automatically log call activities and details into the CRM, enable and configure the Call Journal feature.
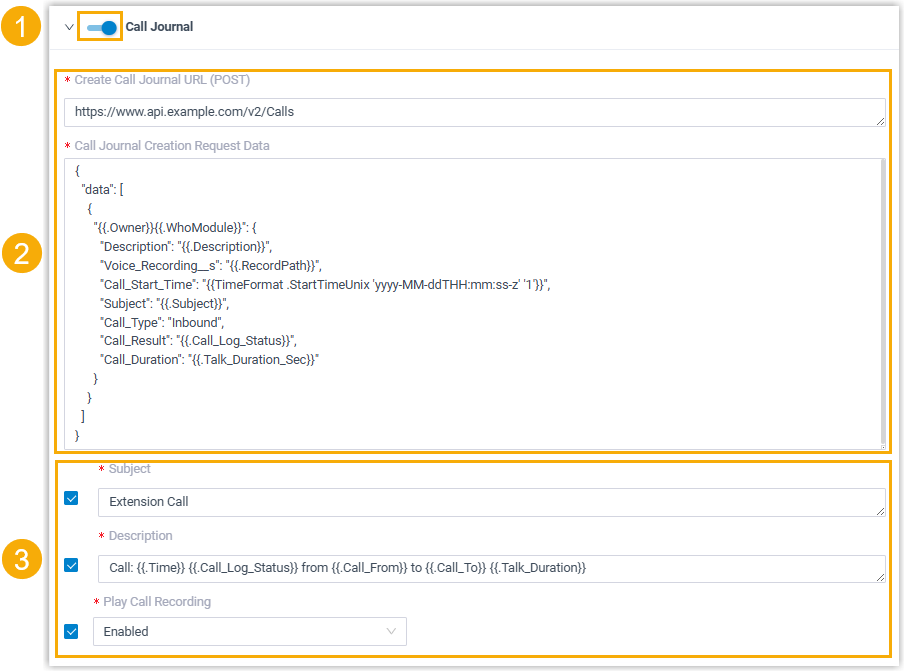
- Turn on the switch of Call Journal.
- Configure the API request and body for call journaling.
- Configure the call journal creation request to create a new call log
in the CRM.
- Create Call Journal URL: Enter the
CRM API request URL used to create a call log in the
CRM.For example,
https://www.api.example.com/v2/Calls - Create Call Log Request Method: Select the request method (POST or PUT).
- Call Journal Creation Request Body:
Enter the request body (in JSON format) to pass the call details.Note: For the variables supported in the request body, see XML Description - Call Journal Variables.For example,
{
  "data": [
    {
      "{{.Owner}}{{.WhoModule}}": {
        "Description": "{{.Description}}",
        "Voice_Recording__s": "{{.RecordPath}}",
        "Call_Start_Time": "{{TimeFormat .StartTimeUnix 'yyyy-MM-ddTHH:mm:ss-z' '1'}}",
        "Subject": "{{.Subject}}",
        "Call_Type": "Inbound",
        "Call_Result": "{{.Call_Log_Status}}",
        "Call_Duration": "{{.Talk_Duration_Sec}}"
      }
    }
  ]
}
- Create Call Journal URL: Enter the
CRM API request URL used to create a call log in the
CRM.
- Optional: Configure the call journal update request to update
an existing call log with additional information.
- Update Call Journal URL: Enter the
CRM API request URL used to update a call log in the
CRM.For example,
https://www.api.example.com/v2/Calls/{{.CallId}} - Update Call Log Request Method: Select the request method (POST or PUT).
- Call Journal Update Request Body:
Enter the request body (in JSON format) to pass the call details.Note: For the variables supported in the request body, see XML Description - Call Journal Variables.For example,
{
  "data": [
    {
      "{{.Owner}}{{.WhoModule}}": {
        "Description": "{{.Description}}",
        "Voice_Recording__s": "{{.RecordPath}}",
        "Call_Start_Time": "{{TimeFormat .StartTimeUnix 'yyyy-MM-ddTHH:mm:ss-z' '1'}}",
        "Subject": "{{.Subject}}",
        "Call_Type": "Inbound",
        "Call_Result": "{{.Call_Log_Status}}",
        "Call_Duration": "{{.Talk_Duration_Sec}}",
        "Call_Note": "{{.Call_Note}}"
      }
    }
  ]
}
- Update Call Journal URL: Enter the
CRM API request URL used to update a call log in the
CRM.
- Configure the call journal creation request to create a new call log
in the CRM.
- Optional: To configure which call journaling settings will be
provided in the integration, select the checkbox of the desired options, and
set their default values.
Option Description Subject If enabled, the corresponding setting will be available to configure in the integration. This can be used to set a default subject for all synchronized call logs. Note:- The values set in these fields will also be captured as variable values if necessary.
- For more information about the supported variables, see XML Description - Call Journal Variables.
Description If enabled, the corresponding setting will be available to configure in the integration. This can be used to specify the details of the synchronized call logs. For example,Call: {{.Time}} {{.Call_Log_Status}} from {{.Call_From}} to {{.Call_To}} {{.Talk_Duration}}Note:- The values set in these fields will also be captured as variable values if necessary.
- For more information about the supported variables, see XML Description - Call Journal Variables.
Play Call Recording If enabled, the corresponding setting will be available to configure in the integration. This can be used to determine whether to enable call recording playback within the CRM. Disable Display Missed Call Records in Unanswered Agents If enabled, the corresponding setting will be available to configure in the integration. This can be used to determine whether call logs for queue and ring group calls are synchronized only to the CRM of the agent who answered the call, while missed call logs for the same call are not synchronized to the CRM of agents who did not answer.
(Optional) Configure chat journaling
If you want to enable chat journaling to automatically synchronize chat messages with CRM contacts into the CRM, enable and configure the Chat Journal feature.
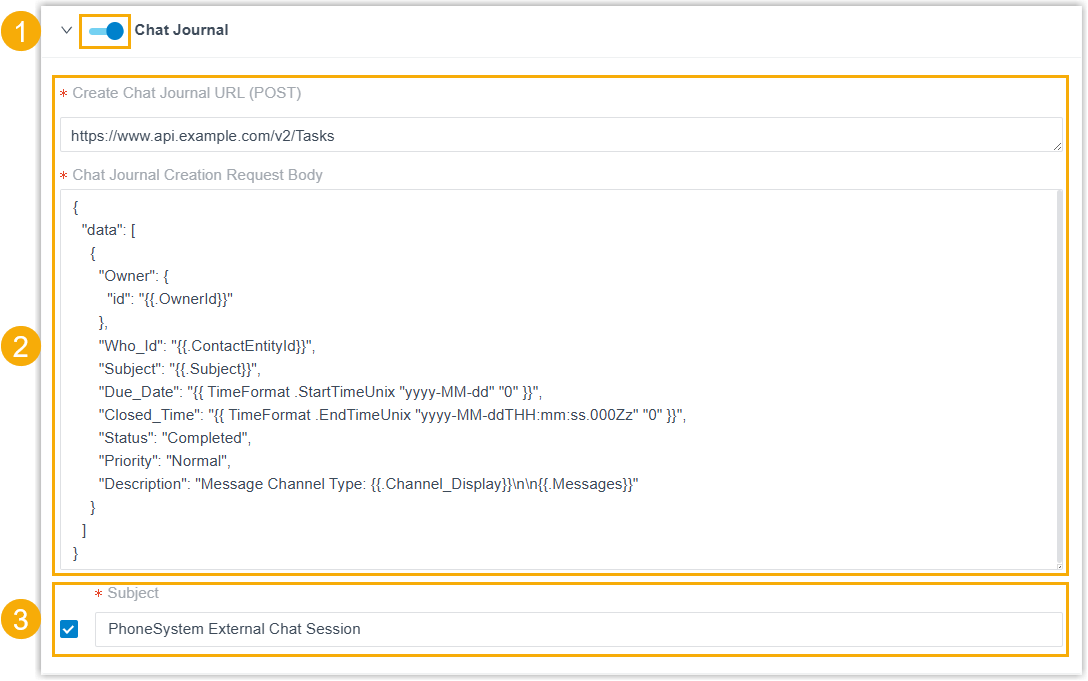
- Turn on the switch of Chat Journal.
- Configure the API request and body for chat journaling.
- Create Chat Journal URL (POST): Enter the CRM
API request URL used to create an object for storing chat messages
in the CRM.For example,
https://www.api.example.com/v2/Tasks - Chat Journal Creation Request Body: Enter the
request body (in JSON format) to pass the chat details.Note: For the variables supported in the request body, see XML Description - Chat Journal Variables.For example,
{
  "data": [
    {
      "Owner": {
        "id": "{{.OwnerId}}"
      },
      "Who_Id": "{{.ContactEntityId}}",
      "Subject": "{{.Subject}}",
      "Due_Date": "{{ TimeFormat .StartTimeUnix "yyyy-MM-dd" "0" }}",
      "Closed_Time": "{{ TimeFormat .EndTimeUnix "yyyy-MM-ddTHH:mm:ss.000Zz" "0" }}",
      "Status": "Completed",
      "Priority": "Normal",
      "Description": "Message Channel Type: {{.Channel_Display}}\n\n{{.Messages}}"
    }
  ]
}
- Create Chat Journal URL (POST): Enter the CRM
API request URL used to create an object for storing chat messages
in the CRM.
- Optional: In the Subject section, decide
whether to allow users to customize the subject of the synchronized record.
- Select the checkbox.
The corresponding Subject field will be available to configure in the integration. This can be used to set a default subject for all synchronized records.
- Set the default value for the Subject
field.Note:
- The values set in this field will also be captured as variable values if necessary.
- For more information about the supported variables, see XML Description -Chat Journal Variables.
- Select the checkbox.