This guide is based on Mitel 6867i v4.1.0.148 and Yeastar Cloud PBX
v81.8.0.7.
Note: For the IP phone with different firmware version, the web GUI may be
different.
-
Log in the web page of the phone.
- Username: admin
- Password: 22222
-
Go to Advanced section, choose a line to
configure.
-
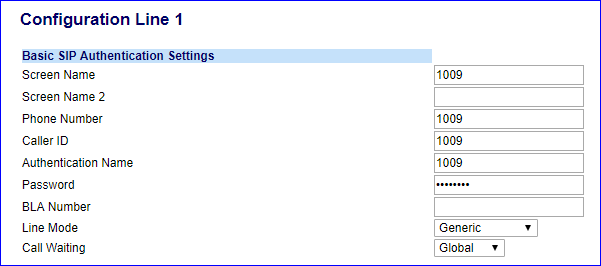
In the Basic SIP Authentication Settings, enter
the extension information.
- Screen Name: Set the name that you want
to display on the phone screen.
- Phone Number: Fill in the extension
number.
- Caller ID: Fill in the extension's
Caller ID.
- Authentication Name: Fill in the
extension's Registration Name.
- Password: Fill in the extension's
Registration Password.
-
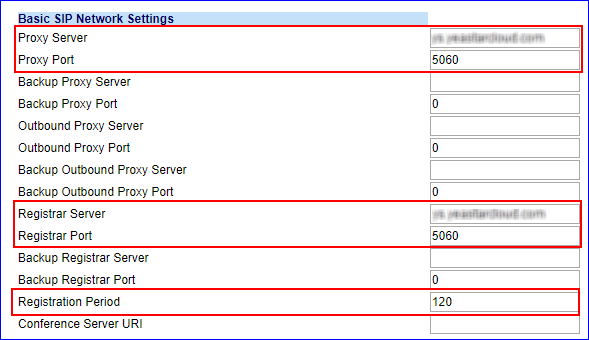
In the Basic SIP Network Settings, enter the PBX
information.
- Proxy Server: Fill in the domain of your
PBX.
- Proxy Port: Fill in the same SIP port of
the PBX. The default SIP port on the PBX is 5060.
- Registrar Server: Fill in the domain of your
PBX.
- Registrar Port: Fill in the same SIP port
of the PBX. The default SIP port on the PBX is 5060.
- Registration Period: Set the registration
period according to the settings on your PBX. The default range
of SIP registration time on the PBX is 60-3600 seconds.
-
Click Save Settings.
-
Go to , set the RTP settings and codec preferences.
-
In the RTP Settings section, configure the RTP
according to the settings on your PBX.
- Force RFC2833 Out-of-Band DTMF:
Enabled
- DTMF Method: RTP
- RTP Encryption: If you don't enable SRTP
for the extension, choose SRTP
Disabled.
-
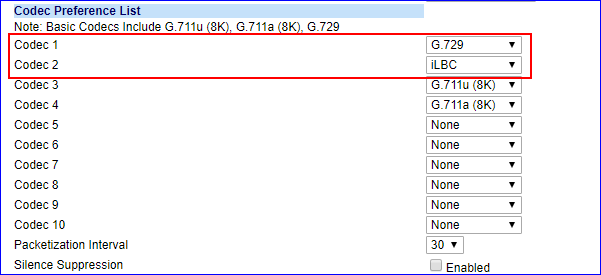
In the Codec Preference List section, set the
codec preferences according your PBX settings.
Note: G729 and iLBC are the default enabled codecs on the PBX, you
should enable the G729 codec or the iLBC codec on your phone.
-
Click Save Settings.
-
Reboot the phone to make the configuration take effect.
You can check the extension status via . If the extension is registered, the status shows
"Registered".


