Customize Your Own Brand of Software PBXs
After subscribing to PSE White Label service for your Partner Portal account, you can set up white label template on Yeastar Central Management and apply the template to your software PBXs.
Prerequisites
-
You have subscribed to PSE White Label service on Yeastar Partner Portal.
- You have upgraded P-Series Software Edition to version 83.21.0.117 or later.
Step 1. Set up white label template
- Log in to Yeastar Central Management, go to .
A default neutral template is displayed in the list.

- At the top-left corner, click Add to create a white
label template.

- Optional: If you have set up Cloud PBX white label template or
Yeastar Central Management branding, you can import the settings for quick
configuration on PSE white label template.
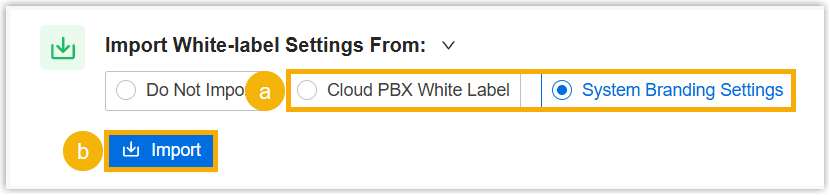
- In the Import White-label Settings From drop-down list, select Cloud PBX White Label or System Branding Settings.
- Click Import.
- Follow the instructions to change the settings as needed.
- Set up the white label template as needed.
- In the Basic Information section, specify
template name and preference.

Setting Description White Label Name Enter a name to help you identify the template. Set as the default option for Partner Portal purchase If you want to set the template as your default white label template, enable this option. In this way, when you try or purchase P-Series Software Edition on Yeastar Partner Portal, the template will be automatically applied.
- In the Brand Information section, customize
your own branding.Note: Brand information will be displayed in PBX management portal and Linkus UC Clients.
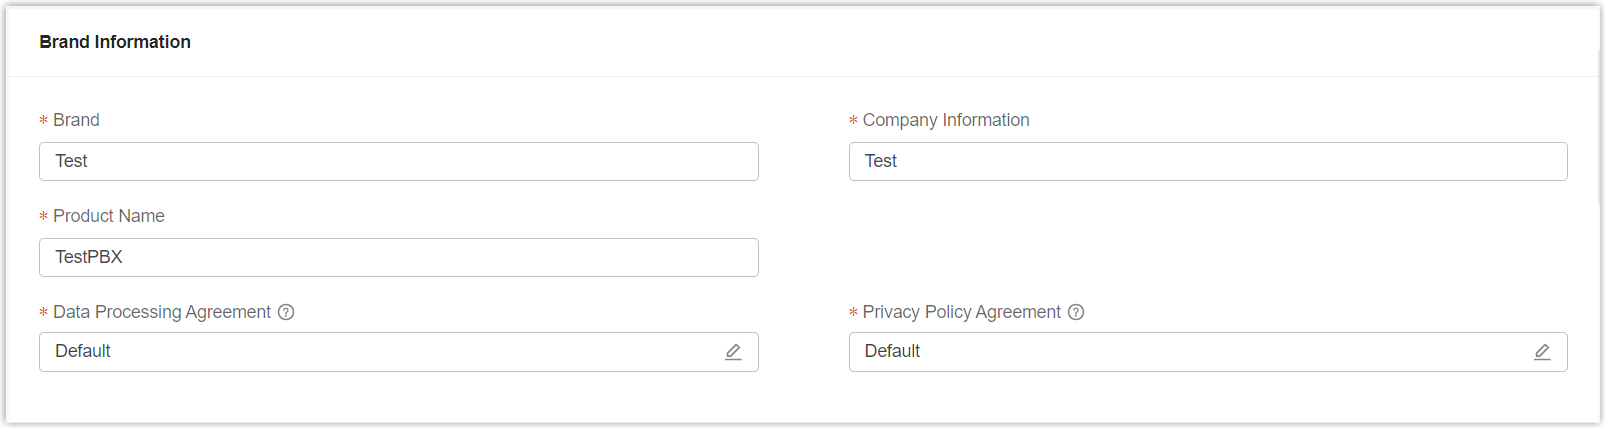
Setting Description Brand Enter your brand name. Company Information Enter your company information. Product Name Specify a product name. Data Processing Agreement Optional. If you want to customize the agreement, click  to choose
Custom template and edit it
as needed.Note: This agreement is only accessible to PBX super administrator from PBX management portal.
to choose
Custom template and edit it
as needed.Note: This agreement is only accessible to PBX super administrator from PBX management portal.Privacy Policy Agreement Optional. If you want to customize the agreement, click to choose
Custom template and edit it
as needed.Note: This agreement is accessible to PBX extension users from Linkus UC Clients. - In the Other Information section, customize
the appearance of software PBX based on the theme mode.Tip: You can preview the changes you make on the right of the page.
Setting Description Theme Mode Theme Select the supported theme mode for the software PBX. 
- Based on Light Mode: PBX only supports light mode, and does not support theme switching.
- Based on Dark Mode: PBX only supports dark mode, and does not support theme switching.
- Both Light & Dark
Mode: PBX supports both light and dark
mode, which can be switched on the PBX web portal.Note:
- If selected, you need to configure appearance
and colors for each mode.
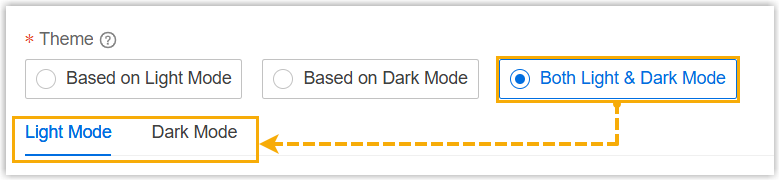
- For more information about theme switching on PBX, see PBX Administrator Guide - Change Theme Mode.
- If selected, you need to configure appearance
and colors for each mode.
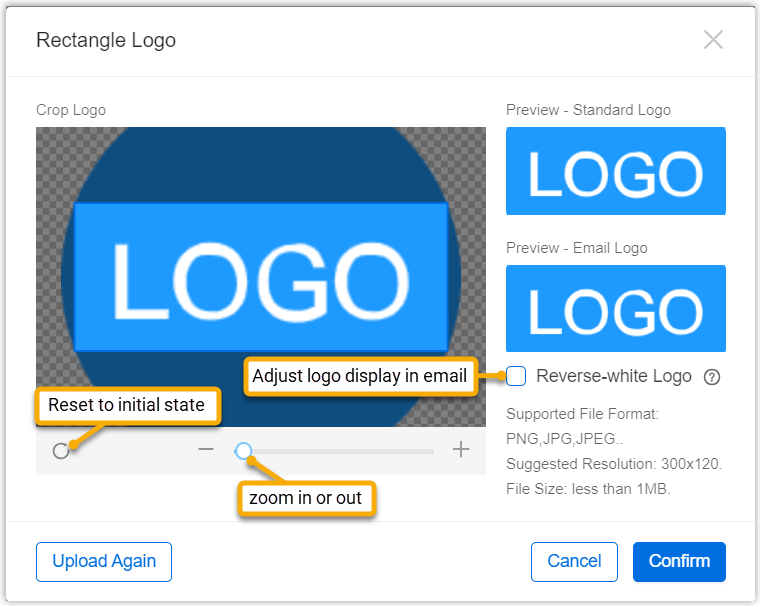
Appearance for PBX web interface Logo Upload the following logos based on the theme mode. - Rectangle Logo: Upload
a rectangle logo, which will be displayed in PBX
login page, notification emails, and wherever the
logo is required.Note: The logo file should meet the following requirements:
- File format: PNG, JPG, or JPEG
- File name: Less than 127 characters (including file extension)
- File size: Less than 1MB
- Suggested resolution: 300×120
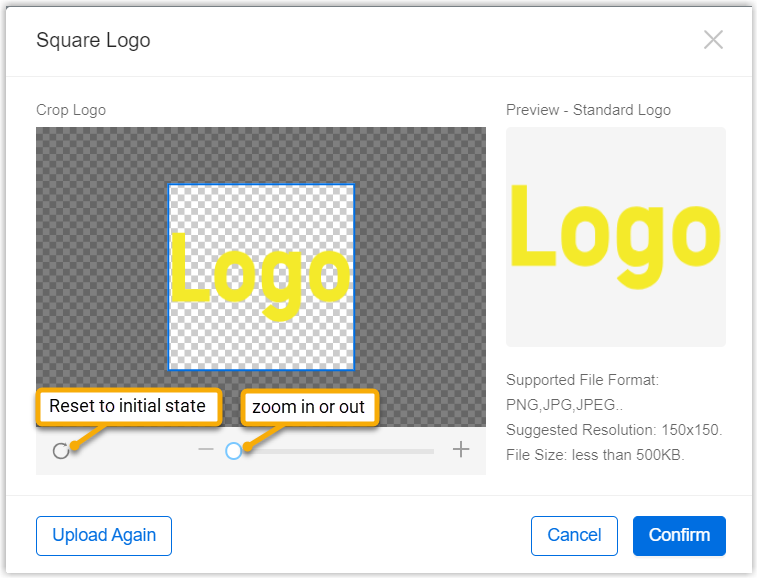
- Square Logo: Upload a
square logo, which will be used as the favicon
displayed in the browser tab.Note: The logo file should meet the following requirements:
- File format: PNG, JPG, or JPEG
- File name: Less than 127 characters (including file extension)
- File size: Less than 500KB
- Suggested resolution: 150×150
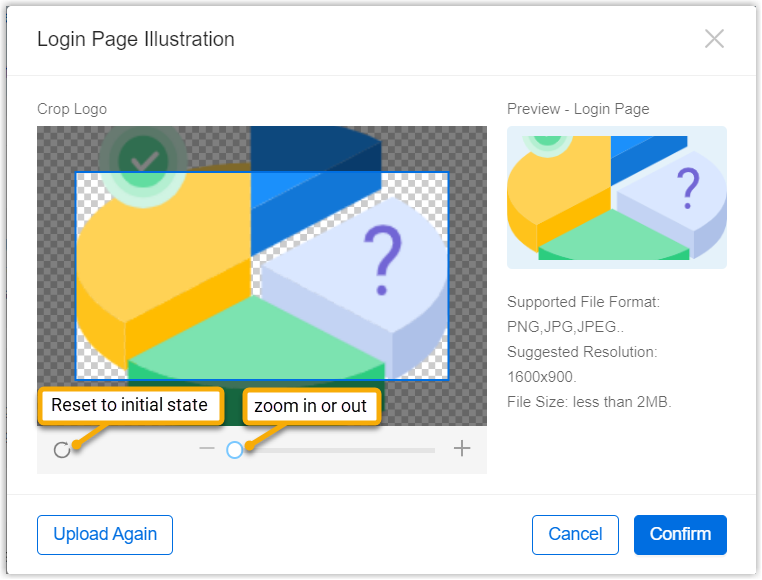
Login Page Illustration Upload an image based on the theme mode, which will be displayed on the left of PBX login page. Note: The image file should meet the following requirements:- File format: PNG, JPG, or JPEG
- File name: Less than 127 characters (including file extension)
- File size: Less than 2MB
- Suggested resolution: 1600×900
Welcome Message Enter welcome message, which will be displayed under the product name in the PBX login page. 
Copyright Information Enter copyright information, which will be displayed on the bottom of PBX login page. 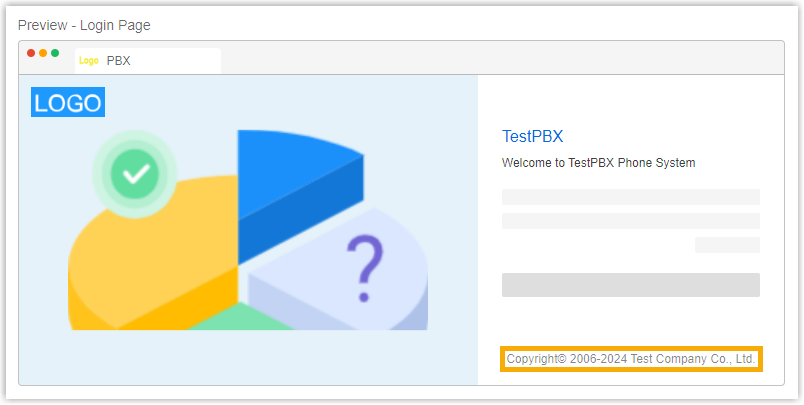
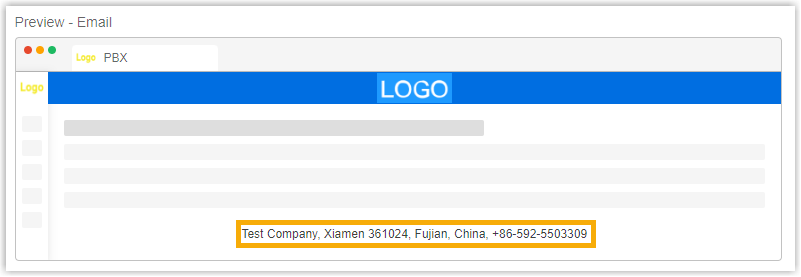
Theme colors for PBX web interface Login Page Left Color Define the background color for the left-side panel of the authentication page illustration. Applied to all auth screens of PBX and Linkus Web Client (including login, password reset, and two-factor authentication). Login Page Right Color Define the background color for the right-side panel of the authentication page illustration. Applied to all auth screens of PBX and Linkus Web Client (including login, password reset, and two-factor authentication). Primary Brand Color The system's primary brand color. Applied to main buttons, key icons, text (including link text), etc. Success Color Color for indicating success. Applied to success buttons, icons, text, etc. Error Color Color for indicating errors or alerts. Applied to error buttons, icons, text, alert, etc. Warning Color Color for indicating warning. Applied to warning buttons, icons, text, etc. Reminder Color The system's accent color for general reminders. Applied to tags, notifications, etc. Neutral Text Color The system's default color for most text. Applied to the normal body text, background, border, and padding, etc. Primary Background Color The system's primary background color. Used as the base color for pages and major content areas. Secondary Background Color The system's secondary background color. Used for containers, pop-ups, and other inset areas to visually separate sections within the interface. Appearance for PBX emails Email Signature Enter the email signature, which will be displayed on the bottom of PBX emails.Note:- The email signature supports up to 500
characters, and allows the use of HTML tags -
<br/>,<strong/>,<b/>, and<a/>. - Line breaks can be achieved using either the
<br/>HTML tag or theEnterkey.
- In the Basic Information section, specify
template name and preference.
- Optional: If you don't wan to use the default built-in SMTP Server of
software PBX, you can set up a custom one.
- Turn on the switch of Custom Built-in SMTP
Server.

- Enter the information of the SMTP server.
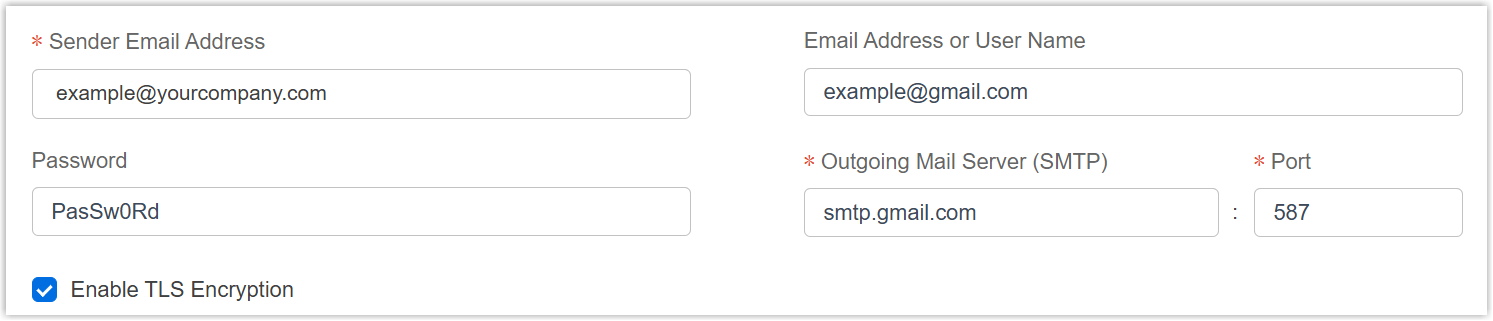
Setting Description Sender Email Address Enter the email address that will appear as the sender in outgoing emails. Email Address or User Name Enter the user name of your email account to authenticate with your email provider. Password Enter the password for your email account. Outgoing Mail Server (SMTP) Enter the address of your email provider's SMTP server. Port Enter the port of your email provider's SMTP server. Enable TLS Encryption Set whether to encrypt the connection when sending emails through the SMTP server for secure transmission. - Optional: Click Test and enter a recipient's email address to test if the email server can successfully send emails.
- Turn on the switch of Custom Built-in SMTP
Server.
- Click Save.
The white label template is created and displayed in the list.

Step 2. Apply white label template to software PBXs
- On Yeastar Central Management, go to .
- Select the checkboxes of the desired software PBXs, then click
Bulk Edit.
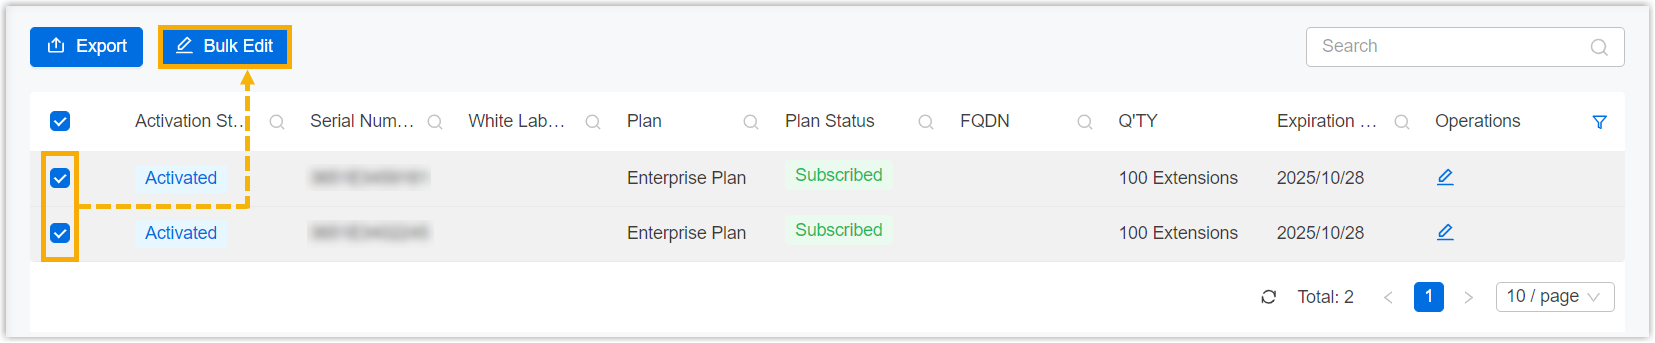
- In the pop-up window, complete the following settings.
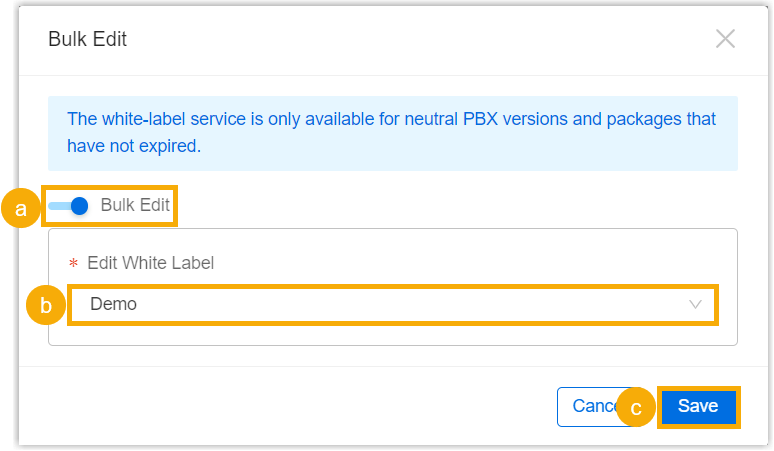
- Turn on the option Bulk Edit.
- In the Edit White Label drop-down list, select a white label template.
- Click Save.
The white label template is applied to the selected software PBXs.
Step 3. Reboot software PBXs
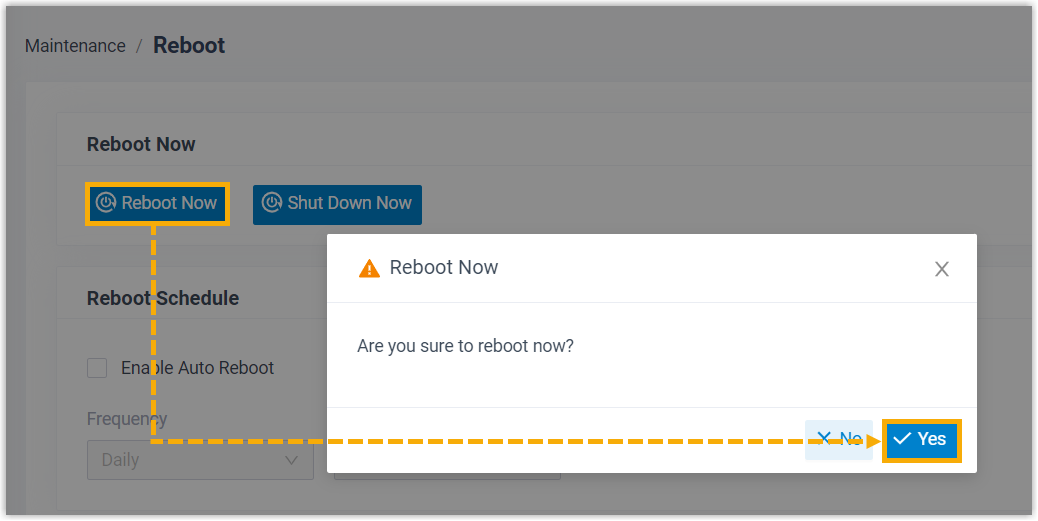
- Log in to PBX web portal, go to .
- Click Reboot Now, then click
Yes to reboot the system, so that the white label
configurations can take effect.
Result
After PBX reboot, the white label configurations are applied to the selected software PBXs.