Configure VLAN on Yeastar S-Series VoIP PBX
To perform VoIP communication securely, you can configure VLAN on Yeastar S-Series VoIP PBX.
Note: Yeastar S-Series VoIP PBX is a VLAN client, not a VLAN server.
- Configure VLAN settings on your switch or router, allocate a VLAN ID and IP address for the PBX.
- Log in the PBX web interface, go to .
- In the Mode field, select a desired Ethernet mode.
- Configure VLAN for LAN port or WAN port.
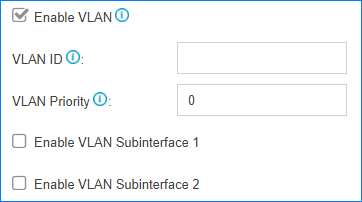
- Enable VLAN: Select the checkbox.
- VLAN ID: Enter the VLAN ID that is assigned to
the PBX.
VLAN ID is the identification of the VLAN.
For example, if the VLAN ID is 3, it means the PBX will send the packet with the tag which has VLAN ID 3. When the packet from PBX is sent to the switch, the switch will send the packet to the VLAN 3 only.
- VLAN Priority: Enter the priority associated with
the VLAN ID.
The priority value is between
0to7.7has the highest priority.
- If you want to connect to other VLANs, select the checkbox of Enable
VLAN Subinterface 1 or Enable VLAN Subinterface
2, configure another VLAN for the network interface.
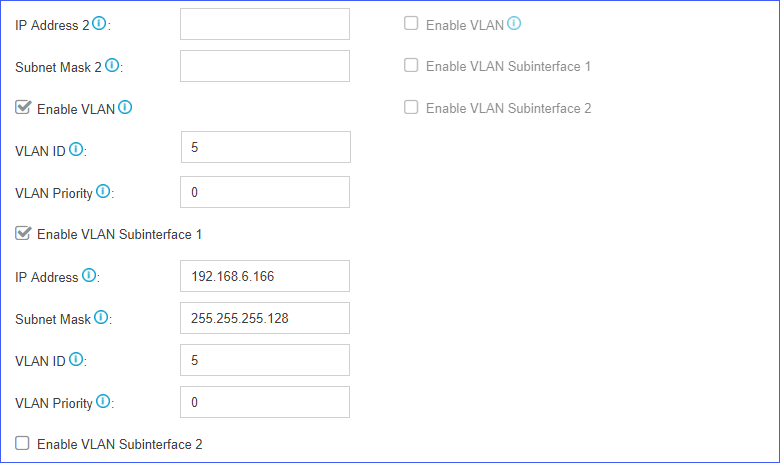
- IP Address: Enter another VLAN IP address.
- Subnet Mask: Enter the subnet mask associated with this VLAN.
- VLAN ID: Enter the VLAN ID associated with this VLAN.
- VLAN Priority: Enter the VLAN priority associated with the VLAN ID.
- Click Save and reboot the PBX to take effect.