Create a VoIP Account Trunk - General
Create a VoIP Account Trunk on the Yeastar S-Series VoIP PBX, and provide trunk information and PBX information for the other device to register. In this way, Yeastar S-Series VoIP PBX and the other device are connected.
Background information
Depending on the network environment of Yeastar S-Series VoIP PBX, you need to take different steps before you can provide information for the other device to register.
| Scenario | Instruction | Description |
|---|---|---|
| Yeastar S-Series VoIP PBX has an FQDN domain name |
A SIP trunk through Internet with a dedicated PBX domain name (FQDN). The FQDN helps you quickly establish a secure tunnel for PBX remote SIP access. |
|
| Yeastar S-Series VoIP PBX has a static public IP address | A SIP trunk through Internet with static public IP address. |
Create a VoIP Account Trunk
- Go to , click Add.
- Under Basic tab, complete the following
settings:
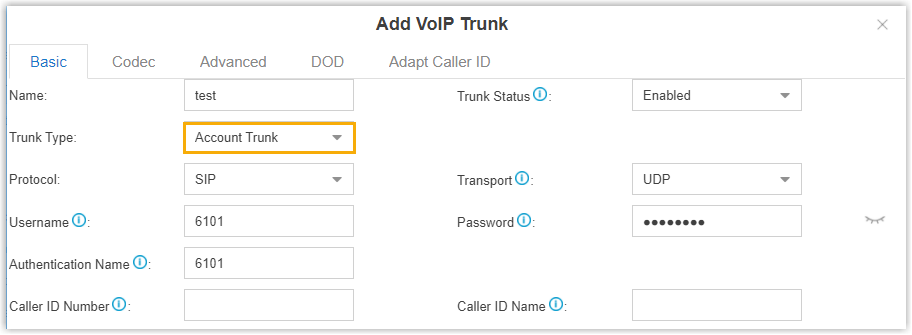
- Name: Enter a name to help you identify the trunk.
- Trunk Status: Select Enabled.
- Trunk Type: Select Account Trunk.
- Protocol: Select SIP.
- Transport: Select a transport
protocol.
- UDP
- TCP
- TLS
- Username: Enter a username for the SIP account.
- Password: Enter a password for the SIP account.
- Authentication Name: Enter an authentication name for the SIP account.
- Caller ID Number: Enter a Caller ID
number for the trunk, which will be displayed on the called
parties' phones.Note: This feature requires support from service provider.
- Caller ID Name: Enter a Caller ID name
for the trunk, which will be displayed on the called parties'
phones.Note: This feature requires support from service provider.
- Configure other VoIP trunk settings as your need.
- Click Save and Apply.
Enable Remote SIP Access for the Account Trunk
- Log in to PBX web interface, go to .
- Select the checkboxes of Enable Linkus Server,
Enable Linkus Cloud Service Pro, and
Enable Remote SIP Service.
An FQDN domain name is generated, composed of the PBX SN and a fixed suffix lcspro.uccpbx.com. You can use the domain name for remote SIP registration.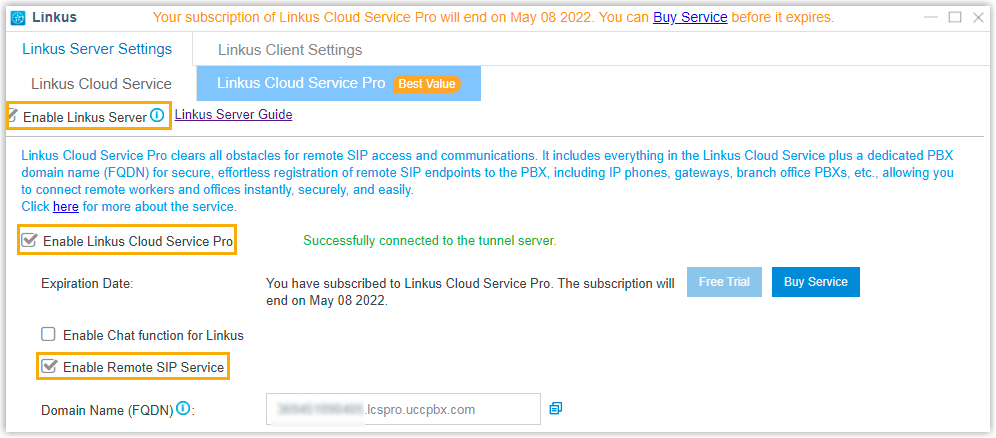
- Grant the permission of Remote SIP Access to the account trunk.
- On the Feature section, click
 .
.
- In the drop-down list of Access Type, select Allowed Account.
- In the Account section, select the account
trunk from Available box to
Selected box.

Only the selected account trunk can access Remote SIP Service.
- Optional: Select the checkbox of Enable IP
Restriction, and add at least one permitted IP
address and subnet mask.Only the permitted IP address(es) can access Remote SIP Service.Note: This option has higher priority than any other defense rules on the system. If the permitted IP address(es) is blocked by other system defense rules, the IP address can still access the service.
- Click Save.
- On the Feature section, click
- Click Apply.
What to do next
- Register the SIP Account Trunk on the third-party software or device.
Depending on the network of the third-party software or device, you need to provide different information:
Third-party Environment Description Same local network as Yeastar S-Series VoIP PBX - SIP Account Trunk details
- Local IP address of PBX
- Local SIP port of PBX
Different network from Yeastar S-Series VoIP PBX - SIP Account Trunk details
- PBX public IP address or domain name (FQDN)
- External SIP port of PBX
- To receive inbound calls through the trunk, you need to select this trunk to
one or more inbound routes.
For more information, see Add an Inbound Route.
- To make outbound calls through the trunk, you need to select this trunk to
one or more outbound routes.
For more information, see Add an Outbound Route.