Connect Yeastar P-Series Software Edition and Yeastar TA1610 Gateway
This topic describes how to connect Yeastar P-Series Software Edition and Yeastar TA1610 gateway, so as to extend 16 FXO trunks on the PBX.
Procedure
Step 1. Create a SIP peer trunk on Yeastar PBX system
- Log in to PBX web portal, go to , click Add.
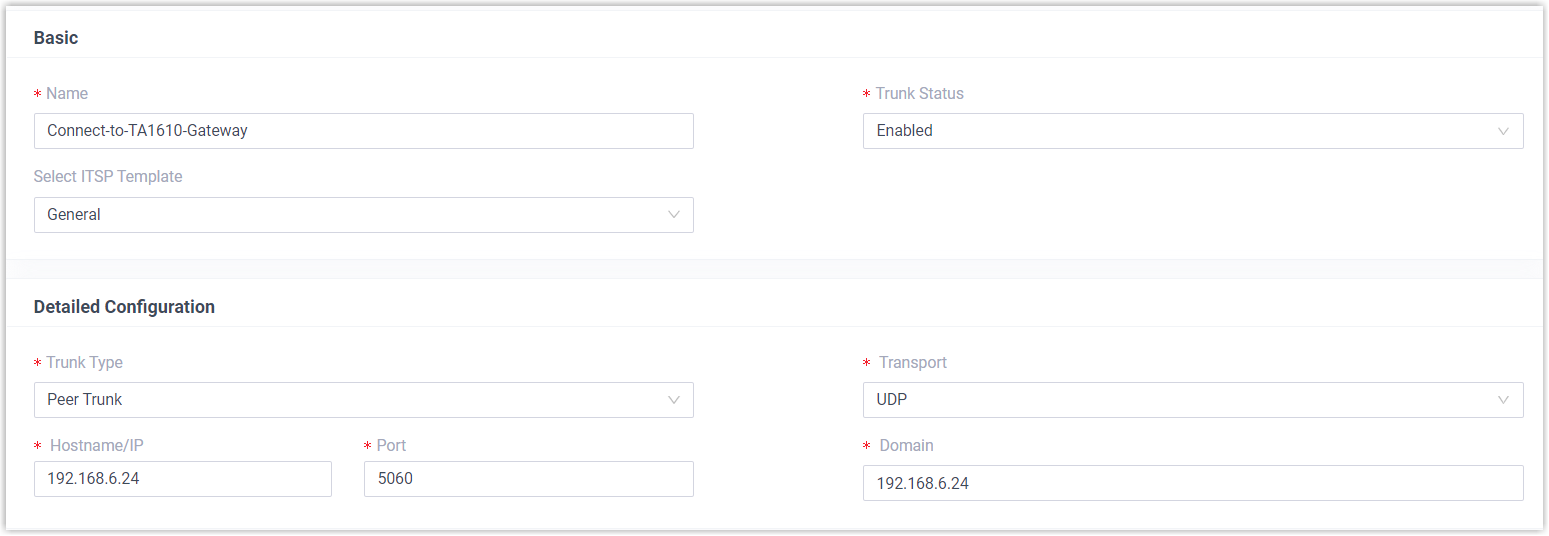
- Configure the trunk settings.

- Name: Enter a name to help you identify it. For example, Connect-to-TA1610-Gateway.
- Trunk Status: Select Enabled.
- Select ITSP Template: Select General.
- Trunk Type: Select Peer Trunk.
- Transport: Select UDP.
- Hostname/IP: Enter the IP address of Yeastar TA1610 gateway. In this example, enter 192.168.6.24.
- Port: Enter the SIP port of Yeastar TA1610 gateway. In this example, enter the default port 5060.
- Domain: Enter the IP address of Yeastar TA1610 gateway. In this example, enter 192.168.6.24.
- Click Save and Apply.
Step 2. Create a SIP peer trunk on Yeastar TA1610 gateway
- Log in to gateway web interface, go to , click Add New Trunk.
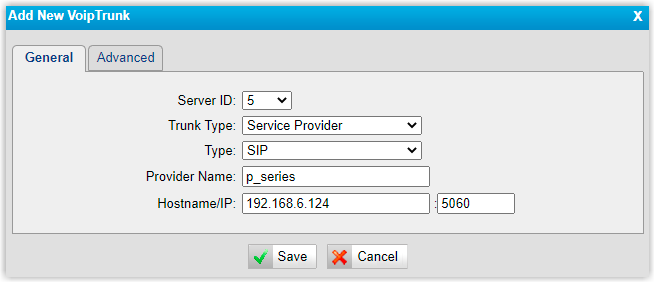
- In the pop-up window, configure the following settings:

- Trunk Type: Select Service Provider.
- Type: Select SIP.
- Provider Name: Enter a name to help you identify it.
- Hostname/IP: Enter the IP address of Yeastar PBX system and the SIP port. In this example, enter 192.168.6.124 and the default SIP port 5060.
- Click Save and Apply Changes.
Result
- On the PBX web portal, go to to check the trunk status. If the connection is successful,
the trunk status displays
 .
.
- On the gateway web interface, go to to check the trunk status. If the connection is successful,
the trunk status displays "OK".

What to do next
- To make outbound calls through the extended FXO trunk, see Make Outbound Calls through the Extended FXO Trunks.
- To receive inbound calls through the extended FXO trunk, see Receive Inbound Calls through the Extended FXO trunks.