Configure AI Call Transcription with Google Service
Yeastar P-Series Software Edition supports AI call transcription powered by Google Cloud Speech-to-Text service (API version: V2), transcribing the audio of a two-party call into readable text in real time. This topic describes how to configure AI call transcription with the third-party service on the PBX.
Requirements
Yeastar P-Series Software Edition should meet the following requirements:
| Item | Requirement |
|---|---|
| Firmware | 83.24.0.30 or later. |
| Subscription |
The AI Transcription feature includes one-time free minutes with your plan subscription (120 minutes for Enterprise Plan or 240 minutes for Ultimate Plan). To expand AI transcription minutes, subscribe to the following add-on service(s) (Path: ). 
Note: If both services are subscribed,
minutes are deducted from the monthly quota pack
first. |
Prerequisites
- PBX network access
-
Make sure the Yeastar P-Series Software Edition can access the following domains to use corresponding services:Note:
You can verify domain accessibility on the PBX (Path: ). If the PBX can not access the domains, go to to configure the PBX network.
Service Domain Google Cloud Speech-to-Text service oauth2.googleapis.com<region>-speech.googleapis.comNote:Select the desired region from the list below and replace<region>with it (e.g.,us-speech.googleapis.com). It is recommended to select a region closest to your PBX deployment location to reduce network latency and ensure stable transcription.- us: United States
- eu: Europe
- asia-southeast1: Singapore
- asia-northeast1: Tokyo
GPT/Gemini LLM According to your preferred LLM, the PBX must be able to access the following corresponding domains:
- GPT LLM:
api.openai.com - Gemini LLM:
oauth2.googleapis.comandgenerativelanguage.googleapis.com
- Third-party service account
-
You have prepared third-party service accounts and login credentials as follows:
Service Account Google Cloud Speech-to-Text service Prepare a Google account with sufficient transcription minute quotas for Google Cloud Speech-to-Text service, and obtain the username and password. GPT/Gemini LLM According to your preferred LLM, the account must meet the following requirements: - GPT LLM: Prepare an OpenAI account with sufficient token quota, and obtain the username and password.
- Gemini LLM: Make sure the Google account have sufficient token quota.
Procedure
Step 1. Create an API key for Google Cloud Speech-to-Text service
To securely access the Google Cloud Speech-to-Text service from the PBX, you must create an API key on Google Console first and export it as a JSON file used to authenticate the service API request.
- Log in to Google Console using your Google username and password.
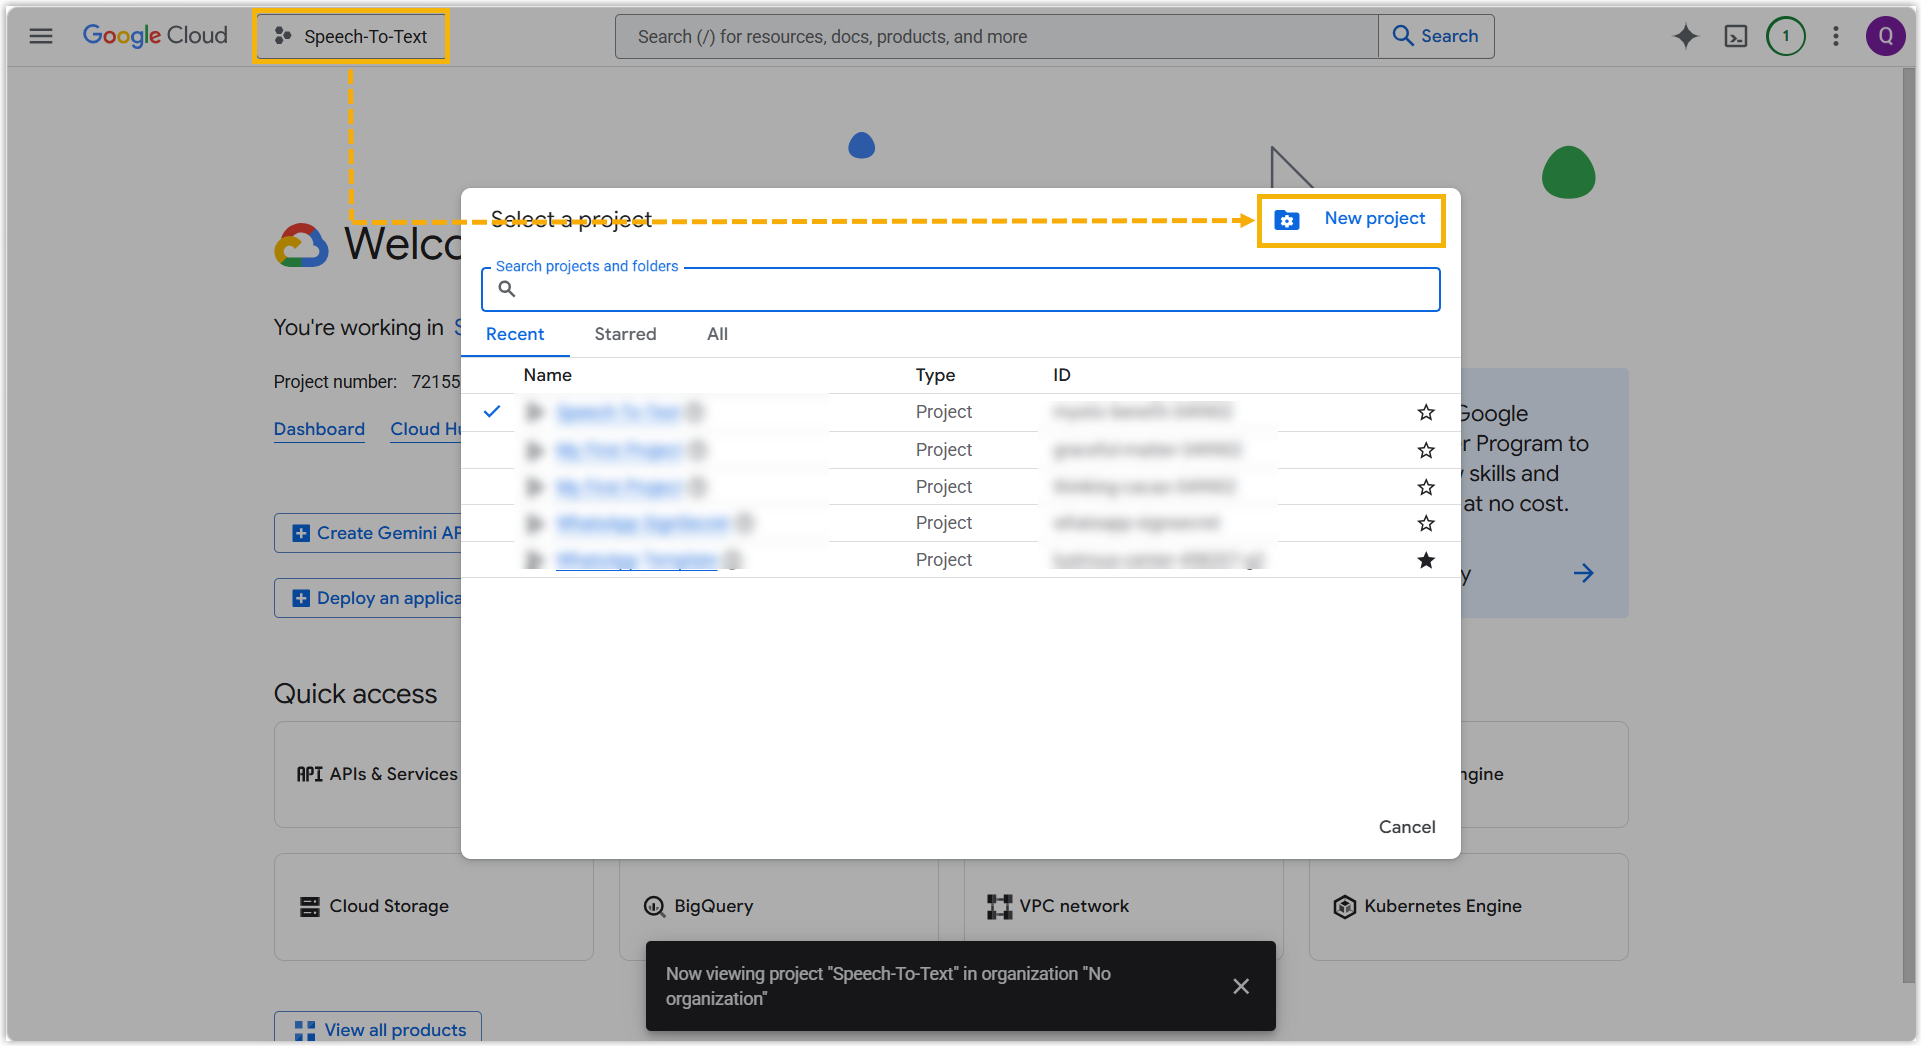
- Create a new project.
- At the top-left corner, click current project tab, and then click
New project in the pop-up window.
- In the New Project page, create a new project.
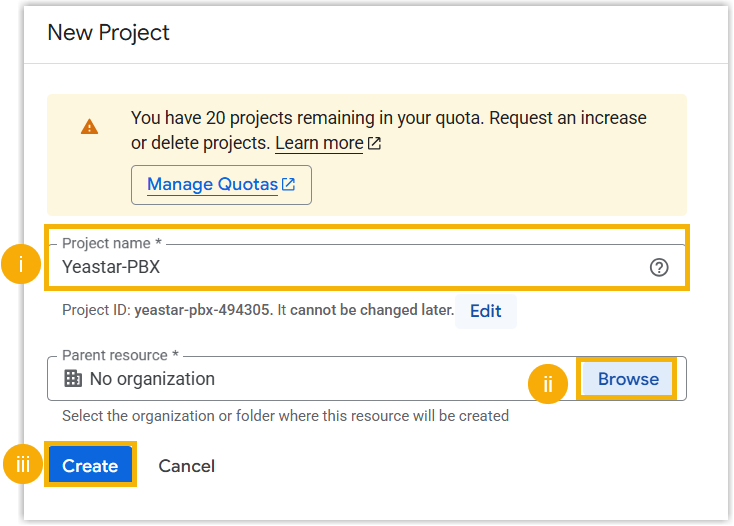
- In the Project name field, enter a name to identify the project.
- Optional: Click Browse to select the desired organization.
- Click Create.
- At the top-left corner, click current project tab, and then click
New project in the pop-up window.
- In the new created project, enable the
Cloud Speech-to-Text API service.
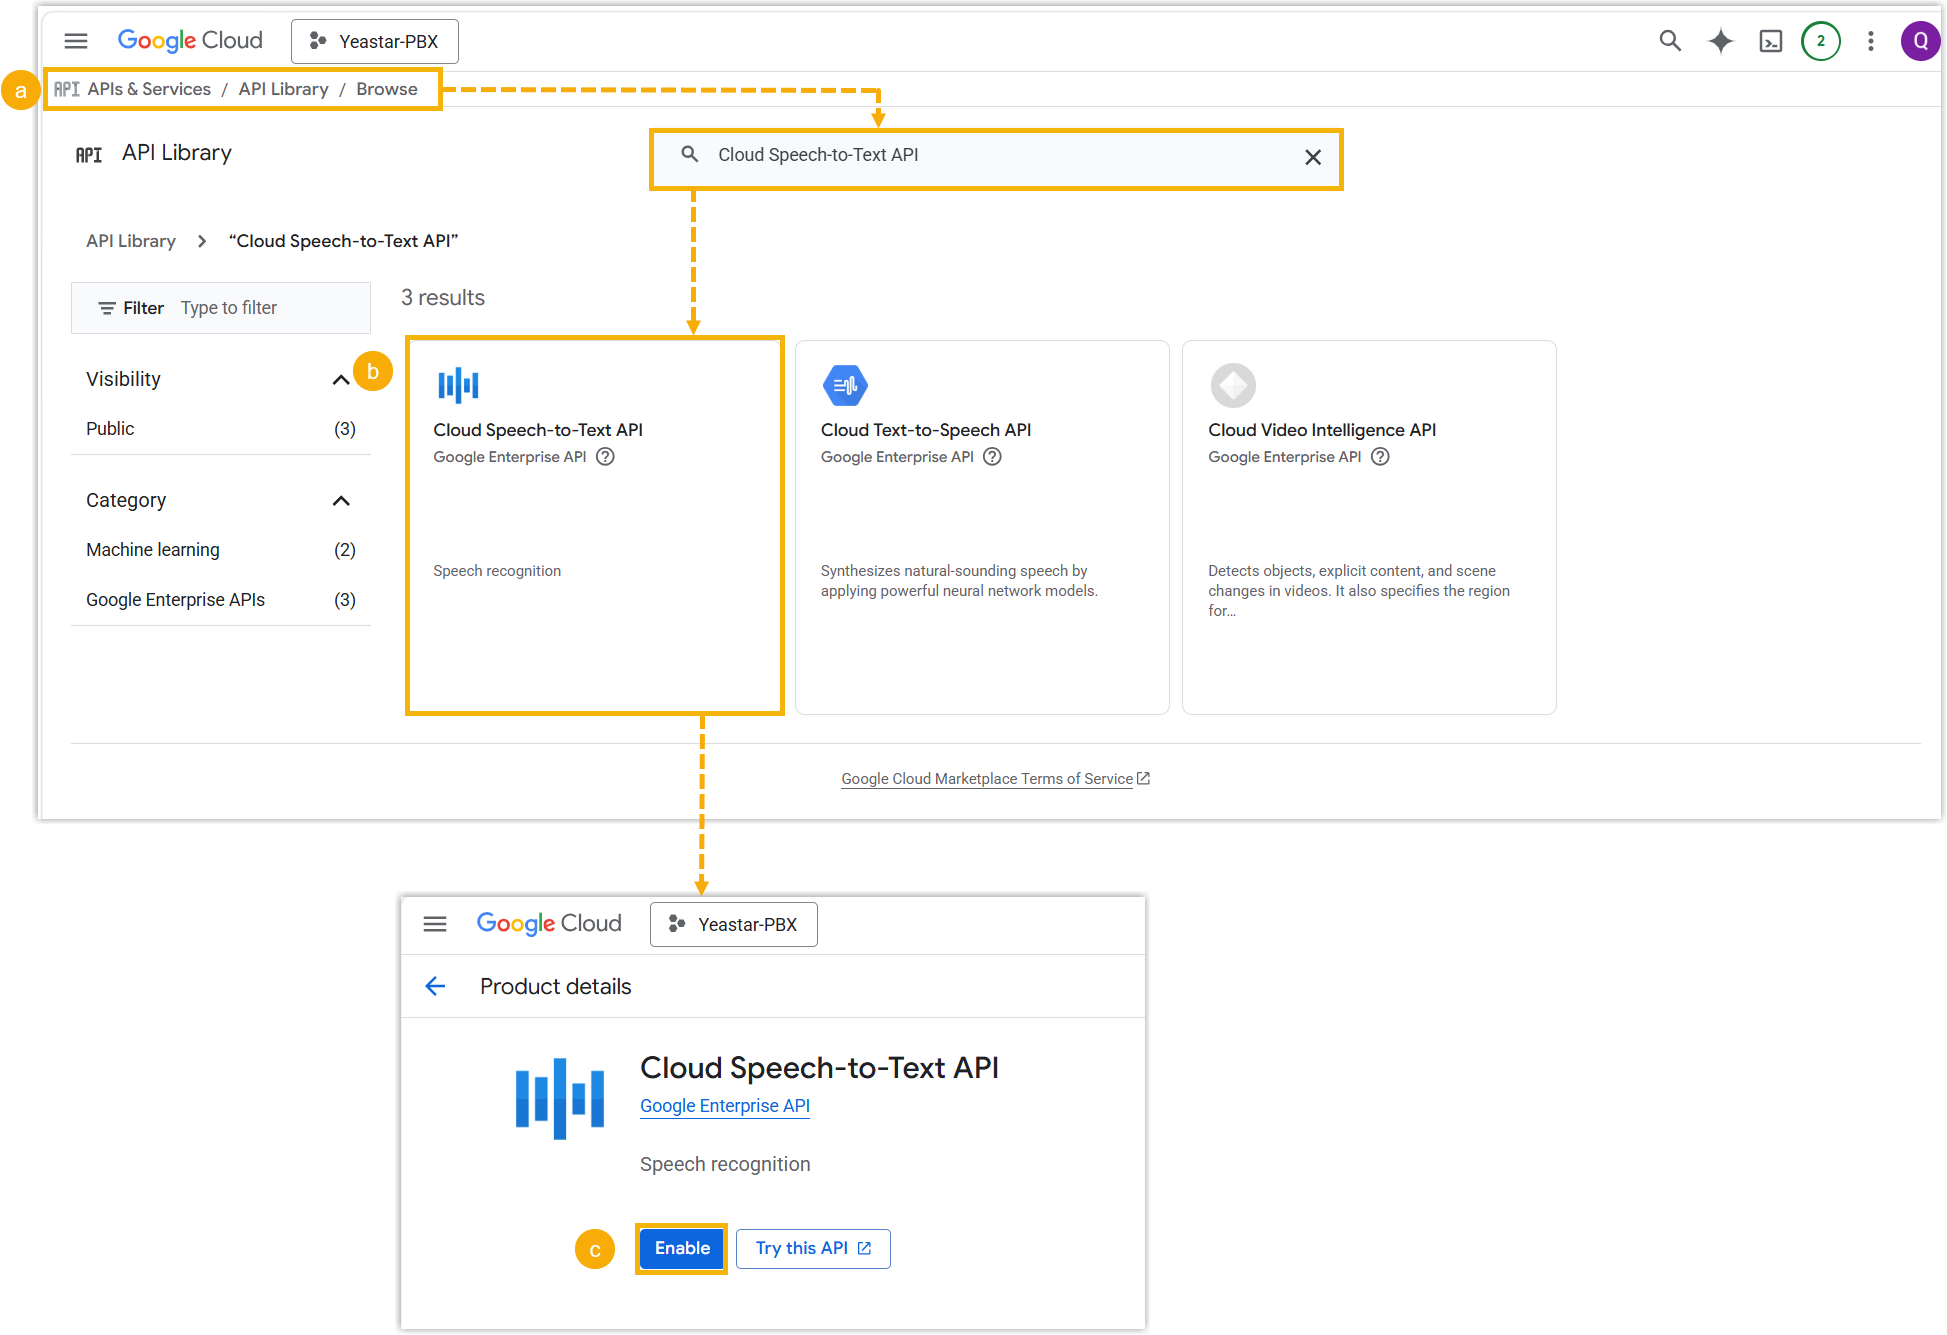
- Go to , search for "Cloud Speech-to-Text API" in the library.
- In the search result list, click the Cloud Speech-to-Text API card to enter its product details.
- Click Enable.
This service displays with Enabled status.
- Create a service account for the new
created project.
- Go to , click Create service account at
the top navigation bar.
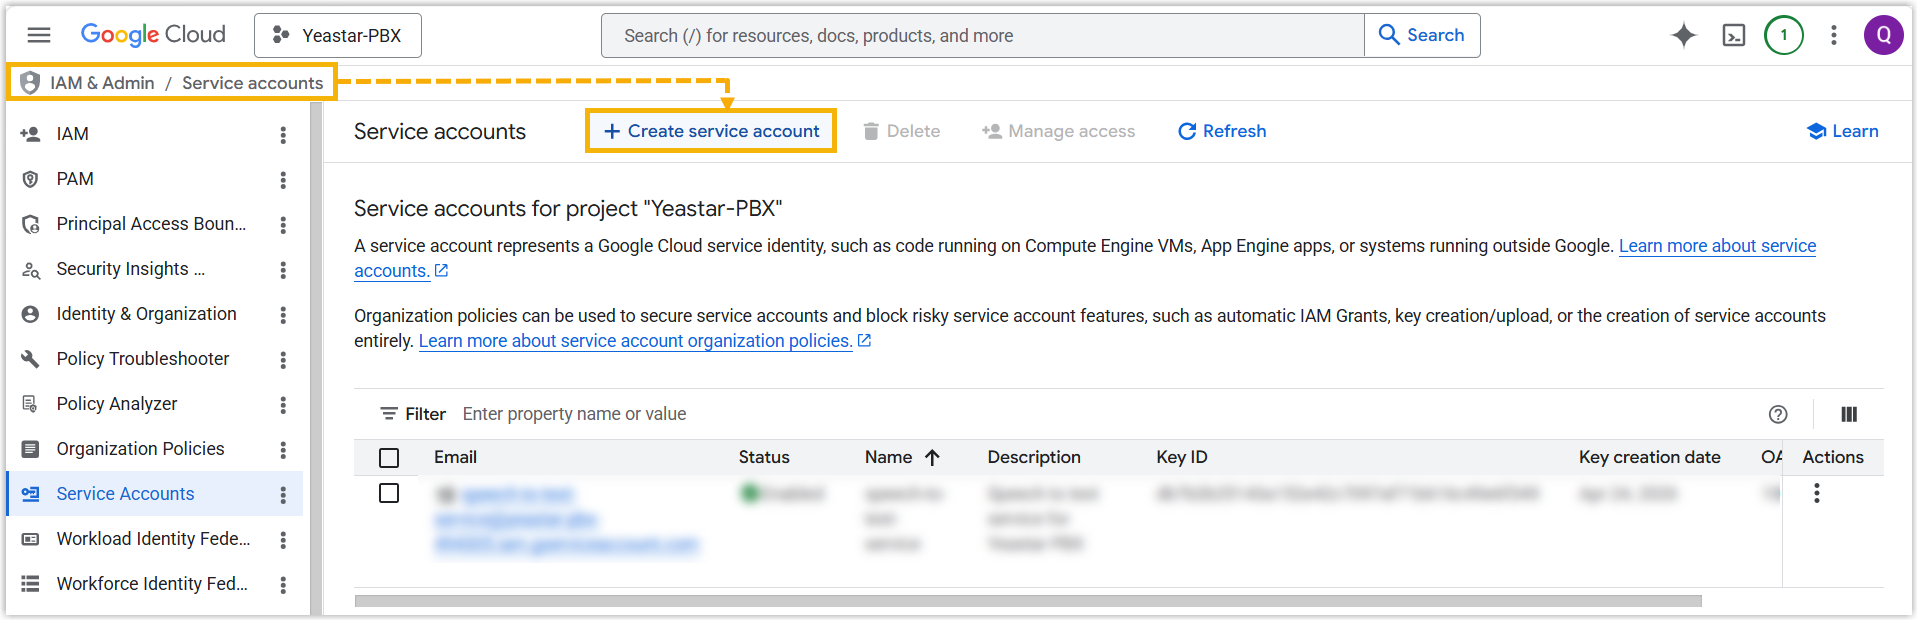
- Create a service account.
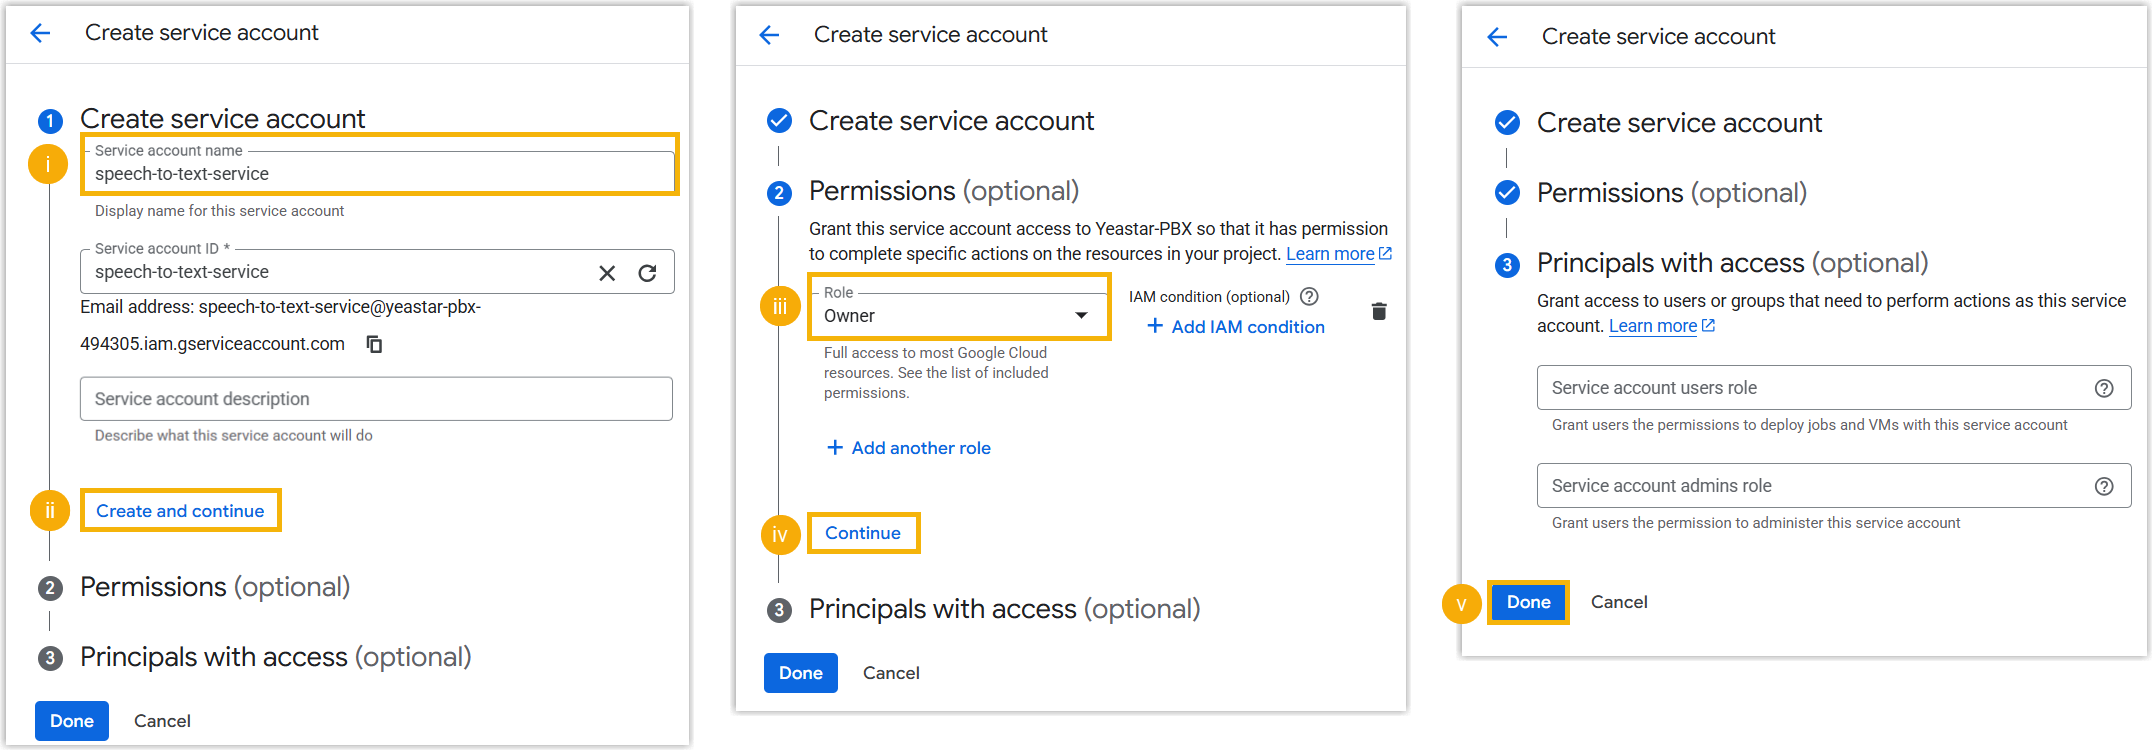
- In the Service account name field, enter a name to identify the service account.
- Click Create and continue.
- In the Role drop-down list, select Owner.
- Click Continue.
- Click Done.
The Service accounts list displays the created service account.
- Go to , click Create service account at
the top navigation bar.
- Create an API key and generate its JSON file
for the new created service account.
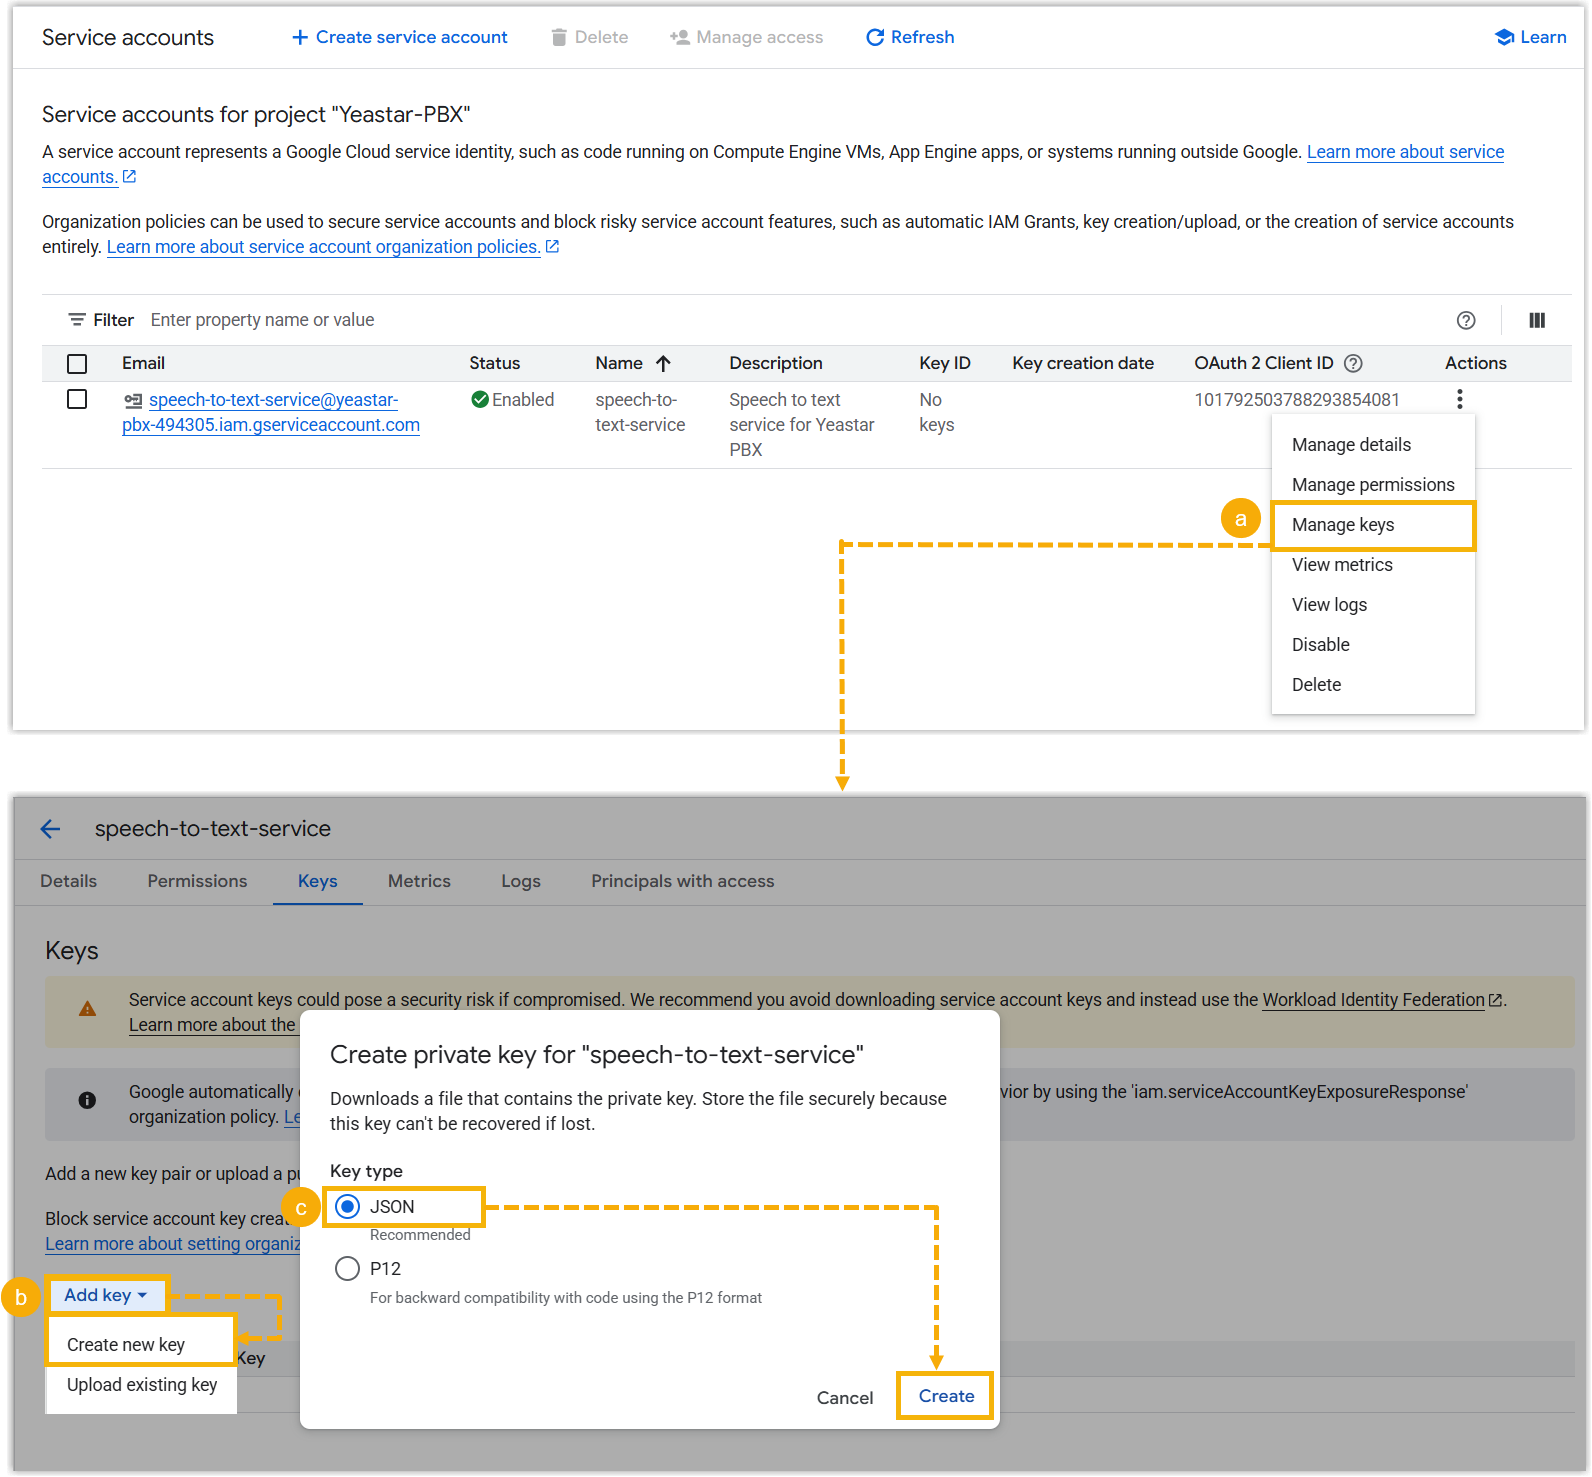
- On the Service accounts page, click
 beside the created service account, and select Manage
keys.
beside the created service account, and select Manage
keys. - On the Keys page, click Add
key and select Create new
key.
A key type selection window pops up.
- In the Key type section, select JSON type,
and click Create.
The system automatically downloads the JSON file that contains the API key to your computer. You can check the JSON file on your computer and save it for later use.
- On the Service accounts page, click
Step 2. (Optional) Create an API key for GPT LLM or Gemini LLM
Yeastar P-Series Software Edition allows you to invoke APIs of GPT or Gemini LLM to automatically generate call summaries from transcribed text after calls end. To implement this feature, you need to create an API key to authenticate requests.
- If you use GPT LLM provided by OpenAI, proceed with Create an API key for OpenAI API.
- If you use Gemini LLM provided by Google, proceed with Create an API key for Gemini API.
- Create an OpenAI API key on OpenAI Platform
-
- Log in to OpenAI Platform using your OpenAI username and password, go to API Keys.
- At the top-right corner of the API key list, click Create new secret key.
- In the pop-up window, create a new API key.
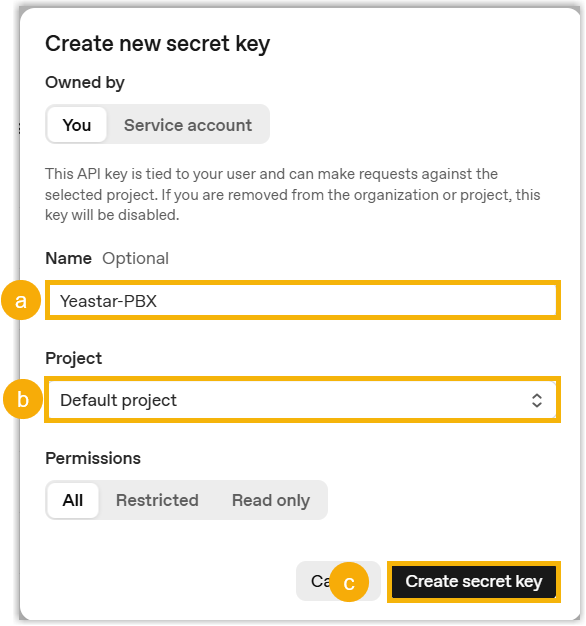
- In the Name field, enter a name to identify the API key.
- In the Project drop-down list, select the desired project.
- Keep the default All permission, and click Create
secret key.
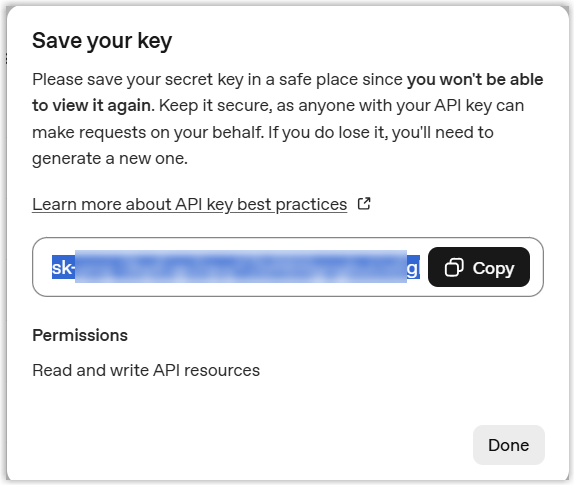
A pop-up window appears, displaying the generated API key.
-
In the pop-up window, click Copy to copy the API key and save it for later use.
- Create a Gemini API key on Google AI Studio
- Log in to Google AI Studio using your Google username and password, go to .
- At the top-right corner of the API key list, click Create API key.
- In the pop-up window, create a new API key.
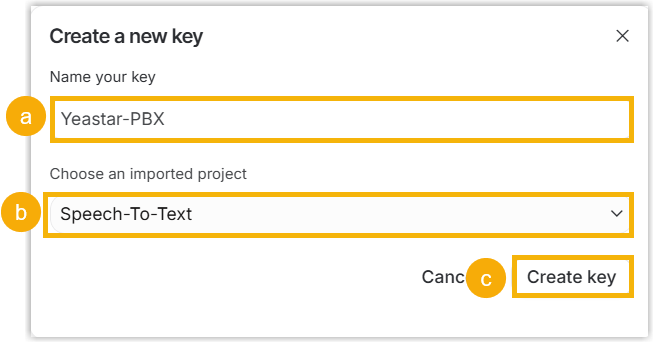
- In the Name your key field, enter a name to identify the API key.
- In the Choose an imported project
drop-down list, select a desired project.Note: In the drop-down list, you can select an existing project, import a project, or create a new one as needed.
- Click Create key.
A pop-up window appears, displaying the details of the generated API key.
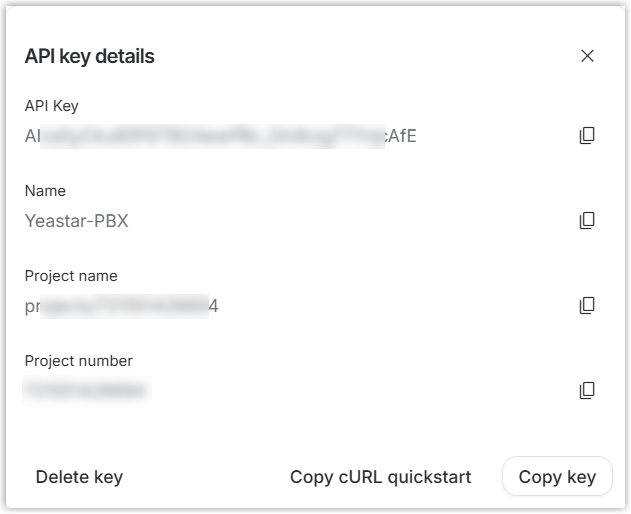
- In the pop-up window, click Copy key to copy the API key and save it for later use.
Step 3. Configure AI call transcription on the Yeastar PBX
After you create authentication credentials for Google Cloud Speech-to-Text service and LLM, you need to configure corresponding settings on the PBX to establish connections between the PBX and the two services.
- Log in to PBX web portal, go to .
- Turn on the switch of Call Transcription.
- Configure AI call transcription service.
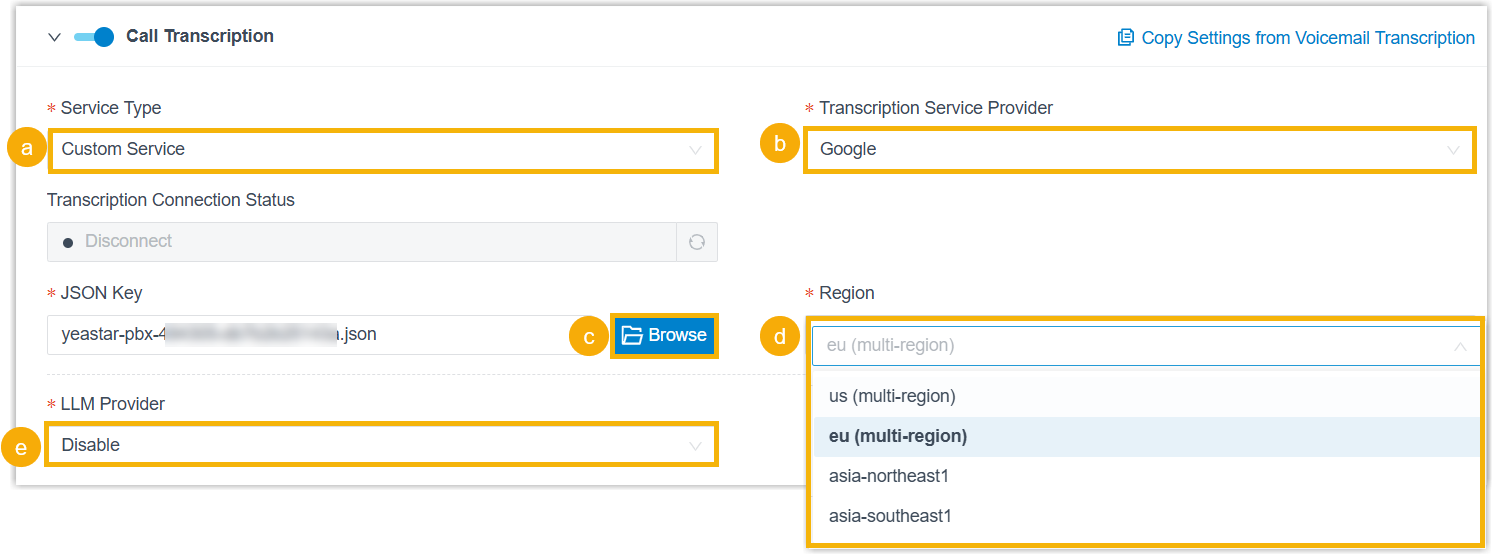
- In the Service Type drop-down list, select Custom Service.
- In the Transcription Service Provider drop-down list, select Google.
- Click Browse to upload the API key JSON file.
- In the Region drop-down list,
select the desired region.
- us (multi-region): United States
- eu (multi-region): Europe
- asia-southeast1: Singapore
- asia-northeast1: Tokyo
-
Configure the LLM service.
Option Instruction Disable If you do not need the PBX to generate call summaries, select Disable in the LLM Provider drop-down list. OpenAI To use GPT LLM, complete the following settings:
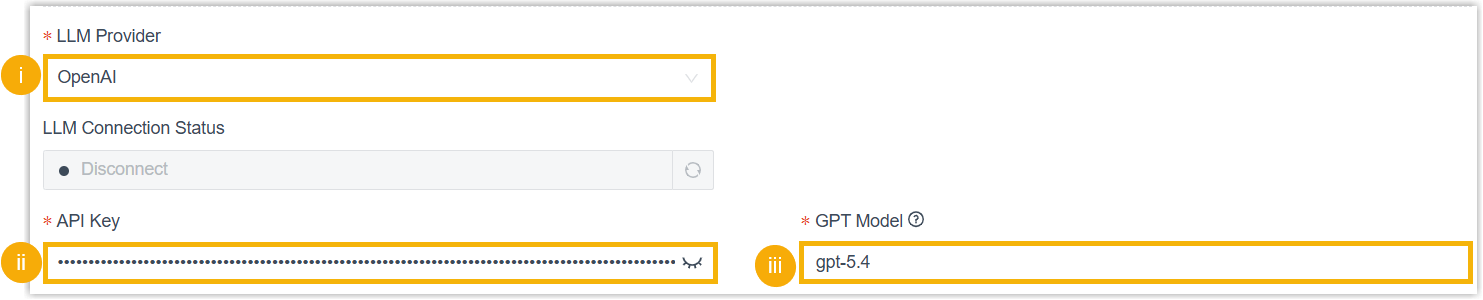
- In the LLM Provider drop-down list, select OpenAI.
- In the API key field, paste the API key created on OpenAI Platform.
- In the GPT
Model field, enter the model ID of
your preferred GPT LLM.Note: You can access the list of GPT Models to check the model ID of your desired GPT LLM. For example, if you want to use GPT-5.4, enter the model ID
gpt-5.4in this field.
Google To use Gemini LLM, complete the following settings:

- In the LLM Provider drop-down list, select Google.
- In the API key field, paste the API key created on Google AI Studio.
- In the
Gemini Model field, enter
the model code of your preferred Gemini LLM.Note: You can access the list of Gemini Models and go to introduction page of your desired Gemini LLM to check its model code. For example, if you want to use Gemini 3.1 Pro Preview, enter the model code
gemini-3.1-pro-previewin this field.
-
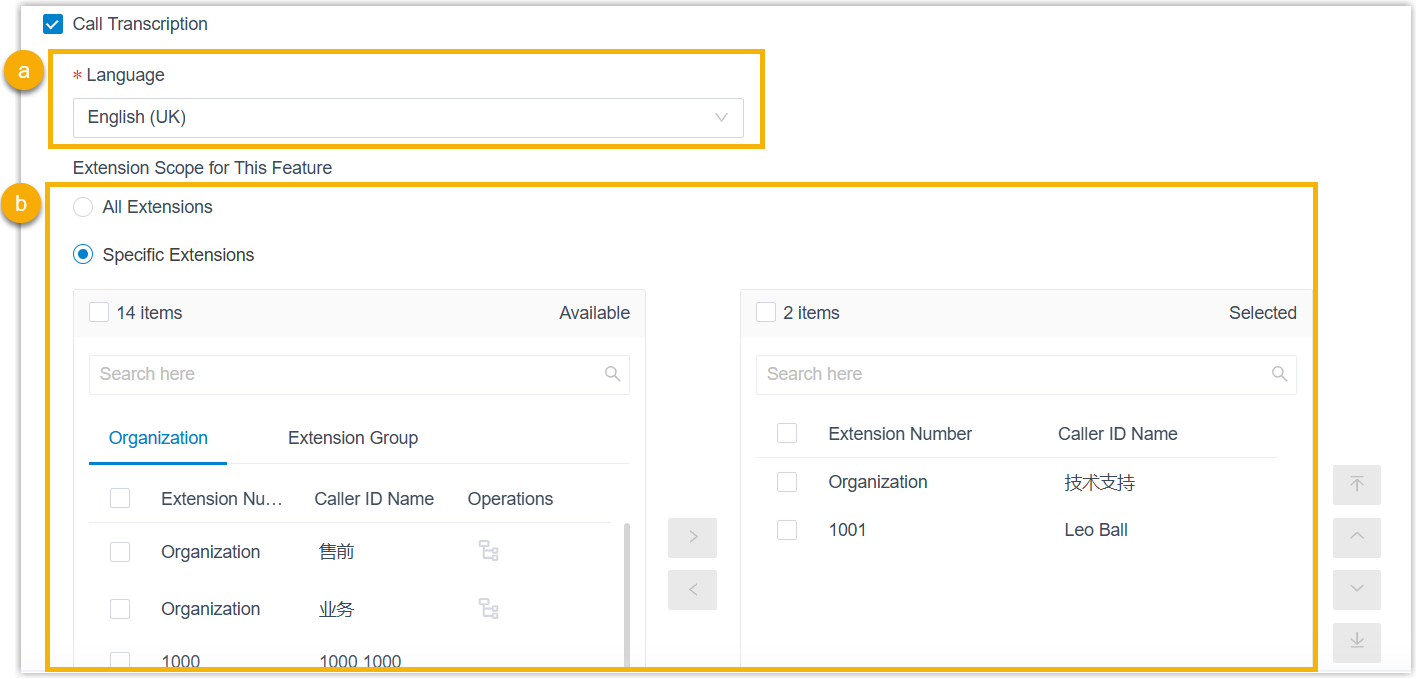
In the Language drop-down list, select the desired language to be detected and transcribed for call audio.
- In the Extension
Scope for This Feature section, specify which extensions /
extension groups / departments have access to the call transcription
feature.
- All Extensions: All extensions can use this feature.
- Specific Extensions: Only selected extensions can use this feature.
- Optional: In the
Automatic Call Transcription section, configure which
call types will be automatically transcribed for the extensions that are allowed to use call transcription.Note: This setting takes precedence over the extension-level Automatic Call Transcription configuration (either the setting that you configured for individual extensions or those set by extension users in their Linkus UC Clients).
Call Type Description Internal If selected, all internal calls involving the authorized extensions will be automatically transcribed. Outbound If selected, all outbound calls from the authorized extensions will be automatically transcribed. Inbound If selected, you need to further configure automatic call transcription based on the inbound call scenarios. 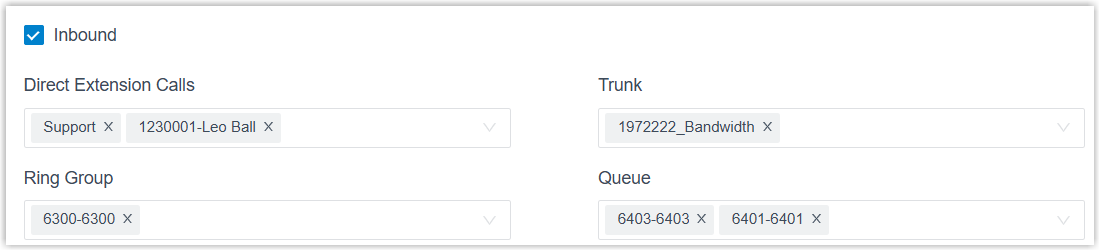
- To automatically transcribe calls that are directly routed to specified extensions, select the desired extensions / extension groups / departments in the Direct Extension Calls drop-down list.
- To automatically transcribe calls routed through specified trunks to any authorized extension, select the desired trunks in the Trunk drop-down list.
- To automatically transcribe calls that are routed to specified ring groups and answered by the authorized extensions, select the desired ring groups in the Ring Group drop-down list.
- To automatically transcribe calls that are routed to specified queues and answered by the authorized extensions, select the desired queues in the Queue drop-down list.
- Click Save.
Result
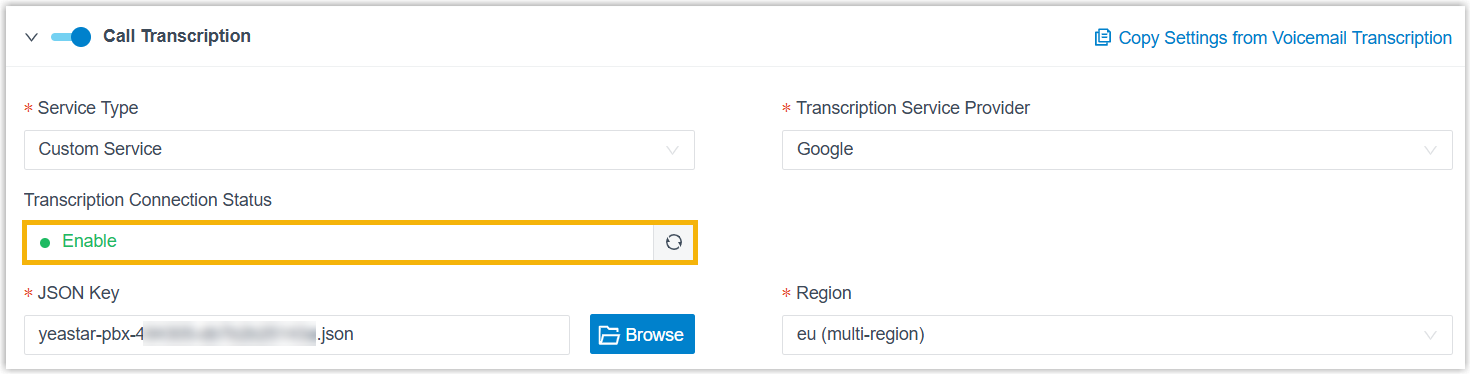
- The Transcription Connection Status displays Enable, indicating
that the AI call transcription feature powered by Google Cloud Speech-to-Text
service is enabled. Call audio can be detected and transcribed into readable
text in the specified language in real time via the Google service.
 Note: You can configure the call transcription language and mode (either automatic or manual) for extensions individually as needed (Path: Extension and Trunk > Extension >
 > AI > Call Transcription). For more information, see Configure AI Call Transcription for an Extension.
 -
The LLM Connection Status displays Enable, indicating that the PBX is successfully connected to the configured LLM. The PBX will automatically generate call summaries from transcribed text after calls end via the LLM.
