Connect Two Yeastar P-Series PBX Systems via Public IP Address
If the Yeastar FQDN feature of PBX is unavailable, you can set up interconnection using public IP address. This topic describes how to connect two Yeastar P570 via public IP address and ports.
Background information
Refer to the following instructions to set up the two Yeastar P570 for interconnection via public IP address.
| Device | Instruction |
|---|---|
| Headquarters PBX | |
| Branch PBX |
Configure port forwarding & NAT
- Configure port forwarding on the routers that are connected to the two Yeastar
P570.
- Log in to PBX web portal, go to , check the SIP port and RTP Ports.
- Port information on Headquarters PBX

- Port information on Branch PBX

- Log in to the router, forward the SIP registration port and RTP
ports.In this example, the port forwarding is as shown below:Note: The internal RTP ports of the PBX should be the same as the forwarded external RTP ports, otherwise the communication may be abnormal.
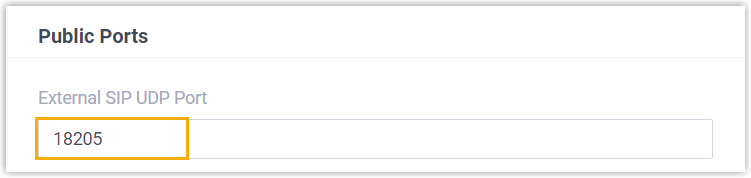
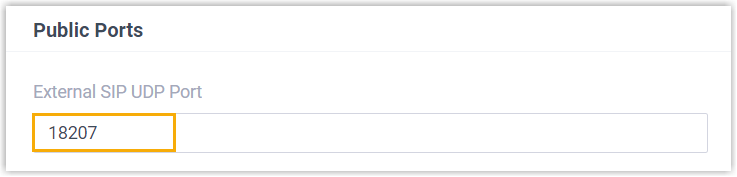
Table 2. Port Internal port External port Headquarters PBX (Public IP: 112.48.19.183) SIP registration UDP 5060 UDP 18205 RTP UDP 10000-12000 UDP 10000-12000 Branch PBX (Public IP: 110.80.36.162) SIP registration UDP 5060 UDP 18207 RTP UDP 13000-15000 UDP 13000-15000
- Log in to PBX web portal, go to , check the SIP port and RTP Ports.
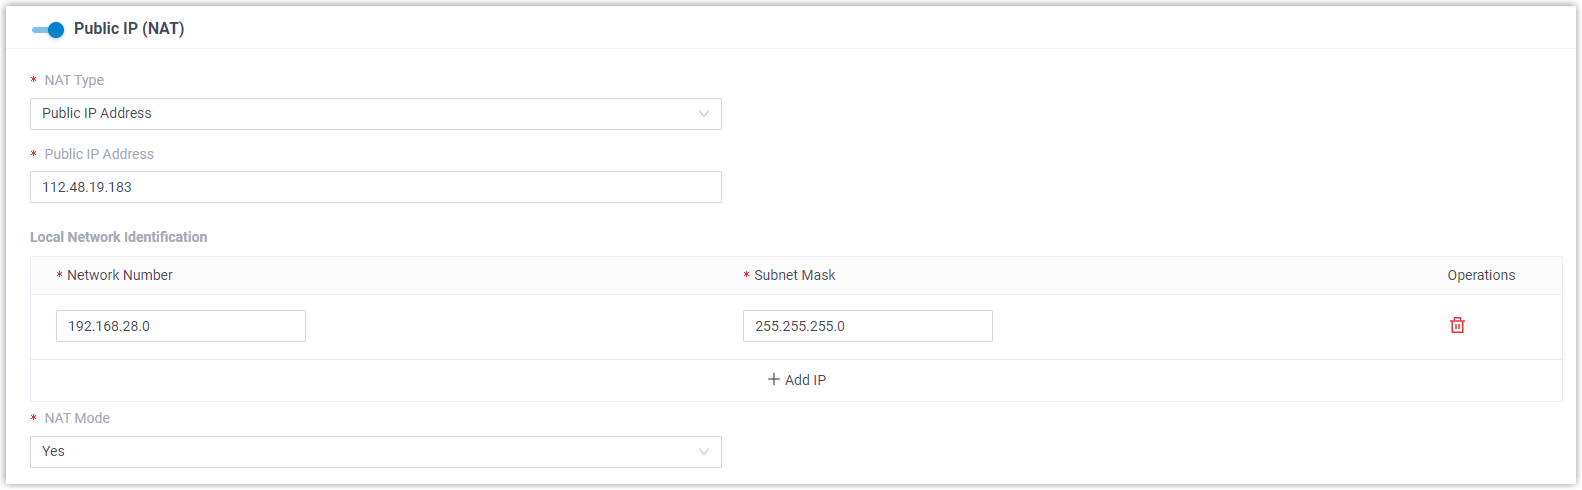
- Configure NAT on the PBX.
- On PBX web portal, go to .
- In the Public IP (NAT) section, complete the
following configurations:
- NAT settings on Headquarters PBX
- NAT settings on Branch PBX

- Public IP (NAT): Turn on the option.
- NAT Type: Select Public IP Address.
- Public IP Address: Enter the public IP address of the PBX.
- Local Network Identification: Add all
your local network.
This setting will allow all your local devices to communicate with the PBX by the local IP address instead of passing through the router.
- NAT Mode: Select a SIP NAT mode. In this
example, select Yes.
The PBX will use NAT and ignore the address information in the SIP/SDP headers and reply to the sender's IP address and port.
- In the Public Ports section, enter the external
ports that you have forwarded on your router.
- Public port on Headquarters PBX
- Public port on Branch PBX
- Click Save and Reply.
Create a Peer Trunk on PBX
- Log in to PBX web portal, go to .
- Click Add to create a Peer Trunk.
- In the Basic section, complete the following settings:
- Basic settings on Headquarters PBX

- Basic settings on Branch PBX

- Name: Set a name to help you identify the trunk.
- Trunk Status: Select Enabled.
- Select ITSP Template: Select General.
- In the Detailed Configuration section, configure the
Peer Trunk.
- Peer Trunk settings on Headquarters PBX

- Peer Trunk settings on Branch PBX

- Trunk Type: Select Peer Trunk.
- Transport: Select UDP.
- Hostname/IP: Enter the public IP address of the opposite PBX.
- Port: Enter the external SIP port of the opposite PBX.
- Domain: Enter the public IP address of the opposite PBX.
- Click Save and Apply.
Result
- On the PBX web portal of Headquarters PBX, go to to check the trunk status.

- On the PBX web portal of Branch PBX, go to to check the trunk status.
