Connect Two Yeastar P-Series PBX Systems via FQDN
A Yeastar-supplied Fully Qualified Domain Name (FQDN) frees you from complicated network settings. Using Yeastar FQDN, you can quickly establish a secure tunnel to interconnect two Yeastar P-Series PBX systems without exposing the devices' public IP addresses and ports, thus greatly improving system security. This topic describes how to interconnect two Yeastar P570 via Yeastar FQDN.
Background information
Refer to the following instructions to set up the two Yeastar P570 for interconnection via FQDN.
| Device | Instruction |
|---|---|
| Headquarters PBX | |
| Branch PBX |
Prerequisites
- The PBX firmware version is 37.6.0.46 or later.
- The Headquarters PBX has subscribed the Yeastar P-Series Enterprise Plan (EP) or Ultimate Plan (UP).
Create an Account Trunk on Headquarters PBX
- Log in to PBX web portal, go to .
- Click Add to create an Account Trunk.
- In the Basic section, complete the following
settings:

- Name: Enter a name to help you identify the trunk.
- Trunk Status: Select Enabled.
- Select ITSP Template: Select General.
- In the Detailed Configuration section, configure the
Account Trunk.

- Trunk Type: Select Account Trunk.
- Transport: Select UDP.
- Username: Specify a username for the
trunk.Note: The username is regarded as the trunk number.
- Password: Specify a password that is associated with the username.
- Authentication Name: Specify an authentication name for the Branch PBX to register with.
- Click Save and Apply.
Configure Yeastar FQDN on Headquarters PBX
- Log in to PBX web portal, go to .
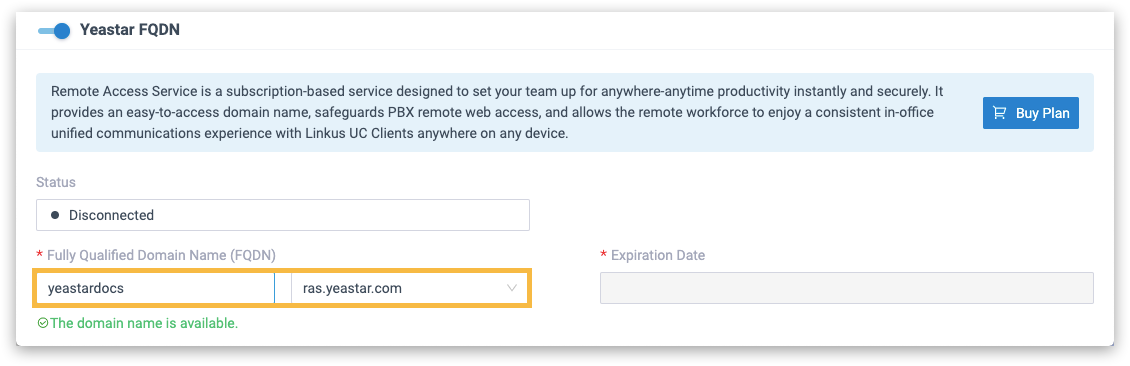
- Turn on Yeastar FQDN.
- In the Fully Qualified Domain Name (FQDN) field,
select a domain name, then enter a host name.
In this example, select domain name ras.yeastar.com and enter hostname yeastardocs, you will get an FQDN yeastardocs.ras.yeastar.com.
- Enable remote SIP access feature and grant usage permissions.Note: By default, all accounts are restricted from using the remote SIP access feature, therefore you need to grant permission for the account trunk.
- In the Features section, go to the SIP Access tab.
- In the Status drop-down list, select Enabled.
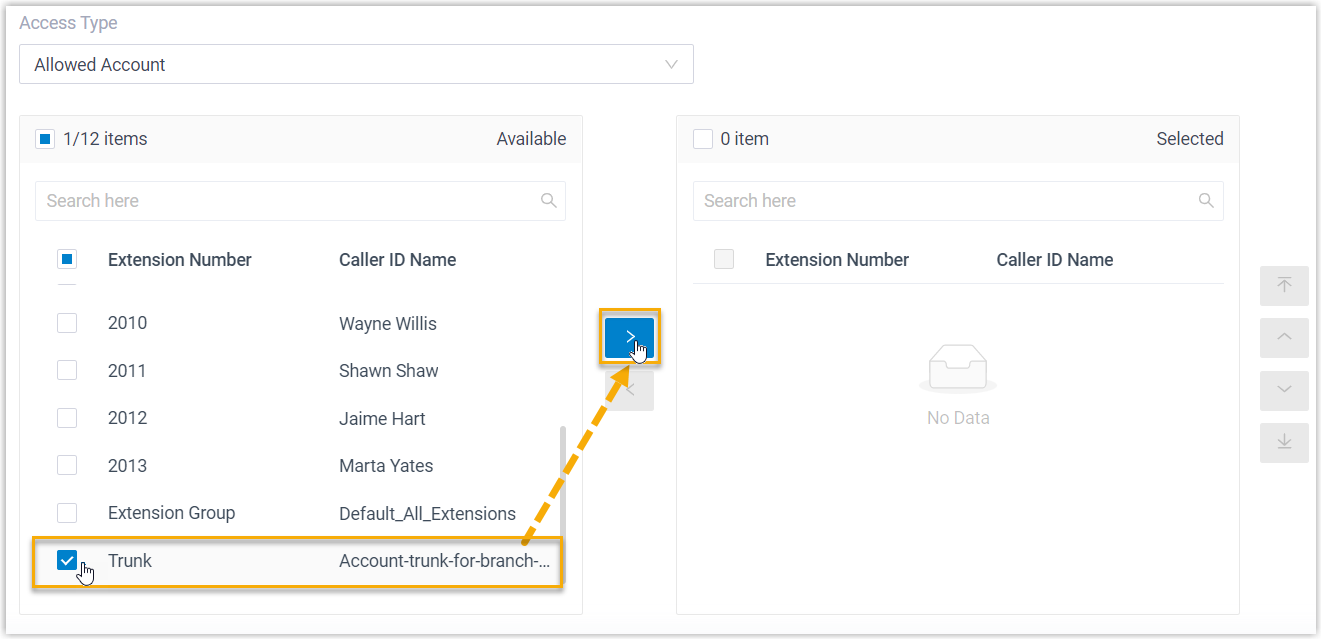
- In the Access Type drop-down list, select Allowed Account.
- Select the account trunk from the
Available box to the
Selected
box.
- Optional: Select the checkbox of
Enable IP Restriction, and add at
least one permitted IP address and subnet mask.
If you set up this option, only the permitted IP address(s) can use the remote access feature.
- Click Save.
Now you can check the remote SIP access port in the Remote Access Service Port field, and set up remote SIP trunk registration using FQDN.
Create a Register Trunk on Branch PBX
- Log in to PBX web portal, go to .
- Click Add to create a Register Trunk.
- In the Basic section, complete the following
settings.

- Name: Enter a name to help you identify the trunk.
- Trunk Status: Select Enabled.
- Select ITSP Template: Select General.
- In the Detailed Configuration section, configure the
Register Trunk.
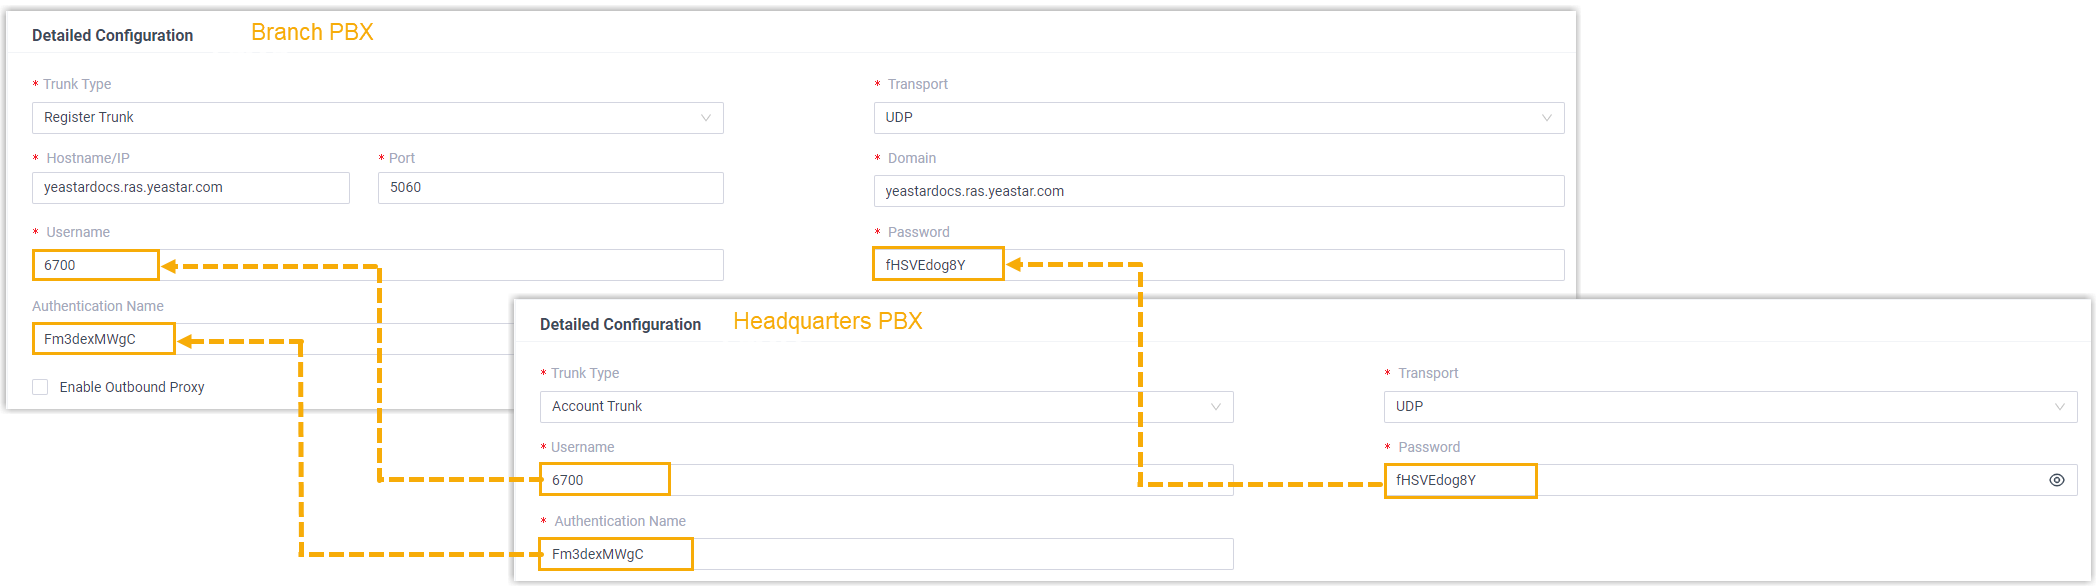
- Trunk Type: Select Register Trunk.
- Transport: Select UDP.
- Hostname/IP: Enter the FQDN of Headquarters PBX. In this example, enter yeastardocs.ras.yeastar.com.
- Port: Enter the remote SIP access port of Headquarters PBX. In this example, enter 5060.
- Domain: Enter the FQDN of Headquarters PBX. In this example, enter yeastardocs.ras.yeastar.com.
- Username: Enter the username provided by Headquarters PBX.
- Password: Enter the password provided by Headquarters PBX.
- Authentication Name: Enter the authentication name provided by Headquarters PBX.
- Click Save and Apply.
Result
- On the PBX web portal of Headquarters PBX, go to to check the trunk status.

- On the PBX web portal of Branch PBX, go to to check the trunk status.
