Connect Yeastar P-Series Cloud Edition and Yeastar TE100 Gateway
This topic describes how to connect Yeastar P-Series Cloud Edition and Yeastar TE100 gateway, so as to extend 1 E1/T1/PRI trunk on the PBX.
Requirements
The version of Yeastar P-Series Cloud Edition is 84.10.0.30 or later.
Procedure
Step 1. Create a SIP account trunk on Yeastar PBX system
- Log in to PBX web portal, go to , click Add.
- Configure the trunk settings.
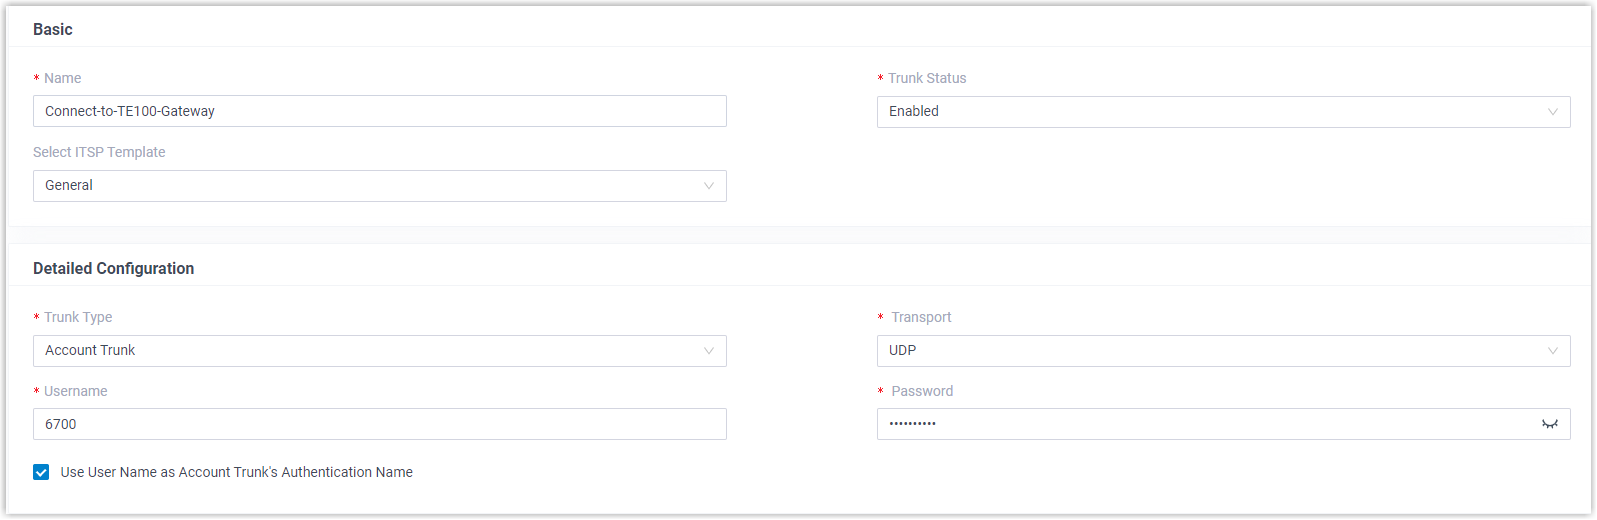
- Name: Enter a name to help you identify it. For example, Connect-to-TE100-Gateway.
- Trunk Status: Select Enabled.
- Select ITSP Template: Select General.
- Trunk Type: Select Account Trunk.
- Transport: Select UDP.
- Username: Specify a
username for the trunk.Note: The username is regarded as the trunk number.
- Password: Specify a password that is associated with the username.
- Use User Name as Account Trunk's Authentication Name: Enable this option to use the trunk's username for authentication.
- Click Save and Apply.
Step 2. Create a SIP register trunk on Yeastar TE100 gateway
- Log in to gateway web interface, go to , click Add VoIP Trunk.
- In the pop-up window, configure the trunk settings:

- Trunk Type: Select Trunk.
- Provider Name: Enter a name to help you identify it.
- Hostname/IP: Enter the domain name of Yeastar PBX system and the SIP port. In this example, enter docs.cntest.yeastarcloud.com and the default SIP port 5060.
- Domain: Enter the domain name of Yeastar PBX system. In this example, enter docs.cntest.yeastarcloud.com.
- User Name: Enter the username provided by Yeastar PBX system. In this example, enter 6700.
- Authorization Name: Enter the username provided by Yeastar PBX system. In this example, enter 6700.
- Password: Enter the password provided by Yeastar PBX system.
- Click Save and Apply Changes.
Result
- On PBX web portal (), the trunk status displays
 .
.
- On TE100 gateway web interface (), the trunk status displays "Registered".

It is concluded that Yeastar PBX system is connected to Yeastar TE100 gateway; 1 E1/T1/PRI trunk is extended on Yeastar PBX system.
What to do next
- To make outbound calls through the extended E1/T1/PRI trunk, see Make Outbound Calls through the Extended E1/T1/PRI Trunk.
- To receive inbound calls through the extended E1/T1/PRI trunk, see Receive Inbound Calls through the Extended E1/T1/PRI Trunk.