Install Yeastar K2 System on Hyper-V
Hyper-V lets you run multiple operating systems as virtual machines on Windows. This topic describes how to install Yeastar K2 IPPBX system on Hyper-V.
Before You Begin
Hyper-V is built into Windows as an optional feature. To use a Hyper-V, make sure both the operating system and the hardware meet the requirements.
- Windows 10 Enterprise, Pro, or Education.
- 64-bit Processor with Second Level Address Translation (SLAT).
- CPU support for VM Monitor Mode Extension (VT-c on Intel CPUs).
- Minimum of 4 GB memory.
Step 1. Enable the Hyper-V on your PC
- Right click on the Windows button and select Apps and Features.
- Select Programs and Features on the right under related settings.
- Select Turn Windows Features on or off.
- Select Hyper-V and click
OK.

When the installation has completed you are prompted to restart your computer.
Step 2. Create a virtual network
Create an external switch to share your computer's network with the virtual machines running on it.
- Open Hyper-V Manager from the start menu.
- Click bring up the Virtual Switch Manager
window.

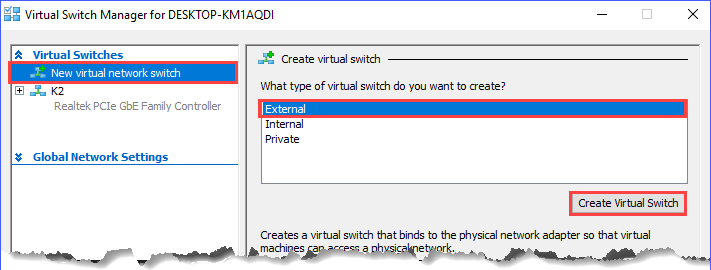
- Under the Virtual Switches section, select New virtual network switch.
- Under 'What type of virtual switch do you want to create?', select
External, and then click Create Virtual
Switch.
- Give the new switch a name such as K2 Switch.
- Under Connection Type, check External Network.
- Select the physical network card to be paired with the new virtual switch.
This is the network card that is physically connected to the network.
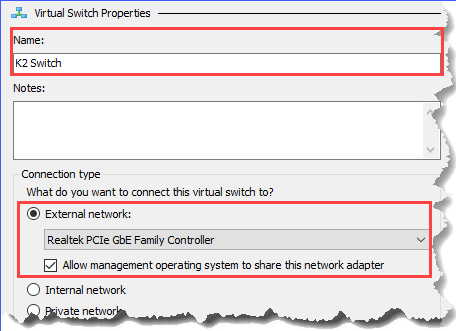
- Click Apply and Yes to create the virtual switch.
- Select OK to close the Virtual Switch Manager window.
Step 3. Create a virtual machine with Hyper-V
- In Hyper-V Manager, click to bring up the New Virtual Machine
Wizard.

- Review the Before You Begin content and click Next.
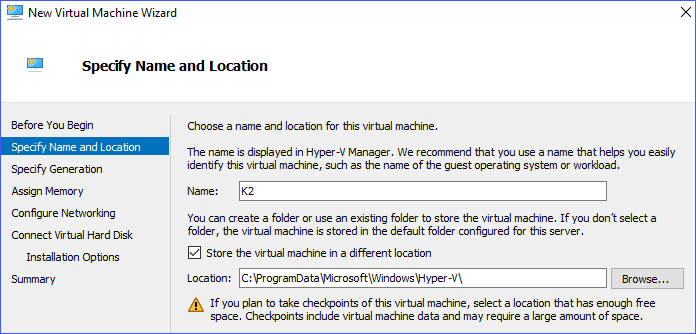
- Specify the virtual machine a name, choose a location to store virtual
machine, and click Next.
- Select a generation for the machine and click Next.
- Select 2048 MB for the Startup Memory, check Use Dynamic Memory for this virtual machine, and then click Next.
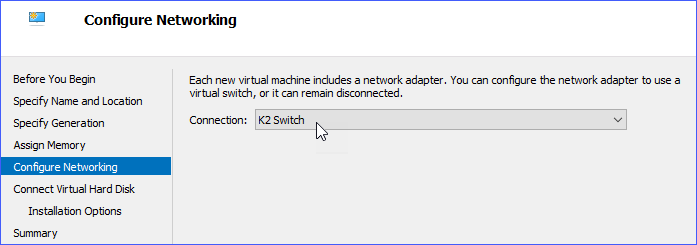
- On the Configure Networking, select the created
virtual switch for the virtual machine, and then click Next.
- Give the virtual hard drive a name, select a location, specify a size, and then click Next.
- On the Installation Options, select Install an
operating system from a bootable image file, select K2
.iso file, and then click Finish.

Step 4. Install Yeastar K2 System on virtual machine
- Start the created virtual machine.

- Connect the created virtual machine.

- Install K2 system on the virtual machine.